Beginner's Guide
SampleApp is an app provided in the source code that already includes integration of Biometric Capture and Document Capture SDKs. The SDK integration developer can copy and paste the SampleApp code and adapt it for their context (such as personalizing the splash screen), allowing them to speed up implementation and to quickly arrive at a workable app with well-designed UX.
This guide provides information on how to obtain the application code and other artifacts needed to run it on your environment. It also explains the application code functionality step-by-step.
Note: This guide includes only the most useful methods for integrating the SDKs. For more detailed information about SDK integration, please see the Android SDK Integration Guide.
Requirements
Product requirements
- Minimum Android version: Android 7.0 (API 24) or higher.
- Supported CPU architectures: armeabi-v7a (32-bit ARM devices), arm64-v8a (64-bit ARM devices)
- Non Supported CPU architectures: x86, x86_64
- Language support: Kotlin, Java
- Internet connection
Development requirements:
- Android Studio 4.0+,
- Windows, Mac or Linux,
- JDK 17 and above,
- Knowledge of Kotlin programming language
Step-by-Step Guide
-
First of all fetch sample apps from Artifactory. There is separate project per SDK feature (document, face, finger capture). There are also dedicated apps for remote use cases.
-
In order to build samples, proper credentials need to be provided. Sample projects use gradle properties for loading credentials. The recommended way to store these properties is local gradle.properties file located in .gradle/ directory on machine. All values should be accessible through the Experience Portal in Access section: My dashboards -> My Identity Proofing -> Access. Under Environments section you can find backend API keys and under SDK artifactory and licenses, Artifactory and LKMS credentials are stored. Please find required properties below.
Properties1#Artifactory2artifactoryUserMI=artifactory_user3artifactoryPasswordMI=artifactory_credentials4repositoryUrlMI=https://mi-artifactory.otlabs.fr/artifactory/smartsdk-android-local56#LKMS7lkmsProfileId="profile_id"8lkmsApiKey="lkms_api_key"910#Backend API KEYS11WbsApiKey="bio_server_api_key"12gipsApiKey="gips_api_key"
More about gradle properties can be found here.
- Before using the Biometric functionality, you need to activate the license. For a detailed description of this step, please go to License Activation. Keep in mind that license is associated with application id. In order to properly run samples there is need to change application id of sample to your id that has been put within LKMS profile. Application id can be changed in build.gradle file that is placed in root directory of application module.
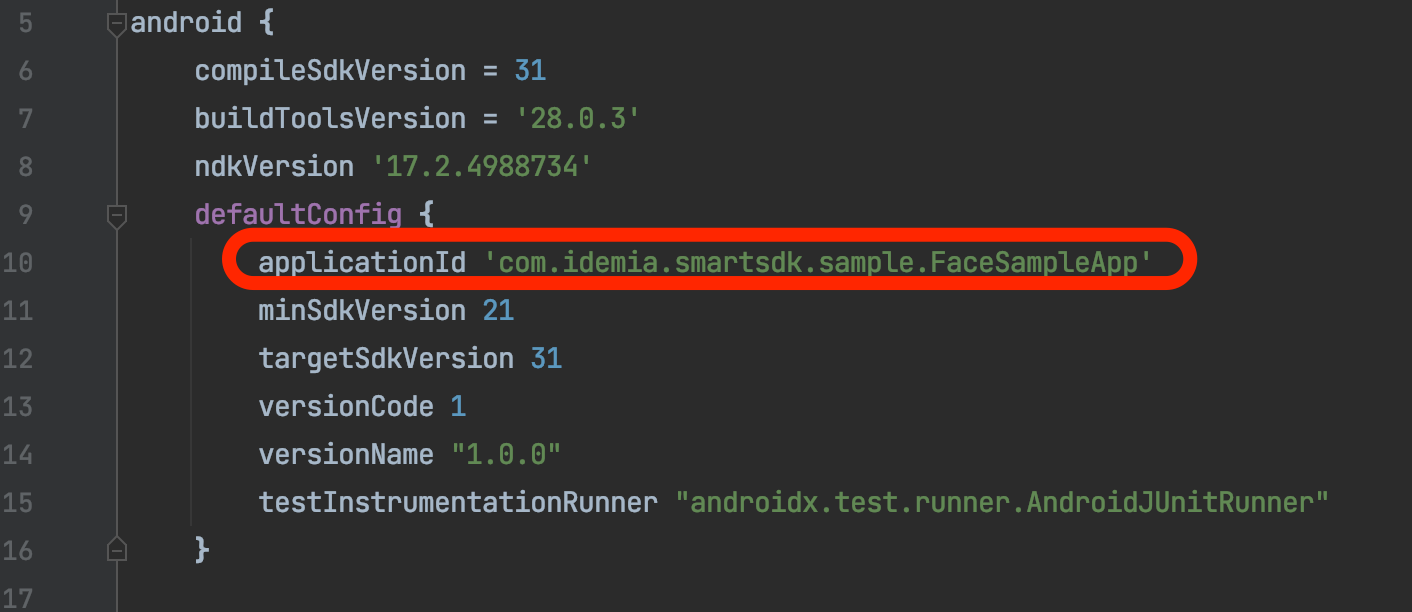
You can find application ids associated with your LKMS profile in Experience Portal. Go: My dashboards -> My Identity Proofing -> Access -> SDK artifactory and licenses. You can find ids in row: Associated App(s) and add new one.

-
When the license is active, you can guide the user through the registration/authentication process described in the User Management section.
-
Review the specific application by studying the
FingerSampleApp,FaceSampleApporDocumentSampleAppmodules. -
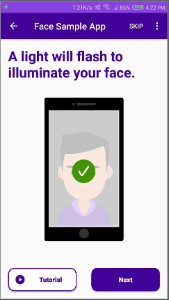
When you run the face scanning application ( menu Run → Run 'FaceSampleApp'), you will be presented with the following screen:

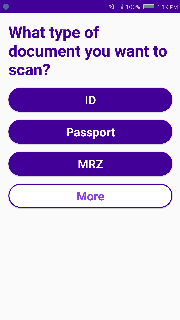
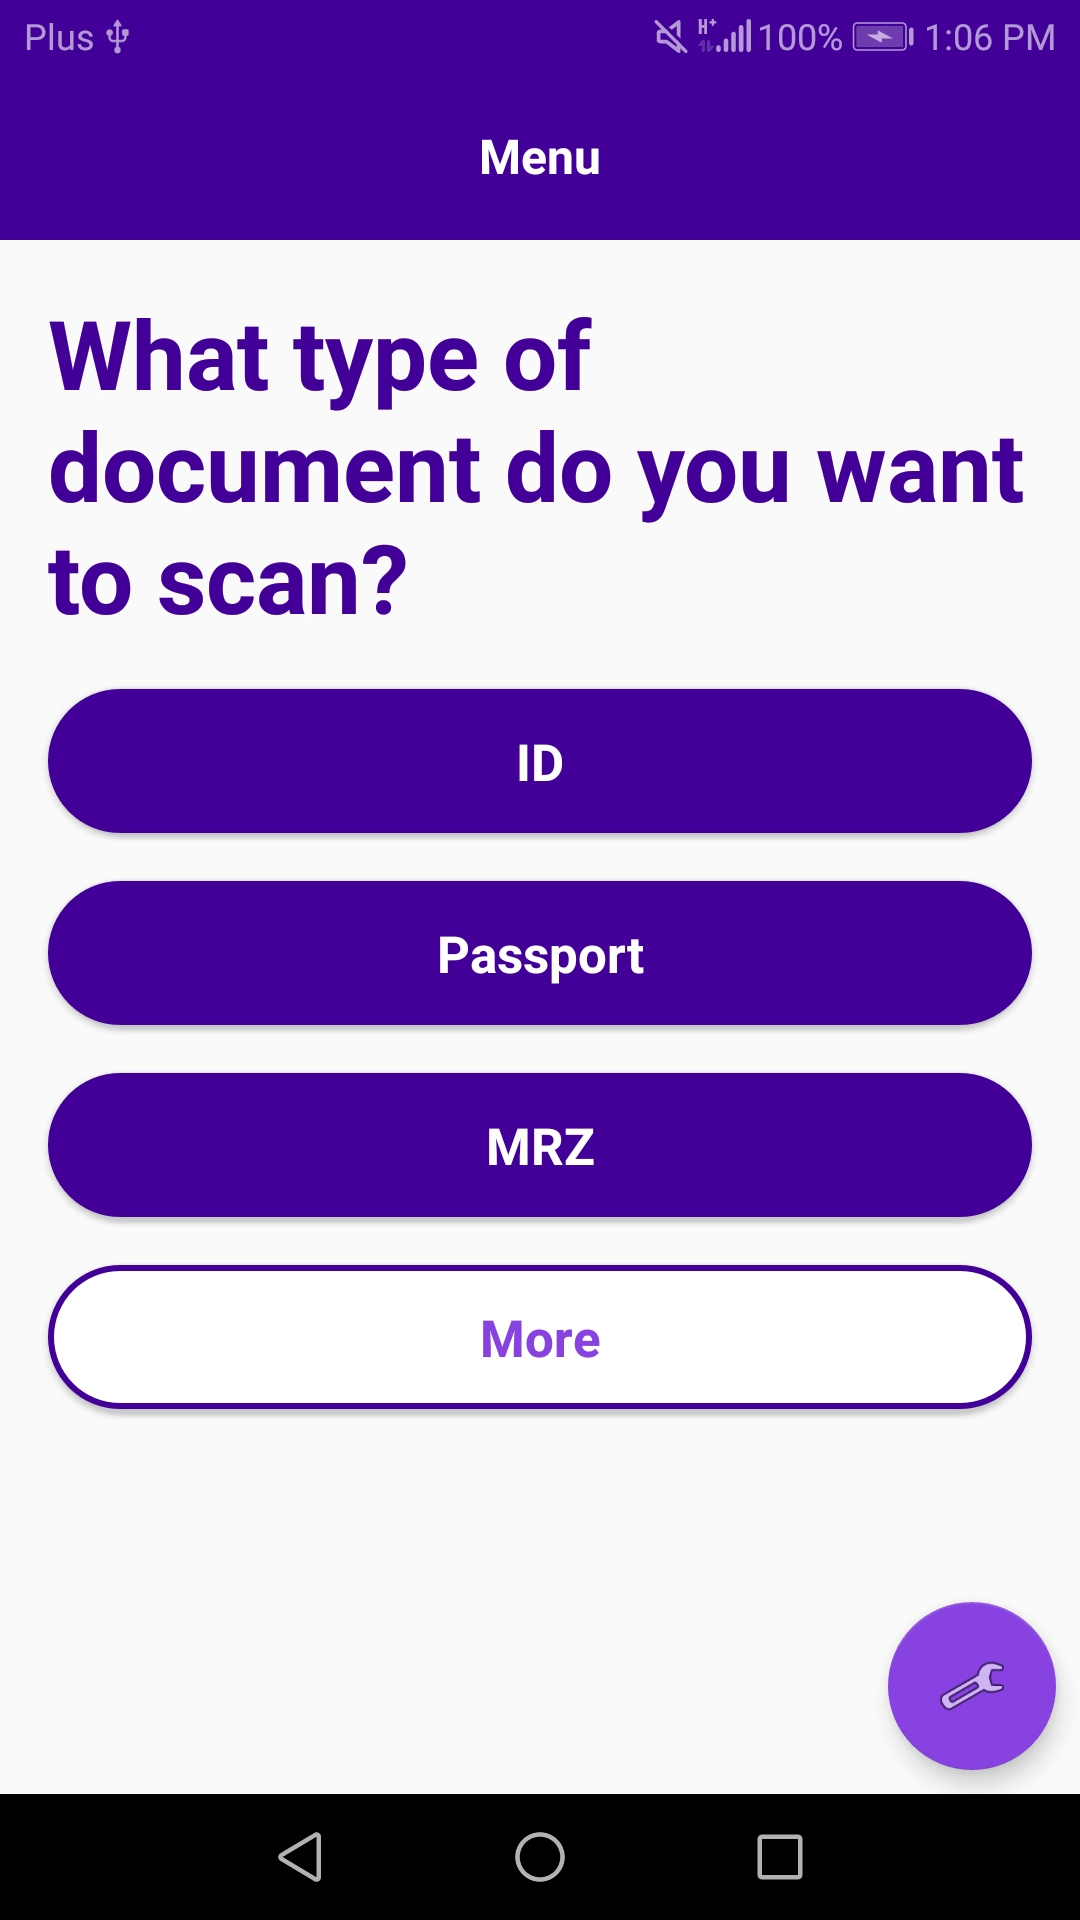
- When you run the document scanning application (menu Run → Run 'DocumentSampleApp'), you will be presented with the following screen:
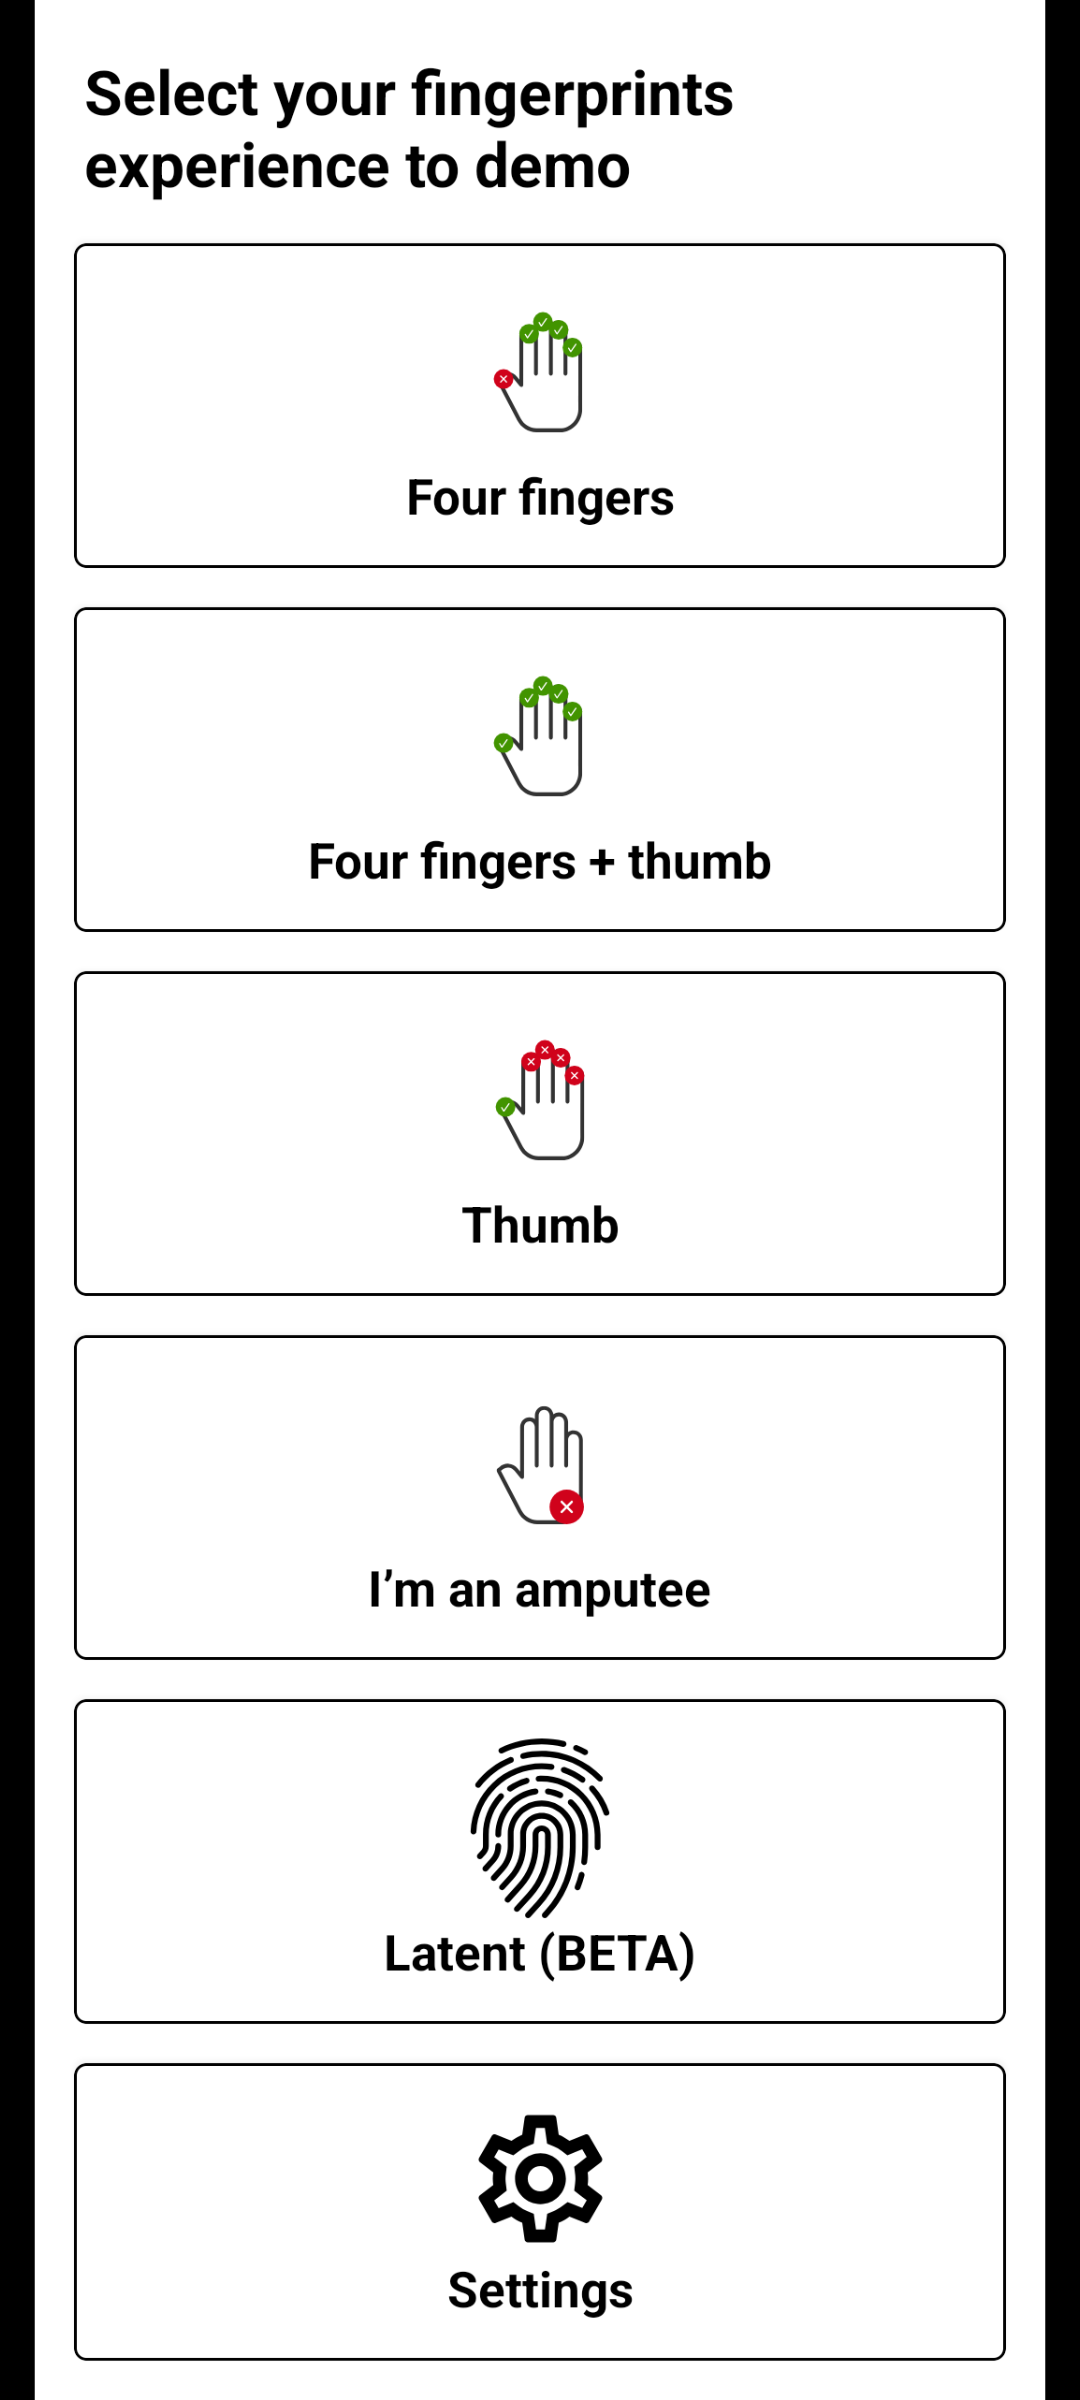
- When you run the finger scanning application (menu Run → Run 'FingerSampleApp'), you will be presented with the following screen:
Finger Sample Application
This is the top-tier application which uses both the License Manager and UserManager components which depend on Biometric Capture SDK.
The Finger Sample Application provides functionality for finger scanning, and can easily be used as a template for your own solution.
The following describes each application screen and explains how it was implemented. There is an assumption that a reader has sufficient technical knowledge about Android development to understand code samples.
Main Screen
The main screen of the application gives you possibility to perform scans with following capture modes:
-
Four fingers - Single capture of four fingers.
BioCaptureMode.FINGERSwill be used for this capture. -
Four fingers + thumb - two captures will be performed - the first one for four fingers, the second for thumb only.
-
Thumb - capture only one finger using
BioCaptureMode.THUMB. -
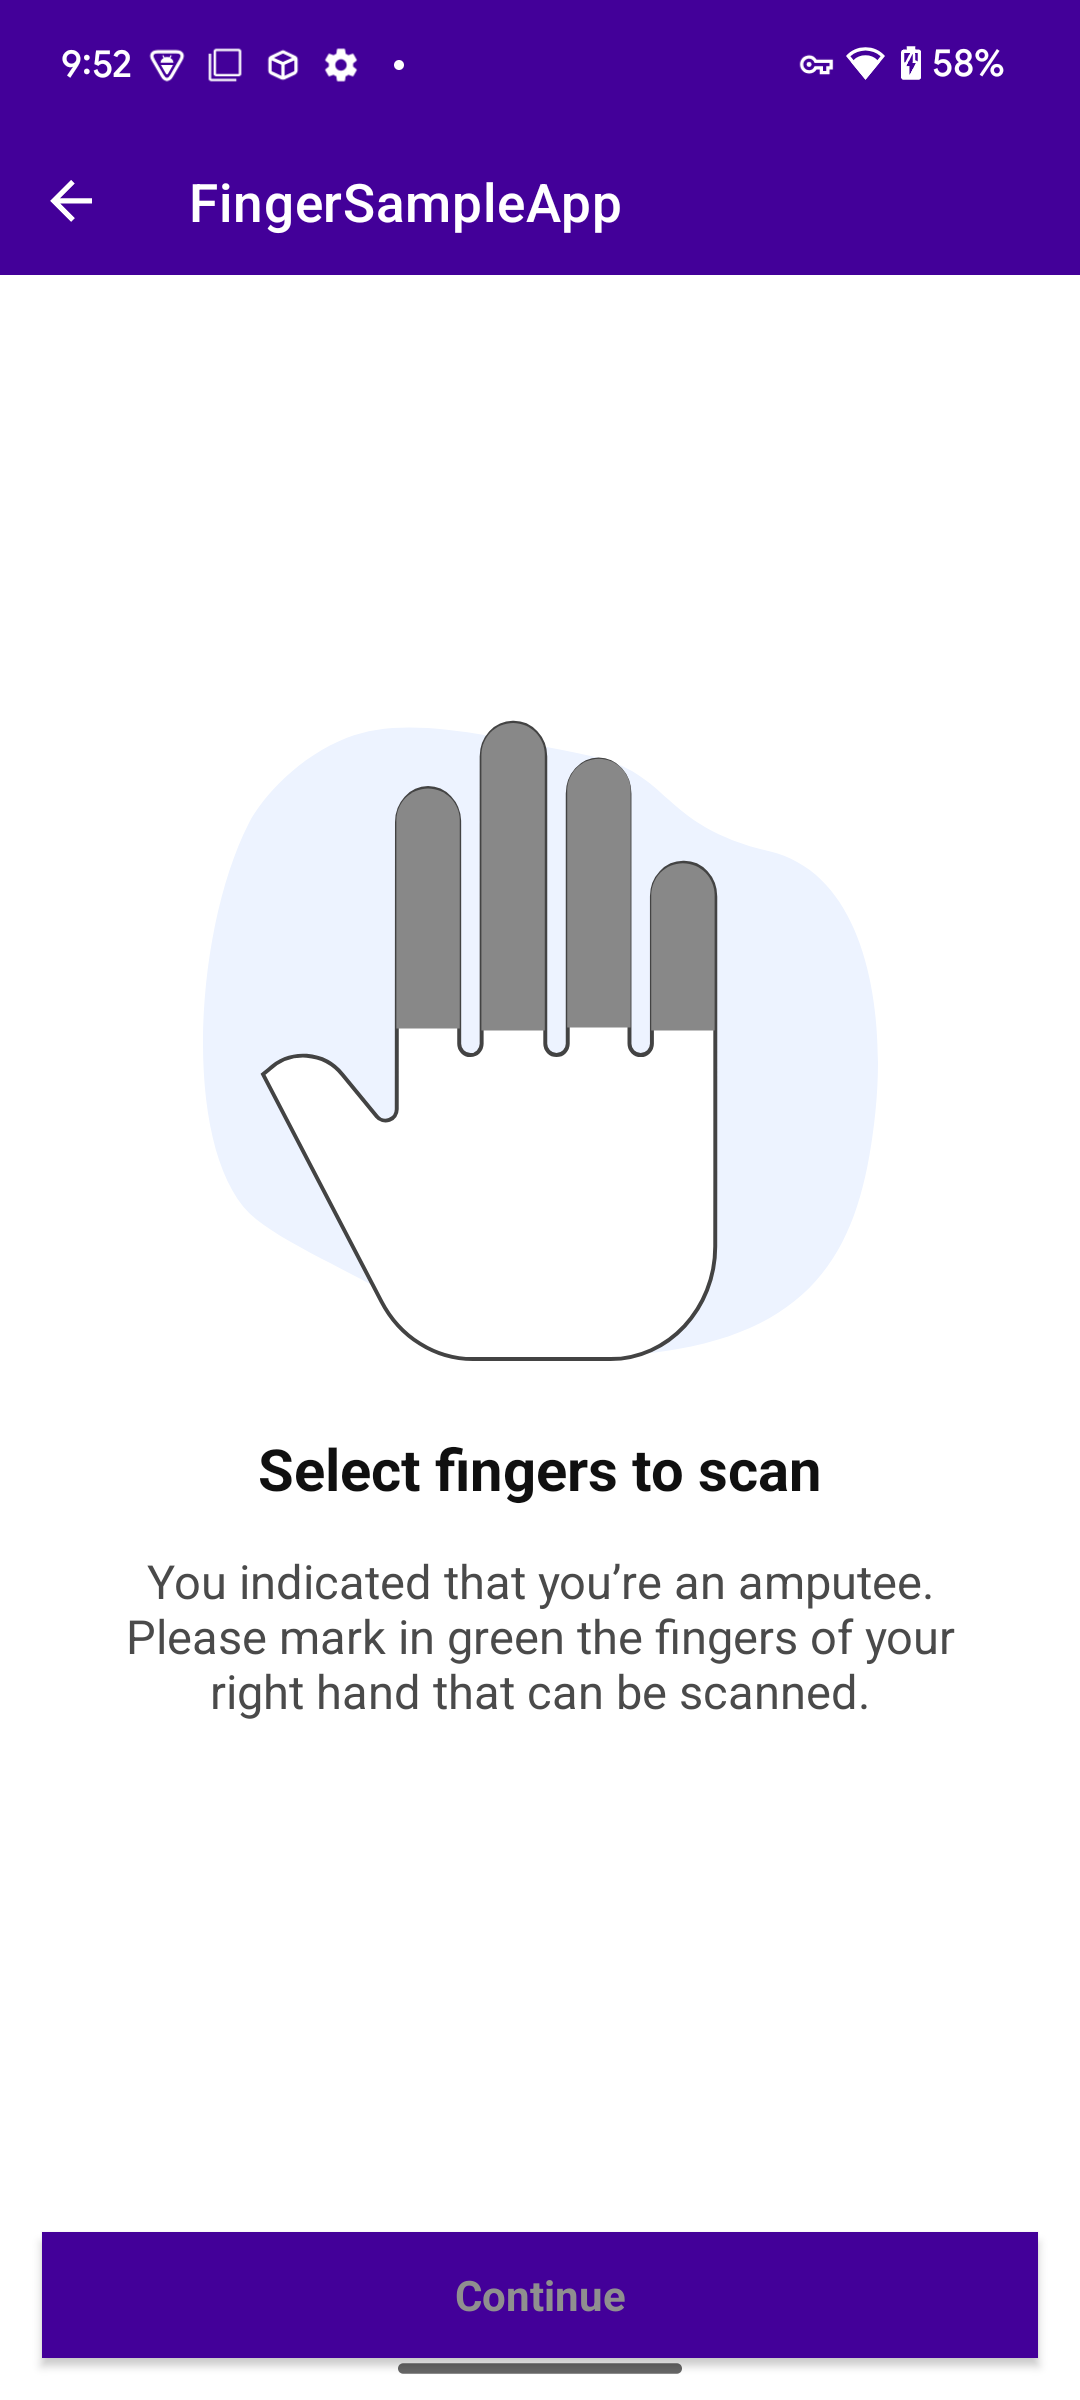
I'm an amputee - allow to choose which fingers are present before performing the capture. It use
BioCaptureMode.FINGERS. Missing fingers are set withsetAmputeeFingers(amputeeFingers: AmputeeFingers)method fromIFingerCaptureOptions. -
Latent - Mode which doesn't detect fingers - only scan indicated area.
Tutorials
Fingers and thumb modes have dedicated tutorials:
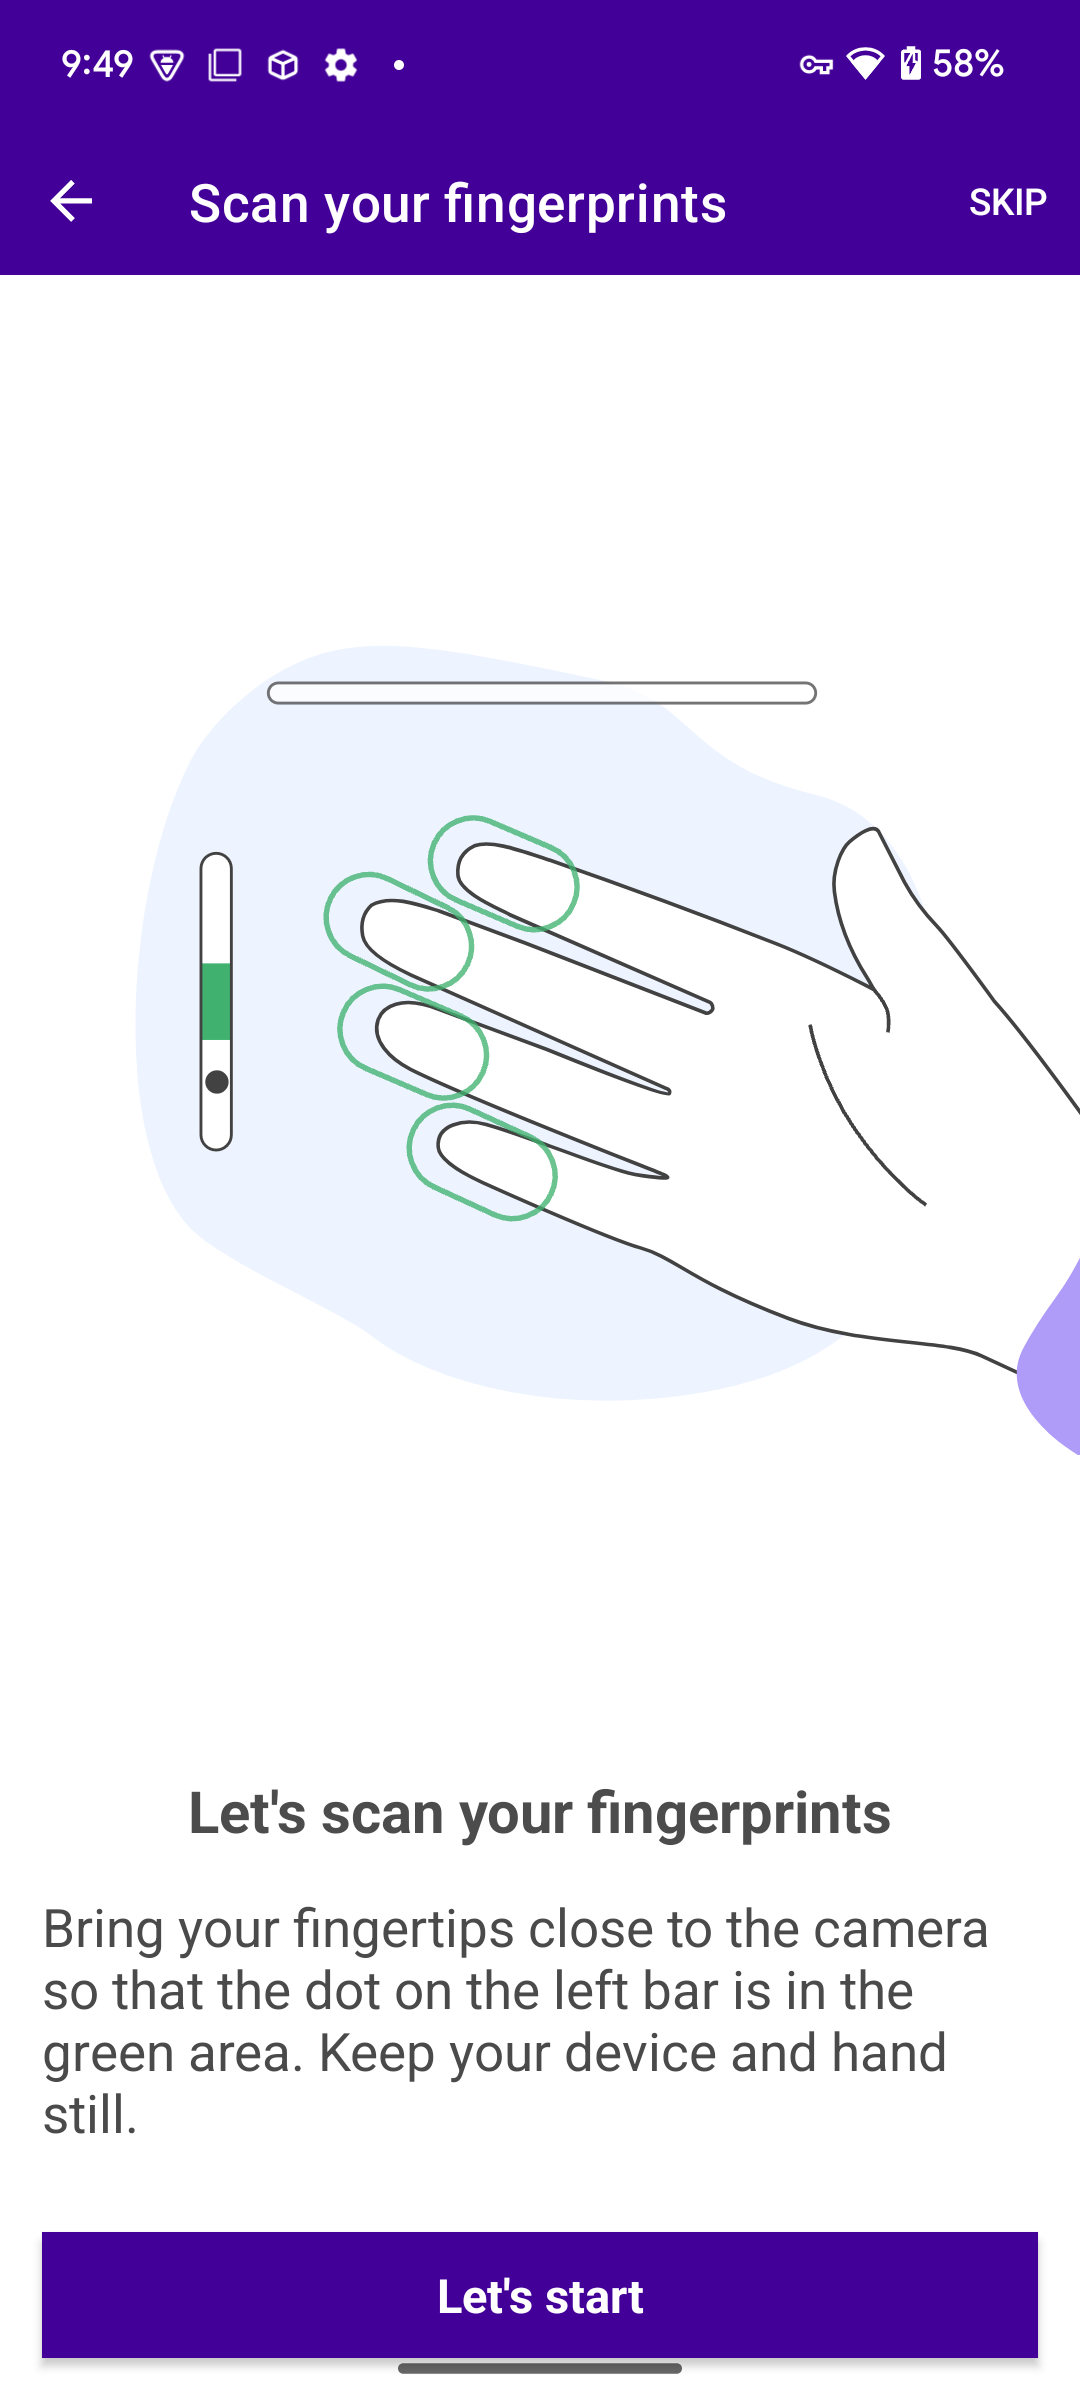
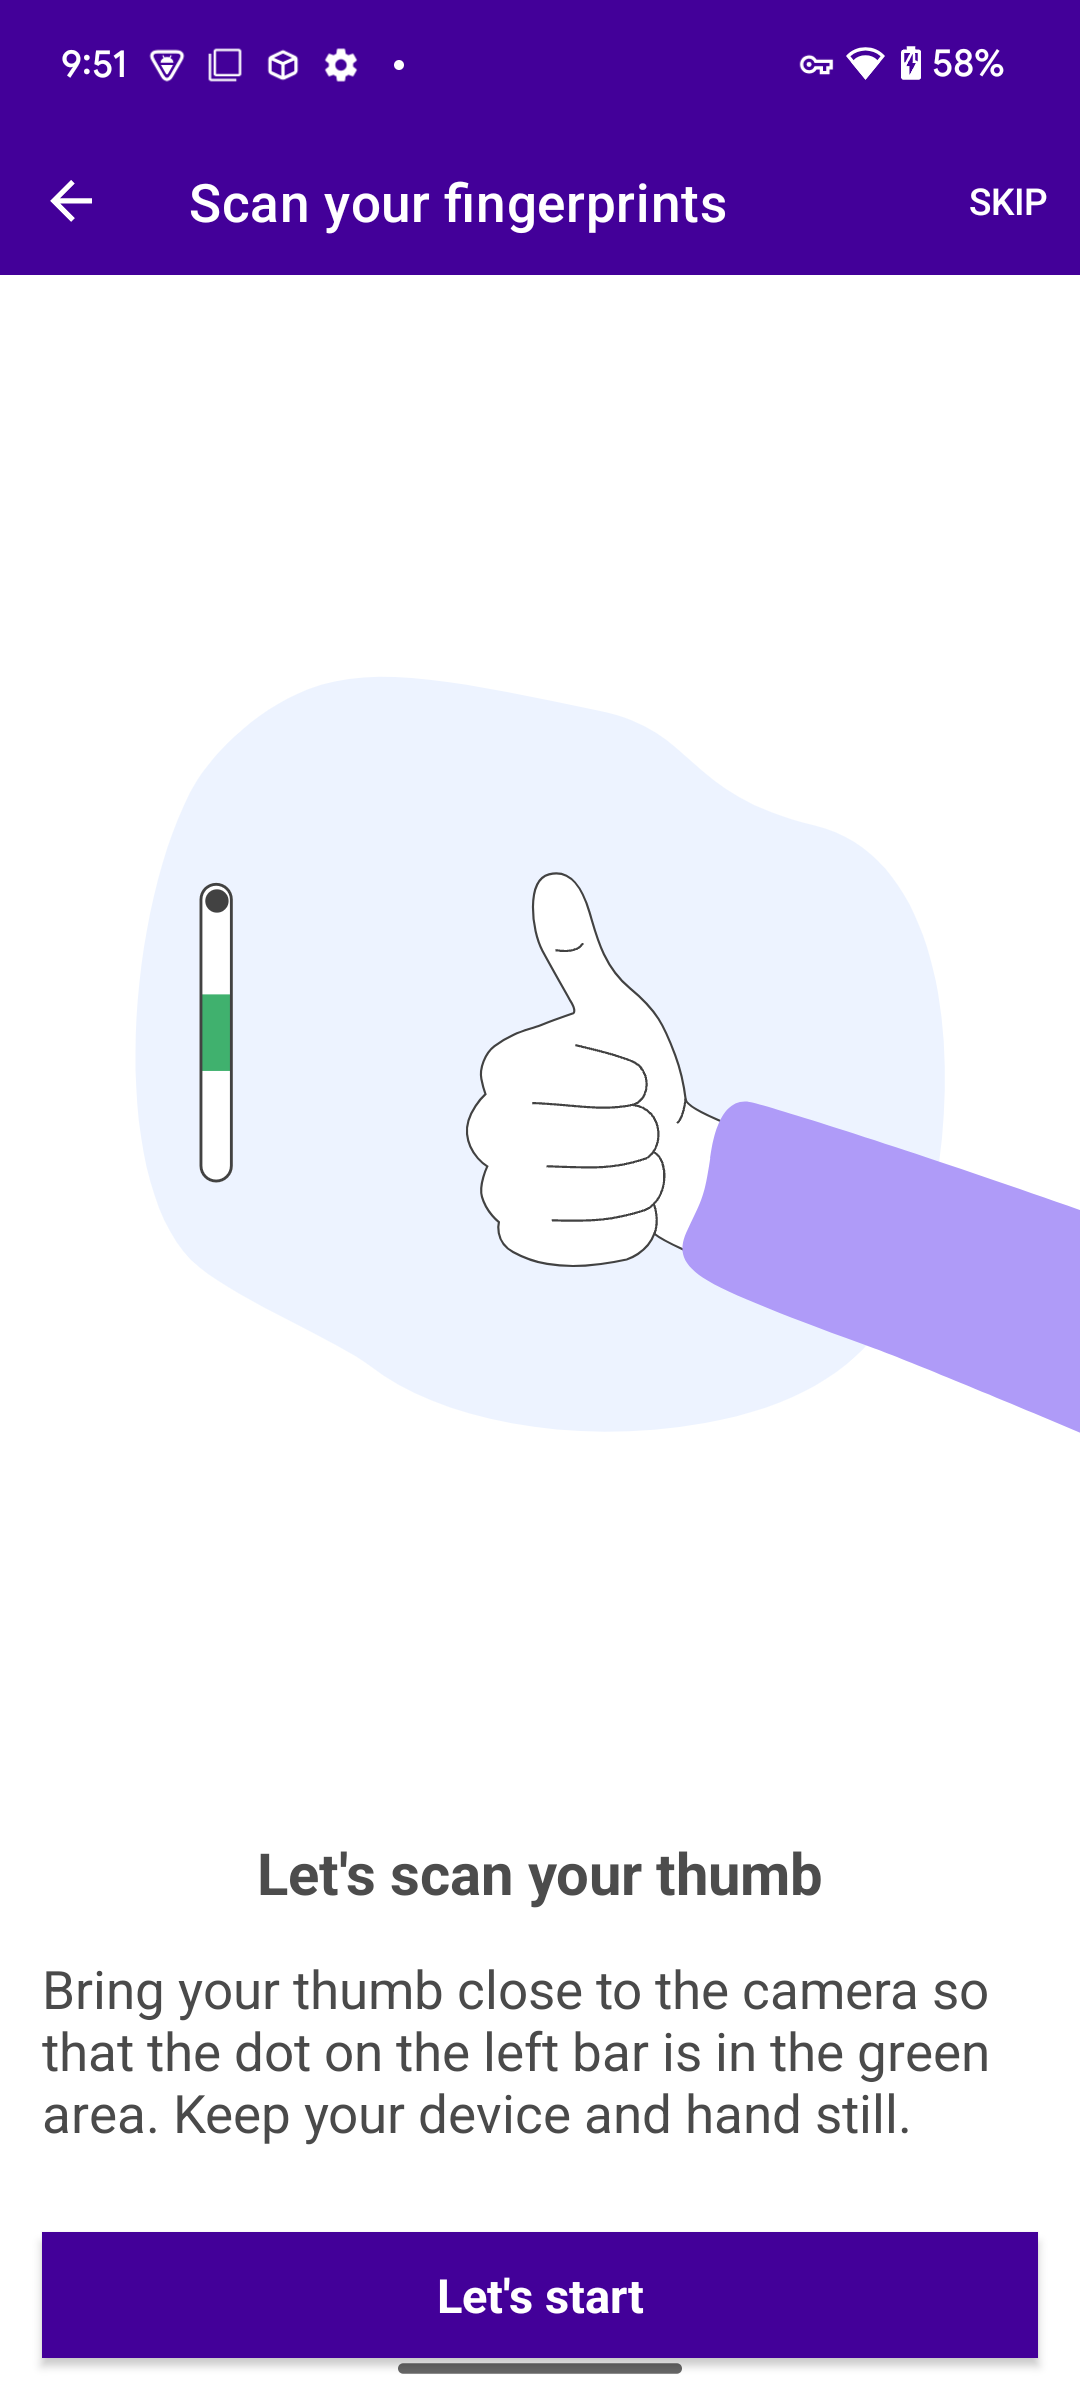
Showing those tutorial is not mandatory and may be turned off in settings.
Settings
There is an option to configure some of capture settings on the screen presented below. It is accessible from the main screen of the application.
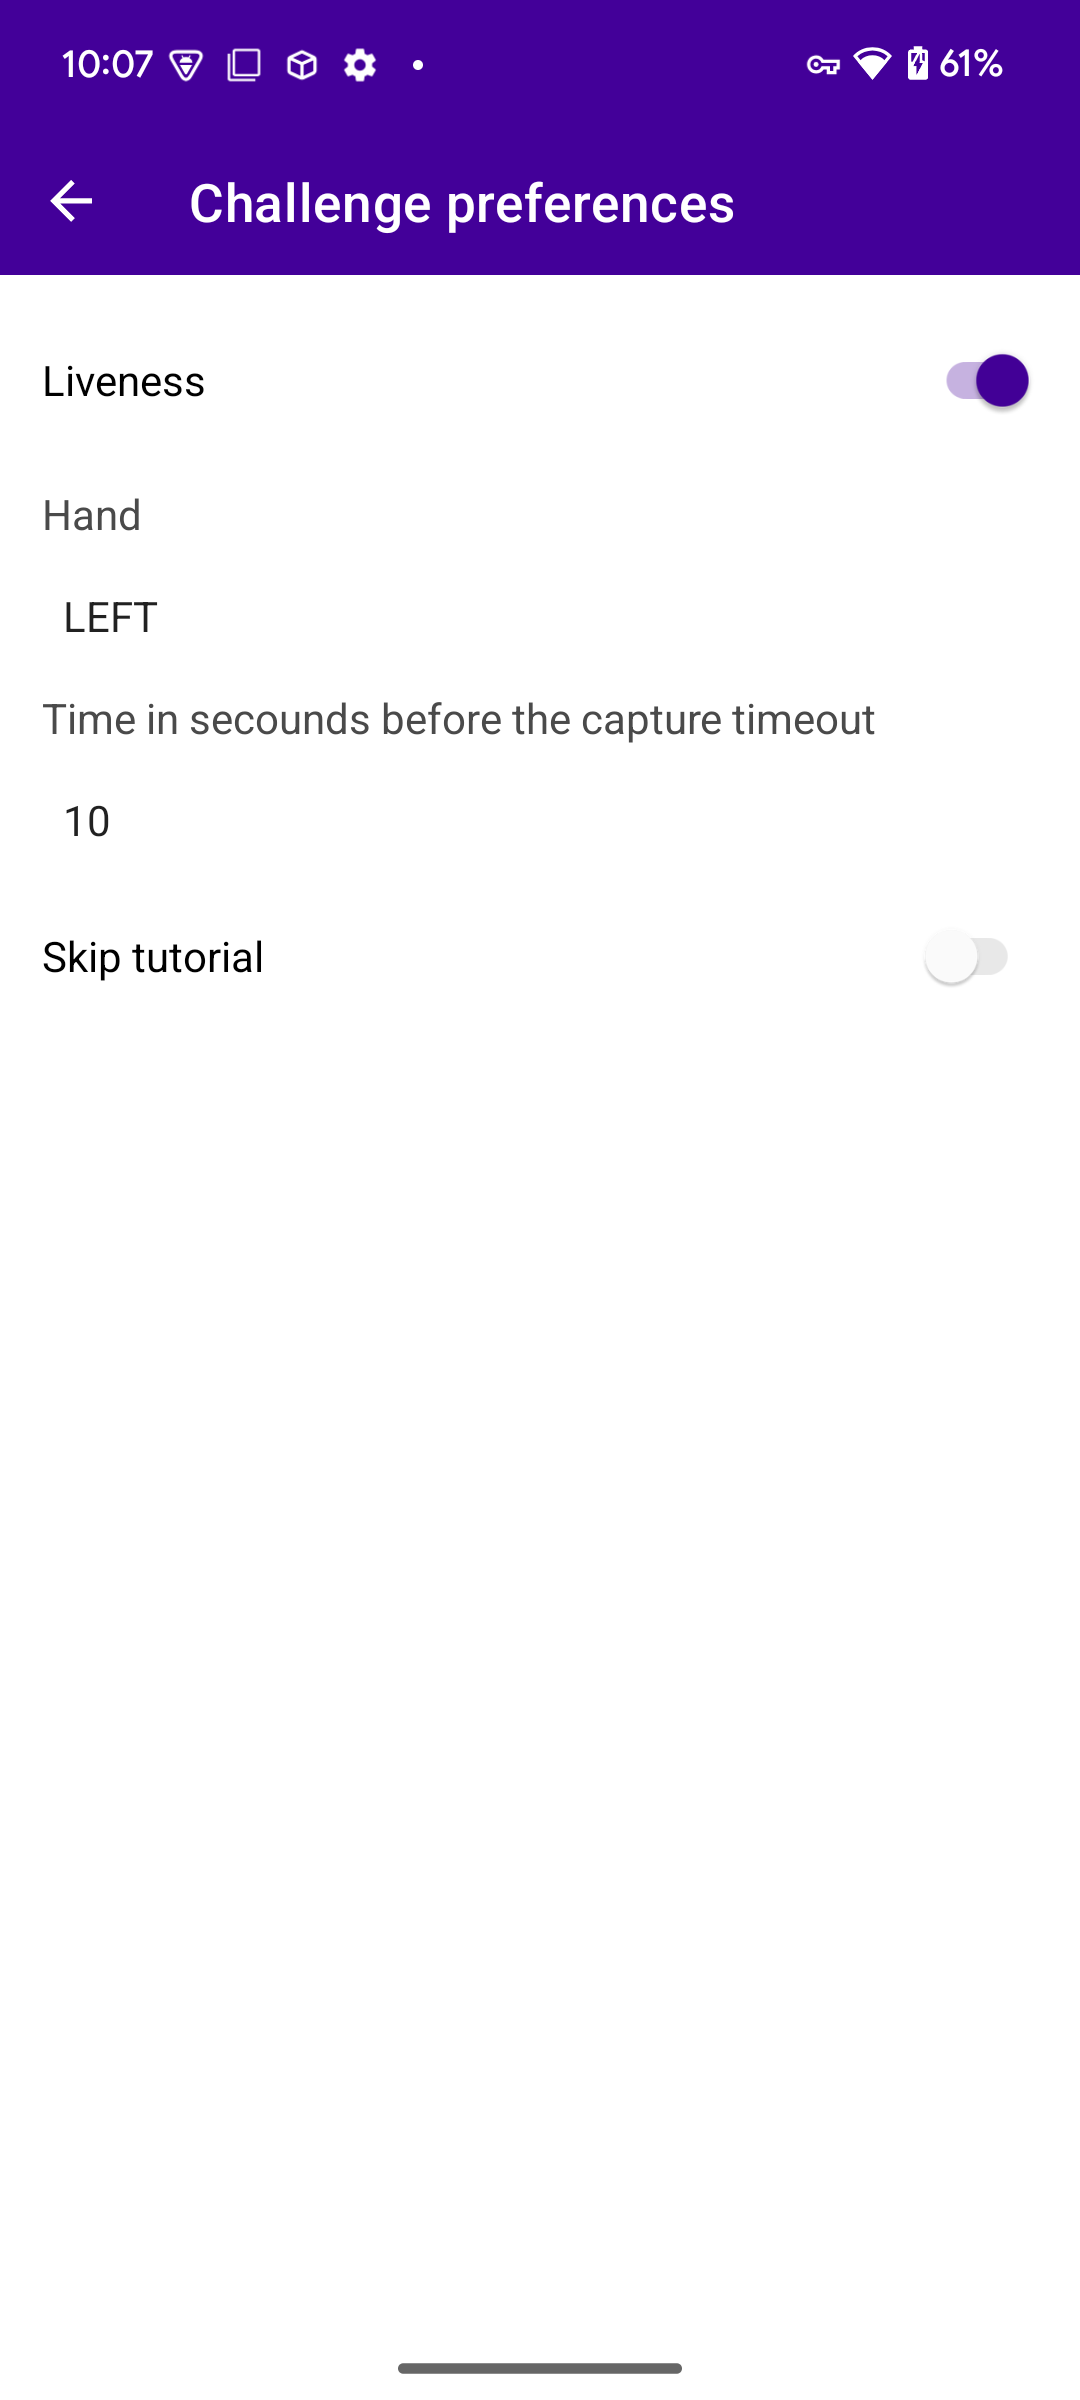
In this screen you can:
- Decide whether liveness detection will be enabled for the capture or not - based on that
FingerCaptureLivenessinFingerCaptureOptionswill be set toFingerLiveness.NO_LIVENESSorFingerLiveness.MEDIUM. - Choose which hand will be captured.
- Change capture timeout (when liveness is enabled and device is not calibrated it will be in fact time of the capture).
- Turn on/off showing tutorials for the capture.
Those settings are handled by FingerAppSettingsStorage. Implementation of this screen can be found in SettingsFragment and SettingsPresenter.
Setting up the capture using FingerCaptureHandler
The Sample App uses the MVP approach which decouple decision logic from the UI view. Logic associated with the capture can be found within CapturePresenter.
CapturePresenter implements ChallengerPresenter interface, which has only three methods, each of them is associated with view lifecycle.
Kotlin1interface ChallengePresenter {2 fun onResume()3 fun onPause()4 fun onDestroy()5}
Implementation of those method is presented below:
Kotlin1class CapturePresenter(2 private val captureView: CaptureView,3 private val handlerCreator: HandlerCreator,4 private val sceneView: SceneView,5 private val imageStore: ImageStore,6 private val settingsStorage: FingerAppSettingsStorage,7) : ChallengePresenter {89 private var handler: FingerCaptureHandler? = null10 private var sceneController: FingerCaptureSceneController? = null11 private var job: Job? = null12 private val fingerSettings = settingsStorage.load()1314 override fun onResume() {15 handler = handlerCreator.createFingerCaptureHandler()16 handler?.let { handler ->17 val range = when (val result = handler.captureDistanceRange) {18 is CaptureDistanceRangeSuccess -> result.captureDistanceRange19 is CaptureDistanceRangeUnavailable -> null20 }21 sceneController = FingerCaptureSceneController(sceneView, settings(range))22 attachListeners()23 job = CoroutineScope(Dispatchers.Main).launch {24 sceneController?.start(handler)25 handler.startCapture()26 }27 }28 }2930 override fun onPause() {31 job?.cancel()32 stopCapture()33 }3435 override fun onDestroy() {36 destroyScene()37 }3839 (...)4041 private fun stopCapture() {42 handler?.let {43 if (it.isStarted) {44 it.stopCapture()45 sceneController?.stop()46 }47 }48 handler?.destroy()49 }5051 private fun destroyScene() {52 sceneController?.destroy()53 }5455 (...)5657}
Constructor parameters:
CaptureView- corresponding View interface. It has only one method (setResult(data: Result, code: Int) responsible for handling the results.HandlerCreator- is responsible for creatingFingerCaptureHandlerwithFingerCaptureOptionsconfigured according to settings presented on screen above. For more details ofFingerCaptureHandler, see finger capture configuration.SceneView- View coming from UiExtensions library, which is useful for e.g. drawing of finger rectangles.ImageStore- Class responsible for storing images after successful capture.FingerAppSettingsStorage- Class for storing data from settings screen.
Function onResume is being called from onResume method of CaptureActivity.
FingerCaptureHandleris created withHandlerCreator.CaptureDistanceRangeis retrieved fromFingerCaptureHandler. This step is not necessary - it allows to show optimal distance indicator for some calibrated devices.FingerCaptureSceneControlleris created. It handles data coming fromFingerCaptureHandlerand draw appropriate view which may be configured. For more details, see section below.- Listeners for fingers are set up.
Kotlin1private fun attachListeners() {2 handler?.apply {3 setFingerTrackingListener(fingerTrackingListener)4 setFingerCaptureResultListener(fingerCaptureResultListener())5 setFingerCaptureCurrentDistanceListener(fingerCaptureCurrentDistanceListener())6 setFingerCaptureFeedbackListener(fingerCaptureFeedbackListener())7 }8}
When using UiExtensions library, implementations of FingerCaptureTrackingListener, FingerCaptureCurrentDistanceListener and FingerCaptureFeedbackListener must pass data to SceneController.
Kotlin1private val fingerTrackingListener = FingerCaptureTrackingListener { trackingInfo -> sceneController?.onTracking(trackingInfo) }
Kotlin1private fun fingerCaptureCurrentDistanceListener() =2 FingerCaptureCurrentDistanceListener { currentCaptureDistance ->3 sceneController?.onCurrentCaptureDistanceChanged(4 currentCaptureDistance.value5 )6 }
Kotlin1private fun fingerCaptureFeedbackListener() = FingerCaptureFeedbackListener { captureInfo -> sceneController?.onNewFeedback(captureInfo) }
Sample implementation of FingerCaptureResultListener is presented below:
Kotlin1private fun fingerCaptureResultListener() = object : FingerCaptureResultListener {2 override fun onCaptureFailure(3 captureError: CaptureError,4 biometricInfo: IBiometricInfo,5 extraInfo: Bundle)6 {7 onFailure(CaptureFailure(captureError))8 }910 override fun onCaptureSuccess(11 images: List<MorphoImage>,12 imagesToDisplay: List<FingerImagePreview>,13 captureResult: FingerCaptureResult, )14 {15 onSuccess(images, imagesToDisplay)16 }1718 override fun onCaptureSuccess(19 images: MutableList<MorphoImage>,20 captureResult: FingerCaptureResult)21 {22 //Deprecated not used23 }24}2526private fun onFailure(captureFailure: CaptureFailure) {27 sceneController?.captureFailure { }28 val failureType = captureErrorToFailureType(captureFailure.captureError)29 val result = Result.Failure(30 failureType,31 captureFailure.captureError32 )33 captureView.setResult(result, Activity.RESULT_OK)34}3536private fun onSuccess(images: List<MorphoImage>, previewImage: List<FingerImagePreview>) {37 sceneController?.captureSuccess { }38 stopCapture()39 destroyScene()40 val imageFilesNames: ArrayList<String> = arrayListOf()41 previewImage.forEachIndexed { index, it ->42 val stream = ByteArrayOutputStream()43 it.image.compress(Bitmap.CompressFormat.PNG, 100, stream)44 val locationName = if (areAllLocationsUnknown(previewImage)) {45 "${index}_${it.location.name}"46 } else {47 it.location.name48 }49 imageStore.saveImage(locationName, stream.toByteArray())50 imageFilesNames.add(locationName)51 }5253 val result = Result.Success(imageFilesNames, saveWSQ(images))54 when (fingerSettings.captureFingerSettings.captureFinger) {55 CaptureFinger.FOUR_FINGER_THUMB -> {56 captureView.setResult(result, RESULT_CAPTURE_FINGER_THUMB_TUTORIAL)57 }5859 CaptureFinger.THUMB_AFTER_FOUR_FINGER -> {60 val resultFinger = settingsStorage.loadResultSuccess()61 resultFinger?.let {62 result.imageFileWSQNames.addAll(it.imageFileWSQNames)63 result.imageFilesNames.addAll(it.imageFilesNames)64 }65 }6667 else -> {68 captureView.setResult(result, Activity.RESULT_OK)69 }70 }71 if (fingerSettings.captureFingerSettings.captureFinger == CaptureFinger.FOUR_FINGER_THUMB) {72 captureView.setResult(result, RESULT_CAPTURE_FINGER_THUMB_TUTORIAL)73 } else {74 captureView.setResult(result, Activity.RESULT_OK)75 }76}7778 (...)7980private fun saveWSQ(images: List<MorphoImage>): ArrayList<String> {81 val imageFilesWSQNames: ArrayList<String> = arrayListOf()82 val wsqImagesWithoutHand =83 images.dropLast(1).map { ImageUtils.toWSQ(it, 15.0f, 0.toByte(), 255.toByte()) }84 for (i in wsqImagesWithoutHand.indices) {85 val name = "wsq$i.wsq"86 imageStore.saveImage(name, wsqImagesWithoutHand[i].buffer)87 imageFilesWSQNames.add(name)88 }89 return imageFilesWSQNames90}
Jobfor handling capture and scene is created. It will be cancelled after putting app to the background.
Setting up the capture with FingerCaptureView
Finger capture can be also set up with FingerCaptureView component. Unfortunately, now it is only possible for Latent capture. In this case, the MVP approach is also used.
Kotlin1interface Latent {2 interface View {3 fun setCapture(useCase: LatentUseCase, uiSettins: UISettings) // set up FingerCaptureView with given parameters4 }56 interface Presenter {7 fun onResume() //called from Fragment onResume()8 fun switchTorch() //to turn torch on/off9 }10}
Implementation of those interfaces is present in LatentCapturePresenter and LatentCaptureFragment.
Kotlin1class LatentCapturePresenter(2 private val view: Latent.View,3 private val prepareImageStore: UserImageStore,4 private val navigation: LatentNavigation5) : Latent.Presenter {67 companion object {8 private const val TIMEOUT = 109 private const val imageKey = "LATENT"10 }1112 private var torchController: TorchController? = null13 (...)14}
- Latent.View - implementation of interface mentioned above.
- UserImageStore - class which implements
ImageStore. It holds fingerprint image. - LatentNavigation - handle navigation to success/error screens for Latent capture.
- TorchController - responsible for turning torch on/off. This interface is implemented within CaptureSDK and can be retrieved from
TorchListener.
Kotlin1(...)2 private val torchListener = TorchListener {3 torchController = it4 }
Capture is set up in onResume method of Presenter:
Kotlin1(...)2 private val latentResult = object : LatentResultListener {3 override fun onError(error: Error) {4 runCatching {5 navigation.goToError()6 }7 }89 override fun onSuccess(result: LatentSuccess) {10 prepareImageStore.saveImage(imageKey, result.image.data) // saves images in order to show them on result screen11 navigation.goToSuccess(imageKey)12 }13 }1415 (...)1617 override fun onResume() {18 val latentUseCase =19 LatentUseCase(20 LatentCaptureSettings(TIMEOUT),21 LatentCaptureListeners(result = latentResult, torchListener = torchListener)22 )23 val uiSettins = UISettings(fingerCaptureSettings {24 scene {25 progressBar {26 show = true27 }28 distance {29 showOptimalDistanceIndicator = true30 }31 }32 })33 view.setCapture(latentUseCase, uiSettins)34 }
- First of all,
LatentUseCaseis created. It takesLatentCaptureSettings(currently those setings contain only timeout) and listeners as parameters. UiSettingsare created. This class wrapsFingerCaptureSettingsfromUiExtensionslibrary. For more details, see preview configurationsetCaptureis called on view and the capture starts.
Torch switching is pretty simple and it requires only calling setTorch on TorchController:
Kotlin1override fun switchTorch() {2 torchController?.let {3 it.setTorch(getNegativeTorch(it.getTorch()))4 }5}67private fun getNegativeTorch(torch: Torch) = when (torch) {8 Torch.ON -> Torch.OFF9 Torch.OFF -> Torch.ON10}
Capture Layouts
Layout for finger/thumb capture is defined in the file activity_capture.xml.
XML1<androidx.constraintlayout.widget.ConstraintLayout xmlns:android="http://schemas.android.com/apk/res/android"2 xmlns:app="http://schemas.android.com/apk/res-auto"3 android:layout_width="match_parent"4 android:layout_height="match_parent">56 <androidx.appcompat.widget.Toolbar7 android:id="@+id/toolbar"8 style="@style/Toolbar"9 app:layout_constraintStart_toStartOf="parent"10 app:layout_constraintTop_toTopOf="parent" />1112<!--Custom component provided by UI-EXTENSIONS library. Is responsible for capturing biometric data -->1314 <com.idemia.biometricsdkuiextensions.ui.scene.view.SceneView15 android:id="@+id/sceneSurface"16 android:layout_width="0dp"17 android:layout_height="0dp"18 app:layout_constraintBottom_toBottomOf="parent"19 app:layout_constraintLeft_toLeftOf="parent"20 app:layout_constraintRight_toRightOf="parent"21 app:layout_constraintTop_toBottomOf="@id/toolbar"22 app:showBorders="false" />2324</androidx.constraintlayout.widget.ConstraintLayout>
Layout for latent capture is defined in fragment_latent_capture.xml
XML1<?xml version="1.0" encoding="utf-8"?>2<androidx.constraintlayout.widget.ConstraintLayout xmlns:android="http://schemas.android.com/apk/res/android"3 xmlns:app="http://schemas.android.com/apk/res-auto"4 android:layout_width="match_parent"5 android:layout_height="match_parent">67<!--Custom component for configuring capture -->89 <com.idemia.capture.finger.api.FingerCaptureView10 android:id="@+id/fingerCaptureView"11 android:layout_width="match_parent"12 android:layout_height="match_parent" />1314<!--Button responsible for turning torch on/off. It is handled in LatentCaptureFragment -->1516 <Button17 android:id="@+id/torchController"18 style="@style/Idemia.Button.Violet"19 android:layout_width="wrap_content"20 android:layout_height="wrap_content"21 android:text="@string/torch_controller"22 android:layout_marginBottom="@dimen/margin_16"23 app:layout_constraintBottom_toBottomOf="parent"24 app:layout_constraintEnd_toEndOf="parent"25 app:layout_constraintStart_toStartOf="parent" />2627</androidx.constraintlayout.widget.ConstraintLayout>
Preview configuration
UiExtensions library let you change some parameters of the view that will be displayed after starting the capture. It is done by passing FingerCaptureSettings to FingerCaptureSceneController constructor or setUp method of FingerCaptureView when using new approach. Example of the settings:
Kotlin1private fun settings(range: CaptureDistanceRange?) = fingerCaptureSettings {2 scene {3 background {4 colorEnd = Color.parseColor(Colors.idemia_blue)5 colorStart = Color.parseColor(Colors.idemia_blue)6 }7 rectangle {8 color = Color.parseColor(Colors.white)9 strokeWidth = 5f10 cornerRadius {11 rx = 90f12 ry = 90f13 }14 }15 feedback {16 showFeedback = true17 if (thumbScanning()) {18 feedbackStringMapping = ::getThumbMapping19 }20 }21 distance {22 distanceRange = range?.let {23 DistanceRange(it.rangeMin, it.optimalMin, it.optimalMax, it.rangeMax)24 }25 showOptimalDistanceIndicator = range != null26 }27 previewScale {28 scaleX = 1.0f29 scaleY = 1.0f30 }31 }32}3334 private fun thumbScanning() =35 settingsStorage.load().captureFingerSettings.captureFinger == CaptureFinger.THUMB3637 private fun getThumbMapping(captureInfo: FingerCaptureInfo): String {38 return when (captureInfo) {39 FingerCaptureInfo.TOO_CLOSE -> "Move your thumb further"40 FingerCaptureInfo.TOO_FAR -> "Move your thumb closer"41 FingerCaptureInfo.OPTIMAL -> ""42 }43 }
A more detailed explanation of the possibilities these settings provide is available in Integrating with the UI Extension section.
Summary screen
Screen below is displayed after successful acquisition of fingers/thumb or when Latent capture is finished.
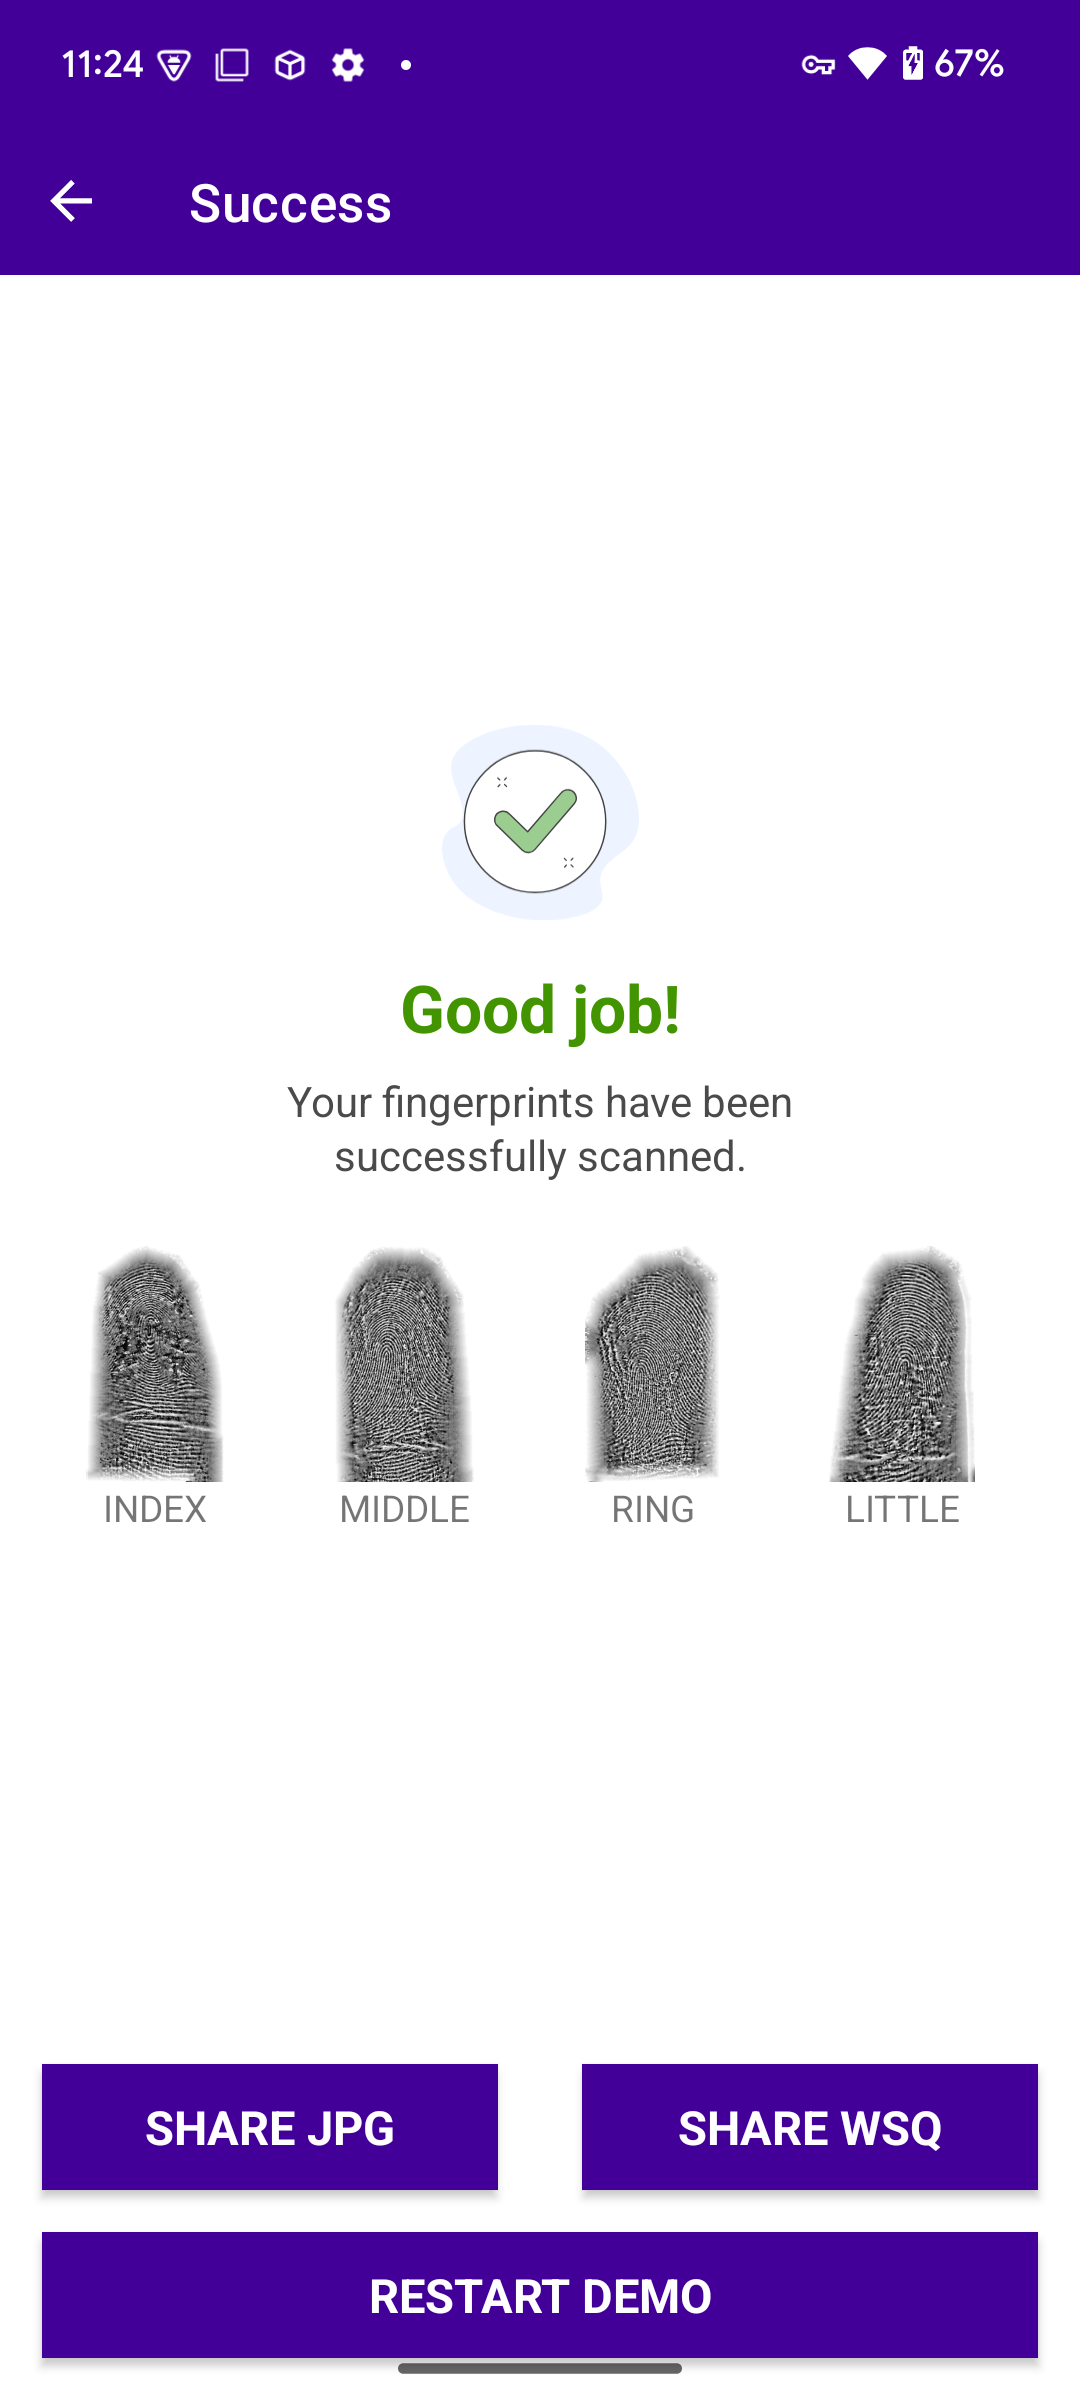
It allows to share captured images in .jpg and .wsq formats. Logic responsible for this can be found in DataShare.kt (see Sharing images for more details). Classes related with this screen are SuccessFragment and SuccessPresenter.
Splash Screen

This screen is displayed when the application is loaded and it can easily be customized with brand colors.
All graphical settings can be found in the layout file: fragment_splash.xml.
Note: It's also a convenient place to put any initial checks and settings like: requesting permissions or activating a license.
The sample app presenter logic behind this screen takes care of requesting a license. If this operations is successful, then it forwards the end-user to the main screen.
Splash Screen Presenter
The Sample App uses the MVP approach which simplifies code testing by decoupling decision logic from the UI view.
For example, when the onViewCreated method in a fragment is called by the framework, then the fragment will inform the presenter that it is started, which triggers the license activation procedure which is described in License
Activation.
Kotlin1//fragment2private val presenter: Splash.Presenter by lazy {3 FingerSplashPresenter(4 this,5 SplashNavigation(findNavController()) { exitApp() },6 LicenseServiceProvider(requireContext()).makeLicenceManager(),7 )8 }910override fun onViewCreated(view: View, savedInstanceState: Bundle?) {11 super.onViewCreated(view, savedInstanceState)12 presenter = providePresenter()13 presenter.onCreate()14 }151617//presenter18 override fun onCreate() {19 fetchLicence()20 }2122 private fun fetchLicence() {23 if (fetchingLicenseAlreadyStarted()) {24 return25 }26 licenseJob = ioScope.launch {27 val licencePreparationResult = licenseService.prepareLicence()28 withContext(Dispatchers.Main) {29 when (licencePreparationResult) {30 is LicenseActivationSuccess -> navigation.goToMenu()31 is LicenseActivationError -> handleError(licencePreparationResult)32 }33 }34 }35 }3637 private fun fetchingLicenseAlreadyStarted() = licenseJob?.isActive == true
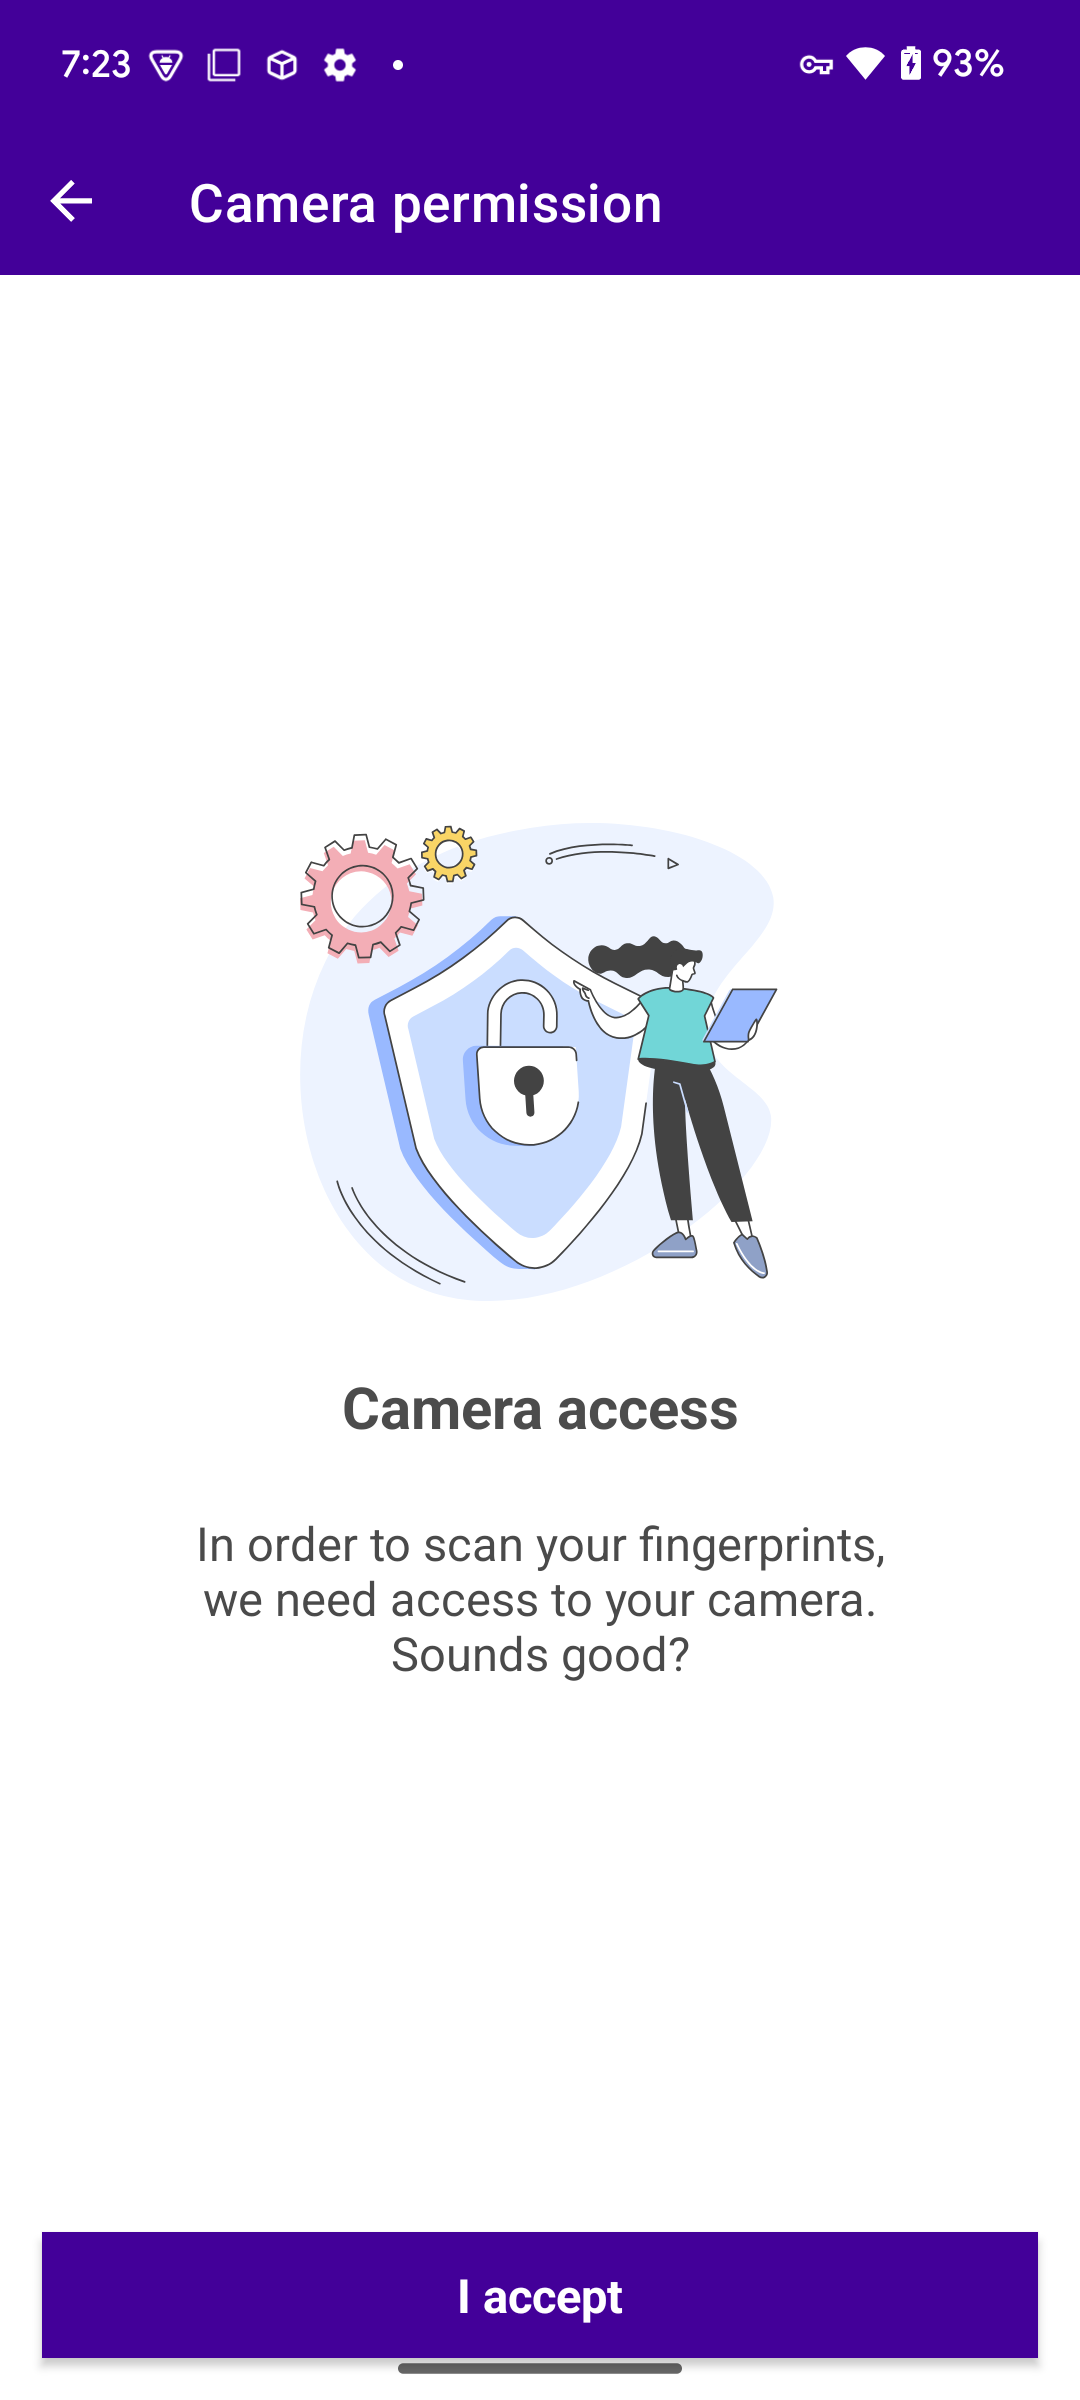
Camera permission screen
If you didn't grant neccessary permission in the the system settings, or permission were granted and revoked, before starting the capture you will see following screen:
Logic behind this screen is presented below:
Kotlin1class PermissionsFragment: Fragment() {23 private val presenter: Permissions.Presenter by lazy {4 val args: PermissionsFragmentArgs by navArgs()5 PermissionsPresenter(6 AppPermissionProvider(this, FingerPermissionInfo()),7 PermissionsNavigator(findNavController()),8 args9 )10 }1112 private var _binding: FragmentPermissionBinding? = null1314 private val binding get() = _binding!!1516 override fun onCreateView(17 inflater: LayoutInflater,18 container: ViewGroup?,19 savedInstanceState: Bundle?20 ): View {21 _binding = FragmentPermissionBinding.inflate(layoutInflater, container, false)22 return binding.root23 }2425 override fun onViewCreated(view: View, savedInstanceState: Bundle?) {26 super.onViewCreated(view, savedInstanceState)27 binding.acceptButton.setOnClickListener { presenter.askForPermission() }28 }2930 override fun onRequestPermissionsResult(31 requestCode: Int,32 permissions: Array<out String>,33 grantResults: IntArray34 ) {35 presenter.onRequestPermissionsResult(requestCode, grantResults)36 }3738 override fun onDestroyView() {39 super.onDestroyView()40 _binding = null41 }42}
Kotlin1class PermissionsPresenter(2 private val permission: PermissionProvider,3 private val permissionsNavigator: PermissionsNavigator,4 private val args: PermissionsFragmentArgs5) : Permissions.Presenter {67 override fun askForPermission() {8 permission.requestPermissions()9 }1011 override fun onRequestPermissionsResult(requestCode: Int, grantResults: IntArray) {12 if (requestCode == AppPermissionProvider.PERMISSION_REQUEST_CODE && grantResults.isNotEmpty()) {13 if (permission.permissionsGranted()) {14 onPermissionGranted()15 } else {16 permissionsNavigator.goToPermissionDeclined()17 }18 }19 }2021 private fun onPermissionGranted() {22 if(isLatent()) {23 permissionsNavigator.goToLatent()24 } else {25 permissionsNavigator.goToScan()26 }27 }2829 private fun isLatent() = args.isLatent3031}
After tapping "I accept button" askForPermission() method from Presenter will be invoked and you will see pop-up with request to grant necessary permissions. Then onRequestPermissionsResult is called within the fragment and request result is passed to presenter method with the same name. If you grant permissions, then application will move forward and capture will be started. Otherwise, following screen will be shown:
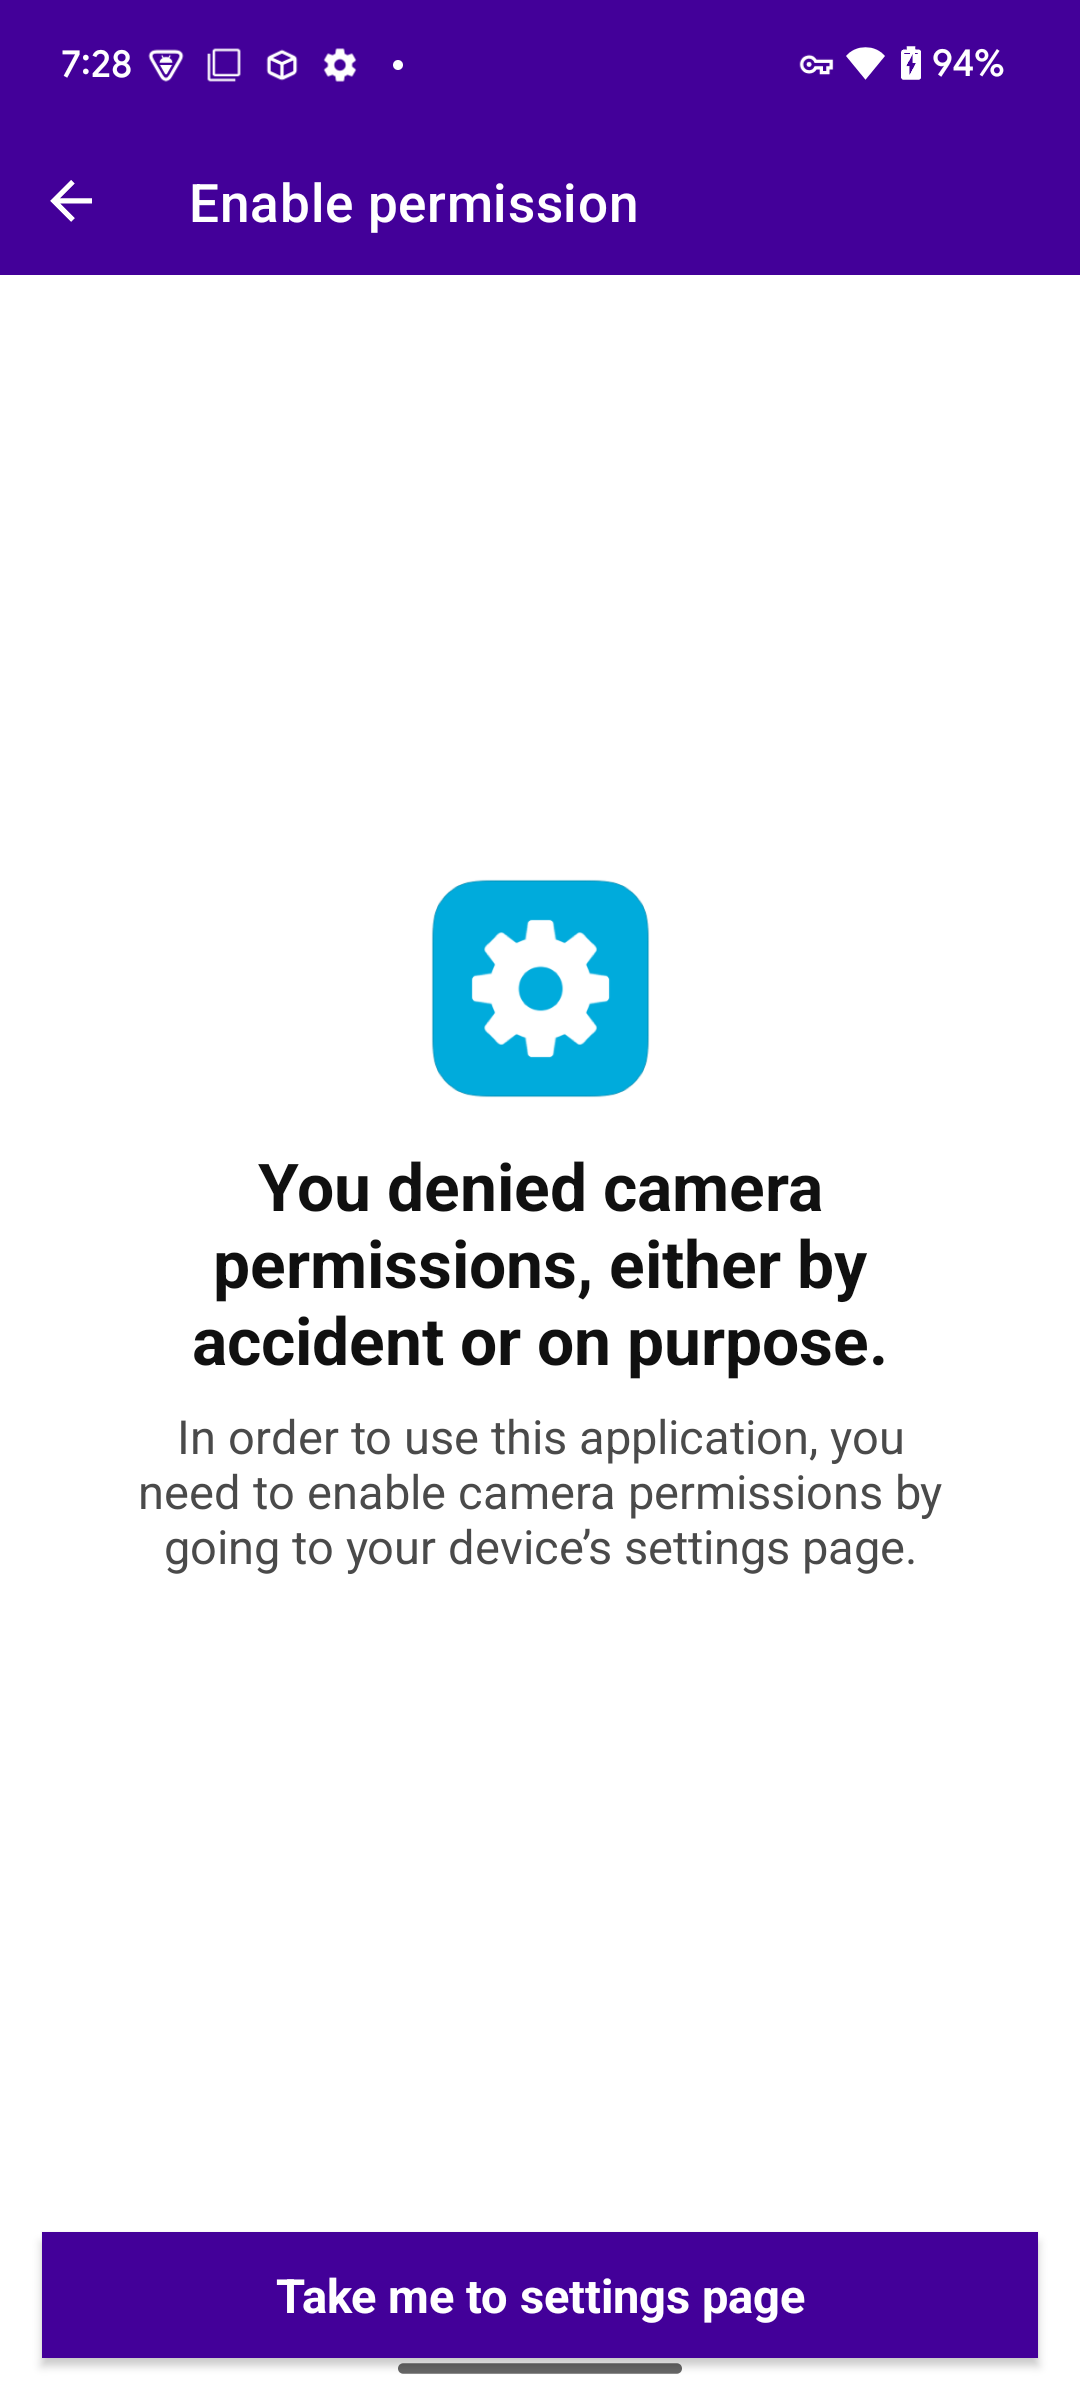
Here you can only navigate to system settings of the application to grant permissions.
Requesting Permissions
To request permission, a component com.idemia.smartsdk.sample.common.permission.AppPermissionProvider from the Commons module is used.
If the Android system version is below M then all permissions will be required statically according to the declaration in the manifest file.
XML1<uses-permission android:name="android.permission.INTERNET" /\>2<uses-permission android:name="android.permission.CAMERA"/\>
From M-version and above, Android supports dynamic permissions requests.
Kotlin1fragment.requestPermissions(PERMISSIONS_TO_REQUEST, PERMISSION_REQUEST_CODE)
AppPermissionProvider has three dependencies but all three have default implementations provided by a companion object. The purpose of this construction is to make testing of this possible by injecting mock dependencies during tests.
Kotlin1class AppPermissionProvider(2 @RequiresApi(Build.VERSION_CODES.M) private val checkPermission: PermissionChecker,3 private val triggerPermissionRequest: PermissionRequester,4 private val versionInfoProvider: VersionInfoProvider = StaticVersionInfo()5) : PermissionProvider {67//In companion object8operator fun invoke(f: Fragment): AppPermissionProvider =9 AppPermissionProvider(10 @RequiresApi(Build.VERSION_CODES.M) {11 (f.activity as Activity).checkSelfPermission( //permission checker12 it13 )14 },15 { f.requestPermissions(PERMISSIONS_TO_REQUEST, PERMISSION_REQUEST_CODE) } //permission requester16 )17}
When permissions are provided, the license activation is launched.
Sharing images
It is possible to share images after successful acquisition. To accomplish this, the DataShare interface is used.
Kotlin1interface DataShare {2 fun shareMultiple(files: List<Uri>, contentType: String)3 fun shareMultipleFiles(files: List<String>, contentType: String, authority: String)4 fun shareMultipleImages(images: List<Bitmap>)5}
Currently it has only one implementation:
Kotlin1class AndroidDataShare(val activity: Activity) : DataShare {23 override fun shareMultiple(uris: List<Uri>, contentType: String) {4 val filesToShare = ArrayList<Uri>().apply { addAll(uris) }56 val intent = Intent().apply {7 action = Intent.ACTION_SEND_MULTIPLE8 type = contentType9 flags = Intent.FLAG_GRANT_READ_URI_PERMISSION or Intent.FLAG_GRANT_WRITE_URI_PERMISSION10 putParcelableArrayListExtra(Intent.EXTRA_STREAM, filesToShare)11 }1213 activity.startActivity(Intent.createChooser(intent, "Share SampleApp data"))14 }1516 override fun shareMultipleFiles(files: List<String>, contentType: String, authority: String) {17 val uris = files.map { FileProvider.getUriForFile(activity, authority , File(activity.filesDir, it)) }18 shareMultiple(uris, contentType)19 }2021 override fun shareMultipleImages(images: List<Bitmap>) {22 val mediaSaver: MediaSaver = getMediaSaver(activity.contentResolver)23 val uris = mediaSaver.saveBitmaps(images)24 shareMultiple(uris, ContentType.JPG.value)25 }26}
Both shareMultipleFiles and shareMultipleImages creates list of Uri and passes it to shareMultiple. Due to changes in media saving across different versions of the Android system, saving bitmap logic in shareMultipleImages is hidden below MediaSaver interface:
Kotlin1abstract class MediaSaver {23 companion object {4 private const val IMAGE_FILENAME = "Image"5 private const val JPG_SUFFIX = ".jpg"6 }78 abstract fun saveBitmaps(images: List<Bitmap>): List<Uri>910 protected fun getImageFileName() = "${IMAGE_FILENAME}_${System.currentTimeMillis()}$JPG_SUFFIX"11}
This interface has 2 implementations - one for Android below 10 (MediaSaverBelowAndroidQ) and the seconds for higher versions of OS (MediaSaverAndroidQAndAbove).
Document Sample Application
This is the top-tier application which uses both the License Manager and UserManager components which depend on Biometric Capture SDK.
The Document Sample Application provides functionality for document scanning, and can easily be used as a template for your own solution.
The following describes each application screen and how it was implemented. There is an assumption that a reader has sufficient technical knowledge about Android development to understand code samples.
Content
Document Sample App Settings
To access the application's settings, click on the round button with the wrench icon located in the bottom right corner of the screen.
This button is accessible on each screen except the scanning page.
Settings options
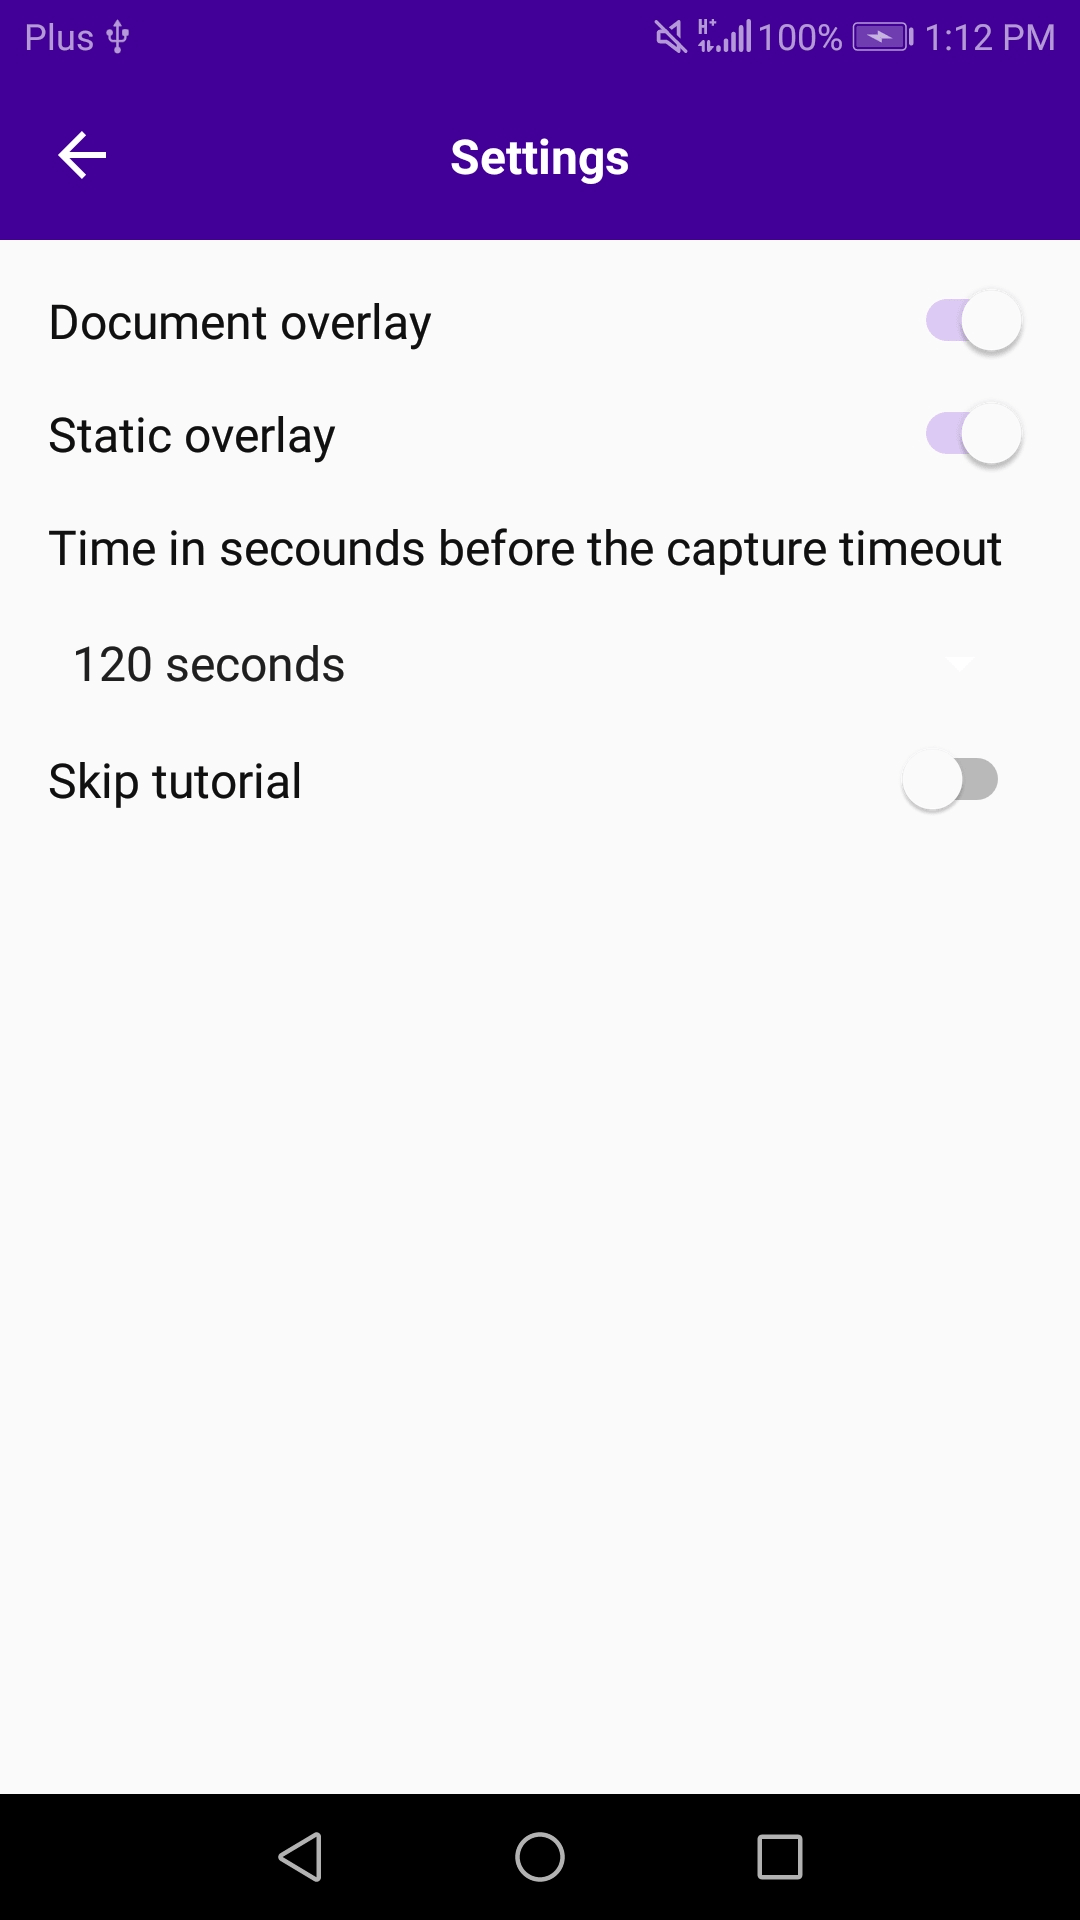
There are four options that an end-user can change:
-
Document overlay - decides whether the display overlay with the document boundaries is to be scanned
-
Static overlay - decides which display colored overlay will be placed within the document overlay
-
Time in seconds before the capture timeout - chooses time in seconds for which capture will stand before timeout error
-
Skip tutorial - decides whether a tutorial will be shown before each scanning operation
Document Sample App Splash Screen
Splash Screen
This screen is displayed when the application is loaded. It can be easily customized it with brand colors.
All graphical settings can be found in the layout file: fragment_splash.xml.
Note: This is also a convenient place to put any initial checks and settings like requesting permissions or activating a license.
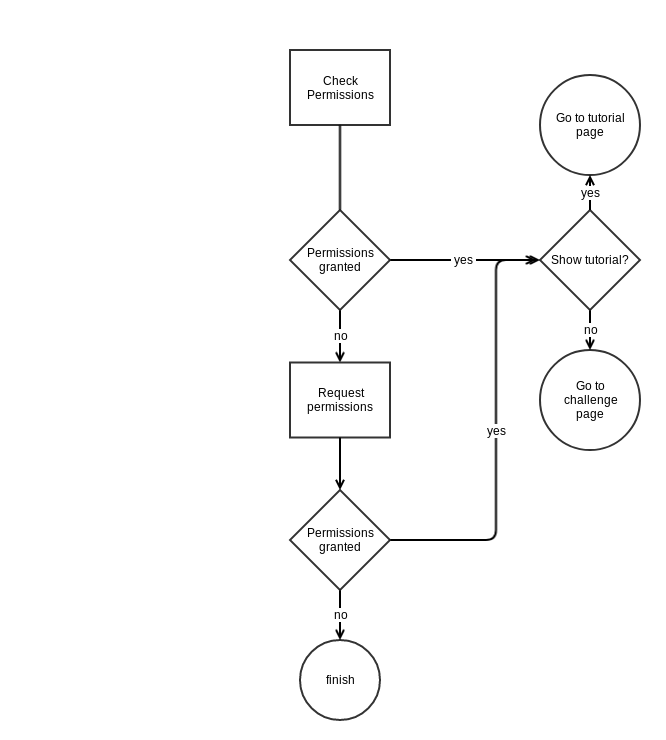
The sample app logic behind this screen takes care of requesting the license and requesting the proper permissions. If those operations are successful then it forwards the end-user to the tutorial page.
The flow is illustrated below:
SampleApp uses the MVP approach which simplifies code testing by decoupling decision logic from the UI view.
In the splash screen fragment, the presenter is responsible for requesting permissions and fetching a license. It is triggered from lifecycle methods of the SlashFragment.
Kotlin1//Fragment2override fun onStart() { //triggered by Android System3 super.onStart()4 scopeIO.launch {5 presenter.onStart()6 }7}89//Presenter10suspend fun onStart() { //triggered by Fragment11 if (permission.permissionsGranted()) {12 fetchLicence()13 } else {14 permission.requestPermissions()15 }16}
For now, ignore the scopeIO.launch instruction. It's part of the official Kotlin framework called Coroutines. It was designed to simplify the execution of concurrent operations.
You can learn more about it on the official support page.
When the onStart method is called, and proper permissions are granted, the license activation is started. The license fetching procedure is described in License Activation.
Requesting Permissions
To request permissions, a component com.idemia.smartsdk.sample.common.permission.DocumentAppPermissionProvider
is used. If the end-user's Android system is below M-version then all permissions will be required statically, according to the declaration in the manifest file.
XML1<uses-permission android:name="android.permission.INTERNET" />2<uses-permission android:name="android.permission.CAMERA"/>
From M-version and above, Android supports dynamic permissions requests:
Kotlin1fragment.requestPermissions(PERMISSIONS_TO_REQUEST, PERMISSION_REQUEST_CODE)
DocumentAppPermissionProvider expects two functions during initialization. One, which will be called when the request for permission has to be triggered, and the second one, for checking if proper permissions were granted.
You can check usage of this component in SplashPresenter.
The first presenter checks if proper permissions are granted and if not, then the request procedure is triggered.
Kotlin1suspend fun onStart() {2 if (permission.permissionsGranted()) {3 fetchLicence()4 } else {5 permission.requestPermissions()6 }7 }
Then we try to repeat an operation but, if permissions are not yet given, then the application can not proceed and exits.
Kotlin1suspend fun onRequestPermissions() {2 if (permission.permissionsGranted()) {3 fetchLicence()4 } else {5 view.exitApp()6 }7 }
Constructions of the two mentioned functions can be found in the companion object of the class.
Kotlin1companion object {2 private const val PERMISSION_REQUEST_CODE = 113 private val PERMISSIONS_TO_REQUEST: Array<String> = arrayOf(Manifest.permission.CAMERA)45 operator fun invoke(f:Fragment):DocumentAppPermissionProvider = DocumentAppPermissionProvider(6 @RequiresApi(Build.VERSION_CODES.M) { (f.activity as Activity).checkSelfPermission(it) }, {7 f.requestPermissions(PERMISSIONS_TO_REQUEST, PERMISSION_REQUEST_CODE) }8 )9 }
Some samples are also in the DocumentAppPermissionProviderTest unit test.
Document Sample App Tutorial
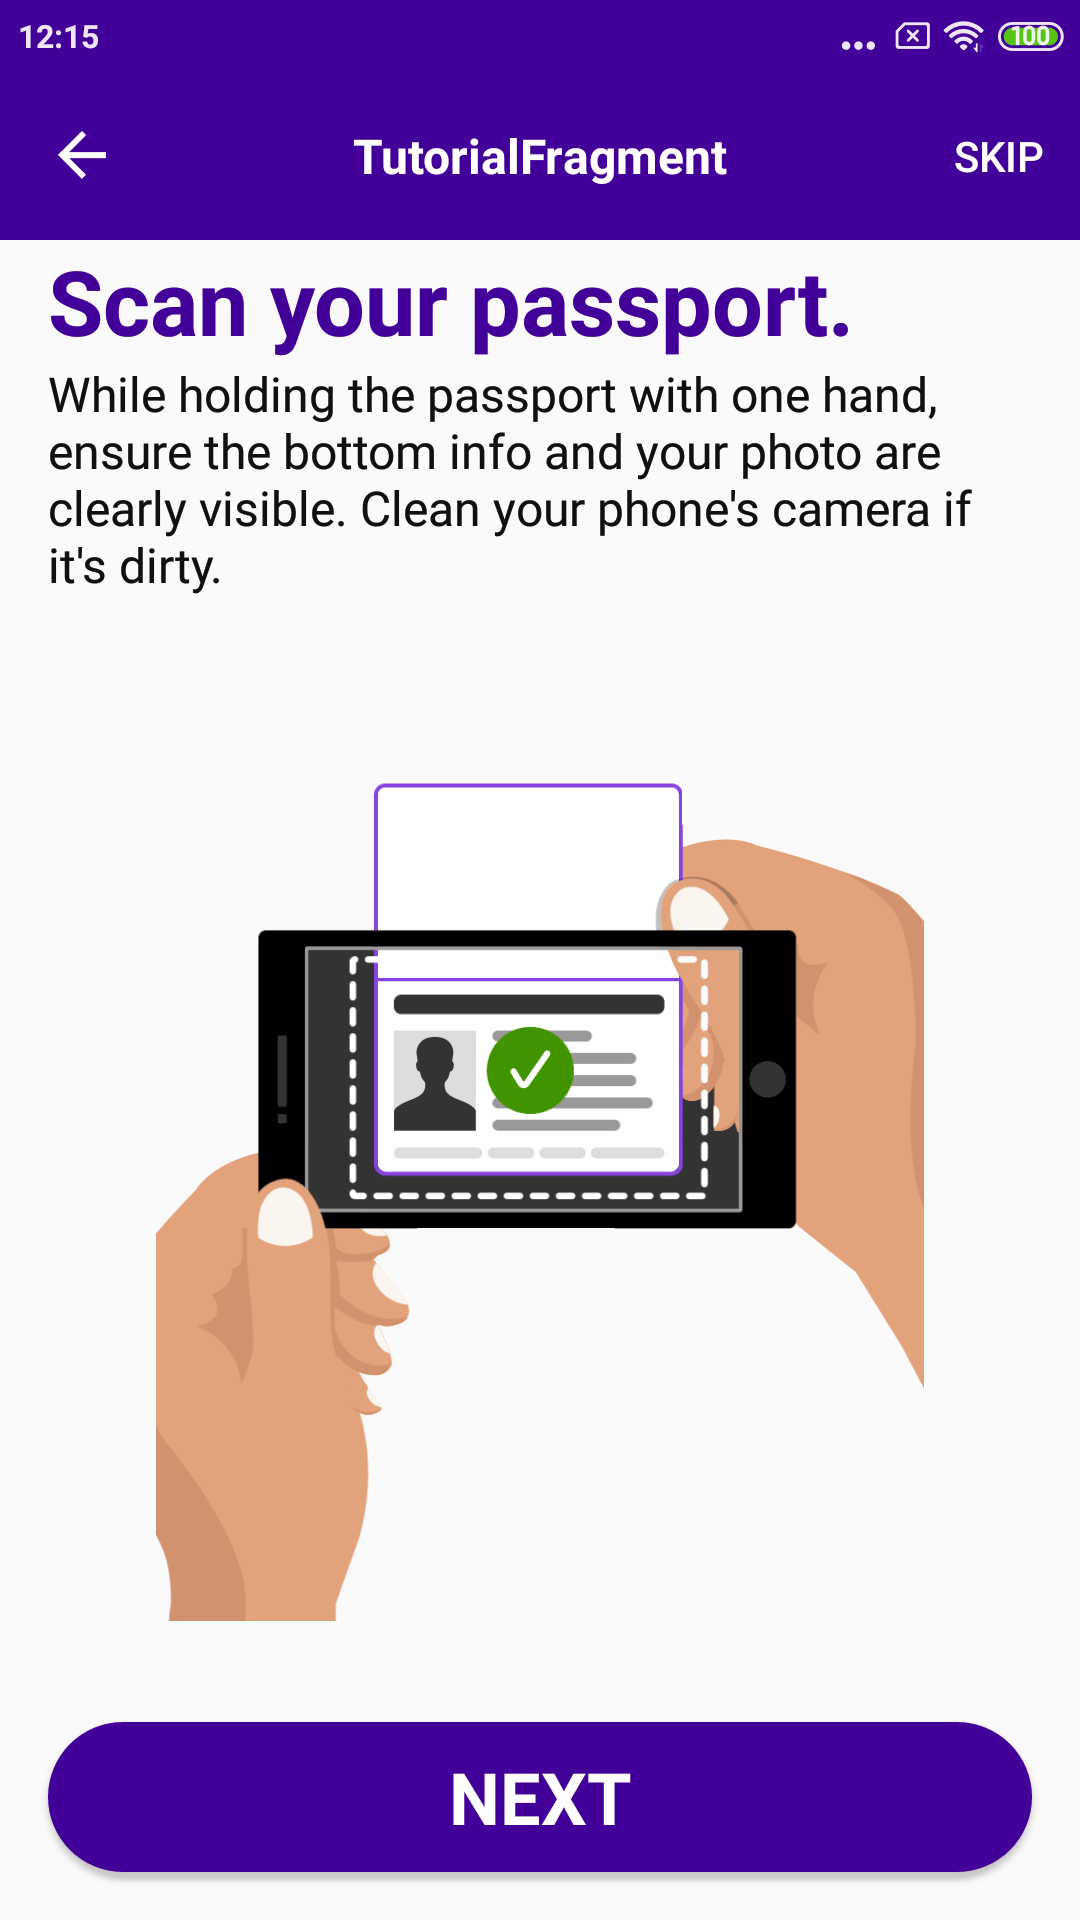
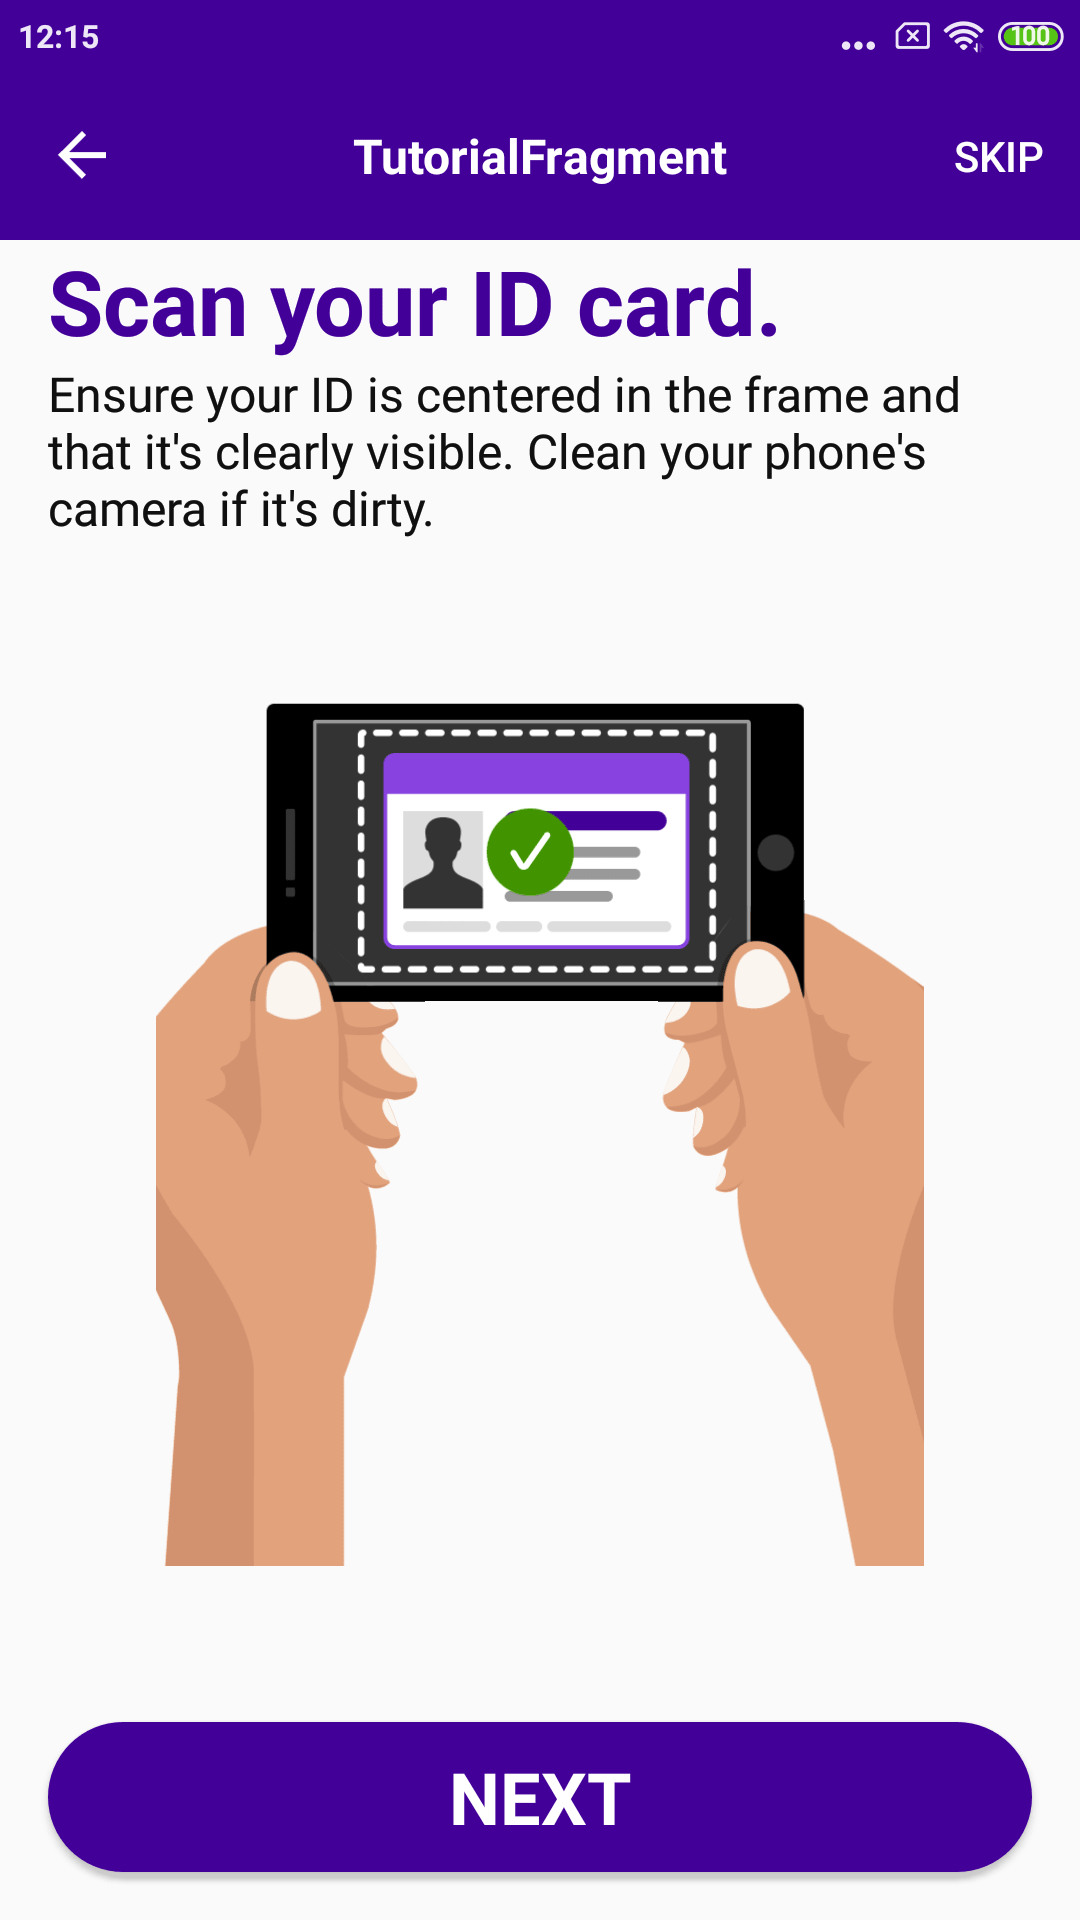
Tutorial
These are a collection of screens that present the tutorial for scanning specific document types.
Tutorial page for an ID
Tutorial page for a passport
Tutorial page for a driver's license
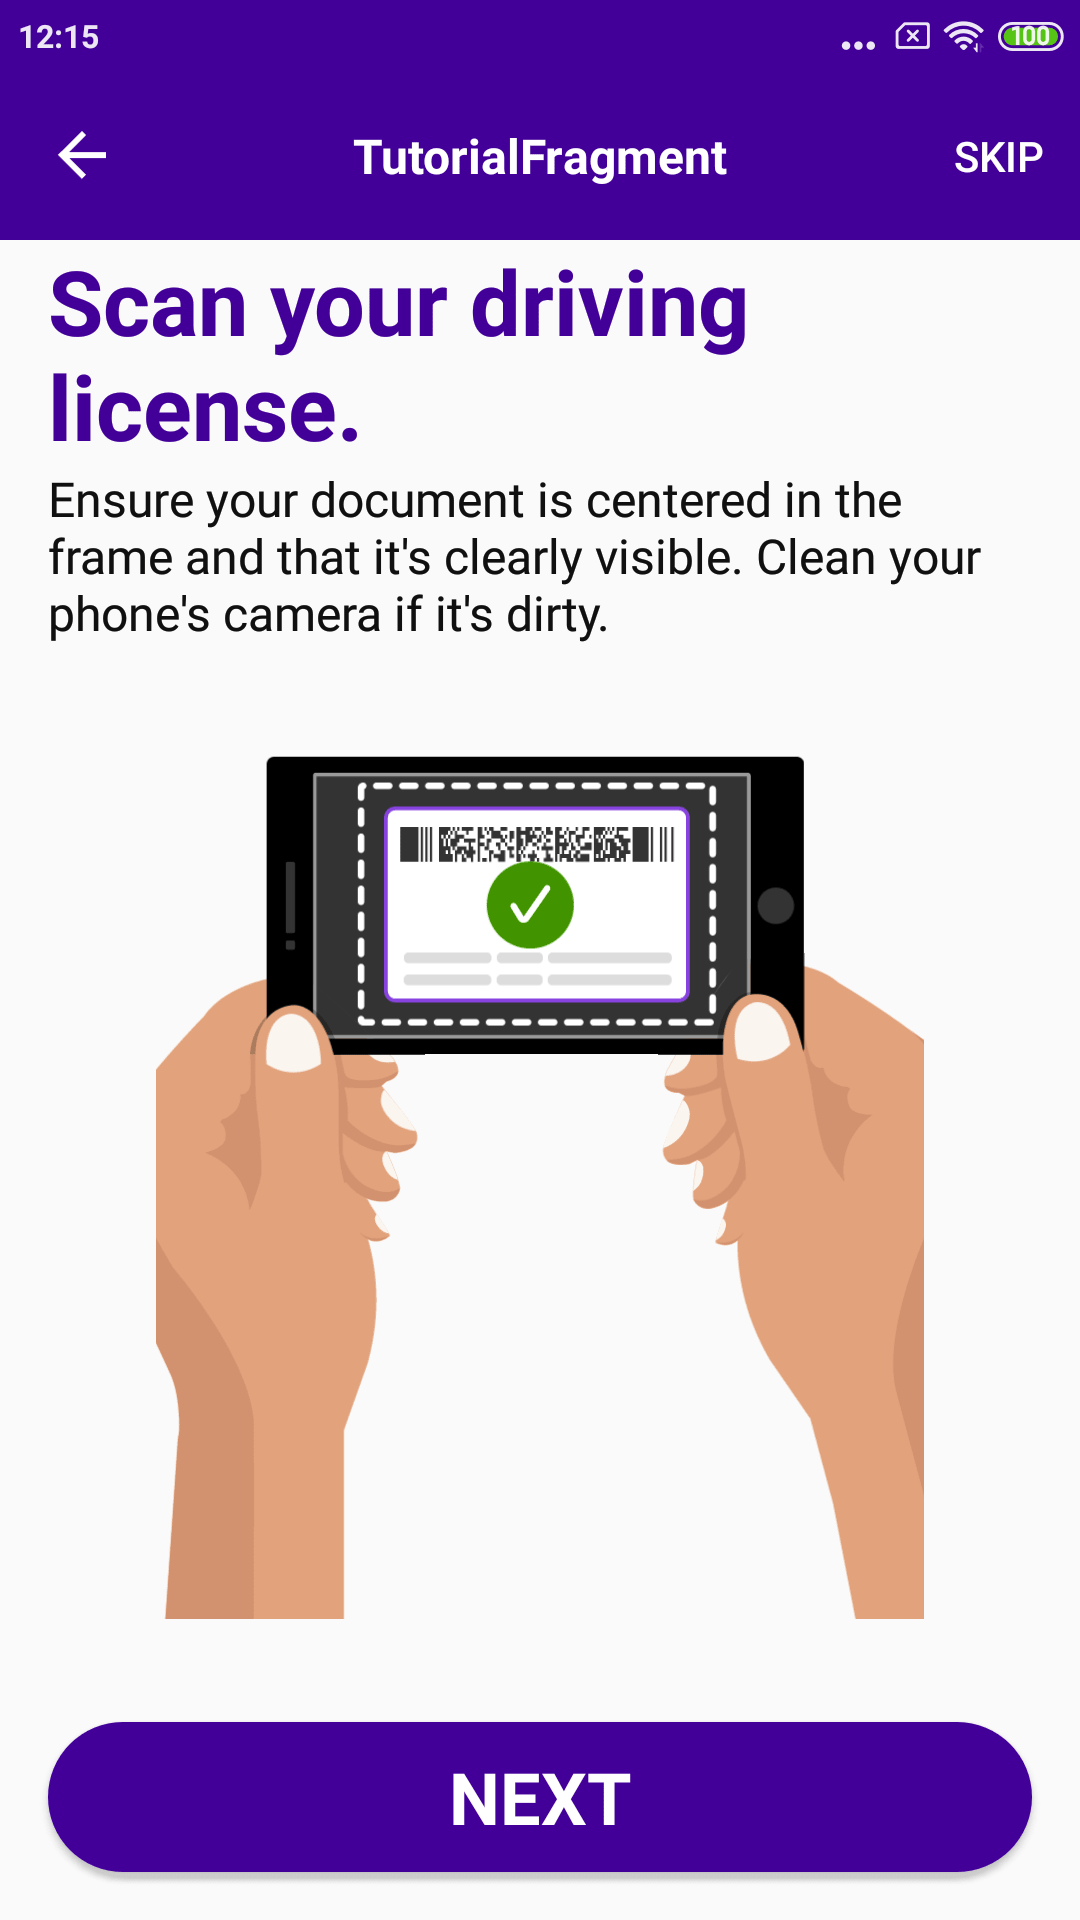
These are simple animations that show the end-user how to properly scan a chosen document or barcode.
The application's architecture is MVP with a single activity where each view is presented by a separate fragment.
Navigation Flow
This approach simplifies inter-screen navigation which is composed with Navigation Component.
The core code for navigation is placed under the navigation package.
A representative navigation graph can be found in the file navigation_graph.xml while in
design mode.
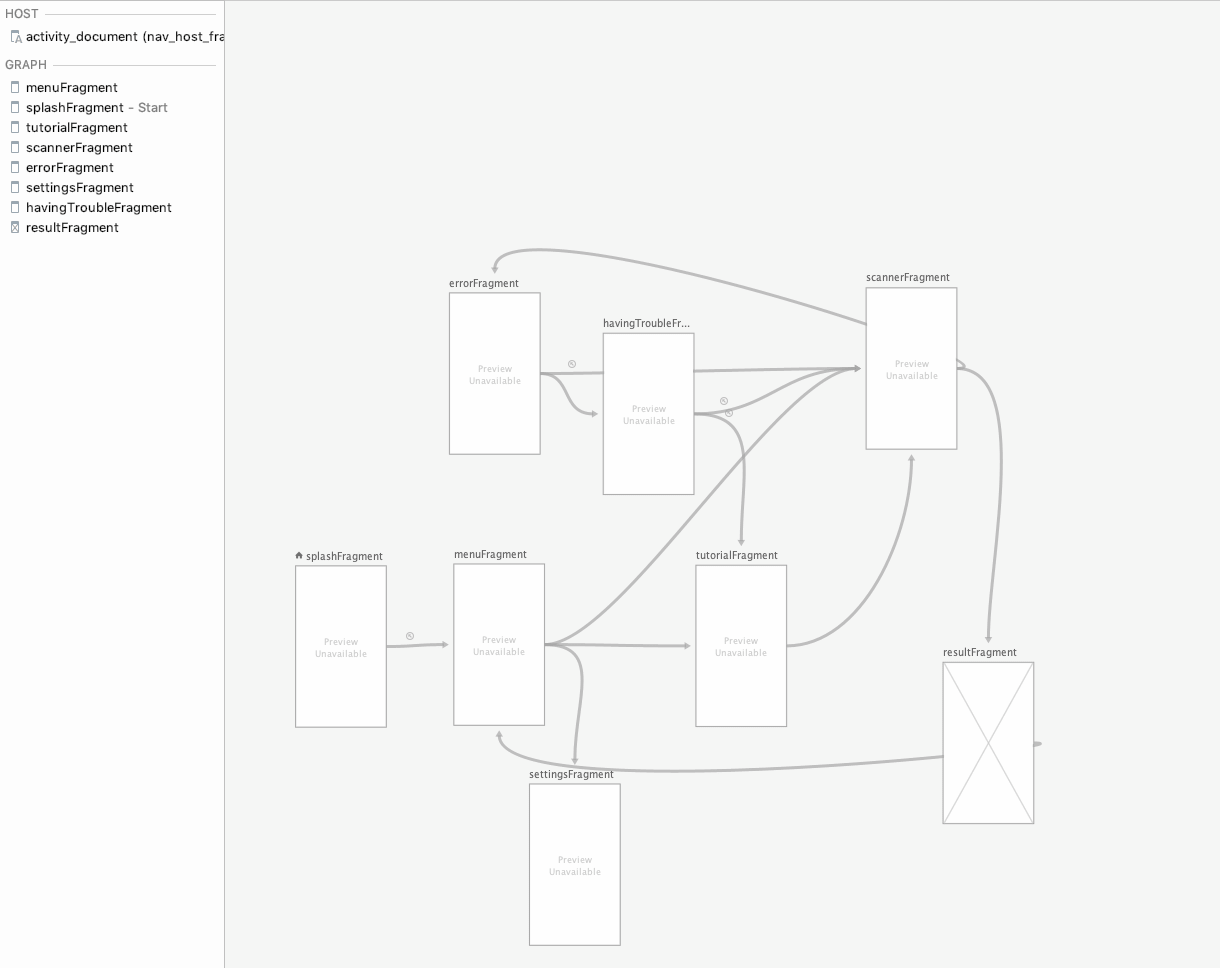
Each fragment that has any buttons that initialize a navigation are handled in the same way. Fragments have internal classes that map button IDs to the proper navigation action.
Tutorial Configuration
There are two cases when a tutorial is not displayed and an end-user is navigated directly to the scanner page.
-
In the first case, the tutorial page is skipped when the given document type was not provided with a tutorial animation file.
Files with tutorial animations are stored in resources under the
rawpackage. -
An end-user may also manually disable a tutorial in the settings page. Whole tutorial content (i.e., title or animation file) is stored inside the
TutorialContentclass.
As it is shown in code below, the first mentioned case is the check on the menu page just after the end-user has chosen one of the document options:
Code Block 1 TutorialNavigationFlow.kt
Kotlin1// Returns true if given document has tutorial animation file2private fun hasTutorialAnimation(documentType: DocumentType): Boolean = getTutorialAnimationFileId(documentType) != TutorialContentProvider.DOCUMENT_OPTION_WITHOUT_TUTORIAL34// Each document has given animation file id as an argument with default value equal 05private fun getTutorialAnimationFileId(documentType: DocumentType): Int = TutorialContentProvider.tutorialContent(documentType).animationFileId
Face Sample Application
This is the top-tier application which uses both License Manager and UserManager components which depends on Biometric Capture SDK.
Face Sample Application can easily be used as a template for an integrator's own biometric application.
The following describes each application screen and explains how it was implemented. It is assumed that the reader has sufficient technical knowledge about Android development to understand code samples.
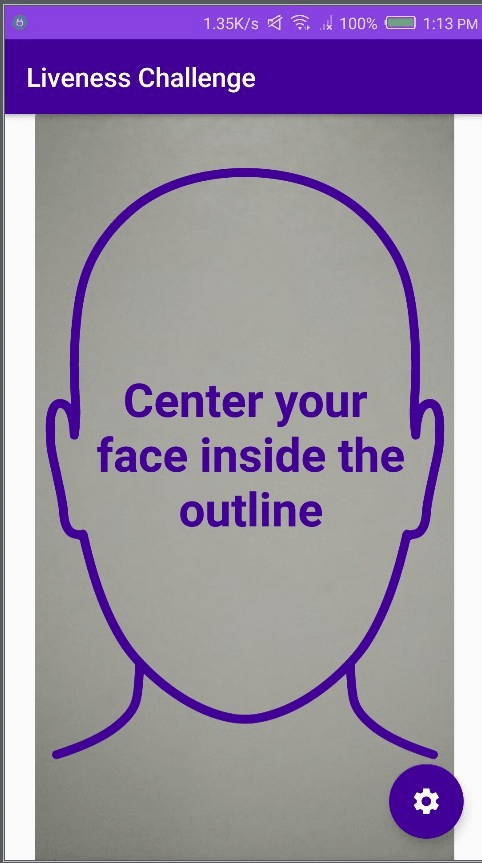
Face Sample App Liveness Challenge
This functionality can be entered directly from the splash screen or after watching the tutorial.
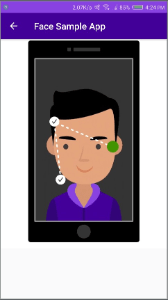
CR2D
This challenge mode requires multiple dots to connect on the screen.
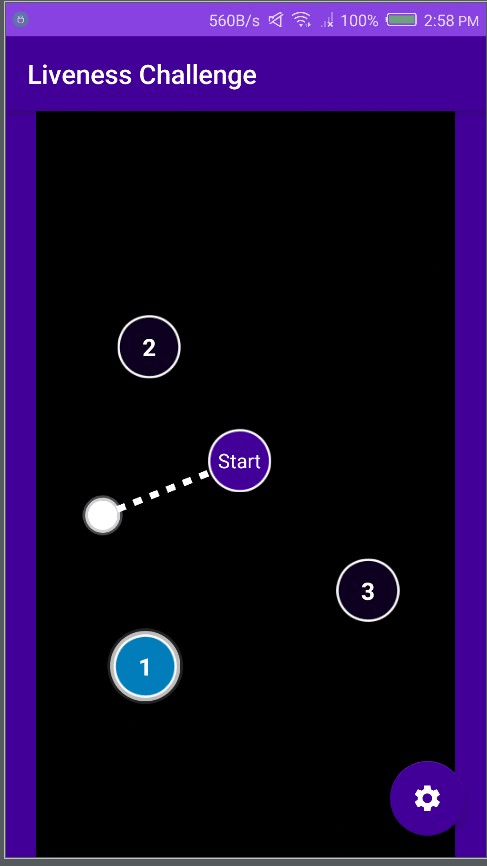
The logic responsible for this challenge mode can be found in the class: CR2DChallengeFragment which delegates operations to CR2DChallengePresenter.
Kotlin1builder.captureMode(BioCaptureMode.TRACK_FACE_CR2D_MEDIUM)2 .timeout(appSettings.timeout.toLong())3 .cr2dConfiguration(Cr2dConfigurationPath(CR2D_POINTS))4 .onCurrentUpdated { sceneController.update(it) }5 .onTargetUpdated { sceneController.update(it) }6 .onFailure(::onCaptureFailure)7 .onSuccess(::onCaptureSuccess)8 .onTracking(BioCaptureTrackingListener { sceneController.onTracking(it) })9 .onFeedback(BioCaptureFeedbackListener(::onFeedbackReceived))10 .onTargetsConditionUpdated { targetCount, targetStability ->11 challengeView.hideFaceOutline()12 sceneController.update(targetCount, targetStability)13 }1415if (appSettings.useIllumination) {16 builder.illumination(this@CR2DChallengePresenter)17}18cR2DPreview = builder.build()
Layout
Layout is defined in the file fragment_challenge_cr2d.xml.
XML1<!--Custom component provided by UI-EXTENSIONS library. Is responsible for capturing biometric data -->2 <com.idemia.biometricsdkuiextensions.ui.scene.scene.SceneView3 ...4 />56 <ImageView7 android:id="@+id/faceOverlay"8 .../>910 <TextView11 android:id="@+id/faceOverlayText"12 ...13 />1415<!--General text field which will be used to display information **for**16 user-->17 <TextView18 android:id="@+id/captureFeedback"19 ...20 />
Preparation
Before performing the challenge, initialize the capture screen. In the sample app it's the responsibility of the CR2DCaptureProcess.ProcessBuilder component which describes the meaning of each parameter.
Kotlin1builder.captureMode(BioCaptureMode.TRACK_FACE_CR2D_MEDIUM)2 .timeout(appSettings.timeout.toLong())3 .cr2dConfiguration(Cr2dConfigurationPath(CR2D_POINTS))4 .onCurrentUpdated { sceneController.update(it) }5 .onTargetUpdated { sceneController.update(it) }6 .onFailure(::onCaptureFailure)7 .onSuccess(::onCaptureSuccess)8 .onTracking(BioCaptureTrackingListener { sceneController.onTracking(it) })9 .onFeedback(BioCaptureFeedbackListener(::onFeedbackReceived))10 .onTargetsConditionUpdated { targetCount, targetStability ->11 challengeView.hideFaceOutline()12 sceneController.update(targetCount, targetStability)13 }1415 if (appSettings.useIllumination) {16 builder.illumination(this@CR2DChallengePresenter)17 }18cR2DPreview = builder.build()
Challenge Resource Management
During the challenge procedure, multiple resources are used. Warning: Be very careful to remember to release each of them.
As in the rest of the sample application, this functionality is implemented with the view/presenter approach and the presenter is of the type CR2DChallengePresenter. It's a great example to understand the proper order of instructions in the activity which uses the presenter.
Here is the order of all the operations which have to be performed:
-
Presenter:
prepareFaceCapture- builds the
CR2DPreviewobject
- builds the
-
Presenter:
startFaceCapture- start
CR2DPreview - draws face outline
- starts
CR2DCapture - starts
SceneController
- start
-
Presenter:
onPause- stops
SceneController - stops
CR2DPreview - stops
CR2DCapture
- stops
-
Presenter:
release- destroys
SceneController - destroys
CR2DCapture
- destroys
Prepare Face Capture in Details
Presenter uses JoinThePointsSceneController from UIExtensions. Configure callbacks to this controller through CR2DCaptureProcess.ProcessBuilder.
Property modifying SceneController | Description |
|---|---|
| onCurrentUpdated { sceneController.update(it) } | |
| onTargetUpdated { sceneController.update(it) } | |
| .onTargetsConditionUpdated { targetCount, targetStability -> challengeView.hideFaceOutline() sceneController.update(targetCount, targetStability) } |
General Property | Description |
|---|---|
| captureMode(BioCaptureMode.TRACK_FACE_CR2D_MEDIUM) | You can choose from among three different: - TRACK_FACE_CR2D_*, TRACK_FACE_LIVENESS_* and INGERPRINT_* |
Face Sample App Settings
The exact flow of the tutorial screens depends on the settings you can choose. To enter the settings screen choose menu (the three little dots) in the right top corner of the screen.
Choose which challenge method to use (CR2D - for joining points on the screen and SLAM for face scan).
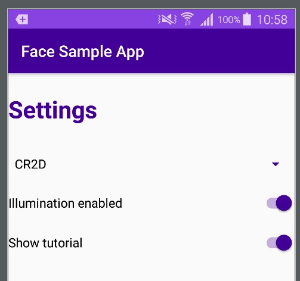
Settings are backed by SettingsFragment.kt and SettingsPresenter.kt. The last one saves the chosen values by using SettingStorage.
Kotlin1interface SettingsStorage {2 fun load(): FaceAppSettings3 fun save(settings: FaceAppSettings)4}
Face Sample App Splash Screen
This screen is displayed when the application is loaded and it can easily be customized with brand colors.
All graphical settings can be found in the layout file: fragment_splash.xml.
Note: It's also a convenient place to put any initial checks and settings like: requesting permissions or activating a license.
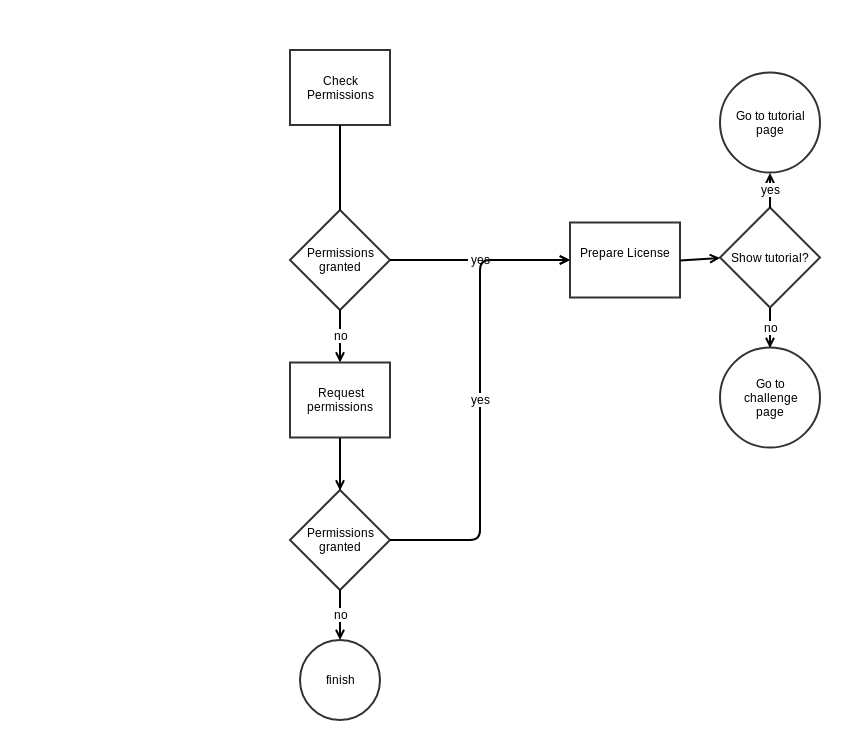
The sample app presenter logic behind this screen takes care of requesting a license and requesting proper permissions. If those operations are successful, then it forwards the end-user to the tutorial page.
The flow is illustrated in the following picture:
Splash Screen Presenter
The Sample App uses the MVP approach which simplifies code testing by decoupling decision logic from the UI view.
For example, when the onViewCreated method in a fragment is called by the framework, then the fragment will inform the presenter that it is started, which triggers the license activation procedure which is described in License
Activation.
Kotlin1//fragment2override fun onViewCreated(view: View, savedInstanceState: Bundle?) {3 super.onViewCreated(view, savedInstanceState)4 presenter = providePresenter()5 presenter.onCreate()6}78//presenter9override fun onCreate() {10 Log.d(TAG, "onStart")11 if (permissionProvider.permissionsGranted()) {12 startFetchLicense()13 } else {14 requestPermissions()15 }16}
The main advantage of this approach is that presenter is completely decoupled from the Android framework, which simplifies testing.
Requesting Permissions
To request permission, a component com.idemia.smartsdk.sample.common.permission.AppPermissionProvider from the Commons module is used.
If the Android system version is below M then all permissions will be required statically according to the declaration in the manifest file.
XML1<uses-permission android:name="android.permission.INTERNET" />2<uses-permission android:name="android.permission.CAMERA"/>
From M-version and above, Android supports dynamic permissions requests.
Kotlin1fragment.requestPermissions(PERMISSIONS_TO_REQUEST, PERMISSION_REQUEST_CODE)
AppPermissionProvider has three dependencies but all three have default implementations provided by a companion object. The purpose of this construction is to make testing of this possible by injecting mock dependencies during tests.
Kotlin1class AppPermissionProvider(2 @RequiresApi(Build.VERSION_CODES.M) private val checkPermission: PermissionChecker,3 private val triggerPermissionRequest: PermissionRequester,4 private val versionInfoProvider: VersionInfoProvider = StaticVersionInfo()5) : PermissionProvider {67//In companion object8operator fun invoke(f: Fragment, permissionInfo: PermissionInfo): AppPermissionProvider =9 AppPermissionProvider(10 @RequiresApi(Build.VERSION_CODES.M) {11 (f.activity as Activity).checkSelfPermission( //permission checker12 it13 )14 },15 { f.requestPermissions(permissionInfo.PERMISSIONS_TO_REQUEST, PERMISSION_REQUEST_CODE) } //permission requester16 )
When permissions are provided, the license activation is launched.
Fetching License with Coroutines
The component responsible for triggering and fetching the license procedure is SplashPresenter, which is defined in the Commons module. It uses navigator abstraction, which is defined separately by each specific application.
In the SplashPresenter is a method which uses the License Activation Module. Because one of the scenario's application has to connect with the remote server, this operation needs to start in a separate thread to not freeze the UI. This problem was solved with the usage of Coroutines framework.
In the sample below, first trigger licenseService in IO context which provides a thread for input/output operation. Afterwards, switch back to UI context.
Kotlin1fun fetchLicence() {2 if (fetchingLicenseAlreadyStarted()) {3 return4 }5 licenseJob = ioScope.launch {6 val licencePreparationResult = licenseService.prepareLicence()7 withContext(Dispatchers.Main) {8 when (licencePreparationResult) {9 is LicenseActivationSuccess -> navigator.navigateTo()10 is LicenseActivationError -> handleLicenseError(licencePreparationResult)11 }12 }13 }14}1516private fun fetchingLicenseAlreadyStarted() = licenseJob?.isActive == true1718private fun handleLicenseError(error: LicenseActivationError) {19 licenseError = error20 view.showDialog(this)21}
When the license is restored and all necessary permissions granted, the end-user will be presenter with a series of tutorials.
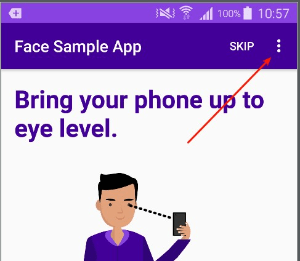
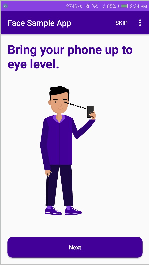
Tutorial
The following is a collection of simple screens which explain the application's functionality:
Screen 1
Screen 2
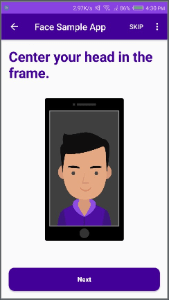
Screen 3
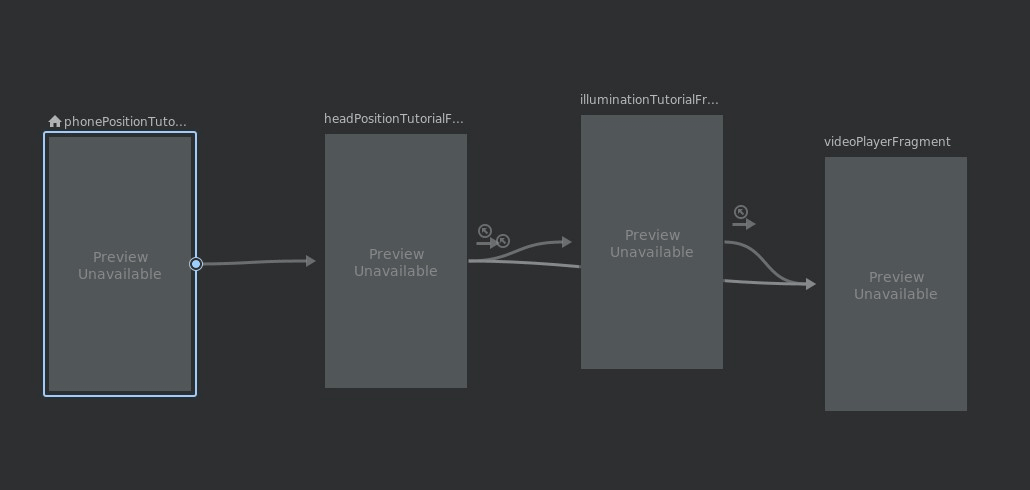
Tutorial
Navigation between those screens is backed by a set of fragments placed in the com.idemia.smartsdk.sample.tutorial.fragments package. Transitions between the tutorial sub pages are implemented with usage of the official Navigation Component from Google.
For a nice graphical overview, open the navigation_cr2d_tutorial.xml file or navigation_slam_tutorial.xml while in design mode.
Note: The picture below is used just for presentation purposes. Current navigation in the app can be different.
Tutorial Configuration
Tutorial navigation is controlled by settings which are described in in the next section. Seeing the tutorial is optional.
Optionally, challenge mode can be chosen, which will be used in registration and authentication.
Having those choices as an input, it's delegated to TutorialPresenter to handle navigation properly.
Kotlin1//This part handles tutorial settings choice2override fun configureTutorial() {3 if (!appSettings.showTutorial) {4 tutorialView.setStartingDestination(R.id.settingsActivity)5 } else {6 chooseChallengeMode()7 }8}910//if you checked tutorial field in settings then the second condition handles challenge mode.1112private fun chooseChallengeMode() {13 when (appSettings.mode) {14 ChallengeMode.CR2D -> {15 tutorialView.setStartingDestination(16 R.id.firstStepFragment,17 bundleOf(TutorialActivity.USE_ILLUMINATION to appSettings.useIllumination)18 )19 }20 ChallengeMode.SLAM ->21 tutorialView.setStartingDestination(R.id.SLAMStepFragment)22 }23}
In the activity, notice the use of the standard navigation API.
Kotlin1override fun setStartingDestination(destinationResId: Int, arguments: Bundle) {2 val graph = navController.navInflater.inflate(R.navigation.navigation_tutorial)3 graph.startDestination = destinationResId4 navController.setGraph(graph, arguments)5}
It's possible to use a different navigational approach within an integrator's own application.
License Activation
To use Biometric Capture SDK, provide the following pre-configuration parameters:
LicenseServerUrl, ApiKey and ProfileID.
Values of those parameters will be determined during external business processes. Please contact your Business Unit Manager for more information.
Pass the aforementioned parameters to the LicenseManager module which is the main component responsible for retrieving a license.
- In
SampleAppsnotice the usage of this module inSplashPresenterwhere the license service is used during theonCreatephase.
The module entry point is the LkmsLicenseService class which tries to restore the license. In the case this step fails, then it tries to recover by fetching a new license.
LkmsLicenseService has only one dependency which you need to use in order to configure the fetching license procedure:
Kotlin1private val licenseManager: LicenseManagerWrapper
LicenseManagerWrapper Configuration
This component has two initial parameters:
-
Android Context can be obtained directly from the Android framework
-
License Manager can be obtained by
LkmsLicenseManagerProviderwhich just acts as a proxy for a call using the static method in theLicenseManager
LicenseService Usage
When all dependencies are provided, you can use an implementation of LicenseService, which is called LkmsLicenseService.
Kotlin1override suspend fun prepareLicence(): LicenseActivationResult {2 return licenseManager.activate()3}
You can see that licenseManager trying to fetch new license and activate or if license was fetched before it will activate license without fetching new one.
Understand API through Tests
In the sample app you can find very useful unit tests which maybe helpful in API exploration.
For license activation please go to the file LkmsLicenseServiceTest. Most of the test cases should be self descriptive. Below, you will find short descriptions to particular test scenarios.
-
should return error after fail to activate licence - calling
prepareLicenseonLicenseServicetrigger on licenseManager activation but ifLicenseManagercan not fetch or activate license it return LicenseActivationError -
should return LicenseActivationSuccess after successful license activation - calling
prepareLicensetrigger on licenseManager activation. If can fetch and activate license with success it return LicenseActivationSuccess
For more information about LicenseManger section in dedicated integration guide.
User Management
This module is responsible for the general management of users of the sample app.
It allows for a user account to be stored, retrieved, or deleted.
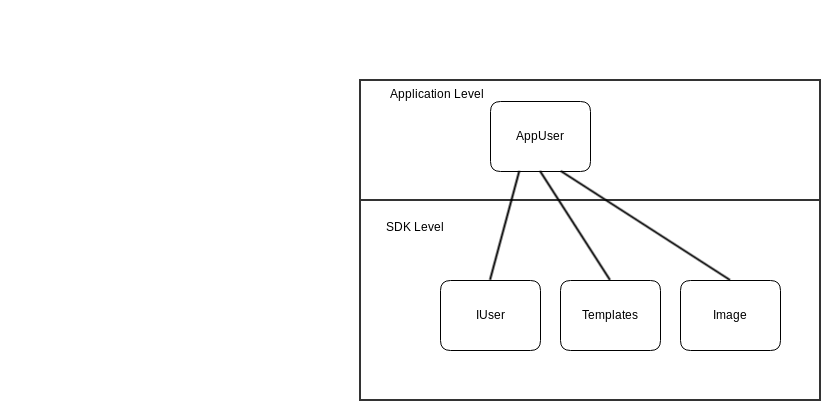
Application User and SDK User
When reading code you'll come across the following classes and interfaces: User, IUser, and AppUser.
-
IUser - Interface provided to the app by Biometric Capture SDK
-
User - Default implementation of IUser. Maintained by Biometric Capture SDK.
-
AppUser - Describes user data inside the application. It consists of:
- Biometric Capture SDK User data - just
nameandid - Templates - Biometric Data captured during enrollment
- Image - it is an image captured during enrollment
- Biometric Capture SDK User data - just
UserService Configuration
This component has three dependencies:
-
UserStore implemented by BiosUserStore - responsible for storing
IUserinformation. Is dependent only onMorphoBioStoreDBWrapperwhich only wraps static calls to Biometric Capture SDK. -
UserTemplateStore implemented by BioUserTemplateStore - it also is only dependent on
MorphoBioStoreDBWrapper. Easy to initialize. -
ImageStore implemented by UserImageStore - this component saves images made by the user during enrollment. They are saved directly on a hard drive. That's why
ImageStoredepends onFileStore. This store is implemented byAndroidInternalFileStorewhich just depends on an Android context.
UserService Usage
The component has a simple interface:
-
save(appUser) - stores userData, templates, and pictures created during enrollment.
-
remove/removeAll - removes a user from the system. In case of any error you will see an error in the logs.
-
listUsers - loads all data from every "store" for each user.
-
anyUserEnrolled - returns information if any user data has been saved.
Understand API through Tests
Because "store" components in this module mainly forward calls to Biometric Capture SDK, the tests defined below explain which internal methods needs to be called in order to obtain the expected behavior.
-
BioUserStoreTest - shows which methods on
BioStoreDBWrapperwill be called as an effect of theBioUSerStoremethod calls. -
BioUserTemplateStoreTest - similar to above but focuses on templates.
-
UserImageStoreTest - this one is for images.
Usages
Below are some specific usages to help you to better understand the API module.
SettingsPresenter - here you can remove all users to start enrollment all over again:
Kotlin1private fun removeUsers() {2 runBlocking {3 userManager.removeAll()4 }5}