Extensions
The BiometricSDK UI Extensions framework is targeted to developers who want to use our default UI with the BiometricSDK framework within their mobile apps. This section covers the BiometricSDKRemote, getting started with AAMVA, and UI extensions for iOS.
Getting started with AAMVA
The AAMVADecoder framework is targeted to developers who need to decode AAMVA within their mobile apps.
Prerequisites
Skills required
The integration tasks require developers with knowledge of:
- Xcode
- Objective-C/Swift
- iOS (min version is 15.0)
Resources required
Integration should be performed on a Mac. The tools required are:
- Xcode that support iOS 15
- iOS device
- CocoaPods (optional)
Adding the framework to your project
CocoaPods (from Artifactory)
- To use CocoaPods with Artifactory, you must install the
cocoapods-artplugin. To installcocoapods-art, run the following command:
Objective-C1gem install cocoapods-art
- The plugin uses authentication as specified in the standard
.netrcfile.
Objective-C1machine mi-artifactory.otlabs.fr2login <USERNAME>3password <PASSWORD>
- Add our repository to your
CocoaPoddependency management system:
Objective-C1pod repo-art add smartsdk "https://mi-artifactory.otlabs.fr/artifactory/api/pods/smartsdk-ios-local"
- At the top of your
Podfileadd:
Objective-C1plugin 'cocoapods-art', :sources => [2 'master', # so it could resolve dependencies from master repo (the main one)3 'smartsdk' # so it could resolve AAMVADecoder depdendency4]
- Add the pod in your
Podfile.
Objective-C1pod 'AAMVADecoder'
- Now you can use install:
Objective-C1pod install
Note: If you already are using our repository, and cannot resolve some dependency, try to update the specifications:
Objective-C1pod repo-art update smartsdk
Manual
- In the project editor, select the target to which you want to add the
AAMVADecoder framework. - Click the General tab at the top of the project editor.
- Scroll down to the Embedded Binaries section.
- Click Add (+).
- Click Add Other below the list.
- Find
AAMVADecoder.frameworkfile and click Open.
Start using the AAMVADecoder
- Import the framework header to your view controller.
1#import <AAMVADecoder/AAMVADecoder.h>
- Initialize the
AAMVADecoderwith a string scanned from a barcode.
1NSString *AAMVAString = @"@\nANSI999999070001DL00310265DLDAQ291965255\n"2 @"DCSSAMPLE\nDDEU\nDACJOE\nDDFU\nDADNONE\nDDGU\nDCAC\n"3 @"DCBNONE\nDCDNONE\nDBD07242018\nDBB02031980\nDBA07242022\n"4 @"DBC1\nDAU073 IN\nDAYGRN\nDAG123 MAIN STREET\nDAIANYTOWN\n"5 @"DAJST\nDAK240660295\nDCF2048387841483\nDCGUSA\n"6 @"DCKPSS to Populate/Replace\nDDAF\nDDB07252013\nDAW175\nDDK1";7AAMVADecoder *decoder = [[AAMVADecoder alloc] initWithAAMVAString:AAMVAString];
- Now you can extract information from the initialized decoder with the AAMVADecoder methods.
AAMVADecoder initialization
AAMVADecoder must be initialized with the AAMVAString. After initialization, various information can be extracted from the decoder.
Objective-C1NSString *AAMVAString = [...]2AAMVADecoder *decoder = [[AAMVADecoder alloc] initWithAAMVAString:AAMVAString];
Common information
First name:
Objective-C1- (nonnull NSString*)firstName
Last name:
Objective-C1- (nonnull NSString*)lastName
Middle name
Objective-C1- (nullable NSString*)middleName
Sex (M, F, or U)
Objective-C1- (nonnull NSString*)sex
Country
Objective-C1- (nullable NSString*)country
Postal code. This may return a short or extended postal code.
Objective-C1- (nonnull NSString*)postalCode
Postal code short. This returns the short postal code.
Objective-C1- (nonnull NSString*)postalCodeShort
State (2-digit code). Use issuer property to determine issuing state.
Objective-C1- (nonnull NSString*)state
City
Objective-C1- (nonnull NSString*)city
Address line 1. Main Address (for example, 123 MAIN STREET)
Objective-C1- (nonnull NSString*)addressLine1
Address line 2. Secondary Address (such as APT 101), if applicable
Objective-C1- (nullable NSString*)addressLine2
Full address. Formatted full address (for example, 123 MAIN STREET, APT 1, SOMECITY, ST 55555)
Objective-C1- (nonnull NSString*)fullAddressWithOptions:(AAMVAAddressOptions)options
Parameter | Description |
|---|---|
| options | Flag that determines the address format. |
AAMVAAddressOptions |
ID Number. This number is also the driver's license number, if applicable.
Objective-C1- (nonnull NSString*)idNumber
Characteristics
Race
Objective-C1- (nullable NSString*)race
Eye color
Objective-C1- (nonnull NSString*)eyeColorWithFormat:(AAMVAColorFormat)format
Parameter | Description |
|---|---|
| format | Flag that determines the returned color format. |
| AAMVAColorFormat |
Hair color
Objective-C1- (nullable NSString*)hairColorWithFormat:(AAMVAColorFormat)format
Parameter | Description |
|---|---|
| format | Flag that determines the returned color format. |
| AAMVAColorFormat |
Weight
Objective-C1-(NSInteger)weightWithFormat:(AAMVAUnitFormat)format
Parameter | Description |
|---|---|
| format | Flag that determines the returned weight unit. |
| AAMVAUnitFormat |
Height
Objective-C1- (NSInteger)heightWithFormat:(AAMVAUnitFormat)format
Parameter | Description |
|---|---|
| format | Flag that determines the returned height unit. |
| AAMVAUnitFormat |
Height in feet and inches representation
Objective-C1- (AAMVAImperialHeight)heightImperialRepresentation
Date of birth
Objective-C1- (nonnull AAMVAModel_Date*)dateOfBirth
Date of birth as string
Objective-C1- (nonnull NSString*)dateOfBirthString2``` |34*Issuance date*56```objective-c7- (nonnull AAMVAModel_Date*)issueDate
Issuance date as string
Objective-C1- (nonnull NSString*)issueDateString2``` |34*Expiration date*56```objective-c7- (nonnull AAMVAModel_Date*)expirationDate
Expiration date as string
Objective-C1- (nonnull NSString*)expirationDateString2``` |34*Find field. Lookup a specific field with a given name.*56```objective-c7 - (nullable AAMVAModel_DataElement*)findField:(nullable NSString*)field
Parameter | Description |
|---|---|
| formatter | Field name. |
| NSString |
Meta information
Issuer. Usually the same state as residence (2-letters, for example: CA, AZ)
Objective-C1- (nullable NSString*)issuer
Country for encoding (for example, USA)
Objective-C1- (nullable NSString*)encodedCountry
Version (encoded version)
Objective-C1- (nullable NSString*)version
Document type (for example, DL, ID, BOTH)
Objective-C1- (nonnull NSString*)documentType
Data sources (list of detected field identifiers)
Objective-C1- (nullable NSString*)dataSources
status information
Class type. Document class type (for example: C, M)
Objective-C1- (nonnull NSString*)documentClassType
Driving restrictions (for example, glasses)
Objective-C1- (nonnull NSString*)documentClassType
Document discriminator
Objective-C1- (nonnull NSString*)documentDiscriminator
Endorsements
Objective-C1- (nullable NSString*)endorsements
Compliance type
Objective-C1- (nullable NSString*)complianceType
Organ donor status
Objective-C1- (BOOL)donor
Veteran status
Objective-C1- (BOOL)veteran
Enums
AAMVAColorFormat. Color format (for eyes and hair color methods)
Attribute | Description |
|---|---|
| AAMVAColorFormatNoConversion | Eye: GRN, Hair: BRN |
| AAMVAColorFormatAAMVAColor | Eye: GRN, Hair: BRN |
| AAMVAColorFormatColorText | Eye: Green, Hair: Brown |
| AAMVAColorFormatMaxColors | Eye: GRN, Hair: BRN |
AAMVAUnitFormat. Unit format (for weight and height methods)
Attribute | Description |
|---|---|
| AAMVAUnitFormatMetricCM | Height: 185 (cm), Weight: 79 (kilogram) |
| AAMVAUnitFormatMetric | Height: 1 (meter), Weight: 79 (kilograms) |
| AAMVAUnitFormatImperial | Height: 73 (inches), Weight: 175 (lbs/pounds) |
AAMVAAddressOptions. Address format options
Attribute | Description |
|---|---|
| AAMVAAddressOptionsNoPostalCode | No zipcode is included |
| AAMVAAddressOptionsPostalCodeShort | Short zipcode is appended (55555) |
| AAMVAAddressOptionsPostalCodeFull | Full zipcode is appended (55555 5555) |
UIExtensions
The BiometricSDK UIExtensions API is offered to developers who wish to use our default user interface for BiometricSDK framework within their mobile apps. It simplifies the implementation of features from our SDK by providing easy to use default UI and components that make it easier to create your own user interface for BiometricSDK challenges. In UIExtensions we provide default user interfaces for passive liveness, passive video and join the points challenges that provides the capability to check whether a real person is in front of the camera. Moreover UIExtensions includes a component that assists in obtaining high-quality fingerprint scans and enables the detection of whether the given fingers are genuine.
Pre-requisites
Skills required
The integration tasks shall be done by developers with knowledge of:
- Xcode 14.2
- Swift 5
- iOS (min version is 15.0)
Resources required
Integration should be performed on a Mac.
The tools required are:
- Xcode that support iOS 15 or later
- iOS device
External dependencies
UIExtensions are split into a few different components. Some of them might require an external dependency used for displaying vector animations. We use open source library named Lottie (https://github.com/airbnb/lottie-ios) for vector animations displayed in our default user interfaces. We recommend using cocoapods dependency manager (https://cocoapods.org/) to add this library to your project by adding pod 'lottie-ios', '~> 3.1' in your Podfile when you use components that require it.
Components
The BiometricSDK UIExtensions consist of few components that allow the use our the default user interface with BiometricSDK framework or simplify creating custom user interfaces for the BiometricSDK challenges. There are three main components that allow the execution of various face liveness challenges:
- BiometricSDKUIFaceModePassive,
- BiometricSDKUIFaceModePassiveVideo,
- BiometricSDKUIFaceModeHigh.
All these components provide the capability to check if a real person is in front of the camera. They can all successfully detect frauds, such as taking a picture of another picture with a face of another person.
There is also component for finger variant of BiometricSDK framework which is able to scan fingerprint images acquisition:
BiometricSDKUIFaceModePassive
BiometricSDKUIFaceModePassive is a group of subcomponents used for face capture with a simple-to-perform passive liveness checking challenge. In this challenge, the user is not required to perform any special actions and is only asked to hold the phone in front of their face. Currently there is only a single subcomponent in this group: BiometricSDKUIFaceModePassiveCore.
- BiometricSDKUIFaceModePassiveCore This is a core component used to implement passive liveness challenge. It contains a complete default user interface needed to perform this challenge. Dependencies: None
BiometricSDKUIFaceModePassive
BiometricSDKUIFaceModePassiveVideo is a group of subcomponents used for face capture with a simple video passive liveness challange. In this challange, user is asked to hold the phone in front of their face in a certain distance and position. The challange is to align their face so that it's image fits inside an oval overlay drawn on the screen. User is being informed in real time to move closer o further from the camera. While user's face is in the correct position capture progress presented on screen is advancing. Currently there is only a single subcomponent in this group: BiometricSDKUIFaceModePassiveVideoCore.
- BiometricSDKUIFaceModePassivVideoeCore This is a core component used to implement passive video liveness challenge. It contains a complete default user interface needed to perform this challenge. Dependencies: None
BiometricSDKUIFaceModeHigh
BiometricSDKUIFaceModeHigh is a group of subcomponents used for face capture with a join the points challenge that requires from the user to connect several random points visible on the screen be performing head movements in various directions depending on the position of displayed points. Subcomponents of this group are:
-
BiometricSDKUIFaceModeHighCore This is a core component used for implementing join the points challenge. It can be used separately to easily create a custom join the points user interface if you do not want to use our default join the points user interface. It is also used by our default user interface provided in BiometricSDKUIFaceModeHighJTP3 subcomponent so if you use that default interface then you also need to add this core subcomponent in your project. Dependencies: None
-
BiometricSDKUIFaceModeHighJTP3 This is a component which provides our default user interface for join the points challenge. Besides BiometricSDKUIFaceModeHighJTP3, there are older versions of default join the points user interfaces in BiometricSDKUIFaceModeHighJTP2 and BiometricSDKUIFaceModeHighJTP1 components, However, we recommend using the newest version, BiometricSDKUIFaceModeHighJTP3. Dependencies: BiometricSDKUIFaceModeHighCore, Lottie (https://github.com/airbnb/lottie-ios)
-
BiometricSDKUIFaceModeHighAnimations This is a component which provides additional, optional animations used by BiometricSDKUIFaceModeHighJTP3. These animations show a face rotating in different directions that might guide the user to pass the join the points challenge. If you do not want to use our face animations for join the points challenge then you do not have to add this subcomponent to your project. Dependencies: None
All challenges listed above with information on how to implement them and customize them in your application with our UIExtensions are described in more detail in further sections of this documentation.
BiometricSDKUIFinger
This framework is responsible for fingerprint images acquisition. It contains graphical components which help extract finger scans. The component has the ability to turn the distance indicator on and off. Moreover, it contains views that inform the user about the proper distance of the fingers from the camera, as well as the progress of the scan.
Framework integration
Note: For face liveness challenges BiometricSDKUIFaceMode* no additional frameworks are required to be integrated, BiometricSDK is enough. Below sections is only for fingerprint image acquisition (BiometricSDKUIFinger framework).
As an integrator you can choose one of two methods of adding UIExtensions to you project: Method 1: This is the recommended option and consists of using cocoapods dependency manager together with cocoapods-art plugin. The cocoapods-art plugin is needed because you must download libraries hosted on our artifactory. Method 2: consists of adding the UIExtensions to your project manually. As mentioned in the components section, UIExtensions are split into a few different components and subcomponents. The procedures for adding different components in your project are generally the same for each of them.
Configuring your project
To use UIExtensions you must add the Privacy - Camera Usage Description (NSCameraUsageDescriptionkey) to the Info.plist as the application will use the camera.
Using Cocoapods
UIExtensions integration with Cocoapods dependency manager (along with cocoapods-art plugin) is the recommended method for integration. Follow these below to integrate UIExtensions in your app:
-
Because standard cocoapods does not support any authentication mechanisms, to use CocoaPods with Artifactory you will must install the 'cocoapods-art' plugin. To install cocoapods-art run the following command:
Language not specified1gem install cocoapods-art -
The plugin uses authentication as specified in standard .netrc file. If you do not have a .netrc file you must create it in your home directory (in terminal you can do this with
cd ~andtouch .netrccommands) and add the following lines with your Artifactory credentials in this file:Language not specified1machine mi-artifactory.otlabs.fr2login ##USERNAME##3password ##PASSWORD## -
Once set, add our Artifactory repository to your cocoapods dependency management system by executing following command:
Language not specified1pod repo-art add smartsdk "https://mi-artifactory.otlabs.fr/artifactory/api/pods/smartsdk-ios-local" -
At the top of your project
Podfileadd the following lines which will allow you to use pods from our Artifactory:Language not specified1plugin 'cocoapods-art', :sources => [2 'master', 'smartsdk'3] -
Add chosen UIExtensions components in your
Podfile. Below are examples of what you might want to add, depending on your needs:
- To integrate the UI for fingerprint scanning:
Language not specified1pod 'BiometricSDKUIFinger' # Installs fingerprint UIExtension
-
Install specified pods as usual from the terminal:
Language not specified1pod install
NOTE: If you already use our repository, and you cannot resolve some dependency, try to update the specifications with the following command:
Language not specified1pod repo-art update smartsdk
Manual integration
Instead of using cocoapods dependency manager, it is also possible to integrate UIExtensions manually. However, note that if you choose to integrate the framework manually you cannot update to the new framework version as easily as can be done with cocoapods. You will have to integrate every subcomponent separately (such as core subcomponent, animation subcomponent).
To manually integrate:
- Download the chosen artifact manually (such as BiometricSDKUIFinger framework) from Artifactory and unpack its contents to get the iOS framework.
- In the project editor, select the target to which you want to add to the framework.
- Click the General tab at the top of the project editor.
- In the Frameworks, Libraries and Embedded Content section, click Add (+),
- Click Add Other below the list to add a file,
- Find the downloaded framework file and click Open,
- Repeat the above steps for all frameworks that you want to add.
Passive liveness
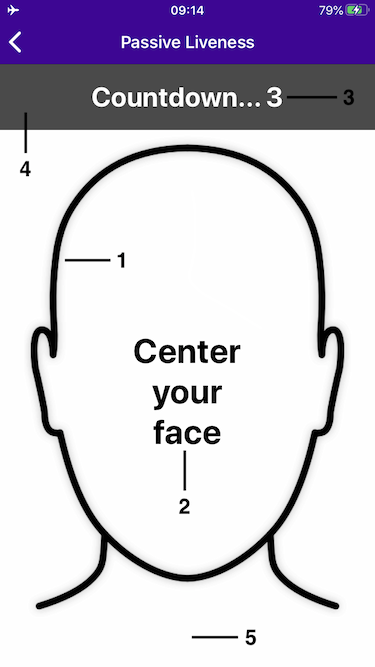
The passive liveness challenge checks whether a real person is using a picture to identify themselves instead of a selfie. This challenge does not require any special actions to be taken by the user and our algorithms will detect frauds, such as taking a picture of another picture, without any special interaction needed from the user. During the passive liveness challenge, a person need only keep their phone in front of themselves so it is very easy to perform.
Implementation
UIExtensions provides a default view class named PassiveLivenessCaptureView that is recommended to use to add passive liveness challenge to your application. This view displays a default UI for this challenge and you must create a capture view variable in your view controller. Then use this variable to start capture view at the start of the main view and stop at the end of the main view. The example is ready to use and commented; you can just copy to your project.
Swift1import UIKit2import BiometricSDK34class PassiveViewController: UIViewController, FaceCaptureHandlerDelegate {56 @IBOutlet weak var captureView: PassiveLivenessCaptureView!78 var captureHandler: FaceCaptureHandler?910 override func viewDidLoad() {11 super.viewDidLoad()1213 title = "Passive Liveness"1415 // optionally you can adjust visual appearance by using appearance proxy as below1617 // PassiveLivenessHintsView.appearance().hintsColor = .blue18 // PassiveLivenessHintsView.appearance().hintsDetailsColor = .red19 // PassiveLivenessHintsView.appearance().imageTintColor = .green20 // PassiveLivenessHintsView.appearance().hintsBackgroundColor = .gray21 // PassiveLivenessHintsView.appearance().faceImage = UIImage(named: "your_custom_face_outline")22 // CaptureInfoView.appearance().backgroundColor = .red23 // CaptureInfoView.appearance().counterColor = .green24 // BlurOverlayView.appearance().blurEffectStrongness = 0.425 // BlurOverlayView.appearance().blurColor = UIColor.white.withAlphaComponent(0.3)26 }2728 override public func viewWillAppear(_ animated: Bool) {29 super.viewWillAppear(animated)3031 // STEP 1. In viewWillAppear we should allocate resources, ie. camera32 captureView.start()33 createCaptureHandler()34 }3536 override public func viewDidDisappear(_ animated: Bool) {37 super.viewDidDisappear(animated)3839 // STEP 10. In viewDidDisappear we should release resources40 captureView.stop()41 captureHandler?.destroy()42 captureHandler = nil43 }4445 func createCaptureHandler() {46 // STEP 2. Choose mode you're willing to use and other options47 // (all options are described in the documentation)48 let options = FaceCaptureOptions(livenessMode: .passive)49 options.captureTimeout = TimeInterval(20)5051 // STEP 3. Create a capture handler52 BIOSDK.createFaceCaptureHandler(with: options) { [weak self] (captureHandler, error) in53 guard let self = self, error == nil, let captureHandler = captureHandler else {54 print("Cannot create handler, error: \(error?.localizedDescription ?? "-")")55 return56 }5758 // STEP 4. Set created capture handler59 self.captureHandler = captureHandler60 // STEP 5. Set the delegate61 self.captureHandler?.delegate = self62 // STEP 6. Set the preview63 self.captureHandler?.preview = self.captureView.previewView64 // STEP 7A. Pass information needed before starting the capture to UIExtension.65 self.captureView.handleCapturePrepared(timeToUnlockHandler: { [weak self] () -> (Int) in66 // STEP 7B. Pass information about unlock time in case capture is locked.67 return self.?.captureHandler?.timeToUnlock ?? 068 }, completionHandler: { [weak self] in69 //STEP 7C. Start capturing after UIExtension finished it's work70 self?.captureHandler?.startCapture()71 }}72 }73 }7475 // MARK: - FaceCaptureHandlerDelegate7677 // STEP 8. During capturing you'll receive capturing info, they're hints for a user to improve78 // or make it even possible to finish the face acquisition. You can simply pass it to UIExtension79 // to handle it in a default way or you can do some additional stuff with it depending on your needs.80 func receiveBioCaptureInfo(_ info: BIOCapturingInfo, withError error: Error?) {81 captureView.handleCaptureInfo(info: info, challengeInfo: challengeInfo, error: error)82 }8384 // STEP 9. When capturing is done, this callback returns detected face as BIOFaceImage. You can85 // pass this information to UIExtension to handle it in a default way (such as display some additional86 // animation after finish etc.) and after that do some additional stuff with it depending on your needs.87 func captureFinished(with images: [BIOFaceImage]?, with biometrics: BIOBiometrics?, withError error: Error?) {88 captureHandler?.preview = nil //Stop updating preview after capture is finished.89 captureView.handleCaptureFinished(images: images, biometrics: biometrics, error: error) { [weak self] in90 // For a face capture only one image is returned91 let image = images?.first92 let success = image != nil && image!.livenessStatus == .live && error == nil9394 // Do something we the final result here, for example convert BIOFaceImage to UIImage and95 // pass it to a next view controller in your application that can display it96 let uiImage = success ? UIImage(from: image!) : nil97 // show a next view controller that displays captured UIImage here98 }99 }100}
After copying the preceding PassiveViewController class to your project, you can push it on your navigation view controller. You receive a working passive liveness challenge with our default UI. As described in the comments in the code above, you can use customization options to adjust the look of our default UI, as explained in more detail in the Customization section.
If you prefer to use our default implementation with minor appearance customization, you can skip to the next section: Customization. If you prefer to create a custom implementation, use the default PassiveLivenessCaptureView class from UI extensions. In addition, you can use only some views — also used in our PassiveLivenessViewController class — from the BiometricSDK framework. By using those views, you can implement the challenge yourself by using those views on your storyboard directly and handling all the presentation logic on your own.
Views that we provide for our passive liveness challenge, which you can use if you want to make your own custom implementation, are listed below:
PassiveLivenessHintsView- This view displays the overlay with hints to the user. In your custom implementation you will typically place it on top of the view on which you display the image from the camera.CaptureInfoView- This view is used for displaying feedback and a timer which in our default implementation is visible on top of the screen.BlurOverlayView- This view can be used for blurring the image from the camera. Typically you will place it between the view on which you display the image from the camera and the view that is displaying hints for the user.
For more information about the views and methods listed, see our UIExtensions API Reference.
Customization
The default UI provided by UIExtensions can be customized. Following, you can see the elements that can be customized and code that customize them in your application. The system appearance proxy mechanism is used to control the look of all visible elements.
-
Face outline image color:
Swift1PassiveLivenessHintsView.appearance().imageTintColor = .greenFace outline custom image:
Swift1PassiveLivenessHintsView.appearance().faceImage = UIImage(named: "your_custom_face_outline") -
Hint text color:
Swift1PassiveLivenessHintsView.appearance().hintsColor = .blue -
Countdown and capture feedbacks text color:
Swift1CaptureInfoView.appearance().counterColor = .green -
Countdown and capture feedbacks view background color:
Swift1CaptureInfoView.appearance().backgroundColor = .red -
Camera blur strength:
Swift1BlurOverlayView.appearance().blurEffectStrongness = 0.4Camera blur tint color:
Swift1BlurOverlayView.appearance().blurColor = UIColor.white.withAlphaComponent(0.3) -
Hint image color:
Swift1PassiveLivenessHintsView.appearance().imageTintColor = .green -
Hint text color:
Swift1PassiveLivenessHintsView.appearance().hintsColor = .blueHint details text color visible if hint details are available:
Swift1PassiveLivenessHintsView.appearance().hintsDetailsColor = .red -
Hints background color:
Swift1PassiveLivenessHintsView.appearance().hintsBackgroundColor = .gray
We recommend placing above code snippets in your viewDidLoad method implementation as visible in the example from the implementation section above.
Translations
UIExtensions allows you to change all the text visible on the screen by using the standard system localization mechanism. We provide a default English translation in our UIExtensions and you can change or localize them for languages you need to support in your application. To change the text you must create a Localizable.strings file in your project. If you are not using it already, go to: Xcode, menu File -> New -> File -> Strings File, and create a new Localizable.strings file. Then enable localization on that file (in File Inspector on the right panel in Xcode, click Localize in the Localization section for the created file). In the strings file, you can place the localized texts for given keys as usual. Following is a list of all supported keys with their default English translation provided in our UIExtension in the Passive Liveness challenge. If you need to translate them to another language, copy the content listed to your strings file and edit the values for the provided keys.
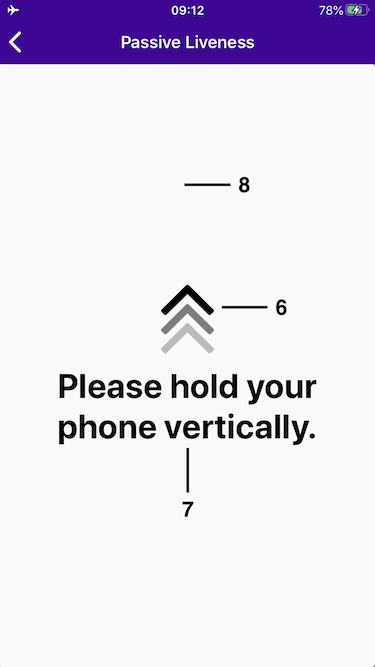
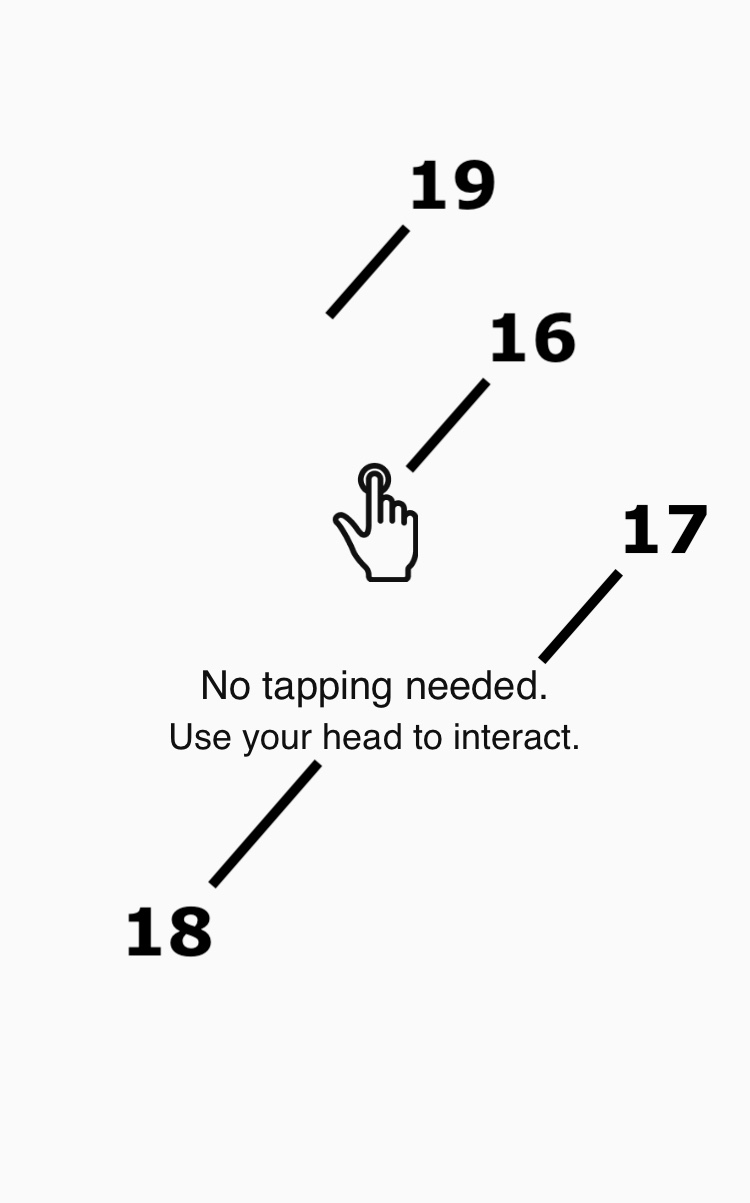
Swift1"com.idemia.smartsdk.UIExtensions.passive.info.noTappingNeeded" = "No tapping needed.";2"com.idemia.smartsdk.UIExtensions.passive.info.useHead" = "Use your head to interact.";3"com.idemia.smartsdk.UIExtensions.passive.info.centerYourFace" = "Center\nyour\nface";4"com.idemia.smartsdk.UIExtensions.passive.info.centerYourFaceInCameraView" = "Center your face in camera view";5"com.idemia.smartsdk.UIExtensions.passive.info.holdPhoneVertically" = "Please hold your phone vertically.";6"com.idemia.smartsdk.UIExtensions.passive.info.faceInGoodPosition" = "Face is in good position";7"com.idemia.smartsdk.UIExtensions.passive.info.standStill" = "Stand still for a moment";8"com.idemia.smartsdk.UIExtensions.passive.info.dontMoveYourPhone" = "Don't move your phone";9"com.idemia.smartsdk.UIExtensions.passive.info.headMovingTooFast" = "Moving too fast";10"com.idemia.smartsdk.UIExtensions.passive.info.comeBackInCameraField" = "Come back in the camera field";11"com.idemia.smartsdk.UIExtensions.passive.info.moveForwards" = "Move your face forward";12"com.idemia.smartsdk.UIExtensions.passive.info.moveBackwards" = "Move your face backward";13"com.idemia.smartsdk.UIExtensions.passive.info.pleaseWaitForTime" = "Please wait for:\n{time}";14"com.idemia.smartsdk.UIExtensions.passive.info.countdownWithSeconds" = "Countdown... {seconds}";15"com.idemia.smartsdk.UIExtensions.passive.info.capturingStayStill" = "Capturing... stay still";
Note: Some strings in our translations, for example Countdown... {seconds}, contain a placeholder {variable} to display some data inside translated strings. These should be kept in the original, untranslated form in case you translate them to another language.
Passive Video Liveness
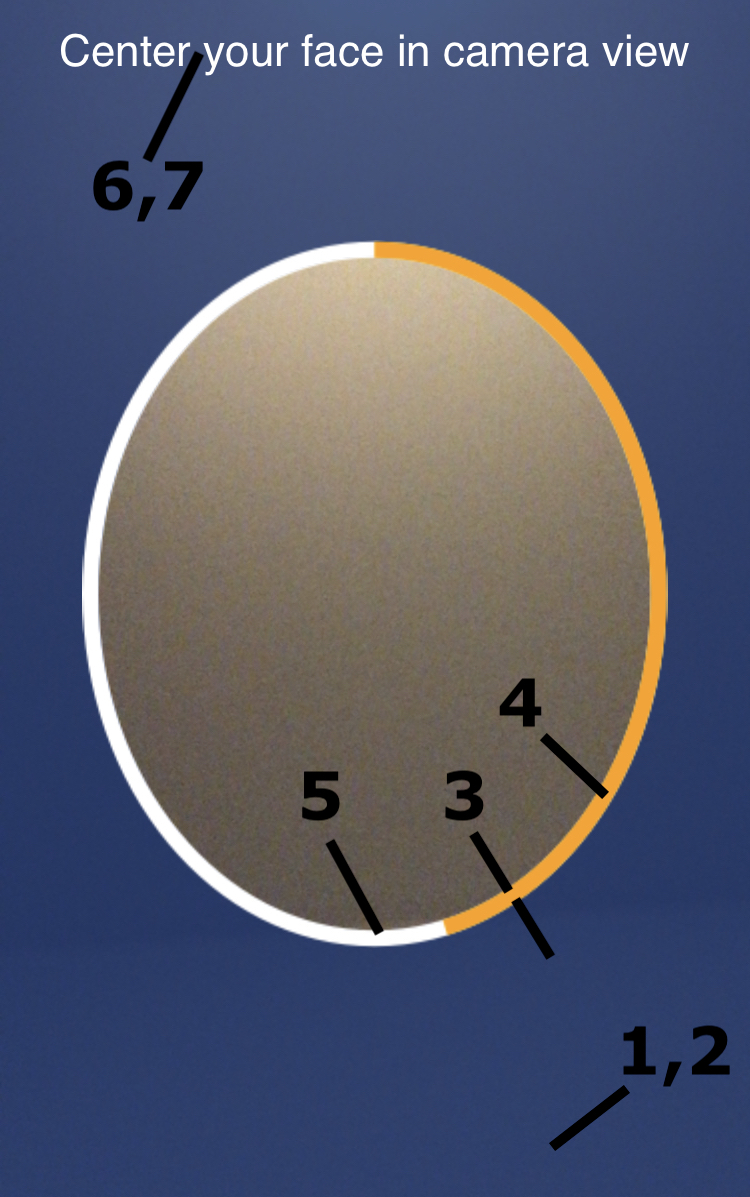
The passive video liveness challenge checks whether a real person is using a picture to identify themselves instead of a selfie. This challange requires user to perform a simple challange such as allignig his face within the oval presented on screen. User is being informed in real time if his face is too far or to close to the camera. While aligned correctly a progress wheel is displayed and a short video of user's face is being recorded. This video is analysed by our algorithms to detect frauds. This challange is only slightly more demanding than the one in the passive liveness mode but it is really quick and simple to succeed.
Implementation
UIExtensions provides a default view class named PassiveVideoLivenessCaptureView that is recommended to use to add passive liveness challenge to your application. This view displays a default UI for this challenge and you must create a capture view variable in your view controller. Then use this variable to start capture view at the start of the main view and stop at the end of the main view. The example is ready to use and commented; you can just copy to your project.
Swift1import BiometricSDK23class PassiveVideoViewController: UIViewController, FaceCaptureHandlerDelegate, BIOPassiveVideoProtocol {4 override public func viewWillAppear(_ animated: Bool) {5 super.viewWillAppear(animated)67 // STEP 1. In viewWillAppear we should allocate resources, ie. camera8 captureView.start()9 createCaptureHandler()10 }1112 override public func viewDidDisappear(_ animated: Bool) {13 super.viewDidDisappear(animated)1415 // STEP 10. In viewDidDisappear we should release resources16 captureView.stop()17 captureHandler?.destroy()18 captureHandler = nil19 }2021 func createCaptureHandler() {22 // STEP 2. Choose mode you're willing to use and other options (all options are described in the documentation)23 let options = FaceCaptureOptions(livenessMode: .passiveVideo)24 options.captureTimeout = TimeInterval(20)2526 // STEP 3. Create a capture handler27 BIOSDK.createFaceCaptureHandler(with: options) { [weak self] (captureHandler, error) in28 guard let self = self, error == nil, let captureHandler = captureHandler else {29 print("Cannot create handler, error: \(error?.localizedDescription ?? "-")")30 return31 }3233 // STEP 4. Set created capture handler34 self.captureHandler = captureHandler35 // STEP 5. Set the delegate36 self.captureHandler?.delegate = self37 // STEP 6. Set the preview38 self.captureHandler?.preview = self.captureView.previewView39 // STEP 7A. Pass information needed before starting the capture to UIExtension.40 self.captureView.handleCapturePrepared(timeToUnlockHandler: { [weak self] () -> (Int) in41 // STEP 7B. Pass information about unlock time in case capture is locked42 return self?.captureHandler?.timeToUnlock ?? 043 }, completionHandler: { [weak self] in44 // STEP 7C. Start capturing after UIExtension finished it's work45 self?.captureHandler?.startCapture()46 })47 }48 }4950 // MARK: - FaceCaptureHandlerDelegate5152 // STEP 8. During capturing you'll receive capturing info, they're hints for a user to improve or make it even possible to finish the face acquisition. You can simply pass it to UIExtension to handle it in a default way or you can do some additional stuff with it depending on your needs.53 func receiveBioCaptureInfo(_ info: BIOCapturingInfo, withError error: Error?) {54 captureView.handleCaptureInfo(info: info, error: error)55 }5657 // STEP 9. When capturing is done, this callback returns detected face as BIOFaceImage. You can pass this information to UIExtension to handle it in a default way (such as display some additional animation after finish etc.) and after that do some additional stuff with it depending on your needs.58 func captureFinished(with images: [BIOFaceImage]?, with biometrics: BIOBiometrics?, withError error: Error?) {59 captureHandler?.preview = nil // Stop updating preview after capture is finished60 captureView.handleCaptureFinished(images: images, biometrics: biometrics, error: error) { [weak self] in61 // For a face capture only one image is returned62 let image = images?.first63 let success = image != nil && error == nil // && image!.livenessStatus == .live6465 let vc = ResultViewController()66 vc.success = success67 vc.image = success ? UIImage(from: image!) : UIImage(named: "invalid")68 self?.navigationController?.pushViewController(vc, animated: true)69 }70 }7172 // MARK: - BIOPassiveVideoProtocol7374 func passiveVideoPreparationDidStart() {75 captureView.handlePreparationStarted()76 }7778 func passiveVideoOverlayDidUpdate(_ overlaySize: CGSize, andPosition position: CGPoint, orError error: Error) {79 captureView.handleOverlayDidUpdate(overlaySize, andPosition: position)80 }8182 func passiveVideoProgressDidUpdate(_ progress: CGFloat, orError error: Error) {83 captureView.handleProgress(progress)84 }8586 func passiveVideoPreparationDidEnd() {87 captureView.handlePreparationEnded()88 }89}
After copying the preceding PassiveVideoViewController class to your project, you can push it on your navigation view controller. You receive a working passive liveness challenge with our default UI. As described in the comments in the code above, you can use customization options to adjust the look of our default UI, as explained in more detail in the Customization section.
If you prefer to use our default implementation with minor appearance customization, you can skip to the next section: Customization. If you prefer to create a custom implementation, use the default PassiveVideoLivenessCaptureView class from UI extensions. In addition, you can use only some views — also used in our PassiveVideoLivenessViewController class — from the BiometricSDK framework. By using those views, you can implement the challenge yourself by using those views on your storyboard directly and handling all the presentation logic on your own.
Views that we provide for our passive liveness challenge, which you can use if you want to make your own custom implementation, are listed below:
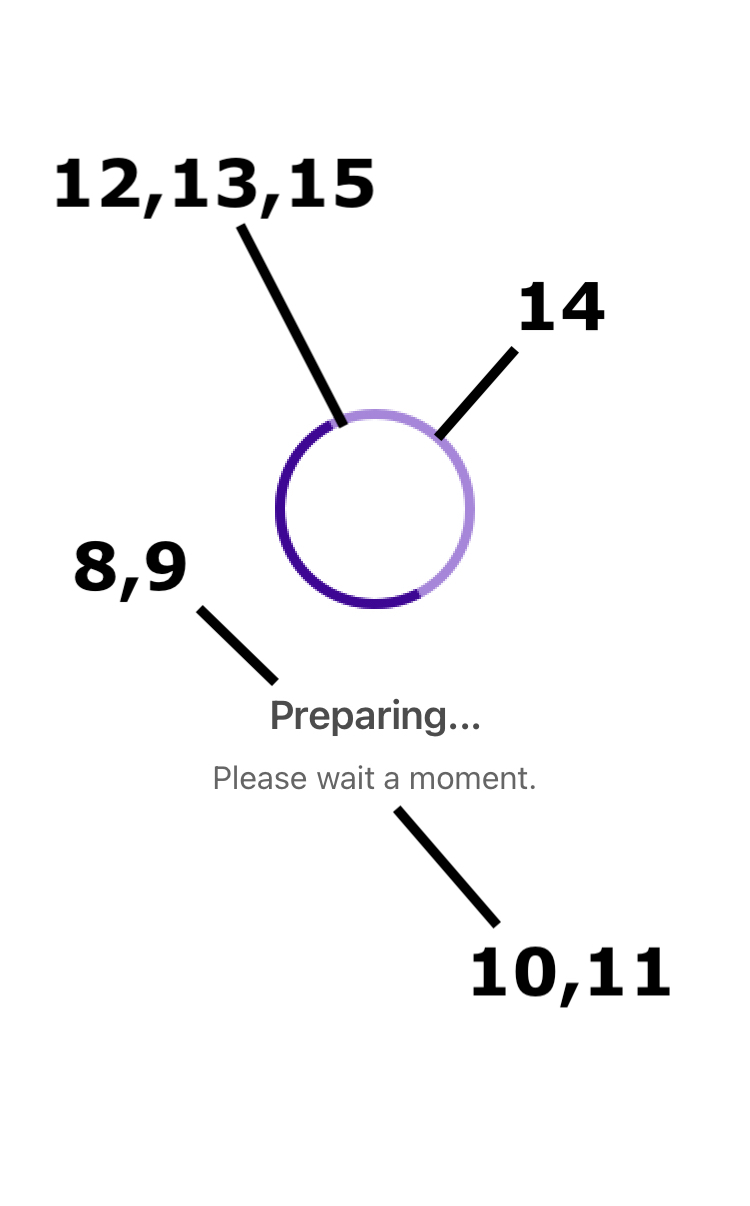
PassiveVideoLivenessHintsView- This view displays the overlay with hints to the user. In your custom implementation you will typically place it on top of the view on which you display the image from the camera.PassiveVideoLoadingView- This view is used for displaying screen with progress indicator while capture is being prepared. Colors and indicator's element widths can be customized.LoadingIndicatorView- This view can be used for showing custom spinning indicator. Can be typically used on screens when it is required for user to wait.FaceOvalImageView- This view can be used to present a result image of a succesfull capture.
For more information about the views and methods listed, see our UIExtensions API Reference.
Customization
The default UI provided by UIExtensions can be customized. Following, you can see the elements that can be customized and code that customize them in your application. The system appearance proxy mechanism is used to control the look of all visible elements.
-
Face overlay background color:
Swift1PassiveVideoLivenessCaptureView.appearance().overlayColor = .blue -
Face overlay opacity:
Swift1PassiveVideoLivenessCaptureView.appearance().overlayOpacity = 0.5 -
Face overlay line width:
Swift1PassiveVideoLivenessCaptureView.appearance().progressLineWidth = 12 -
Face overlay progress line color:
Swift1PassiveVideoLivenessCaptureView.appearance().progressColor = .blue -
Face overlay progress line background color:
Swift1PassiveVideoLivenessCaptureView.appearance().progressBackgroundColor = .blue -
Feedback text color:
Swift1PassiveVideoLivenessCaptureView.appearance().feedbackTextColor = .green -
Feedback text font:
Swift1PassiveVideoLivenessCaptureView.appearance().feedbackFont = UIFont.systemFont(ofSize: 22)
Capture preparation screen
-
Capture preparation screen - title font:
Swift1PassiveVideoLoadingView.appearance().titleFont = UIFont.systemFont(ofSize: 18, weight: .bold) -
Capture preparation screen - title color:
Swift1PassiveVideoLoadingView.appearance().titleColor = .blue -
Capture preparation screen - subtitle font:
Swift1PassiveVideoLoadingView.appearance().subTitleFont = UIFont.systemFont(ofSize: 14, weight: .regular)
- Capture preparation screen - subtitle color:
Swift1PassiveVideoLoadingView.appearance().subTitleColor = .blue
Loading circle indicator
- Loading indicator - progress value:
Swift1LoadingIndicatorView.appearance().progressValue = 0.7
- Loading indicator - progress color:
Swift1LoadingIndicatorView.appearance().progressColor = .yellow
- Loading indicator - progress background color:
Swift1LoadingIndicatorView.appearance().progressBackgroundColor = .yellow
-
Loading indicator - progress line width:
Swift1LoadingIndicatorView.appearance().progressWidth = 10.0
Hints screen
- Hint image color:
Swift1PassiveVideoLivenessHintsView.appearance().imageTintColor = .yellow
- Hint text color:
Swift1PassiveVideoLivenessHintsView.appearance().hintsColor = .yellow
- Hint details text color visible if hint details are available:
Swift1PassiveVideoLivenessHintsView.appearance().hintsDetailsColor = .yellow
- Hints background color:
Swift1PassiveVideoLivenessHintsView.appearance().hintsBackgroundColor = .yellow
We recommend placing these code snippets in your viewDidLoad method implementation as visible in the example from the implementation section above.
Translations
UIExtensions allows you to change all the text visible on the screen by using standard system localization mechanism. We provide default English translation in our UIExtensions and you can change them or localize them for languages that you need to support in your application. To change the text you must create a Localizable.strings file in your project if you are not using it already (in Xcode, go to menu File -> New -> File -> Strings File and create a new Localizable.strings file) and enable localization on that file (in File Inspector on the right panel in Xcode, click Localize in the Localization section for the created file). In that strings file you can put localized text for given keys as usual. Following is a list of all supported keys with their default English translation provided in our UIExtension in the Passive Video Liveness challenge. If you need to translate them to another language, copy the content listed to your strings file and edit the values for provided keys.
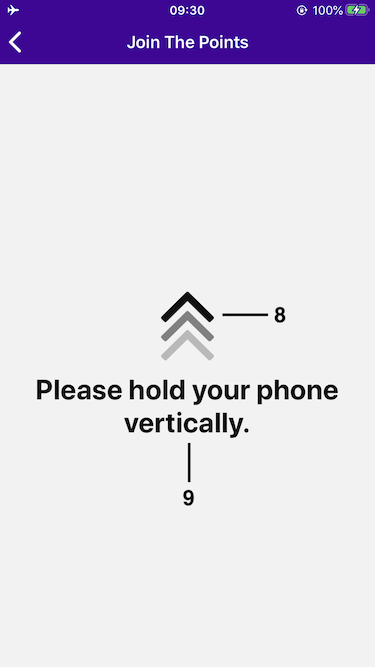
Swift1"com.idemia.smartsdk.UIExtensions.passiveVideo.preparation.title" = "Preparing...";2"com.idemia.smartsdk.UIExtensions.passiveVideo.preparation.subTitle" = "Please wait a moment.";3"com.idemia.smartsdk.UIExtensions.passiveVideo.info.noTappingNeeded" = "No tapping needed.";4"com.idemia.smartsdk.UIExtensions.passiveVideo.info.useHead" = "Use your head to interact.";5"com.idemia.smartsdk.UIExtensions.passiveVideo.info.positionFaceWithinOval" = "Position your face \nwithin the oval";6"com.idemia.smartsdk.UIExtensions.passiveVideo.info.holdPhoneVertically" = "Please hold your phone vertically.";7"com.idemia.smartsdk.UIExtensions.passiveVideo.info.stayWithinOval" = "Great!\nStay within the oval";8"com.idemia.smartsdk.UIExtensions.passiveVideo.info.dontMoveYourPhone" = "Don't move your phone";9"com.idemia.smartsdk.UIExtensions.passiveVideo.info.headMovingTooFast" = "Moving too fast";10"com.idemia.smartsdk.UIExtensions.passiveVideo.info.pleaseWaitForTime" = "Please wait for:\n{time}";11"com.idemia.smartsdk.UIExtensions.passiveVideo.info.moveForwards" = "Move closer";12"com.idemia.smartsdk.UIExtensions.passiveVideo.info.moveBackwards" = "Move further";13"com.idemia.smartsdk.UIExtensions.passiveVideo.info.scanningStayWithinOval" = "Scanning...\nStay within the oval";
Note: Some strings in our translations, for example Countdown... {seconds}, contain a placeholder {variable} to display some data inside translated strings which should be kept in original, untranslated form in case you translate them to another language.
Active mode liveness
Active mode liveness challenge provides the capability to check whether a real person is taking a picture of himself. This challenge requires from the user to perform a small task. In high mode liveness, the SDK generates random points on the screen called target points. the user needs to keep the phone in front of them and is asked to turn their head in random directions according to points positions on the screen. The SDK will track the user's head position and check if they properly moved it in order to connect target points. Based on the user's interaction, the algorithms will detect if the person engaging in the challenge is a real person. It will detect frauds, such as using a fake picture to pass the challenge.
Implementation
UIExtensions provides a default view controller class named JoinThePoints3ViewController that is recommended to use to add high mode liveness challenge to your application. This view controller displays a default UI for this challenge and you need only pass the data received from our SDK to this view controller to make it work. The recommended method is to make your own subclass of our JoinThePoints3ViewController, create a capture handler, and implement the SDK delegate methods in it. Below is a ready-to-use and detailed view controller implementation that connects our SDK with high mode liveness UIExtension, which can be copied directly into your project.
Swift1import UIKit2import BiometricSDK34class JTPViewController: UIViewController, FaceCaptureHandlerDelegate {56 @IBOutlet weak var captureView: JoinThePoints3CaptureView!78 var captureHandler: FaceCaptureHandler?910 override func viewDidLoad() {11 super.viewDidLoad()1213 title = "Join The Points"1415 // optionally you can adjust visual appearance by using appearance proxy as below1617 // JoinThePoints3HintsView.appearance().hintsColor = .blue18 // JoinThePoints3HintsView.appearance().hintsDetailsColor = .red19 // JoinThePoints3HintsView.appearance().imageTintColor = .green20 // JoinThePoints3HintBubbleView.appearance().textColor = .green21 // JoinThePoints3HintBubbleView.appearance().font = UIFont.boldSystemFont(ofSize: 20)22 // JoinThePoints3HintBubbleView.appearance().bubbleColor = .blue23 // JoinThePoints3HintBubbleView.appearance().shadowOpacity = 0.824 // JoinThePoints3HintBubbleView.appearance().shadowRadius = 2025 // JoinThePoints3HintBubbleView.appearance().shadowOffset = CGSize(width: 10, height: 10)26 // JoinThePoints3HintBubbleView.appearance().shadowColor = .blue27 // JoinThePoints3StartPointView.appearance().fillColor = .blue28 // JoinThePoints3StartPointView.appearance().strokeColor = .green29 // JoinThePoints3StartPointView.appearance().pointSize = CGSize(width: 60, height: 60)30 // JoinThePoints3LinkView.appearance().dotRadius = 1031 // JoinThePoints3LinkView.appearance().dotMaxRadius = 3032 // JoinThePoints3LinkView.appearance().dotDistance = 1433 // JoinThePoints3LinkView.appearance().dottedLineFillColor = .blue34 // JoinThePoints3LinkView.appearance().dottedLineStrokeColor = .green35 // JoinThePoints3LinkView.appearance().dottedLineStrokeWidth = 536 // JoinThePoints3TargetView.appearance().fillColor = .blue37 // JoinThePoints3TargetView.appearance().progressColor = .green38 // JoinThePoints3TargetView.appearance().textColor = .red39 // JoinThePoints3TargetView.appearance().successBackgroundColor = .brown40 // JoinThePoints3TargetView.appearance().failureBackgroundColor = .orange41 // JoinThePoints3TargetView.appearance().successImage = UIImage(named: "your_custom_success_image")42 // JoinThePoints3TargetView.appearance().failureImage = UIImage(named: "your_custom_failure_image")43 // BlurOverlayView.appearance().blurEffectStrongness = 0.544 // BlurOverlayView.appearance().blurColor = UIColor.white.withAlphaComponent(0.3)4546 // optionally you can also set custom rotating face animation as below47 // (use names of animated png or animated gif files in your main bundle48 // or in assets catalog added as a data asset)4950 // JoinThePoints3FaceAnimationView.appearance().upLeftAnimationName = "rotating_face_up_left"51 // JoinThePoints3FaceAnimationView.appearance().upRightAnimationName = "rotating_face_up_right"52 // JoinThePoints3FaceAnimationView.appearance().upFrontAnimationName = "rotating_face_up_front"53 // JoinThePoints3FaceAnimationView.appearance().downLeftAnimationName = "rotating_face_down_left"54 // JoinThePoints3FaceAnimationView.appearance().downRightAnimationName = "rotating_face_down_right"55 // JoinThePoints3FaceAnimationView.appearance().downFrontAnimationName = "rotating_face_down_front"56 // JoinThePoints3FaceAnimationView.appearance().sideLeftAnimationName = "rotating_face_side_left"57 // JoinThePoints3FaceAnimationView.appearance().sideRightAnimationName = "rotating_face_side_right"58 }5960 override public func viewWillAppear(_ animated: Bool) {61 super.viewWillAppear(animated)6263 // STEP 1. In viewWillAppear we should allocate resources, ie. camera64 captureView.start()65 createCaptureHandler()66 }6768 override public func viewDidDisappear(_ animated: Bool) {69 super.viewDidDisappear(animated)7071 // STEP 10. In viewDidDisappear we should release resources72 captureView.stop()73 captureHandler?.destroy()74 captureHandler = nil75 }7677 func createCaptureHandler() {78 // STEP 2. Choose mode you're willing to use and other options (all options are described in the documentation)79 let options = FaceCaptureOptions(livenessMode: .active)80 options.cr2dMode = BIOCr2dMode.path(withNumberOfTargets: 3)81 options.captureTimeout = TimeInterval(20)8283 // STEP 3. Create a capture handler84 BIOSDK.createFaceCaptureHandler(with: options) { [weak self] (captureHandler, error) in85 guard let self = self, error == nil, let captureHandler = captureHandler else {86 print("Cannot create handler, error: \(error?.localizedDescription ?? "-")")87 return88 }8990 // STEP 4. Set created capture handler91 self.captureHandler = captureHandler92 // STEP 5. Set the delegate93 self.captureHandler?.delegate = self94 // STEP 6. Set the preview95 self.captureHandler?.preview = self.captureView.previewView96 // STEP 7A. Pass information needed before starting the capture to UIExtension.97 self.captureView.handleCapturePrepared(timeToUnlockHandler: { [weak self] () -> (Int) in98 // STEP 7B. Pass information about unlock time in case capture is locked99 return self?.captureHandler?.timeToUnlock ?? 0100 }, completionHandler: { [weak self] in101 // STEP 7C. Start capturing after UIExtension finished it's work102 self?.captureHandler?.startCapture()103 })104 }105 }106107 // MARK: - FaceCaptureHandlerDelegate108109 // STEP 8A. During capturing you'll receive capturing info, they're hints for a user to improve110 // or make it even possible to finish the face acquisition. You can simply pass it to UIExtension111 // to handle it in a default way or you can do some additional stuff with it depending on your needs.112 func receiveBioCaptureInfo(_ info: BIOCapturingInfo, withError error: Error?) {113 captureView.handleCaptureInfo(info: info, error: error)114 }115116 // STEP 8B. During capturing you'll receive target info, they're are informations about points117 // which should be joined with the movements of your head. You pass them to UIExtension to handle118 // it in a default way.119 func receive(_ target: BIOCr2DTargetInfo?, at index: UInt, outOf numberOfTargets: UInt, withError error: Error?) {120 captureView.handleTargetInfo(target: target, index: index, numberOfTargets: numberOfTargets, error: error)121 }122123 // STEP 8C. During capturing you'll receive challenge info with pointer position, that is, with124 // the point position where a user is currently pointing with his head. You pass that to UIExtension125 // to handle it in a default way.126 func receive(_ challengeInfo: BIOCr2DChallengeInfo?, withError error: Error?) {127 captureView.handleChallengeInfo(challengeInfo: challengeInfo, error: error)128 }129130 // STEP 9. When capturing is done, this callback returns detected face as BIOFaceImage. You can131 // pass this information to UIExtension to handle it in a default way (such as display some additional132 // animation after finish etc.) and after that do some additional stuff with it depending on your needs.133 func captureFinished(with images: [BIOFaceImage]?, with biometrics: BIOBiometrics?, withError error: Error?) {134 captureHandler?.preview = nil // Stop updating preview after capture is finished135 captureView.handleCaptureFinished(images: images, biometrics: biometrics, error: error) { [weak self] in136 // For a face capture only one image is returned137 let image = images?.first138 let success = image != nil && image!.livenessStatus == .live && error == nil139140 // Do something we the final result here, for example convert BIOFaceImage to UIImage and141 // pass it to a next view controller in your application that can display it142 let uiImage = success ? UIImage(from: image!) : nil143 // show a next view controller that displays captured UIImage here144 }145 }146}
After copying above JTPViewController class to your project you can just push it on your navigation view controller and you will have a working high mode liveness challenge with our default UI. As in the comments in the code above, you can use customization options to adjust the look of our UI, which is explained in the Customization section.
If you simply want to use our default implementation with maybe only some additional minor customization of its appearance then you can skip to the next section of this documentation, Customization. However, if you want to create a custom implementation instead of using default JoinThePoints3CaptureView class from UI extensions you can also use only some views, which are used by our JoinThePoints3ViewController class, from BiometricSDK framework. You can implement the challenge yourself by using those views on your storyboard directly and handling all the presentation logic.
Views for our high mode liveness challenge to make your own custom implementation are listed:
JoinThePoints3FaceAnimationView- This view displays the animated face that moves in various directions. In your custom implementation, place it on top of the view that displays the image from the camera.JoinThePoints3HintsView- This view displays the overlay that presents hints to the user. In your custom implementation, place it above the view that displays the image from the camera and above face animation view.JoinThePoints3View- This view displays the points and links on the screen. In your custom implementation, place it between face animation view and hints view.BlurOverlayView- This view can be used for blurring the image from the camera. Place it on top of the view on which you display the image from the camera.
For more information about the views and methods listed, refer to our UIExtensions API Reference.
Note 1: Besides JoinThePoints3ViewController in other subcomponents, we provide older JoinThePoints2ViewController and JoinThePointsViewController classes. Those are previous versions of our UI for high mode liveness challenge. We still provide them to our integrators and you use them in the same way as JoinThePoints3ViewController. However, we recommend using the latest version of our UI provided in JoinThePoints3ViewController.
NOTE 2: High mode liveness is the most difficult mode to implement by yourself. For this challenge, we also expose some additional lower level views and protocols. The integrator can use them to achieve more custom implementation of this type of challenge; that is: ChallengeView, ChallengeStartPoint, ChallengeTarget, challengeLink, ChallengePointer. If you want to make a custom look from this type of challenge, you can check those classes in our API Reference.
Customization
The default UI provided by UIExtensions can be customized. Following, you can see which elements can be customized and code that customize them in your application. The system appearance proxy mechanism is used to control the look of all visible elements.

-
Face outline custom animated gifs or animated pngs file names for each direction:
Swift1JoinThePoints3FaceAnimationView.appearance().upLeftAnimationName = "your_custom_rotating_face_up_left"2JoinThePoints3FaceAnimationView.appearance().upRightAnimationName = "your_custom_rotating_face_up_right"3JoinThePoints3FaceAnimationView.appearance().upFrontAnimationName = "your_custom_rotating_face_up_front"4JoinThePoints3FaceAnimationView.appearance().downLeftAnimationName = "your_custom_rotating_face_down_left"5JoinThePoints3FaceAnimationView.appearance().downRightAnimationName = "your_custom_rotating_face_down_right"6JoinThePoints3FaceAnimationView.appearance().downFrontAnimationName = "your_custom_rotating_face_down_front"7JoinThePoints3FaceAnimationView.appearance().sideLeftAnimationName = "your_custom_rotating_face_side_left"8JoinThePoints3FaceAnimationView.appearance().sideRightAnimationName = "your_custom_rotating_face_side_right" -
Starting point fill color:
Swift1JoinThePoints3StartPointView.appearance().fillColor = .blueStarting point stroke color:
Swift1JoinThePoints3StartPointView.appearance().strokeColor = .greenStarting point size:
Swift1JoinThePoints3StartPointView.appearance().pointSize = CGSize(width: 60, height: 60) -
Link dot minimum radius:
Swift1JoinThePoints3LinkView.appearance().dotRadius = 10Link dot maximum radius:
Swift1JoinThePoints3LinkView.appearance().dotMaxRadius = 30Distance between link dots:
Swift1JoinThePoints3LinkView.appearance().dotDistance = 14Link dot fill color:
Swift1JoinThePoints3LinkView.appearance().dottedLineFillColor = .blueLink dot stroke color:
Swift1JoinThePoints3LinkView.appearance().dottedLineStrokeColor = .greenLink dot stroke width:
Swift1JoinThePoints3LinkView.appearance().dottedLineStrokeWidth = 5 -
Successfully connected target point color:
Swift1JoinThePoints3TargetView.appearance().successBackgroundColor = .brownSuccessfully connected target point image:
Swift1JoinThePoints3TargetView.appearance().successImage = UIImage(named: "your_custom_success_image")Not connected (after failing the challenge, for example due to timeout) target point color:
Swift1JoinThePoints3TargetView.appearance().failureBackgroundColor = .orangeNot connected (after failing the challenge, for example due to timeout) target point image:
Swift1JoinThePoints3TargetView.appearance().failureImage = UIImage(named: "your_custom_failure_image") -
Target point fill color:
Swift1JoinThePoints3TargetView.appearance().fillColor = .blueTarget point progress color:
Swift1JoinThePoints3TargetView.appearance().progressColor = .greenTarget point text color:
Swift1JoinThePoints3TargetView.appearance().textColor = .red -
Hint bubble color:
Swift1JoinThePoints3HintBubbleView.appearance().bubbleColor = .blueHint bubble text color:
Swift1JoinThePoints3HintBubbleView.appearance().textColor = .greenHint bubble text font:
Swift1JoinThePoints3HintBubbleView.appearance().font = UIFont.boldSystemFont(ofSize: 20)Hint bubble shadow color:
Swift1JoinThePoints3HintBubbleView.appearance().shadowColor = .blueHint bubble shadow opacity:
Swift1JoinThePoints3HintBubbleView.appearance().shadowOpacity = 0.8Hint bubble shadow radius:
Swift1JoinThePoints3HintBubbleView.appearance().shadowRadius = 20Hint bubble shadow offset:
Swift1JoinThePoints3HintBubbleView.appearance().shadowOffset = CGSize(width: 10, height: 10) -
Camera blur strength:
Swift1BlurOverlayView.appearance().blurEffectStrongness = 0.4Camera blur tint color:
Swift1BlurOverlayView.appearance().blurColor = UIColor.white.withAlphaComponent(0.3) -
Hint image color:
Swift1JoinThePoints3HintsView.appearance().imageTintColor = .green -
Hint text color:
Swift1JoinThePoints3HintsView.appearance().hintsColor = .blueHint details text color visible if hint details are available:
Swift1JoinThePoints3HintsView.appearance().hintsDetailsColor = .red
We recommend placing the code snippets in your viewDidLoad method implementation, as visible in the example from the implementation section.
Translations
UIExtensions allows you to change all the text visible on the screen by using standard system localization mechanism. We provide default English translation in our UIExtensions and you can change them or localize them for languages that you need to support in your application. To change the text you must create a Localizable.strings file in your project if you are not using it already (in Xcode, go to menu File -> New -> File -> Strings File and create a new Localizable.strings file) and enable localization on that file (in File Inspector on the right panel in Xcode, click Localize in the Localization section for the created file). In that strings file you can put localized text for given keys as usual. Following is a list of all supported keys with their default English translation provided in our UIExtension in the High Liveness challenge. If you need to translate them to another language, copy the content listed to your strings file and edit the values for provided keys.
Swift1"com.idemia.smartsdk.UIExtensions.jtp3.challenge.startHere" = "START\nHERE";2"com.idemia.smartsdk.UIExtensions.jtp3.challenge.moveLineHere" = "Move the line here with your nose";3"com.idemia.smartsdk.UIExtensions.jtp3.info.pleaseWaitForTime" = "Please wait for:\n{time}";4"com.idemia.smartsdk.UIExtensions.jtp3.info.noTappingNeeded" = "No tapping needed.";5"com.idemia.smartsdk.UIExtensions.jtp3.info.useHead" = "Use your head to interact.";6"com.idemia.smartsdk.UIExtensions.jtp3.info.centerYourFace" = "Center your face";7"com.idemia.smartsdk.UIExtensions.jtp3.info.centerYourFaceInCameraView" = "Center your face in camera view";8"com.idemia.smartsdk.UIExtensions.jtp3.info.holdPhoneVertically" = "Please hold your phone vertically.";9"com.idemia.smartsdk.UIExtensions.jtp3.info.moveHead" = "Move your head to connect the dots";10"com.idemia.smartsdk.UIExtensions.jtp3.info.standStill" = "Stand still for a moment";11"com.idemia.smartsdk.UIExtensions.jtp3.info.dontMoveYourPhone" = "Don't move your phone";12"com.idemia.smartsdk.UIExtensions.jtp3.info.headMovingTooFast" = "Moving too fast";13"com.idemia.smartsdk.UIExtensions.jtp3.info.comeBackInCameraField" = "Come back in the camera field";14"com.idemia.smartsdk.UIExtensions.jtp3.info.moveForwards" = "Move your face forward";15"com.idemia.smartsdk.UIExtensions.jtp3.info.moveBackwards" = "Move your face backward";
Note: Some strings in our translations, for example Please wait for:\n{time}, contain a placeholder {variable} to display some data inside translated strings that should be kept in original, untranslated form in case you translate them to another language.
MLC mode
Multidimensional Liveness Check (MLC) Capture is the recommended mode for liveness detection. The CaptureSDK automatically creates and displays the MLCCaptureView for the integrator. While there is an option to implement liveness capture independently, the preferred approach is to leverage the built-in functionality within the CaptureSDK framework for seamless integration.
Customization MLCCaptureView
The MLCCaptureView is initialized automatically within the CaptureSDK, so manual setup is not required. However, integrators have the flexibility to customize its behavior and appearance using the provided API, allowing them to tailor the experience to specific application needs.
Turn on/off components
Feedback label
Swift1MLCCaptureView.appearance().enabledFeedback = false
Tapping feedback
Swift1MLCCaptureView.appearance().enabledTappingFeedback = false
Vertical Tilt feedback
Swift1MLCCaptureView.appearance().enabledDeviceVerticalTiltFeedback = false
Face oval border
Swift1MLCCaptureView.appearance().enabledFaceOvalBorder = false
Capture progress bark
Swift1MLCCaptureView.appearance().enabledProgressBar = false
Cancel button
Swift1MLCCaptureView.appearance().cancelButtonEnabled = true
Capture feedback settings
Set smileAcquiredTextReading delay
Swift1/// Time in seconds of displaying (or reading) smile acquired text.2 /// Default value is 3s.3 MLCCaptureView.appearance().smileAcquiredTextReadingDelay = 3
Set moveCloserText delay
Swift1/// Time in seconds of displaying (or reading) move closer text.2 /// Default value is 3s.3 MLCCaptureView.appearance().moveCloserTextDelay = 3
Set flashesWarningTextReading delay
Swift1/// Time in seconds of displaying (or reading) flashes warning text.2 /// Default value is 5s.3 MLCCaptureView.appearance().flashesWarningTextReadingDelay = 5
Set capture feedback text color
Swift1MLCCaptureView.appearance().feedbackTextColor = .green
Tapping feedback settings
This feedback show a message preventing the user from tapping further on the screen.
Set tapping feedback image color
Swift1MLCCaptureView.appearance().tappingFeedbackBackgroundColor = .white
Set tapping feedback image color
Swift1MLCCaptureView.appearance().tappingFeedbackImageColor = .black
Set tapping feedback header text color
Swift1MLCCaptureView.appearance().tappingFeedbackH1TextColor = .green
Set tapping feedback text color
Swift1MLCCaptureView.appearance().tappingFeedbackTextColor = .green
Device vertical tilt feedback settings
The feedback displays until the phone is held vertically.
Set tapping feedback image color
Swift1MLCCaptureView.appearance().deviceVerticalTitleFeedbackBackgroundColor = .white
Set tapping feedback image color
Swift1MLCCaptureView.appearance().deviceVerticalTitleFeedbackImageColor = .black
Set tapping feedback header text color
Swift1MLCCaptureView.appearance().tappingFeedbackH1TextColor = .green
Set tapping feedback text color
Swift1MLCCaptureView.appearance().deviceVerticalTitleFeedbackTextColor = .green
Capture progress bar settings
For MLC capture, you can configure progress bar that will show current progress of the capture.
Progress text color
Swift1MLCCaptureView.appearance().progressTextColor = .green
Progress tint color
Swift1MLCCaptureView.appearance().progressColor = .green
Progress track color
Swift1MLCCaptureView.appearance().progressBackgroundColor = .yellow
Progress tint color during illumination phase
Swift1MLCCaptureView.appearance().progressIlluminationPhaseColor = .white
Progress track color during illumination phase
Swift1MLCCaptureView.appearance().progressIlluminationPhaseBackgroundColor = .white
Cancel button settings
For MLC capture it is possible to configure "X" button, visible at the upper right corner of the screen during the capture.
Set icon color
Swift1MLCCaptureView.appearance().cancelButtonIconColor = .green
Set icon size
Swift1MLCCaptureView.appearance().cancelButtonIconSize = 24
Translations
UIExtensions allows you to change all the text visible on the screen by using standard system localization mechanism. We provide default English translation in our UIExtensions and you can change them or localize them for languages that you need to support in your application. To change the text you must create a Localizable.strings file in your project if you are not using it already (in Xcode, go to menu File -> New -> File -> Strings File and create a new Localizable.strings file) and enable localization on that file (in File Inspector on the right panel in Xcode, click Localize in the Localization section for the created file). In that strings file you can put localized text for given keys as usual. Following is a list of all supported keys with their default English translation provided in our UIExtension in the High Liveness challenge. If you need to translate them to another language, copy the content listed to your strings file and edit the values for provided keys.
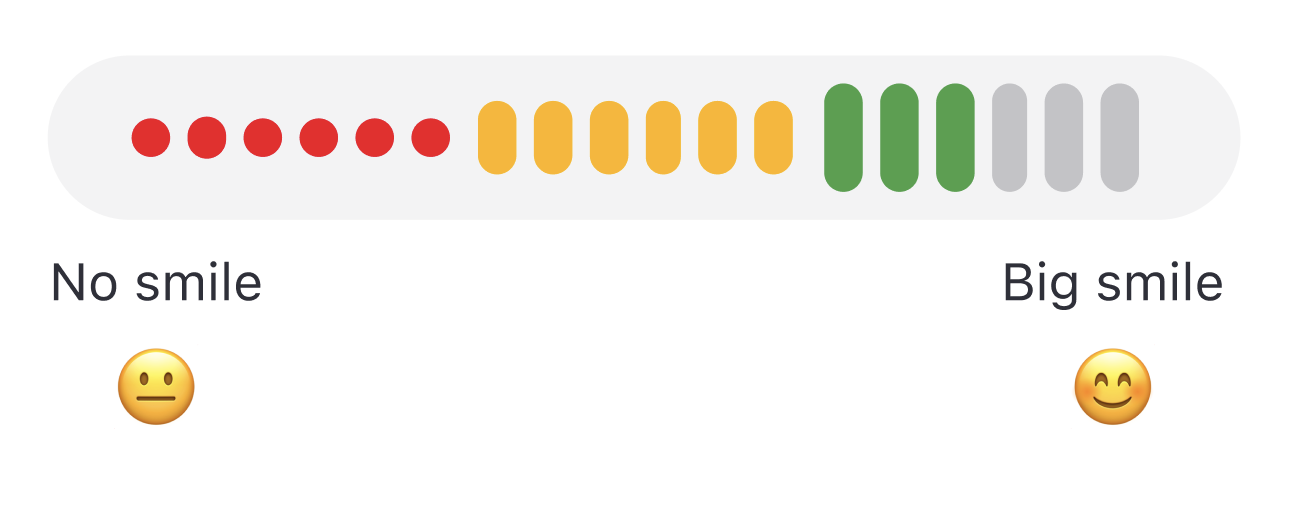
Swift1"com.idemia.smartsdk.UIExtensions.smileIllumination.smileSizeProgressLegendLow" = "No smile";2"com.idemia.smartsdk.UIExtensions.smileIllumination.smileSizeProgressLegendHigh" = "Big smile";3"com.idemia.smartsdk.UIExtensions.smileIllumination.smileSizeProgressIconLow" = "😐";4"com.idemia.smartsdk.UIExtensions.smileIllumination.smileSizeProgressIconHigh" = "😊";5"com.idemia.smartsdk.UIExtensions.smileIllumination.faceInfoComeBackField" = "Come back in the camera field";6"com.idemia.smartsdk.UIExtensions.smileIllumination.faceInfoCenterMoveForwards" = "Move your face forward";7"com.idemia.smartsdk.UIExtensions.smileIllumination.faceInfoCenterMoveBackwards" = "Move your face backward";8"com.idemia.smartsdk.UIExtensions.smileIllumination.faceInfoTooFast" = "Moving too fast";9"com.idemia.smartsdk.UIExtensions.smileIllumination.faceInfoCenterGood" = "Face is in good position";10"com.idemia.smartsdk.UIExtensions.smileIllumination.faceInfoStandStill" = "Stand still for a moment";11"com.idemia.smartsdk.UIExtensions.smileIllumination.dontMoveYourPhone" = "Don't move your phone";12"com.idemia.smartsdk.UIExtensions.smileIllumination.faceInfoCenterMoveLeft" = "Move your phone slightly to the left";13"com.idemia.smartsdk.UIExtensions.smileIllumination.faceInfoCenterMoveRight" = "Move your phone slightly to the right";14"com.idemia.smartsdk.UIExtensions.smileIllumination.faceInfoCenterMoveUp" = "Move your phone slightly downwards";15"com.idemia.smartsdk.UIExtensions.smileIllumination.faceInfoCenterMoveDown" = "Move your phone slightly upwards";16"com.idemia.smartsdk.UIExtensions.smileIllumination.faceInfoMakeNeutralExpression" = "Keep a neutral facial expression for the moment";17"com.idemia.smartsdk.UIExtensions.smileIllumination.faceInfoMakeSmile" = "Fill the gauge bellow by doing a true smile";18"com.idemia.smartsdk.UIExtensions.smileIllumination.faceInfoMoveDarkerArea" = "It’s too bright. Make sure you are in a well lit environment.";19"com.idemia.smartsdk.UIExtensions.smileIllumination.faceInfoMoveBrighterArea" = "It’s too dark. Make sure you are in a well lit environment.";20"com.idemia.smartsdk.UIExtensions.smileIllumination.holdPhoneVertically" = "Please hold your phone vertically.";21"com.idemia.smartsdk.UIExtensions.smileIllumination.faceCloser" = "Now, move your face closer to the phone";22"com.idemia.smartsdk.UIExtensions.smileIllumination.fillTheOval" = "Fill the oval frame with your face";23"com.idemia.smartsdk.UIExtensions.smileIllumination.holdStillAndCloseYourEyes" = "Hold still. You can close your eyes.";24"com.idemia.smartsdk.UIExtensions.smileIllumination.smileAcquired" = "Smile acquired successfully! Now, please hold still";25"com.idemia.smartsdk.UIExtensions.smileIllumination.flashesWarning" = "In the last step, your face will be verified with a sequence of color flashes. Please hold still during color’s countdown.";26"com.idemia.smartsdk.UIExtensions.smileIllumination.noTappingNeeded" = "No tapping needed.";27"com.idemia.smartsdk.UIExtensions.smileIllumination.useHead" = "Use your head to interact.";28"com.idemia.smartsdk.UIExtensions.smileIllumination.faceInfoNotSmiling" = "Looks like you’re not smiling. Please try to make a wide, genuine smile.";29"com.idemia.smartsdk.UIExtensions.smileIllumination.faceInfoSmileWider" = "Almost there! Make your smile a little wider.";30"com.idemia.smartsdk.UIExtensions.smileIllumination.complete" = "%d%% Complete";
MLC: SmileSizeProgressView
When a custom liveness capture view is implemented instead of using the full MLCCaptureView, the SmileSizeProgressView component can be used independently to track and visualize smile progression.
Simple integration
View creation:
Swift1var smileProgressView: SmileSizeProgressView!23func setup() {4 smileProgressView = SmileSizeProgressView()5 addSubview(smileProgressView)6 NSLayoutConstraint.activate([7 smileProgress.centerYAnchor.constraint(equalTo: self.centerYAnchor),8 smileProgress.leadingAnchor.constraint(equalTo: self.leadingAnchor),9 smileProgress.trailingAnchor.constraint(equalTo: self.trailingAnchor)10 ])11 }
How to use with MLCDelegate :
Swift1func captureDidUpdate(smileSize: Double) {2 smileProgressView.progress = smileSize3}
Finger scanning
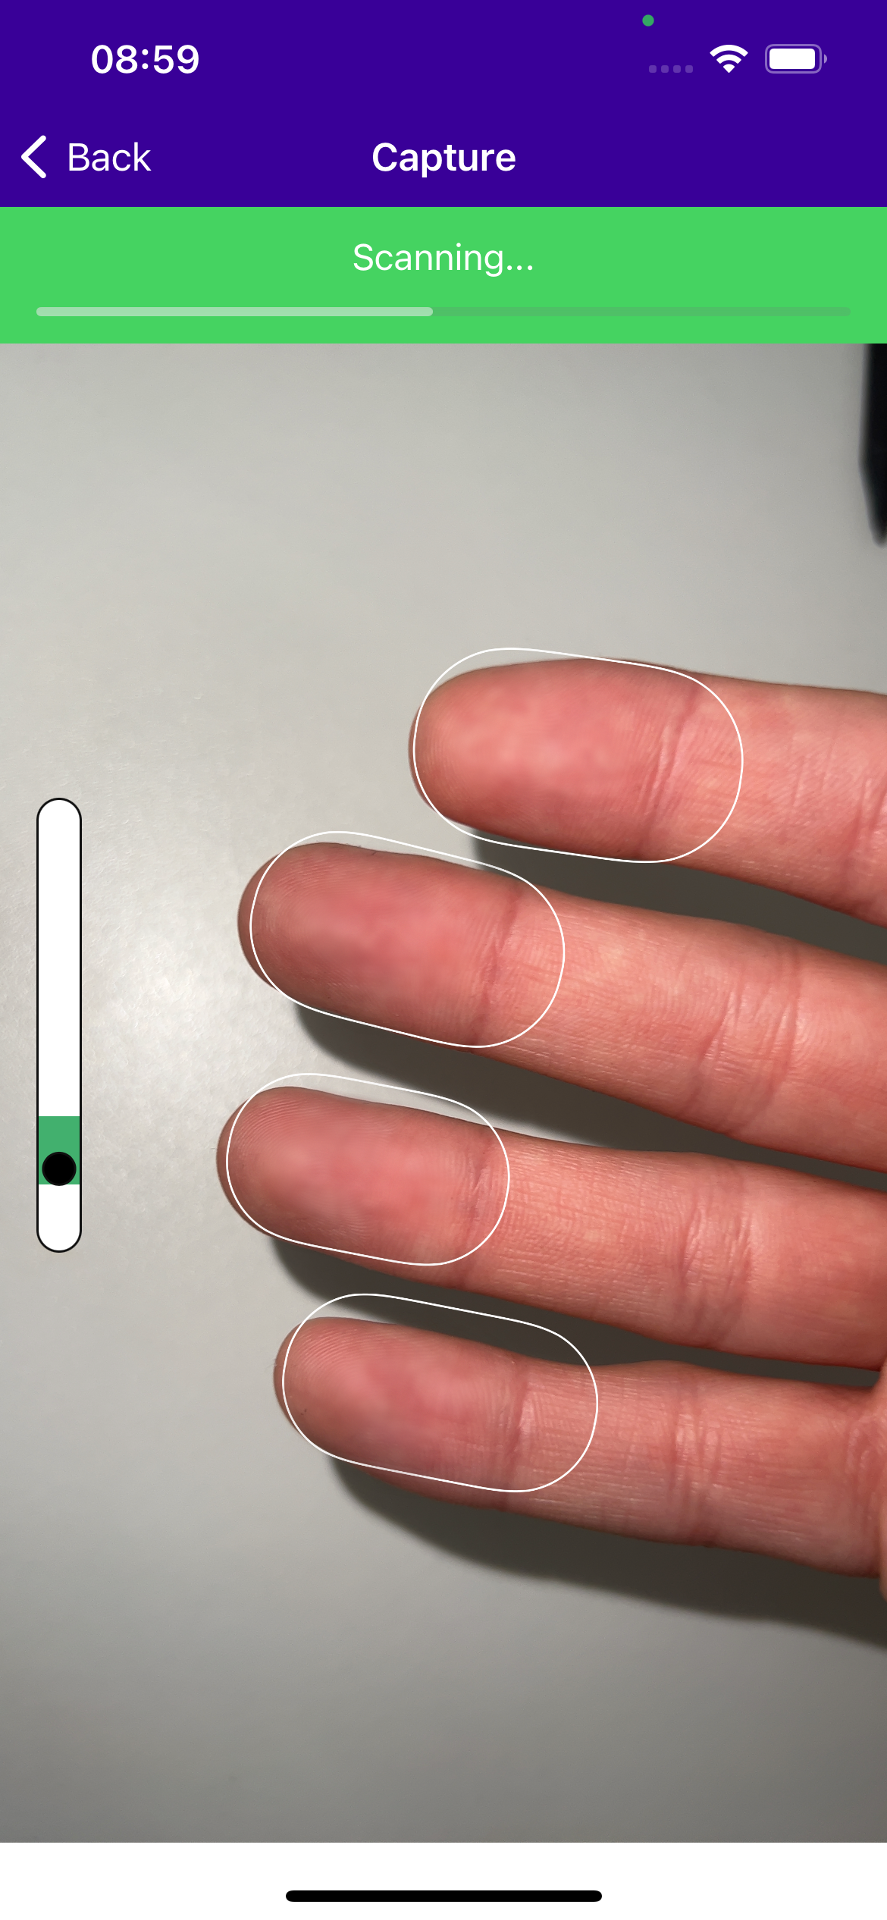
The component is responsible for extracting high-quality fingerprint scans. The user is continuously informed about the progress of the scan and receives information about the distance of the fingers from the camera through an indicator located on the left side of the screen. Additionally, information may appear across the entire screen, assisting during the entire process. It informs whether the user's fingers are too far or too close.
Implementation
To implement fingeprint scanning, use the BiometricSDKUIFinger component from our UIExtensions. As described in the integration section, we recommend using cocoapods to integrate UIExtensions. For passive liveness, you must add pod 'BiometricSDKUIFinger' to your Podfile.
BiometricSDKUIFinger provides a default view class named FingerCaptureView. This view displays a default UI for fingerprint scan and you must create a capture view variable in your view controller. The example is ready to use and commented; you can just copy it to your project.
The simplest way to integrate with finger UIExtension.
Swift1class FingerViewController: UIViewController, FingerCaptureHandlerDelegate {2 @IBOutlet private var captureView: FingerCaptureView!34 private var captureHandler: FingerCaptureHandler?56 override open func viewDidLoad() {7 super.viewDidLoad()89 title = "Finger Capture"10 }111213 override func viewWillAppear(_ animated: Bool) {14 super.viewWillAppear(animated)1516 // STEP 1. In viewWillAppear we should allocate resources, ie. camera17 captureView.reset()18 startCapture(handSide: .left)19 }2021 override func viewDidDisappear(_ animated: Bool) {22 super.viewDidDisappear(animated)2324 // STEP 15. In viewDidDisappear we should release resources25 captureHandler?.destroy()26 captureHandler = nil27 }2829 func startCapture(handSide: BIOHand) {30 // STEP 2. Choose which mode you’re willing to use and other options (all options are described in the documentation)31 let options = FingerCaptureOptions(mode: .fingers, hand: handSide)32 options.captureTimeout = 1033 options.overlay = .OFF34 options.livenessType = .medium3536 // STEP 3. Create a capture handler37 BIOSDK.createFingerCaptureHandler(with: options) { [weak self] bioCaptureHandler, error in38 guard let self = self else {39 return40 }41 guard let captureHandler = bioCaptureHandler, error == nil else {42 return43 }4445 // STEP 4. Set created capture handler46 self.captureHandler = captureHandler47 // STEP 5. Set the delegate48 self.captureHandler?.delegate = self49 // STEP 6. Set the preview50 self.captureHandler?.preview = self.captureView.previewView51 // STEP 7. Start capturing52 self.captureHandler?.startCapture()5354 // Part UIExtension settings55 // STEP 8. Set distance indicator range56 let range = DistanceBarRange(from: captureHandler.captureDistanceRange())57 // STEP 9. Set distance indicator settings58 let settings = DistanceIndicatorSettings(with: range)59 // STEP 10. Start UIExtension60 self.captureView.start(with: settings, duration: captureHandler.fullCaptureTime())61 }62 }6364 // STEP 11. When capturing, you will receive finger tracking information that serves as hints for users to improve or facilitate the process of acquiring facial data. You also have the option to pass this information to UIExtension, which will handle it in a default manner, or you can choose to perform additional actions based on your specific requirement.65 internal func fingerCaptureReceivedTrackingInfo(_ trackingInfo: [FingerTrackingInfo]?, withError error: Error?) {66 captureView.handle(trackingInfo: trackingInfo)67 }6869 // STEP 12. During capturing you'll receive information about current distance of fingers. It helps to get high quality fingerprints. You can simply pass it to UIExtension to handle it in a default way or you can do some additional stuff with it depending on your needs.70 func fingerCaptureReceivedCurrentDistance(_ distance: FingerCaptureCurrentDistance) {71 captureView.handle(distance: distance.value)72 }7374 // STEP 13. During capturing you'll get helpful infromation from FingerCaptureInfo about position. It improves user experience and gives better feedback about fingerprint scan. You can simply pass it to UIExtension to handle it in a default way or you can do some additional stuff with it depending on your needs.7576 func fingerCaptureReceivedFeedback(_ info: FingerCaptureInfo) {77 captureView.handle(feedback: info)78 }7980 // STEP 14A. When capturing is done, this callback returns detected fingerprints as BIOImage array and capture result info.81 func capturedFingers(_ images: [BIOImage]?, with captureInfo: BIOFingerCaptureInfo?, withError error: Error?) {82 let image = images?.first83 let success = image != nil && error == nil8485 let vc = ResultViewController()86 vc.success = success87 vc.image = success ? UIImage(from: image!) : UIImage(named: "invalid")88 navigationController?.pushViewController(vc, animated: true)89 }9091 // STEP 14B. When capturing failed, this callback returns the error describing failure reason.92 func captureFinishedWithError(_ error: Error?) {93 let vc = ResultViewController()94 vc.success = false95 vc.image = UIImage(named: "invalid")96 navigationController?.pushViewController(vc, animated: true)97 }98}
Translations
UIExtensions allows you to change all the text visible on the screen by using the standard system localization mechanism. We provide a default English translation in our UIExtensions and you can change or localize them for languages you need to support in your application. To change the text you must create a Localizable.strings file in your project. If you are not using it already, go to: Xcode, menu File -> New -> File -> Strings File, and create a new Localizable.strings file. Then enable localization on that file (in File Inspector on the right panel in Xcode, click Localize in the Localization section for the created file). In the strings file, you can place the localized texts for given keys as usual. Following is a list of all supported keys with their default English translation provided in our UIExtension in the Passive Liveness challenge. If you need to translate them to another language, copy the content listed to your strings file and edit the values for the provided keys.
Swift1"com.idemia.smartsdk.UIExtensions.fingercheck.hint.scanning" = "Scanning...";2"com.idemia.smartsdk.UIExtensions.fingercheck.hint.centerfingers" = "Center your finger tips in the middle of the camera's frame";3"com.idemia.smartsdk.UIExtensions.fingercheck.hint.dontmovefingers" = "Try not to move your fingers";4"com.idemia.smartsdk.UIExtensions.fingercheck.hint.bringfingerscloser" = "Bring your fingers closer to the camera";5"com.idemia.smartsdk.UIExtensions.fingercheck.hint.notappingneeded" = "No tapping needed.";6"com.idemia.smartsdk.UIExtensions.fingercheck.hint.puthandundercamera" = "Put the palm side of your hand underneath your device’s back camera.";
Customization
Currently finger UIExtension hasn't styling views. You can disable the indicator by passing a parameter to the initializer DistanceIndicatorSettings(with:, show:). By default distance bar is enabled but you can set show parameter false, then it is hidden for user.
Swift1BIOSDK.createFingerCaptureHandler(with: options) { [weak self] bioCaptureHandler, error in2 /// some implementation3 self.captureHandler?.startCapture()45 //start captureView from UIExtensions with settings.6 let range = DistanceBarRange(from: captureHandler.captureDistanceRange())7 let settings = DistanceIndicatorSettings(with: nil, show: false)89 self.captureView.start(with: settings, duration: captureHandler.fullCaptureTime())10 }
API Reference
Classes
BlurOverlayView
Swift1public class BlurOverlayView: UIView
View used for bluring the camera preview.
Properties
blurEffectStrongness
Swift1@IBInspectable @objc public dynamic var blurEffectStrongness: Float = 0.2
Blur effect strongness which should be a value in range [0, 1]
blurColor
Swift1@IBInspectable @objc public dynamic var blurColor: UIColor = UIColor.white.withAlphaComponent(0.5)
Blur effect color.
Methods
init(frame:)
Swift1public override init(frame: CGRect)
Initializes and returns a newly allocated view object.
- Parameter frame: Frame rectangle.
Parameters
Name | Description |
|---|---|
| frame | Frame rectangle. |
init(coder:)
Swift1public required init?(coder aDecoder: NSCoder)
Initializes and returns a newly allocated view object.
- Parameter aDecoder: Decoder.
Parameters
Name | Description |
|---|---|
| aDecoder | Decoder. |
deinit
Swift1deinit
Performs deinitialization.
CaptureInfoView
Swift1public class CaptureInfoView: UIView
View used for displaying countdown timer at the begining of the challenge and additional hints during the challange.
Properties
counterColor
Swift1@objc public dynamic var counterColor = UIColor.white
Color of counter text.
text
Swift1public var text: String
Text currently displayed on the view.
Methods
init(frame:)
Swift1public override init(frame: CGRect)
Initializes and returns a newly allocated view object.
- Parameter frame: Frame rectangle.
Parameters
Name | Description |
|---|---|
| frame | Frame rectangle. |
init(coder:)
Swift1public required init?(coder aDecoder: NSCoder)
Initializes and returns a newly allocated view object.
- Parameter aDecoder: Decoder.
Parameters
Name | Description |
|---|---|
| aDecoder | Decoder. |
startCountdown(seconds:completionHandler:)
Swift1public func startCountdown(seconds: Int, completionHandler: (()->())? = nil)
Starts countdown from given amout of seconds.
- Parameters:
- seconds: Starting number of seconds.
- completionHandler: Completion handler that will be executed when counting is finished.
Parameters
Name | Description |
|---|---|
| seconds | Starting number of seconds. |
| completionHandler | Completion handler that will be executed when counting is finished. |
showCountdown(seconds:)
Swift1public func showCountdown(seconds: Int)
Shows countdown text with given amout of seconds.
- Parameter seconds: Number of seconds.
Parameters
Name | Description |
|---|---|
| seconds | Number of seconds. |
showHint(text:)
Swift1public func showHint(text: String)
Shows a hint with a given text.
- Parameter text: Text to show.
Parameters
Name | Description |
|---|---|
| text | Text to show. |
deinit
Swift1deinit
Performs deinitialization.
ChallengeResultView
Swift1public class ChallengeResultView: UIView
View used for displaying challenge result.
Properties
validColor
Swift1@objc public dynamic var validColor = UIColor.idemiaGreen
Color of success image background.
invalidColor
Swift1@objc public dynamic var invalidColor = UIColor.idemiaRed
Color of failure image background.
validImage
Swift1@objc public dynamic var validImage = UIImage(named: "success", in: Bundle(for: ChallengeResultView.self), compatibleWith: nil)
Image used for displaying success.
invalidImage
Swift1@objc public dynamic var invalidImage = UIImage(named: "failure", in: Bundle(for: ChallengeResultView.self), compatibleWith: nil)
Image for displaying failure.
intrinsicContentSize
Swift1override public var intrinsicContentSize: CGSize
Intrinsic content size.
Methods
init(frame:)
Swift1public override init(frame: CGRect)
Initializes and returns a newly allocated view object.
- Parameter frame: Frame rectangle.
Parameters
Name | Description |
|---|---|
| frame | Frame rectangle. |
init(coder:)
Swift1public required init?(coder aDecoder: NSCoder)
Initializes and returns a newly allocated view object.
- Parameter aDecoder: Decoder.
Parameters
Name | Description |
|---|---|
| aDecoder | Decoder. |
showResult(success:)
Swift1@objc public func showResult(success: Bool)
Shows given result on the view.
- Parameter success: Specifies if should show success or failure.
Parameters
Name | Description |
|---|---|
| success | Specifies if should show success or failure. |
ChallengeView.Context
Swift1public class Context
Holds informations related to currently performed join the points challenge.
Properties
viewScale
Swift1public internal(set) var viewScale: CGFloat = 0.0
Scale of the view.
startPointViewModel
Swift1public internal(set) var startPointViewModel: StartPointViewModelClass?
Starting point element.
pointerViewModel
Swift1public internal(set) var pointerViewModel: PointerViewModelClass?
Pointer element.
linkViewModels
Swift1public internal(set) var linkViewModels: [LinkViewModelClass] = []
Link elements.
targetViewModels
Swift1public internal(set) var targetViewModels: [TargetViewModelClass] = []
Target points elements.
currentTarget
Swift1public internal(set) var currentTarget: Int = 0
Current target number.
ChallengeView
Swift1open class ChallengeView: UIView
View used for displaying join the points challange with elements such as for example target points and links between points.
Properties
linkClass
Swift1public var linkClass: LinkViewModelClass.Type = DefaultLinkView.self
Link class.
targetClass
Swift1public var targetClass: TargetViewModelClass.Type = DefaultTargetView.self
Target class.
pointerClass
Swift1public var pointerClass: PointerViewModelClass.Type? = DefaultPointerView.self
Pointer class.
startPointClass
Swift1public var startPointClass: StartPointViewModelClass.Type? = nil
Start point class.
layersOrder
Swift1public var layersOrder: [Layer] = [.links, .pointer, .startPoint, .targets]
Order in which elements are presented on the screen.
snappingEnabled
Swift1public var snappingEnabled: Bool = true
Snapping enabled.
preview
Swift1public weak var preview: UIImageView?
context
Swift1public internal(set) var context = Context()
Challenge context.
Methods
init()
Swift1public init()
Initializes and returns a newly allocated view object.
init(frame:)
Swift1public override init(frame: CGRect)
Initializes and returns a newly allocated view object.
- Parameter frame: Frame rectangle.
Parameters
Name | Description |
|---|---|
| frame | Frame rectangle. |
init(coder:)
Swift1public required init?(coder aDecoder: NSCoder)
Initializes and returns a newly allocated view object.
- Parameter aDecoder: Decoder.
Parameters
Name | Description |
|---|---|
| aDecoder | Decoder. |
updateConstraints()
Swift1override open func updateConstraints()
Updates constraints for the view.
reset()
Swift1public func reset()
Resets the challange.
fail()
Swift1public func fail()
Fails the challange.
FaceOvalImageView
Swift1public class FaceOvalImageView: UIImageView
Class is responsible for displaying a face image in the center of an oval
Properties
borderWidth
Swift1public dynamic var borderWidth: CGFloat = 5
Sets the border's width
borderColor
Swift1public dynamic var borderColor: UIColor = .passiveVideoOvalDefaultGreenColor
Sets the border's color
image
Swift1override public var image: UIImage?
Image to be placed inside oval view
Methods
layoutSubviews()
Swift1override public func layoutSubviews()
set(faceBox:)
Swift1public func set(faceBox: CGRect) -> Bool
Sets a face's position, so the image will be centered to that position
- Parameters:
- faceBox: a face's position
- Returns:
trueif succeeded,falseotherwise
Parameters
Name | Description |
|---|---|
| faceBox | a face’s position |
JoinThePoints3CaptureView
Swift1public class JoinThePoints3CaptureView: UIView
View used for showing default join the points liveness challenge.
Properties
minimumDevicePitch
Swift1public var minimumDevicePitch = 60.0
Minimum device pitch needed to perform the challenge.
previewView
Swift1public var previewView: UIImageView
View used for displaying preview from the camera.
Methods
init(frame:)
Swift1public override init(frame: CGRect)
Initializes and returns a newly allocated view object.
- Parameter frame: Frame rectangle.
Parameters
Name | Description |
|---|---|
| frame | Frame rectangle. |
init(coder:)
Swift1public required init?(coder aDecoder: NSCoder)
Initializes and returns a newly allocated view object.
- Parameter aDecoder: Decoder.
Parameters
Name | Description |
|---|---|
| aDecoder | Decoder. |
start()
Swift1public func start()
Prepares the view to perform the challange. You should call this method before you start using this view.
stop()
Swift1public func stop()
Cleans up the view after the challange. You should call this method after you finish using this view.
handleCapturePrepared(delay:timeToUnlockHandler:completionHandler:)
Swift1public func handleCapturePrepared(delay: Int = 2, timeToUnlockHandler: (()->(Int))? = nil, completionHandler: (()->())? = nil)
Method that you should call before starting the capture. It is used to handle initial capture delay automatically, completionHandler is executed after capture is unlocked and ready to start.
- Parameters:
- delay: Number of seconds for initial countdown.
- timeToUnlockHandler: Time to unlock handler.
- completionHandler: Completion handler.
Parameters
Name | Description |
|---|---|
| delay | Number of seconds for initial countdown. |
| timeToUnlockHandler | Time to unlock handler. |
| completionHandler | Completion handler. |
handleCaptureInfo(info:error:)
Swift1public func handleCaptureInfo(info: BIOCapturingInfo, error: Error?)
Method that you should call to handle capturing info from SDK.
- Parameters:
- info: Capturing info.
- error: Capture error.
Parameters
Name | Description |
|---|---|
| info | Capturing info. |
| error | Capture error. |
handleCaptureIsLocked(seconds:)
Swift1public func handleCaptureIsLocked(seconds: Int)
Method that you should call to handle capture is locked information from SDK.
- Parameter seconds: Number of seconds for which capture was locked.
Parameters
Name | Description |
|---|---|
| seconds | Number of seconds for which capture was locked. |
handleCaptureFinished(images:biometrics:error:animationDuration:completionHandler:)
Swift1public func handleCaptureFinished(images: [BIOFaceImage]?, biometrics: BIOBiometrics?, error: Error?, animationDuration: TimeInterval = 1, completionHandler: (()->())? = nil)
Method that you should call to handle capture finished information from SDK.
- Parameters:
- images: Captured images.
- biometrics: Captured biometrics.
- error: Capture error.
- animationDuration: Finish animation duration.
- completionHandler: Completion handler called after finishing the animation.
Parameters
Name | Description |
|---|---|
| images | Captured images. |
| biometrics | Captured biometrics. |
| error | Capture error. |
| animationDuration | Finish animation duration. |
| completionHandler | Completion handler called after finishing the animation. |
handleTargetInfo(target:index:numberOfTargets:error:)
Swift1public func handleTargetInfo(target: BIOCr2DTargetInfo?, index: UInt, numberOfTargets: UInt, error: Error?)
Method that you should call to handle target points information from SDK.
- Parameters:
- target: Target point information.
- index: Target index.
- numberOfTargets: Total number of targets.
- error: Error.
Parameters
Name | Description |
|---|---|
| target | Target point information. |
| index | Target index. |
| numberOfTargets | Total number of targets. |
| error | Error. |
handleChallengeInfo(challengeInfo:error:)
Swift1public func handleChallengeInfo(challengeInfo: BIOCr2DChallengeInfo?, error: Error?)
Method that you should call to handle challange information from SDK.
- Parameters:
- challengeInfo: Challange information.
- error: Error.
Parameters
Name | Description |
|---|---|
| challengeInfo | Challange information. |
| error | Error. |
JoinThePoints3FaceAnimationView
Swift1public class JoinThePoints3FaceAnimationView: UIView
View used for displaying face animation during the join the points liveness challange.
Properties
upLeftAnimationName
Swift1@objc public dynamic var upLeftAnimationName: String?
Optional custom face animation name for up and left face movement.
upRightAnimationName
Swift1@objc public dynamic var upRightAnimationName: String?
Optional custom face animation name for up and right face movement.
upFrontAnimationName
Swift1@objc public dynamic var upFrontAnimationName: String?
Optional custom face animation name for up face movement.
downLeftAnimationName
Swift1@objc public dynamic var downLeftAnimationName: String?
Optional custom face animation name for down and left face movement.
downRightAnimationName
Swift1@objc public dynamic var downRightAnimationName: String?
Optional custom face animation name for down and right face movement.
downFrontAnimationName
Swift1@objc public dynamic var downFrontAnimationName: String?
Optional custom face animation name for down face movement.
sideLeftAnimationName
Swift1@objc public dynamic var sideLeftAnimationName: String?
Optional custom face animation name for left face movement.
sideRightAnimationName
Swift1@objc public dynamic var sideRightAnimationName: String?
Optional custom face animation name for right face movement.
Methods
init(frame:)
Swift1public override init(frame: CGRect)
Initializes and returns a newly allocated view object.
- Parameter frame: Frame rectangle.
Parameters
Name | Description |
|---|---|
| frame | Frame rectangle. |
init(coder:)
Swift1public required init?(coder aDecoder: NSCoder)
Initializes and returns a newly allocated view object.
- Parameter aDecoder: Decoder.
Parameters
Name | Description |
|---|---|
| aDecoder | Decoder. |
handleChallenge(target:startingPoint:)
Swift1public func handleChallenge(target: BIOCr2DTargetInfo?, startingPoint: CGPoint?)
Updates face animation movement based on the data from SDK.
- Parameters:
- target: Target point information.
- startingPoint: Starting point position.
Parameters
Name | Description |
|---|---|
| target | Target point information. |
| startingPoint | Starting point position. |
JoinThePoints3HintBubbleView
Swift1public class JoinThePoints3HintBubbleView: UIView
Hint bubble view in join the points liveness challenge.
Properties
textColor
Swift1@objc dynamic public var textColor = UIColor.white
Hint text color.
font
Swift1@objc dynamic public var font = UIFont.boldSystemFont(ofSize: 15)
Hint text font.
bubbleColor
Swift1@objc dynamic public var bubbleColor = UIColor.idemiaOrange
Hint bubble color.
shadowOpacity
Swift1@objc dynamic public var shadowOpacity: CGFloat = 0.7
Hint bubble shadow opacity.
shadowRadius
Swift1@objc dynamic public var shadowRadius: CGFloat = 6
Hint bubble shadow radius.
shadowOffset
Swift1@objc dynamic public var shadowOffset: CGSize = .zero
Hint bubble shadow offset.
shadowColor
Swift1@objc dynamic public var shadowColor = UIColor.black
Hint bubble shadow color.
Methods
layoutSubviews()
Swift1override public func layoutSubviews()
Lays out hint bubble subviews.
JoinThePoints3HintsView
Swift1public class JoinThePoints3HintsView: UIView
View used for displaying join the points liveness hints above the camera preview.
Properties
hintsColor
Swift1@objc dynamic public var hintsColor = UIColor.idemiaBlack
Color of hints.
hintsDetailsColor
Swift1@objc dynamic public var hintsDetailsColor = UIColor.idemiaBlack
Color of hints details.
hintsBackgroundColor
Swift1@objc public dynamic var hintsBackgroundColor = UIColor.idemiaLightGray
Color of hints background.
imageTintColor
Swift1@objc dynamic public var imageTintColor = UIColor.idemiaBlack
Color of displayed images.
Methods
init(frame:)
Swift1public override init(frame: CGRect)
Initializes and returns a newly allocated view object.
- Parameter frame: Frame rectangle.
Parameters
Name | Description |
|---|---|
| frame | Frame rectangle. |
init(coder:)
Swift1public required init?(coder aDecoder: NSCoder)
Initializes and returns a newly allocated view object.
- Parameter aDecoder: Decoder.
Parameters
Name | Description |
|---|---|
| aDecoder | Decoder. |
resetState()
Swift1public func resetState()
Shows initial state with information to center your face.
handleDevicePitchTooLow()
Swift1public func handleDevicePitchTooLow()
Shows hint about device pitch too low.
handleScreenTap()
Swift1public func handleScreenTap()
Shows hint about no tapping needed.
handleCaptureIsLocked(seconds:)
Swift1public func handleCaptureIsLocked(seconds: Int)
Shows hint about locked capture.
- Parameter seconds: Duration of lock in seconds.
Parameters
Name | Description |
|---|---|
| seconds | Duration of lock in seconds. |
handleCaptureInfo(info:)
Swift1public func handleCaptureInfo(info: BIOCapturingInfo)
Shows hint for given capturing info.
- Parameter info: Capturing info.
Parameters
Name | Description |
|---|---|
| info | Capturing info. |
JoinThePoints3LinkView
Swift1public class JoinThePoints3LinkView: UIView, ChallangeLink
Link view which shows dotted line between target points in join the points liveness challenge.
Properties
dotRadius
Swift1@objc dynamic public var dotRadius: CGFloat = 20
Minimum dot radius.
dotMaxRadius
Swift1@objc dynamic public var dotMaxRadius: CGFloat = 50
Maximum dot radius.
dotDistance
Swift1@objc dynamic public var dotDistance: CGFloat = 18
Distance between dots.
dottedLineFillColor
Swift1@objc dynamic public var dottedLineFillColor: UIColor = .defaultLinkFillColor
Dots fill color.
dottedLineStrokeColor
Swift1@objc dynamic public var dottedLineStrokeColor: UIColor = .defaultLinkStrokeColor
Dots stroke colorl
dottedLineStrokeWidth
Swift1@objc dynamic public var dottedLineStrokeWidth: CGFloat = 3
Dots stroke width.
state
Swift1public var state: ChallengeView.ElementState = .unset
Link state.
frame
Swift1override public var frame: CGRect
Link frame.
Methods
init(context:startPoint:)
Swift1required public init(context: ChallengeView.Context, startPoint: CGPoint)
Initializes and returns a newly allocated view object.
- Parameters:
- context: Challange context.
- startPoint: Link start point.
Parameters
Name | Description |
|---|---|
| context | Challange context. |
| startPoint | Link start point. |
drawLink(to:)
Swift1public func drawLink(to: CGPoint)
Method that draws the link.
draw(_:)
Swift1override public func draw(_ rect: CGRect)
System drawing.
- Parameter rect: Drawing rect.
Parameters
Name | Description |
|---|---|
| rect | Drawing rect. |
JoinThePoints3PointerView
Swift1public class JoinThePoints3PointerView: UIView, ChallengePointer
Pointer view in join the points liveness challenge.
Properties
state
Swift1public var state: ChallengeView.ElementState = .unset
Pointer state.
angle
Swift1public var angle: CGFloat = 0
Pointer angle.
Methods
init(context:)
Swift1public required init(context: ChallengeView.Context)
Initializes and returns a newly allocated view object.
- Parameter context: Challange context.
Parameters
Name | Description |
|---|---|
| context | Challange context. |
JoinThePoints3StartPointView
Swift1public class JoinThePoints3StartPointView: UIView, ChallengeStartPoint
Starting point view in join the points liveness challenge.
Properties
fillColor
Swift1@objc dynamic public var fillColor: UIColor = .defaultStartPointFillColor
Fill color.
strokeColor
Swift1@objc dynamic public var strokeColor: UIColor = .defaultStartPointStrokeColor
Stroke color.
pointSize
Swift1@objc dynamic public var pointSize: CGSize = CGSize(width: 40, height: 40)
Point size.
Methods
init(context:)
Swift1public required init(context: ChallengeView.Context)
Initializes and returns a newly allocated view object.
- Parameter context: Challange context.
Parameters
Name | Description |
|---|---|
| context | Challange context. |
JoinThePoints3TargetView
Swift1public class JoinThePoints3TargetView: UIView, ChallengeTarget
Target point view in join the points liveness challenge.
Properties
fillColor
Swift1@objc dynamic public var fillColor: UIColor = .defaultTargetFillColor
Fill color.
progressColor
Swift1@objc dynamic public var progressColor: UIColor = .defaultTargetProgressColor
Progress color.
textColor
Swift1@objc dynamic public var textColor: UIColor = .defaultTargetTextColor
Text color.
successBackgroundColor
Swift1@objc dynamic public var successBackgroundColor: UIColor = .defaultTargetSuccessBackgroundColor
Successfully connected target background color.
failureBackgroundColor
Swift1@objc dynamic public var failureBackgroundColor: UIColor = .defaultTargetFailureBackgroundColor
Unsuccessfully connected target background color.
successImage
Swift1@objc dynamic public var successImage: UIImage? = UIImage(named: "jtp_node_success", in: JoinThePoints3TargetView.bundle, compatibleWith: nil)
Successfully connected target image.
failureImage
Swift1@objc dynamic public var failureImage: UIImage? = UIImage(named: "jtp_result_error", in: JoinThePoints3TargetView.bundle, compatibleWith: nil)
Unsuccessfully connected target image.
state
Swift1public var state: ChallengeView.ElementState = .unset
Target point state.
Methods
init(context:number:size:)
Swift1public required init(context: ChallengeView.Context, number: Int, size: CGSize)
Initializes and returns a newly allocated view object.
- Parameters:
- context: Challange context.
- number: Target number.
- size: Target size.
Parameters
Name | Description |
|---|---|
| context | Challange context. |
| number | Target number. |
| size | Target size. |
JoinThePoints3View
Swift1public class JoinThePoints3View: ChallengeView
View used for displaying join the points challange with elements such as for example target points and links between points.
Methods
init()
Swift1public override init()
Initializes and returns a newly allocated view object.
init(frame:)
Swift1public override init(frame: CGRect)
Initializes and returns a newly allocated view object.
- Parameter frame: Frame rectangle.
Parameters
Name | Description |
|---|---|
| frame | Frame rectangle. |
init(coder:)
Swift1public required init?(coder aDecoder: NSCoder)
Initializes and returns a newly allocated view object.
- Parameter aDecoder: Decoder.
Parameters
Name | Description |
|---|---|
| aDecoder | Decoder. |
LoadingIndicatorView
Swift1public class LoadingIndicatorView: UIView
Properties
progressValue
Swift1public dynamic var progressValue: CGFloat = 0
Progress value:
- accpeted values are between 0.0 - .1.0
- any others values turn on infinity mode
progressColor
Swift1public dynamic var progressColor: UIColor = .init(red: 0.26, green: 0, blue: 0.6, alpha: 1.0)
The progress bar's color
progressBackgroundColor
Swift1public dynamic var progressBackgroundColor: UIColor = .init(red: 0.84, green: 0.80, blue: 0.91, alpha: 1.0)
The progress bar's background color
progressWidth
Swift1public dynamic var progressWidth: CGFloat = 5.0
The progress bar's width
Methods
init(frame:)
Swift1public override init(frame: CGRect)
Initializes and returns a newly allocated view object.
- Parameter frame: Frame rectangle.
Parameters
Name | Description |
|---|---|
| frame | Frame rectangle. |
init(coder:)
Swift1public required init?(coder: NSCoder)
Initializes and returns a newly allocated view object.
- Parameter aDecoder: Decoder.
Parameters
Name | Description |
|---|---|
| aDecoder | Decoder. |
action(for:forKey:)
Swift1override public func action(for layer: CALayer, forKey event: String) -> CAAction?
PassiveLivenessCaptureView
Swift1public class PassiveLivenessCaptureView: UIView
View used for showing default passive liveness challenge.
Properties
minimumDevicePitch
Swift1public var minimumDevicePitch = 60.0
Minimum device pitch needed to perform the challenge.
previewView
Swift1public var previewView: UIImageView
View used for displaying preview from the camera.
Methods
init(frame:)
Swift1public override init(frame: CGRect)
Initializes and returns a newly allocated view object.
- Parameter frame: Frame rectangle.
Parameters
Name | Description |
|---|---|
| frame | Frame rectangle. |
init(coder:)
Swift1public required init?(coder aDecoder: NSCoder)
Initializes and returns a newly allocated view object.
- Parameter aDecoder: Decoder.
Parameters
Name | Description |
|---|---|
| aDecoder | Decoder. |
start()
Swift1public func start()
Prepares the view to perform the challange. You should call this method before you start using this view.
stop()
Swift1public func stop()
Cleans up the view after the challange. You should call this method after you finish using this view.
handleCapturePrepared(delay:timeToUnlockHandler:completionHandler:)
Swift1public func handleCapturePrepared(delay: Int = 3, timeToUnlockHandler: (()->(Int))? = nil, completionHandler: (()->())? = nil)
Method that you should call before starting the capture. It is used to handle initial capture delay automatically, completionHandler is executed after capture is unlocked and ready to start.
- Parameters:
- delay: Number of seconds for initial countdown.
- timeToUnlockHandler: Time to unlock handler.
- completionHandler: Completion handler.
Parameters
Name | Description |
|---|---|
| delay | Number of seconds for initial countdown. |
| timeToUnlockHandler | Time to unlock handler. |
| completionHandler | Completion handler. |
handleCaptureInfo(info:error:)
Swift1public func handleCaptureInfo(info: BIOCapturingInfo, error: Error?)
Method that you should call to handle capturing info from SDK.
- Parameters:
- info: Capturing info.
- error: Capture error.
Parameters
Name | Description |
|---|---|
| info | Capturing info. |
| error | Capture error. |
handleCaptureIsLocked(seconds:)
Swift1public func handleCaptureIsLocked(seconds: Int)
Method that you should call to handle capture is locked information from SDK.
- Parameter seconds: Number of seconds for which capture was locked.
Parameters
Name | Description |
|---|---|
| seconds | Number of seconds for which capture was locked. |
handleCaptureFinished(images:biometrics:error:animationDuration:completionHandler:)
Swift1public func handleCaptureFinished(images: [BIOFaceImage]?, biometrics: BIOBiometrics?, error: Error?, animationDuration: TimeInterval = 1, completionHandler: (()->())? = nil)
Method that you should call to handle capture finished information from SDK.
- Parameters:
- images: Captured images.
- biometrics: Captured biometrics.
- error: Capture error.
- animationDuration: Finish animation duration.
- completionHandler: Completion handler called after finishing the animation.
Parameters
Name | Description |
|---|---|
| images | Captured images. |
| biometrics | Captured biometrics. |
| error | Capture error. |
| animationDuration | Finish animation duration. |
| completionHandler | Completion handler called after finishing the animation. |
PassiveLivenessHintsView
Swift1public class PassiveLivenessHintsView: UIView
View used for displaying passive liveness hints above the camera preview.
Properties
hintsColor
Swift1@objc public dynamic var hintsColor = UIColor.black
Color of hints.
hintsDetailsColor
Swift1@objc public dynamic var hintsDetailsColor = UIColor.black
Color of hints details.
hintsBackgroundColor
Swift1@objc public dynamic var hintsBackgroundColor = UIColor.idemiaLightGray
Color of hints background.
imageTintColor
Swift1@objc public dynamic var imageTintColor = UIColor.black
Color of displayed images.
faceImage
Swift1@objc public dynamic var faceImage: UIImage?
Optional custom image for face outline.
Methods
init(frame:)
Swift1public override init(frame: CGRect)
Initializes and returns a newly allocated view object.
- Parameter frame: Frame rectangle.
Parameters
Name | Description |
|---|---|
| frame | Frame rectangle. |
init(coder:)
Swift1public required init?(coder aDecoder: NSCoder)
Initializes and returns a newly allocated view object.
- Parameter aDecoder: Decoder.
Parameters
Name | Description |
|---|---|
| aDecoder | Decoder. |
resetState()
Swift1public func resetState()
Shows initial state with information to center your face.
startCountdown(seconds:completionHandler:)
Swift1public func startCountdown(seconds: Int, completionHandler: (()->())? = nil)
Starts countdown from given amout of seconds.
- Parameters:
- seconds: Starting number of seconds.
- completionHandler: Completion handler that will be executed when counting is finished.
Parameters
Name | Description |
|---|---|
| seconds | Starting number of seconds. |
| completionHandler | Completion handler that will be executed when counting is finished. |
handleDevicePitchTooLow()
Swift1public func handleDevicePitchTooLow()
Shows hint about device pitch too low.
handleScreenTap()
Swift1public func handleScreenTap()
Shows hint about no tapping needed.
handleCaptureIsLocked(seconds:)
Swift1public func handleCaptureIsLocked(seconds: Int)
Shows hint about locked capture.
- Parameter seconds: Duration of lock in seconds.
Parameters
Name | Description |
|---|---|
| seconds | Duration of lock in seconds. |
handleCaptureInfo(info:)
Swift1public func handleCaptureInfo(info: BIOCapturingInfo)
Shows hint for given capturing info.
- Parameter info: Capturing info.
Parameters
Name | Description |
|---|---|
| info | Capturing info. |
PassiveVideoLivenessCaptureView
Swift1open class PassiveVideoLivenessCaptureView: UIView
View controller used for showing default passive video liveness challenge.
Properties
progressLineWidth
Swift1public dynamic var progressLineWidth: CGFloat = 8.0
Sets progress line width
progressColor
Swift1public dynamic var progressColor: UIColor = .idemiaProgressColor
Sets progress color
progressBackgroundColor
Swift1public dynamic var progressBackgroundColor: UIColor = .white
Sets progress background color
overlayOpacity
Swift1public dynamic var overlayOpacity: Float = 0.8
Sets background overlay opacity
overlayColor
Swift1public dynamic var overlayColor: UIColor = UIColor.idemiaOverlayBackground
Sets background overlay color
feedbackTextColor
Swift1public dynamic var feedbackTextColor: UIColor = .white
Feedback label text color
feedbackFont
Swift1public dynamic var feedbackFont: UIFont = UIFont.systemFont(ofSize: 22, weight: .semibold)
Font of feedback text label
minimumDevicePitch
Swift1public var minimumDevicePitch = 60.0
Minimum device pitch needed to perform the challenge.
previewView
Swift1public var previewView: UIImageView
View used for displaying preview from the camera.
Methods
init(frame:)
Swift1public override init(frame: CGRect)
Initializes and returns a newly allocated view object.
- Parameter frame: Frame rectangle.
Parameters
Name | Description |
|---|---|
| frame | Frame rectangle. |
init(coder:)
Swift1public required init?(coder aDecoder: NSCoder)
Initializes and returns a newly allocated view object.
- Parameter aDecoder: Decoder.
Parameters
Name | Description |
|---|---|
| aDecoder | Decoder. |
start()
Swift1public func start()
Prepares the view to perform the challange. You should call this method before you start using this view.
stop()
Swift1public func stop()
Cleans up the view after the challange. You should call this method after you finish using this view.
handleCapturePrepared(delay:timeToUnlockHandler:completionHandler:)
Swift1public func handleCapturePrepared(delay: Int = 3, timeToUnlockHandler: (()->(Int))? = nil, completionHandler: (()->())? = nil)
Method that you should call before starting the capture. It is used to handle initial capture delay automatically, completionHandler is executed after capture is unlocked and ready to start.
- Parameters:
- delay: Number of seconds for initial countdown.
- timeToUnlockHandler: Time to unlock handler.
- completionHandler: Completion handler.
Parameters
Name | Description |
|---|---|
| delay | Number of seconds for initial countdown. |
| timeToUnlockHandler | Time to unlock handler. |
| completionHandler | Completion handler. |
handlePreparationStarted()
Swift1public func handlePreparationStarted()
Method that you should call to handle start of capture preparation from SDK.
handlePreparationEnded()
Swift1public func handlePreparationEnded()
Method that you should call to handle end of capture preparation from SDK.
handleOverlayDidUpdate(_:andPosition:)
Swift1public func handleOverlayDidUpdate(_ overlaySize: CGSize, andPosition position: CGPoint)
Method that you should call to handle overlay updates from SDK.
- Parameters:
- overlaySize: Size of an overlay proportional to preview image view.
- position: Position of an overlay proportional to preview image view.
Parameters
Name | Description |
|---|---|
| overlaySize | Size of an overlay proportional to preview image view. |
| position | Position of an overlay proportional to preview image view. |
handleProgress(_:)
Swift1public func handleProgress(_ progress: CGFloat)
Method that you should call to handle capture progress value from SDK.
- Parameters:
- progress: Capture progreess from 0.0 to 1.
Parameters
Name | Description |
|---|---|
| progress | Capture progreess from 0.0 to 1. |
handleCaptureInfo(info:error:)
Swift1public func handleCaptureInfo(info: BIOCapturingInfo, error: Error?)
Method that you should call to handle capturing info from SDK.
- Parameters:
- info: Capturing info.
- error: Capture error.
Parameters
Name | Description |
|---|---|
| info | Capturing info. |
| error | Capture error. |
handleCaptureIsLocked(seconds:)
Swift1public func handleCaptureIsLocked(seconds: Int)
Method that you should call to handle capture is locked information from SDK.
- Parameter seconds: Number of seconds for which capture was locked.
Parameters
Name | Description |
|---|---|
| seconds | Number of seconds for which capture was locked. |
handleCaptureFinished(images:biometrics:error:animationDuration:completionHandler:)
Swift1public func handleCaptureFinished(images: [BIOFaceImage]?, biometrics: BIOBiometrics?, error: Error?, animationDuration: TimeInterval = 1, completionHandler: (()->())? = nil)
Method that you should call to handle capture finished information from SDK.
- Parameters:
- images: Captured images.
- biometrics: Captured biometrics.
- error: Capture error.
- animationDuration: Finish animation duration.
- completionHandler: Completion handler called after finishing the animation.
Parameters
Name | Description |
|---|---|
| images | Captured images. |
| biometrics | Captured biometrics. |
| error | Capture error. |
| animationDuration | Finish animation duration. |
| completionHandler | Completion handler called after finishing the animation. |
PassiveVideoLivenessHintsView
Swift1public class PassiveVideoLivenessHintsView: UIView
View used for displaying passive liveness hints above the camera preview.
Properties
hintsColor
Swift1@objc public dynamic var hintsColor = UIColor.idemiaBlack
Color of hints coloured background.
hintsDetailsColor
Swift1@objc public dynamic var hintsDetailsColor = UIColor.idemiaBlack
Color of hints details on coloured background.
imageTintColor
Swift1@objc public dynamic var imageTintColor = UIColor.idemiaBlack
Color of displayed images on coloured background.
hintsBackgroundColor
Swift1@objc public dynamic var hintsBackgroundColor = UIColor.idemiaLightGray
Color of hints background.
Methods
init(frame:)
Swift1public override init(frame: CGRect)
Initializes and returns a newly allocated view object.
- Parameter frame: Frame rectangle.
Parameters
Name | Description |
|---|---|
| frame | Frame rectangle. |
init(coder:)
Swift1public required init?(coder aDecoder: NSCoder)
Initializes and returns a newly allocated view object.
- Parameter aDecoder: Decoder.
Parameters
Name | Description |
|---|---|
| aDecoder | Decoder. |
resetState()
Swift1public func resetState()
Shows initial state with information to center your face.
handleDevicePitchTooLow()
Swift1public func handleDevicePitchTooLow()
Shows hint about device pitch too low.
handleScreenTap()
Swift1public func handleScreenTap()
Shows hint about no tapping needed.
handleCaptureIsLocked(seconds:)
Swift1public func handleCaptureIsLocked(seconds: Int)
Shows hint about locked capture.
- Parameter seconds: Duration of lock in seconds.
Parameters
Name | Description |
|---|---|
| seconds | Duration of lock in seconds. |
PassiveVideoLoadingView
Swift1public class PassiveVideoLoadingView: UIView
Properties
progress
Swift1public dynamic var progress: Int = -1
Progress bar, accepted values:
0 - 100 - progress
-1 - infinity animation
title
Swift1public var title: String?
Title label text
titleFont
Swift1public dynamic var titleFont: UIFont
Title label font
titleColor
Swift1public dynamic var titleColor: UIColor
Title label color
subTitle
Swift1public var subTitle: String?
Subtitle label text
subTitleFont
Swift1public dynamic var subTitleFont: UIFont
Subitle label font
subTitleColor
Swift1public dynamic var subTitleColor: UIColor
Subtitle label color
Methods
init(frame:)
Swift1public override init(frame: CGRect)
Initializes and returns a newly allocated view object.
- Parameter frame: Frame rectangle.
Parameters
Name | Description |
|---|---|
| frame | Frame rectangle. |
init(coder:)
Swift1public required init?(coder: NSCoder)
Initializes and returns a newly allocated view object.
- Parameter aDecoder: Decoder.
Parameters
Name | Description |
|---|---|
| aDecoder | Decoder. |
Enums
ChallengeView.ElementState
Swift1public enum ElementState: Equatable
Type of element state.
Cases
unset
Swift1case unset
Not set state.
unlinked
Swift1case unlinked
Not linked state.
linking(on:progress:)
Swift1case linking(on: Bool, progress: CGFloat)
Linking in progress state.
linked
Swift1case linked
Linking finished state.
failed
Swift1case failed
Linking failed state.
Methods
==(::)
Swift1public static func == (lhs: ElementState, rhs: ElementState) -> Bool
Comparator for ElementState enum.
- Parameters:
- lhs: ElementState enum.
- rhs: ElementState enum.
- Returns: True if given enums are the same, false otherwise.
Parameters
Name | Description |
|---|---|
| lhs | ElementState enum. |
| rhs | ElementState enum. |
ChallengeView.Layer
Swift1public enum Layer
Type of layer.
Cases
links
Swift1case links
Links layer.
targets
Swift1case targets
Targets layer.
pointer
Swift1case pointer
Pointer layer.
startPoint
Swift1case startPoint
Start point layer.
Protocols
ChallangeElementViewSource
Swift1public protocol ChallangeElementViewSource: class
Protocol that associates a view related to challange element with view model.
Properties
associatedView
Swift1var associatedView: UIView
Associated view.
ChallangeLink
Swift1public protocol ChallangeLink: ChallangeElementViewSource
Protocol used for implementing a custom link element between target points.
Properties
state
Swift1var state: ChallengeView.ElementState
State of the link.
Methods
drawLink(to:)
Swift1func drawLink(to: CGPoint)
Method that draws the link.
init(context:startPoint:)
Swift1init(context: ChallengeView.Context, startPoint: CGPoint)
Initializes and returns a newly allocated link object.
- Parameters:
- context: Challange context.
- startPoint: Link start point.
Parameters
Name | Description |
|---|---|
| context | Challange context. |
| startPoint | Link start point. |
ChallengePointer
Swift1public protocol ChallengePointer: ChallangeElementViewSource
Protocol used for implementing a custom link pointer element.
Properties
state
Swift1var state: ChallengeView.ElementState
State of the pointer.
angle
Swift1var angle: CGFloat
Angle of the pointer.
Methods
init(context:)
Swift1init(context: ChallengeView.Context)
Initializes and returns a newly allocated pointer object.
- Parameter context: Challange context.
Parameters
Name | Description |
|---|---|
| context | Challange context. |
ChallengeStartPoint
Swift1public protocol ChallengeStartPoint: ChallangeElementViewSource
Protocol used for implementing a custom starting point element.
Methods
init(context:)
Swift1init(context: ChallengeView.Context)
Initializes and returns a newly allocated starting point object.
- Parameter context: Challange context.
Parameters
Name | Description |
|---|---|
| context | Challange context. |
ChallengeTarget
Swift1public protocol ChallengeTarget: ChallangeElementViewSource
Protocol used for implementing a custom target point element.
Properties
state
Swift1var state: ChallengeView.ElementState
State of the target.
Methods
init(context:number:size:)
Swift1init(context: ChallengeView.Context, number: Int, size: CGSize)
Initializes and returns a newly allocated target object.
- Parameters:
- context: Challange context.
- number: Target number.
- size: Target size.
Parameters
Name | Description |
|---|---|
| context | Challange context. |
| number | Target number. |
| size | Target size. |
MLCCaptureView
Instance Properties
feedbackDisplayTime
Swift1var feedbackDisplayTime: TimeInterval
Time in seconds of displaying feedback messages. Default value is 2s.
flashesWarningTextReadingDelay
Swift1var flashesWarningTextReadingDelay: TimeInterval
Time in seconds of displaying (or reading) flashes warning text. Default value is 5s.
minimumDevicePitch
Swift1var minimumDevicePitch: Double
Minimum device pitch needed to perform the challenge.
moveCloserTextDelay
Swift1var moveCloserTextDelay: TimeInterval
Time in seconds of displaying (or reading) move closer text. Default value is 3s.
previewView
Swift1var previewView: UIImageView
View used for displaying preview from the camera.
showDeviceVerticalTiltFeedback
Swift1var showDeviceVerticalTiltFeedback: Bool
Set whether device tilt feedbacks will be displayed.
showFeedbacks
Swift1var showFeedbacks: Bool
Set whether capture feedbacks will be displayed.
showTappingFeedback
Swift1var showTappingFeedback: Bool
Set whether ‘no tapping’ feedbacks will be displayed.
smileAcquiredTextReadingDelay
Swift1var smileAcquiredTextReadingDelay: TimeInterval
Time in seconds of displaying (or reading) smile acquired text. Default value is 3s.
Instance Methods
applySmile(with:)
Swift1func applySmile(_ size: Double)
Method used to indicate smile challenge progress.
Parameters
Name | Description |
|---|---|
| with Double | percentage value (0.0-1.0) represent smile size |
handle(feedback:)
Swift1func handle(feedback: FaceCaptureFeedback)
Method used to handle displaying of face capture feedback.
Name | Description |
|---|---|
| feedback FaceCaptureFeedback | FaceCaptureFeedback object passed from CaptureSDK |
handleCapturePrepared(delay:timeToUnlockHandler:completionHandler:)
Swift1func handleCapturePrepared(delay: Int, timeToUnlockHandler: (() -> (Int))?, completionHandler: (() -> ())?)
Method that you should call before starting the capture. It is used to handle initial capture delay automatically, completionHandler is executed after capture is unlocked and ready to start.
Parameters
Name | Description |
|---|---|
| delay Int | Number of seconds for initial countdown. |
| timeToUnlockHandler () -> (Int) | Time to unlock handler. |
| completionHandler () -> () | Completion handler. |
hideIllumination
Swift1func hideIllumination()
Method that shall be called when illumination challenge is done.
prepareIllumination(scale:)
Swift1func prepareIllumination(scale: Double)
Method used to rescale oval preview before starting illumination phase.
showIllumination(red:green:blue:)
Swift1func showIllumination(red: Int, green: Int, blue: Int)
Method used to handle returned color by CaptureSDK, represented in RGB color.
Name | Description |
|---|---|
| red Int | Red color component (0-255) |
| green Int | Green color component (0-255) |
| blue Int | Blue color component (0-255) |
smileEnded(requestIllumination:)
Swift1func smileEnded(requestIllumination: () -> ())
Method used to end smile part of the challenge and start illumination part.
Name | Description |
|---|---|
| requestIllumination | This closure was designed to trigger illumination from CaptureSDK after all neccessary feedback on the UIExtension side. |
start
Swift1func start()
Prepares the view to perform the challenge. You should call this method before any other interaction with this view.
stop
Swift1func stop()
Cleans up the view after the challenge. You should call this method after you finish using this view.
setCancelListener(:)
Swift1func setCancelListener(_ listener: @escaping @convention(block) () -> (Void))
Sets action for the cancel button.
Name | Description |
|---|---|
| listener | Closure/block to be called when user taps cancel button. |
SmileSizeProgressView
Instance Properties
Swift1var progress: Double
It highlights progress size using specific color. (0-0.33) red, (0.34-0.66) yellow, (0.67-1) green.
FingerCaptureView
Swift1public class FingerCaptureView: UIView
View used for showing fingers scanning preview. In this view are drawn components which are responsible for displaying feedback, progress, overlays and current distance of fingers.
Properties
previewView
Swift1public var previewView: UIImageView
View used for displaying preview from the camera. It should be assigned to parameter preview in FingerCaptureHandler.
Swift1BIOSDK.createFingerCaptureHandler(with: options) { [weak self] bioCaptureHandler, error in2 /// some implementation3 /// Example how it should be assign4 self.captureHandler?.preview = self.captureView.previewView5 /// Start capture6 self.captureHandler?.startCapture()7 ...
Methods
init(frame:)
Swift1public override init(frame: CGRect)
Initializes and returns a newly allocated view object.
- Parameter frame: Frame rectangle.
Parameters
Name | Description |
|---|---|
| frame | Frame rectangle. |
init(coder:)
Swift1public required init?(coder aDecoder: NSCoder)
Initializes and returns a newly allocated view object.
- Parameter aDecoder: Decoder.
Parameters
Name | Description |
|---|---|
| aDecoder | Decoder. |
start(with settings:duration:)
Swift1public func start(with settings: DistanceIndicatorSettings?, duration: TimeInterval)
Prepares the view to perform the fingerprint scanning. You should call this method immediately after starting handler.
Example:
Swift1BIOSDK.createFingerCaptureHandler(with: options) { [weak self] bioCaptureHandler, error in2 /// some implementation3 self.captureHandler?.startCapture()45 //start captureView from UIExtensions with settings.6 let range = DistanceBarRange(from: captureHandler.captureDistanceRange())7 let settings = DistanceIndicatorSettings(with: range)89 self.captureView.start(with: settings, duration: captureHandler.fullCaptureTime())10 }
Parameters
Name | Description |
|---|---|
| settings | DistanceIndicatorSettings |
| duration | TimeInterval |
handle(distance value:)
Swift1public func handle(distance value: CGFloat)
This method should be called to handle distance from the fingers to the camera.
Swift1/// How to use this method:2 func fingerCaptureReceivedCurrentDistance(_ distance: FingerCaptureCurrentDistance) {3 captureView.handle(distance: distance.value)4 }
Parameters
Name | Description |
|---|---|
| distance | You should pass parameter value from FingerCaptureCurrentDistance located in BiometricSDK |
handle(trackingInfo)
Swift1public func handle(trackingInfo: [FingerTrackingInfo]?)
Method that you should call to handle tracking info from SDK.
Swift1/// How to use this method:2 func fingerCaptureReceivedTrackingInfo(_ trackingInfo: [FingerTrackingInfo]?, withError error: Error?) {3 captureView.handle(trackingInfo: trackingInfo)4 }
Parameters
Name | Description |
|---|---|
| trackingInfo | FingerTrackingInfo from BiometricSDK |
handle(feedback:)
Swift1public func handle(feedback: FingerCaptureInfo)
Method that you should call to handle capture info/feedback from BiometricSDK
Swift1/// How to use this method:2 func fingerCaptureReceivedFeedback(_ info: FingerCaptureInfo) {3 captureView.handle(feedback: info)4 }
Parameters
Name | Description |
|---|---|
| feedback | FingerCaptureInfo from BiometricSDK |
| #### reset() |
Swift1public func reset()
Cleans up the view after capture.
DistanceIndicatorSettings
Settings for distance indicator. You can pass in this class DistanceBarRange or turn off indicator.
Properties
distanceBarRange
Swift1let distanceBarRange: DistanceBarRange?
Range for indicator.
show
Swift1let show: Bool
Display distance bar indicator. You can turn off indicator.
Methods
init(with range:)
Swift1public init(with range: DistanceBarRange?, show: Bool = true)
Initializer for DistanceIndicatorSettings.
Parameters
Name | Description |
|---|---|
| range | DistanceBarRange contains information about optimal distance |
| show | this flag is responsible for displaying distance indicators |
DistanceBarRange
DistanceBarRange is needed to configure distance indicator displayed in FingerCaptureView. It is used as parameter in DistanceIndicatorSettings.
Graphical example which parameters are responsible for range bar:
|rangeMin-------|optimalMin-------optimalMax|---------rangeMax|
optimalMin and optimalMax have values always beetween rangeMin and rangeMax. If all values are equal: 0.0 then DistanceBarRange initializer return nil.
rangeMin
Swift1let rangeMin: CGFloat
Minimum range value for indicator.
optimalMin
Swift1let optimalMin: CGFloat
Optimal minimum value for indicator.
optimalMax
Swift1let optimalMax: CGFloat
Optimal maximum value for indicator.
rangeMax
Swift1let rangeMax: CGFloat
Maximum range value for indicator.
Methods
init?(from rangeResult)
Swift1public init?(from rangeResult: FingerCaptureDistanceRangeResult)
It can return nil if some parameters from this class are incorrect, nil or FingerCaptureDistanceResult contains error.
Parameters
Name | Description |
|---|---|
| rangeResult | FingerCaptureDistanceRangeResult from BiometricSDK |
Additional components
NFCReaderTutorialView
This component is intended to be used with NFC Reader.
TutorialView
This view shows tutorials provided by TutorialProvider in NFC Reader library. It contains one method:
start(animation:completion:)
It sets and starts animation in lottie format. At the end animation completion will be called.
Swift1public func start(animation: Data, completion: (()->())? = nil )
Quick Integration
-
In step 5. Add the pod in your
Podfile:
Language not specified1pod 'NFCReaderTutorialView'
- Proceed with next steps in tutorial.
Release notes
Version 2.3.0:
- Adds video liveness functionality.
Version 2.3.1:
- Bugfixes regarding Objective-C compatibility.
Version 2.3.2:
- Bugfixes regarding blur effect on high liveness chalange views.
- Bitcode for this version has been disabled.
Version 2.3.3:
- Bugfixes regarding Swift version incompatibility.
- Build with Xcode 14
Version 2.3.4:
- Bugfixes regarding with blur effect increasing during capture reattempt.
- Removing UI for obsolete
Mediumcapture mode.
Release notes are moved to iOS Release Notes
NFCReader
The NFC Reader library is the mobile part of the NFC Document Reading Solution. The core of the solution is the NFC Server (minimum supported version is 2.2.2), which collects and process the read data. Once the whole document's data is read, it is available to securely download from/or to push by the NFC Server. Reading is possible only on real iOS devices supporting NFC scanning.
This library allows to read ICAO compliant passports and IDs.
Quick integration guide
Adding the framework to your project
CocoaPods (from Artifactory)
- To use CocoaPods with Artifactory you must install the
cocoapods-artplugin. To installcocoapods-art, run the following command:
Language not specified1gem install cocoapods-art
- The plugin uses authentication as specified in a standard
.netrcfile.
Language not specified1machine mi-artifactory.otlabs.fr2login <USERNAME>3password <PASSWORD>
- Once set, add our repository to your cocoapod dependency management system:
Language not specified1pod repo-art add smartsdk "https://mi-artifactory.otlabs.fr/artifactory/api/pods/smartsdk-ios-local"
- At the top of your
Podfileadd:
Language not specified1plugin 'cocoapods-art', :sources => [2 'smartsdk' # so it could resolve NFCReader depdendency3]
-
(Optional) Before building the app, please change
Build libraries for distributionflag toYESin theBuild Settingsin Xcode for the project. If this flag is not visible usuallyBasicview is set as default. Then change toAll. -
Add the pod in your
Podfile:
Language not specified1pod 'NFCReader'
There is also XCFramework variant available:
Language not specified1pod 'NFCReader/XCFramework'
- Then you can use install as usual:
Language not specified1pod install
Note: If you already are using our repository, and you cannot resolve some dependency, try to update the specifications:
Language not specified1pod repo-art update smartsdk
Manual
-
In the project editor, select the target to which you want to add
NFCReader.framework. -
Click the General tab at the top of the project editor.
-
Scroll down to the Embedded Binaries section.
-
Click Add (+).
-
Click Add Other below the list.
-
Find the
NFCReader.framework(orNFCReader.xcframework) file and click Open. -
NFCReader.framework(orNFCReader.xcframework) needs specific dependency to compile the app:SQLite.swift. -
Add dependency
SQLite.swiftat least 0.14.0 ver. Follow tutorial from the webpage: manual integration with SQLite.swift -
(Optional) If
NFCReaderTutorialViewis added, please add another dependencylottie-ios4.4.1 ver. You can find it here: lottie-ios framework.
Start using the NFCReader
-
Create Identity on GIPS component using v1/identities endpoint. More information can be found here.
-
Create NFC session using MRZ lines fetched from the document and Identity id from previous step using v1/identities/{identityId}/id-documents/nfc-session endpoint. More informations can be found here.
-
Create the SmartNFCReader object. This is an entry point to the whole document reading procedure.
- The parameter
nfcConfigurationis the Configuration object with the customer identifier in the ID&V cloud.
Swift1//STEP 1 Create SmartNFCReader object (required minimum iOS 15 version)2if #available(iOS 15.0, *) {3 // STEP 1.1 Create NFC configuration4 var nfcConfiguration = Configuration(apiKey: "apiKey")5 // STEP 1.2 Set NFCServer's address if using other than EU PROD6 nfcConfiguration.serverAddress = "https://#{PROOFING_PLATFORM_URL}/nfc"7 // STEP 1.3 Set SDKExperience configuration8 nfcConfiguration.sdkExperience = Configuration.SDKExperience(apiKey: "apiKey")9 // STEP 1.4 Provide SDK Experience service and assets addresses if using other than EU PROD10 nfcConfiguration.serviceAddress = URL(string: "https://#{PROOFING_PLATFORM_URL}/sdk-exprience")!,11 nfcConfiguration.assetsAddress = URL(string: "https://#{ASSETS_URL}/assets/animations")!12 // STEP 1.5 Create the reader13 let reader = SmartNFCReader(configuration: nfcConfiguration)14 // STEP 1.6 Set the NFCReader's delegate15 reader.delegate = self16}
- Start reading process.
- Possibility of performing NFC reading on the current device can be also checked using static variable of the SmartNFCReader:
Swift1if SmartNFCReader.isAvailable {2 ...3}
-
After SmartNFCReader object is created the NFC reading process might be started. In order to do that,
session idwill be required. Thus ID should be obtained from the ID&V cloud. -
Implement SmartNFCReaderDelegate methods
Swift1func reader(_ reader: SmartNFCReader, didUpdateProgress progress: Int) {2 //Progress update3}45func reader(_ reader: SmartNFCReader, didFinishWithResult result Result<Void, SmartNFCReaderError>) {6 // Reading finished with success or failure7}
Swift1reader.start(sessionId: "sessionId")
Components
Configuration
This is the configuration class that contains information about the server url, customer identifier (apiKey), and which logs are available for viewing.
Parameter | Description |
|---|---|
serverAddress URL | The URL of the service where the reader can reach the NFCServer's device API. |
serverApiKey String | API key used for the authorization process |
logLevel LogLevel | Logging level |
translations LocalNFCConnectorTranslations | Localization translations for NFC related strings |
sdkExperience SDKExperience? | Configuration for SDKExperience, used by TutorialProvider. If missing, the provider will fall back to local configuration. |
SDKExperience
This is the configuration class for SDK Experience. Used by TutorialProvider.
Parameter | Description |
|---|---|
serviceUrl String | The URL of the service where the TutorialProvider can reach SDKExperience API. (It has default value) |
apiKey String | API key used for the authorization process |
assetsUrl String | The URL of the service where the TutorialProvider can reach animmations. (It has default value) |
LogLevel
This is the enum used to configure the behaviour of logs.
Attribute | Description |
|---|---|
VERBOSE | Show verbose logs |
DEBUG | Show debug logs |
INFO | Show info logs |
WARNING | Show warning logs |
ERROR | Show error logs |
NONE | Do not show logs |
SmartNFCReader
This is the main class that is an entry point to every activity connected with the document reading process.
start(sessionId:mrz:)
This method starts document's NFC reading process. It requires session id and MRZ lines as a parameters to fetch communication scripts.
Swift1public func start(sessionId: String, mrz: [String])
cancel()
This methods stops the NFC reading process.
Swift1public override func cancel()
var tutorialProvider
This property returns TutorialProvider instance. If field sdkExperience in Configuration is not set, the provider will fall back to local configuration.
Swift1public var tutorialProvider: TutorialProvider { get }
static var isNFCAvailable
This variable checks if all requirements needed for NFC reading process are satisfied.
Swift1if SmartNFCReader.isNFCAvaialable {2 //start reading3}
SmartNFCReaderDelegate
This delegate provides the possibility to invoke code based upon the reading result.
reader(_ reader: SmartNFCReader, didUpdateProgress progress: Int)
This method is called when reading progress changes. The value of progress parameter can be in the range from 0 to 100.
Swift1func reader(_ reader: SmartNFCReader, didUpdateProgress progress: Int)
reader(_ reader: SmartNFCReader, didFinishWithResult result Result<Void, SmartNFCReaderError>)
This method is called when the NFC chip has been read. Parameter result dictates whether it was successful or it failed due some failure.
Swift1func reader(_ reader: SmartNFCReader, didFinishWithResult result: Result<Void, SmartNFCReaderError>)
Failure
This contains information about the document reading failure. It's built from message, code and type. Type is a more general failure cause (more than one failures might have the same type). Code can be used to easily identify the error. The message contains detailed information what happened for a given type.
Failure types
- nfcConnectionBroken - NFC connection has been broken.
- connectionIssue - Cannot connect with external server, no internet connection.
- invalidSessionState - Session is in an unexpected state. New one needs to be created.
- serverConnectionBroken - Cannot process data with the server side, might be a compatibility issue.
- serverError - Server side error occurred.
- unsupportedDevice - Device does not support NFC or it's disabled.
- readingIssue - Document reading issue occurred. Can be related with NFC issues and data converting.
- requestsLimitExceeded - Document reading is impossible because of too many requests to server has been made or API key request limit has been exceeded.
- nfcInvalidPosition - NFC chip reading failed from invalid placement of the phone NFC antenna posiotn over document's chip.
- cancelled - The NFC reading has been canceled by the user.
- timeout - Reading timeout is reached.
- wrongMrz - The data from provided MRZ does not match with data on scanned document's NFC chip.
- unknown - Unidentified error has occurred.
TutorialProvider
This is the class that allow to get information about NFC antenna location on phone and document. It also provides animation DocumentType and animation based on the previous three variables.
provideNFCLocation(mrz:completion:)
This provides phone and document NFC antenna location on callback. It also provides document type.
Swift1public func provideNFCLocation(mrz: [String], completion: @escaping (Result<NFCLocation, LocationFetchError>) -> Void)
Thre is also async/await variant available:
Swift1public func provideNFCLocation(mrz: [String]) async -> Result<NFCLocation, LocationFetchError>
provideAnimation(location:completion:)
This provide animation in lottie format on callback.
Swift1public func provideAnimation(forLocation location: NFCLocation, completion: @escaping (Result<Data, AnimationFetchError>) -> Void)
Thre is also async/await variant available:
Swift1public func provideAnimation(forLocation location: NFCLocation) async -> Result<Data, AnimationFetchError>
NFCLocation
This is a class which contains information about phone and document NFC antenna location on callback. It also contains document type information.
Parameter | Description |
|---|---|
| phoneNFCLocation PhoneNFCLocation | NFC antenna location on phone. If NFC antenna location is unknown for us, we return list of possible locations |
| documentNFCLocation DocumentNFCLocation | NFC chip location on document. If we do not have information about location we return as a default FRONT_COVER |
| documentType DocumentType | Document type which have mrz |
| documentFeature String? | optional regional feature (eg. "METAL_COVER" for US) |
PhoneNFCLocation
This is the enum with information about phone NFC antenna location.
Attribute | Description |
|---|---|
TOP | NFC antenna is in top of phone |
MIDDLE | NFC antenna is in middle of phone |
BOTTOM | NFC antenna is in bottom of phone |
DocumentNFCLocation
This is the enum with information about document NFC location.
Attribute | Description |
|---|---|
FRONT_COVER | NFC chip is on cover of passport |
INSIDE_PAGE | NFC chip is on the first page of passport |
NO_NFC | Document do not have NFC antenna |
DocumentType
This is the enum with information about document type which have mrz.
Attribute | Description |
|---|---|
PASSPORT | Passport |
ID | eID |
UNKNOWN | Unknown |
LocationFetchError
This contains information about the NFC antenna location and document information fetching failure. It's built from message, code and type. Type is a more general failure cause (more than one failures might have the same type). Code can be used to easily identify the error. The message contains detailed information what happened for a given type.
Failure types
- mrzIssue - MRZ parser encountered an issue.
- unsupportedDevice - Device does not support NFC or it's disabled.
- connectionIssue - Cannot connect with external server.
- noInternetConnection - No internet connection.
- serverError - Server side error occurred.
- unknown - Unidentified error has occurred.
AnimationFetchError
This contains information about the tutorial animation fetching failure. It's built from message, code and type. Type is a more general failure cause (more than one failures might have the same type). Code can be used to easily identify the error. The message contains detailed information what happened for a given type.
Failure types
- readingIssue - Issue during reading animation format.
- unsupportedDevice - Device does not support NFC or it's disabled.
- documentTypeIssue - Document is not supported is its type is unkown.
- connectionIssue - Cannot connect with external server.
- noInternetConnection - No internet connection.
- serverError - Server side error occurred.
- unknown - Unidentified error has occurred.
Sample Application
Below you will find instructions to add and run the sample NFC application.
Note: To run the sample NFC application, you will need LKMS credentials along with NFC and IPV (GIPS) API keys.
Step 1: Obtain the API keys from the IDEMIA Experience Portal dashboard:
To obtain the API keys from the IDEMIA Experience Portal dashboard, follow these steps:
For NFC API Key:
Language not specified11. Log in to the [IDEMIA Experience Portal](https://experience.idemia.com/).22. In the top menu, go to My Dashboard and select My Identity Proofing.33. On the right-hand menu, under Access, select [**Environment**](/dashboard/my-identity-proofing/access/environments/).44. On the Environments page, look for the **gips-ua** key under Environment.
For IPV (GIPS) API Key:
Language not specified11. Log in to the [IDEMIA Experience Portal](https://experience.idemia.com/).22. In the top menu, go to My Dashboard and select My Identity Proofing.33. On the right-hand menu, under Access, select [**Environment**](/dashboard/my-identity-proofing/access/environments/).44. On the Environments page, look for the **gips-rs** key under Environment.
Note: Remember to use the default environment (EU PROD) and confirm that serverUrl value in NFCAppConfiguration is the same as the selected environment address.
Note: In case of using non-default environment, SDK Experience service and assets urls in SDKExperience initializer in NFCScanner.reader must be provided.
To access your LKMS and Artifactory credentials, follow these steps:
Language not specified11. Log in to the [IDEMIA Experience Portal](https://experience.idemia.com/).22. In the top menu, go to **My Dashboard** and select **My Identity Proofing**.33. On the right-hand menu, under **Access**, select **SDK artifactory and licenses**.44. On the **SDK artifactory and licenses**, go to [**Artifactory access**](/dashboard/my-identity-proofing/access/artifactory-and-licenses/) to find the credentials you need.
Step 2: Download the sample app source code as a .zip package from Artifactory at Artifactory.
Step 3: Before building the app, you need to configure the project settings and select the application build target. Go to Build Settings and set the Build libraries for distribution flag to YES. If this flag is not visible, it is likely because the Basic view is set as default. Switch to All to make the row with flag visible.
Step 4: In the folder with the source sample app run pod install to configure the project. Cocoapods has to be at least 1.14.3 ver.
Step 5: Open project settings again and select application build target. Make sure that General tab is selected.
- In Identity section make sure that Bundle Identifier (PRODUCT_BUNDLE_IDENTIFIER) is set to the APP_ID that you provided to us to generate your license.
- In
Capabilities & Signingsection make sure that your Team (DEVELOPER_TEAM) is selected.
Step 6: Open the NFCAppConfiguration and add NFC, IPV, LKMS and SDKExperience credentials.
Swift1enum NFCAppConfiguration {23 enum LKMS {4 static let endpoint: String = "URL for proofing platform"5 static let profileID: String = "profile id"6 static let apiKey: String = "license api key"7 }8 enum IPV {9 static let baseAddress: String = "URL for proofing platform"10 static let apiKey: String = "api key with ACL gips-rs"11 static let endpointUrl = URL(string: "\(baseAddress)/gips")!12 }13 enum NFCServer {14 static let baseAddress: String = "URL for proofing platform"15 static let apiKey: String = "api key with ACL gips-ua"16 static let endpointUrl = URL(string: baseAddress)!.appendingPathComponent("nfc")17 }18 enum SDKExperience {19 static let baseAddress: String = "URL for proofing platform"20 static let apiKey: String = "api key with ACL gips-ua"21 static let endpointUrl = URL(string: baseAddress)!.appendingPathComponent("sdk-experience")22 }
Step 4: You can now run the app. If you have followed all the steps correctly, you should not encounter any issues.