WebCapture SDK - FaceAutocapture and Liveness
Overview
WebCapture SDK (FaceAutocapture and Liveness) is intended to be used by service providers to build identity proofing services for their users.
- Biometric Services exposes a simple REST API to detect and recognize faces from still images.
- WebCapture SDK (FaceAutocapture and Liveness) brings face and liveness detection from video streams.
WebCapture SDK (FaceAutocapture and Liveness) video adds the ability to detect faces and liveness from video streams, and relies on the Biometric Services core to:
- Acquire a best-image from the video
- Create a face resource from this best-image and add it to a bio-session
Note: A demo app is available to showcase the integration of IDEMIA Web CaptureSDK for IDEMIA Identity offer
Github repository: https://github.com/idemia/WebCaptureSDK
Section: Face autocapture with liveness detection
Requirements
Minimal connectivity upload/download: 400 Kbps (means Wifi, 4G, regular 3G)
Maximal connectivity latency: 500ms
Minimal supported resolution: Video resolution HD (720 pixels * 1280 pixels)
Supported browsers:
Mobile
-
Android: Chrome 101+, FireFox 132+, Opera 87+, Samsung Internet 19+, HuaweiBrowser 12+, Brave 110+, Edge 127+
-
iOS: Safari 15.3+, Chrome 120+, FireFox 132+, Opera Touch 5+, Edge 125+
Note: Using Edge and Chrome on iOS generates a pop-up for a few seconds when the camera is opened. This may degrade the user experience by hiding part of the screen and possibly user instructions.
Desktop
-
Windows: Chrome 101+, Firefox 132+, Opera 87+, Edge 92+, Brave 110+
-
Mac OS: Safari 15.3+, Chrome 101+, Firefox 132+, Opera 87+
-
Linux,Ubuntu: Chrome 101+, Firefox 132+, Opera 87+, Brave 110+
WebView:
WebCapture SDK supports:
- Chrome WebView (v101+) on Android
- WKWebView on iOS (v15.3+)
In order to integrate properly the SDK in a WebView it is mandatory to follow the recommendations. See the FAQ section for integration details.
Webcams:
Webcams are supported. But as the webcam average quality is below smartphone camera quality, we have the following limitations:
- security : similar fraud detection rate than smartphone camera. Choice is being driven by the security
- degraded passrate : there are about twice more rejects than with a smartphone camera, depending on the webcam quality
Warning for developers :
WebCapture SDK is not blocking the usage of the debugger for integrator development convenience – nevertheless, for security purpose some elements of the development environment are detected making the liveness check failing from time to time during the development process.
Services
Biometric WebCapture SDK is a JavaScript SDK that permits the autocapture of high-quality selfie images and performs liveness verification through a web browser. No browser extension is required.
The computation is done within the back end. Only minimal resources from the user's smartphone are required.
Autocaptured images can then be matched using Biometric Services that are part of IDEMIA's overall solutions.
Biometric WebCapture SDK allows the following:
-
Provides dynamic guidance to the user in order to ensure a good quality image
-
Detects whether the web browser is compatible
-
Monitors the connectivity during the transaction
Liveness Possibilities
Passive Video Liveness
Passive-video liveness improves the user verification process by seamlessly integrating additional verification measures without requiring a challenge.
This method ensures a smooth user experience while still maintaining a high level of security. By adjusting the interaction based on the user's initial position, it gently adapts to provide a straightforward and efficient liveness confirmation, further enhancing the verification process with minimal user effort.
Passive Liveness
Passive liveness verifies the user's liveness without requiring the user to move their head or face. This allows the user to experience a frictionless experience.
This process is compatible with high-end mobile phones, average mobile phones, and some older model or more basic mobile phones.
PAD evaluation is done through an independent lab according to ISO/IEC 30107-3. Click these links for more information:
Active Liveness
Active liveness verifies the user's liveness while the user is moving their head. The user is requested to perform a challenge by moving their head to follow a series of displayed dots on the screen, as one dot appears after another. (The user must follow the displayed dots correctly with their head.)
This process is compatible with high-end mobile phones, average mobile phones, and some older model or more basic mobile phones.
PAD evaluation is done through an independent lab according to ISO/IEC 30107-3. Click these links for more information:
Getting Started
Biometric WebCapture SDK is intended to be used by service providers to build identity proofing services for their users. It is a JavaScript SDK hosted within a back end server. This SDK allows face and liveness detection from video streams.
The main services are:
- Acquiring a best-image from a video stream
- Performing a liveness check to verify that the acquired FACE is genuine and not a photocopy, video, or mask
JavaScript Files SDK
This SDK is not a set of tools to download, but rather JavaScript files that are to be integrated into a client web application.
To include the JavaScript files in the main HTML page of the client application:
- Use a script tag in the HTML header for each JavaScript file
- Set the
srcattribute to the .js file location
Environment Detection
HTML1<script src="$URL-WBS/video-server/bioserver-environment-api.js"></script>
This detects if the current environment (OS/browser) is supported. If the environment is not supported, the response contains a list of supported browsers according to the current OS (parameter supportedBrowser).
For more details, please refer to : EnvironmentDetection
Network Check
HTML1<script src="$URL-WBS/video-server/bioserver-network-check.js"></script>
This JavaScript library allows the ability to check user connectivity requirements for video capture, by calculating latency and upload speeds.
For more details, please refer to : NetworkCheck
UI Extension
HTML1<script src="$URL-WBS/video-server/bioserver-video-ui.js"></script>
This is the JavaScript library of the user interface management that allows the ability to customize the HTML elements associated with the capture and challenge instructions.
For more details, please refer to : UIExtensions
Face Capture
HTML1<script src="$URL-WBS/video-server/bioserver-video-api.js"></script>
This is the Javascript library that allows the ability to retrieve the user's camera from a browser and perform real-time communication using a websocket.
For more details, please refer to : FaceCapture
Liveness modes
Each liveness mode requires its own user interface because integrating a particular liveness involves a unique tutorial, a distinct method of showing the video stream to the user, a different approach to presenting the challenge, and varied feedback from the liveness detection algorithm.
- Liveness Passive
The liveness mode is LIVENESS_PASSIVE. It means a liveness check on a single best image without a challenge.
Only biometric passive liveness and spoof detection are done.
- Liveness Passive Video (recommendation)
The liveness mode is LIVENESS_PASSIVE_VIDEO. It means a liveness check on the whole video without a challenge.
Only biometric passive liveness and spoof detection are done.
- Active Liveness
The liveness mode is LIVENESS_ACTIVE. Biometric active liveness and spoof detection are done. The user must meet the challenge Joining the dots. The user interacts with Biometrics Web Server by following challenge instructions on the screen.
Integrate Sample App
As an integrator, you can follow the three steps below. The process will take approximately 15 minutes to test and use the Biometric WebCapture SDK through our sample client application.
1. Requirements:
Required Systems
-
Linux or Windows OS
-
Memory: At least 8GB of RAM
-
CPU: CPU 2.5 GHz
Install Node.js
To facilitate integration with the Biometric Services SDK, we provide a web application in source code as an integration good practice example.
This sample application is developed in Node.js. To use it, install Node.js as shown below:
- Linux: Download & install https://nodejs.org/dist/v16.17.1/node-v16.17.1-linux-x64.tar.gz
- Windows: Download & install https://nodejs.org/dist/v16.17.1/node-v16.17.1-x64.msi
Node installation process installs also npm.
Integration Environment
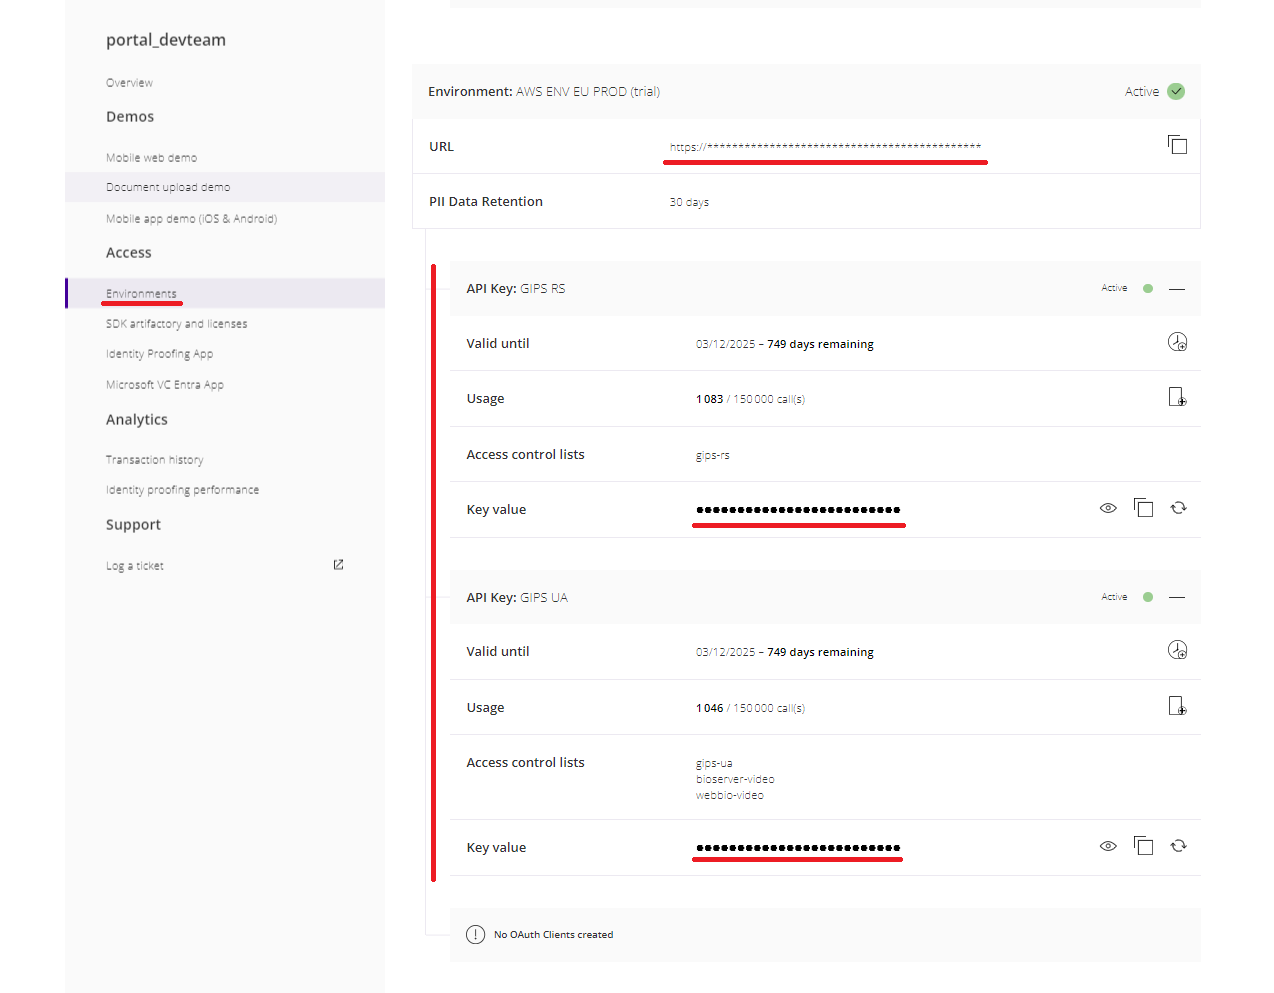
In order to start the integration, you need an API key and access to a sandbox environment. You can obtain these by registering at:
After registering, click on 'My Dashboard' then 'Environment' and finally choose 'Trial' or 'Production' for your tests. The following information has to be retrieved from the displayed dashboard to connect to the testing environment:
- The unique URL for the Bioserver (SDK backend) and ID&V services
- Two API keys for secure backend connections : Bioserver (SDK backend) and ID&V services
JavaScript1`GIPS RS` // API key for ID&V services2`GIPS UA` // API key for Bioserver (SDK backend)
Integration Methods
There are two primary ways to integrate this technology:
-
ID&V Integration
IDEMIA's ID&V (Identity Proofing and Verification) service offers identity proofing to applications worldwide via the internet.
-
Bioserver Component Usage
This approach allows for biometric operations using only the Bioserver component.
By default, ID&V workflow is enabled in this sample application.
2. Deploy Sample App
- Download the latest sample web application from github repository.
Github repository: https://github.com/idemia/WebCaptureSDK
-
Unzip the archive and go to the root folder.
-
Go to the folder /face-autocapture-with-liveness-detection. It contains Biometrics Sample App.
-
Edit the file '/server/config/default.js' and update the configuration variables to set your environment :
- Biometrics credentials
- Biometrics Services URL
- Activate or deactivate ID&V workflow
- ID&V credentials and URL (if ID&V workflow is enabled)
- Update your Biometrics credential with the API key available from your portal account.
JavaScript1WEB_SDK_LIVENESS_ID_DOC: '<WEBC_SDK_APIKEY_FROM_EXPERIENCE_PORTAL>'
- Update the Biometric Services URL using the environment information available in your portal account.
JavaScript1BIOSERVER_CORE_URL: '<URL_FROM_EXPERIENCE_PORTAL>/bioserver-app/v2', // Biometric API2BIOSERVER_VIDEO_URL: '<URL_FROM_EXPERIENCE_PORTAL>', // Biometric SDK
- Activate or deactivate ID&V workflow. If configuration value is true, ID&V workflow is enabled. If configuration value is false, ID&V workflow is disabled. Note: The age estimation feature is only supported if IDPROOFING value is false.
JavaScript1IDPROOFING: true
- If ID&V workflow is enabled, update your ID&V credentials and URL with the information available from your portal account.
JavaScript1GIPS_URL: '<URL_FROM_EXPERIENCE_PORTAL>/gips',2 GIPS_RS_API_Key: '<GIPS_RS_APIKEY_FROM_EXPERIENCE_PORTAL>',
- Create a TLS keypair and certificate. You can also convert an existing key/certificate in PEM format into a PKCS#12 file, or use an existing one. Then, fill in the values in the server/config/defaults.js file with the corresponding file locations.
An example snippet is shown below:
JavaScript1TLS_KEYSTORE_PATH: path.join(__dirname, 'certs/demo-server.p12'),2TLS_KEYSTORE_PASSWORD: loadSecretFromFile(path.join(__dirname, 'secrets/tls_keystore_password.txt')),
The password of this keystore should be filled inside the default file at 'secrets/tls_keystore_password.txt'
Notes: Alternatively, for a quick local deployment, you can disable TLS and deploy the demo server on a HTTP port. Set the keys as shown below to deploy the server on http only:
JavaScript1HTTP_SERVER_PORT: 8080,2TLS_API_PORT: null,
3. Run and Test Sample App
-
Open a terminal to the root folder
-
Check your version of npm and Node.js
Shell1node -v2npm -v
- Launch following command to load the dependencies
Shell1npm install --verbose
- Launch following command to run the sample application
Shell1npm run start
- Now you can open a browser with the following link:
Note: Alternatively, for a quick local deployment, if you have previously set 8080 as the HTTP port and disabled TLS, you can open a browser with the following link:
Note: If you can't access the URLs set by the portal and you are under a proxy, add the following key to your Sample App configuration and restart.
JavaScript1PROXY_URL: 'http://[ip_or_servername]:[port]'
Note: For testing sample source code from GitHub with an Android phone please consult FAQ section.
Warning: Since the front-end sources and the back-end sources are located under this same package, everything should be protected behind an authentication tool (except for local test purposes). The defaults.js source file should not be exposed at any time to the world (it contains the API key used to communicate with the Document WebCapture SDK). A good practice is to use an external tool to retrieve the API key and any sensitive information, such as KMS or VAULT.
Use Case 1: Bioserver Component Usage
-
Deploy Sample App as described above: link to the section.
-
Disable ID&V workflow.
JavaScript1IDPROOFING: false
- Run and Test Sample App as described above: link to the section.
Use Case 2: ID&V Integration with ID&V workflow
-
Deploy Sample App as described above: link to the section.
-
Enable ID&V workflow and update Sample App configuration as follows :
JavaScript1IDPROOFING: true,2GIPS_URL: '<URL_FROM_EXPERIENCE_PORTAL>/gips',3GIPS_RS_API_Key: '<GIPS_RS_APIKEY_FROM_EXPERIENCE_PORTAL>',
Update your ID&V credentials and URL with the information available from your portal account.
- Run and Test Sample App as described above : link to the section.
Note: The age estimation feature is not supported in this use case.
Sample App Configuration
Parameters for changing Liveness Mode
Variable | Description | Value |
|---|---|---|
LIVENESS_MODE | The liveness capture mode. Determines the type of capture and liveliness control to be performed on the video stream. | Allowed values: LIVENESS_PASSIVE, LIVENESS_PASSIVE_VIDEO, LIVENESS_ACTIVE. Recommendation: LIVENESS_PASSIVE_VIDEO mode. |
LIVENESS_ACTIVE_NUMBER_OF_CHALLENGE | Number of dots generated for « join the dots » challenge. Only applies when LIVENESS_MODE is set to LIVENESS_ACTIVE | 2 |
Parameters for changing Security/Usability Compromise
Variable | Description | Value |
|---|---|---|
LIVENESS_SECURITY_LEVEL | The security level applied on fraud detection. The higher the level, the stricter the fraud verification. Allowed values: LOW, MEDIUM,HIGH. Recommendation: HIGHlevel for all liveness modes. |
Other Parameters
The table shows other configuration variables used for the autocapture.
Variable | Description | Value |
|---|---|---|
DISABLE_CALLBACK | Disables the callback functionality from WebBioServer | true |
SERVER_PUBLIC_ADDRESS | Sample page public address. Used to callback the sample page when the liveness capture is finished. | https://[ip_or_servername]:[port]. Ex: https://localhost:9943 |
LIVENESS_RESULT_CALLBACK_PATH | Used in the callback URL to receive liveness result from the Biometrics WebCapture | /liveness-result-callback |
BIOSERVER_CORE_URL | Biometrics WebCapture URL for images coding and matching. Biometrics WebCapture exposes a simple REST API to detect and recognize faces from still images. It also exposes rest API to save and retrieve the liveness capture result in a session. This server is used by the WebCapture SDK for the coding captured best image and to save and retrieve the liveness capture result in a session. | https://[ip_or_servername]:[port]/bioserver-app/ https://localhost/bioserver-app/ |
BIOSERVER_VIDEO_URL | Biometrics WebCapture SDK URL | https://[ip_or_servername]:[port] For example: https://localhost:9443 |
WEB_SDK_LIVENESS_ID_DOC | Biometrics API key | ******************** |
IDPROOFING | To link sample application server with ID&V | false |
GIPS_URL | ID&V API URL | <URL_FROM_EXPERIENCE_PORTAL>/gips |
GIPS_RS_API_Key | ID&V API key | ******************** |
PROXY_URL | Proxy | http://[ip_or_servername]:[port] |
Files from Sample App
The table list the files contained in the Sample App.
Filename | Description |
|---|---|
| ./index.js | NodeJS index file that initialize front-end endpoints and call the file ''./server/httpEndpoints.js" for back-end endpoints |
| ./package.json | nodeJS dependencies |
| ./GettingStarted.md | Readme markdown file |
| ./assets/* | Contains a video tutorial for active liveness |
| ./licenses | Licenses from the demonstration project |
| ./server | Back-end side package |
| ./server/wbs-api.js | Allow communication with WebBioserver API |
| ./server/packer.js | Prepare the front-end source to be exposed |
| ./server/httpEndpoints.js | Back-end endpoint (used by the front end to reach ID&V and WebBioserver) |
| ./server/gips-api.js | Allow communication with ID&V API |
| ./server/config/index.js | Read the Server configuration file and set defaults keys |
| ./server/config/defaults.js | Server configuration file |
| ./server/config/certs/* | Procedure for TLS certificate generation |
| ./server/config/i18n/* | Translation files (spanish / french / japanese) |
| ./front | Front-end side package |
| ./front/utils/* | Common resources called by front-end JS |
| ./templates | Front-end sources divided by each supported liveness mode |
| ./templates/active-liveness/index.js | Unique Active liveness javascript. All the JS source code to integrate the active liveness is present here. |
| ./templates/active-liveness/index.html | Unique Active liveness html. All the html source code to integrate the active liveness is present here. |
| ./templates/active-liveness/home.html | Home page for active liveness that expose only links to the main active index.html page |
| ./templates/active-liveness/statics | Assets: images, logo, fonts, css for active liveness |
| ./templates/active-liveness/animations | JSON animation files (alternative to .gif) for active liveness |
| ./templates/passive-liveness/index.js | Unique passive liveness JavaScript. All the JS source code to integrate the passive liveness is present here. |
| ./templates/passive-liveness/index.html | Unique passive liveness HTML. All the HTML source code to integrate the passive liveness is present here. |
| ./templates/passive-liveness/home.html | Home page for passive liveness that expose only links to the main passive index.html page |
| ./templates/passive-liveness/statics | Assets : images, logo, fonts, css for passive liveness |
| ./templates/passive-liveness/animations | JSON animation files (alternative to .gif) for passive liveness |
| ./templates/passive-video-liveness/index.js | Unique passive video liveness JavaScript. All the JS source code to integrate the passive video liveness is present here. |
| ./templates/passive-video-liveness/index.html | Unique passive video liveness HTML. All the HTML source code to integrate the passive video liveness is present here. |
| ./templates/passive-video-liveness/home.html | Home page for passive video liveness that expose only links to the main passive index.html page |
| ./templates/passive-video-liveness/statics | Assets : images, logo, fonts, css for passive video liveness |
| ./templates/passive-video-liveness/animations | JSON animation files (alternative to .gif) for passive video liveness |
Use Cases
The two use cases for liveness detection and their corresponding UML diagrams follow.
Note: These use cases refer to comparisons with a reference image. The reference face image is any previously acquired face image, which can be:
-
A face image extracted from the identity document, either from a scanned copy of the document or from the NFC chip on a passport.
-
Face stored with a system of record (SOR), such as a driver's license.
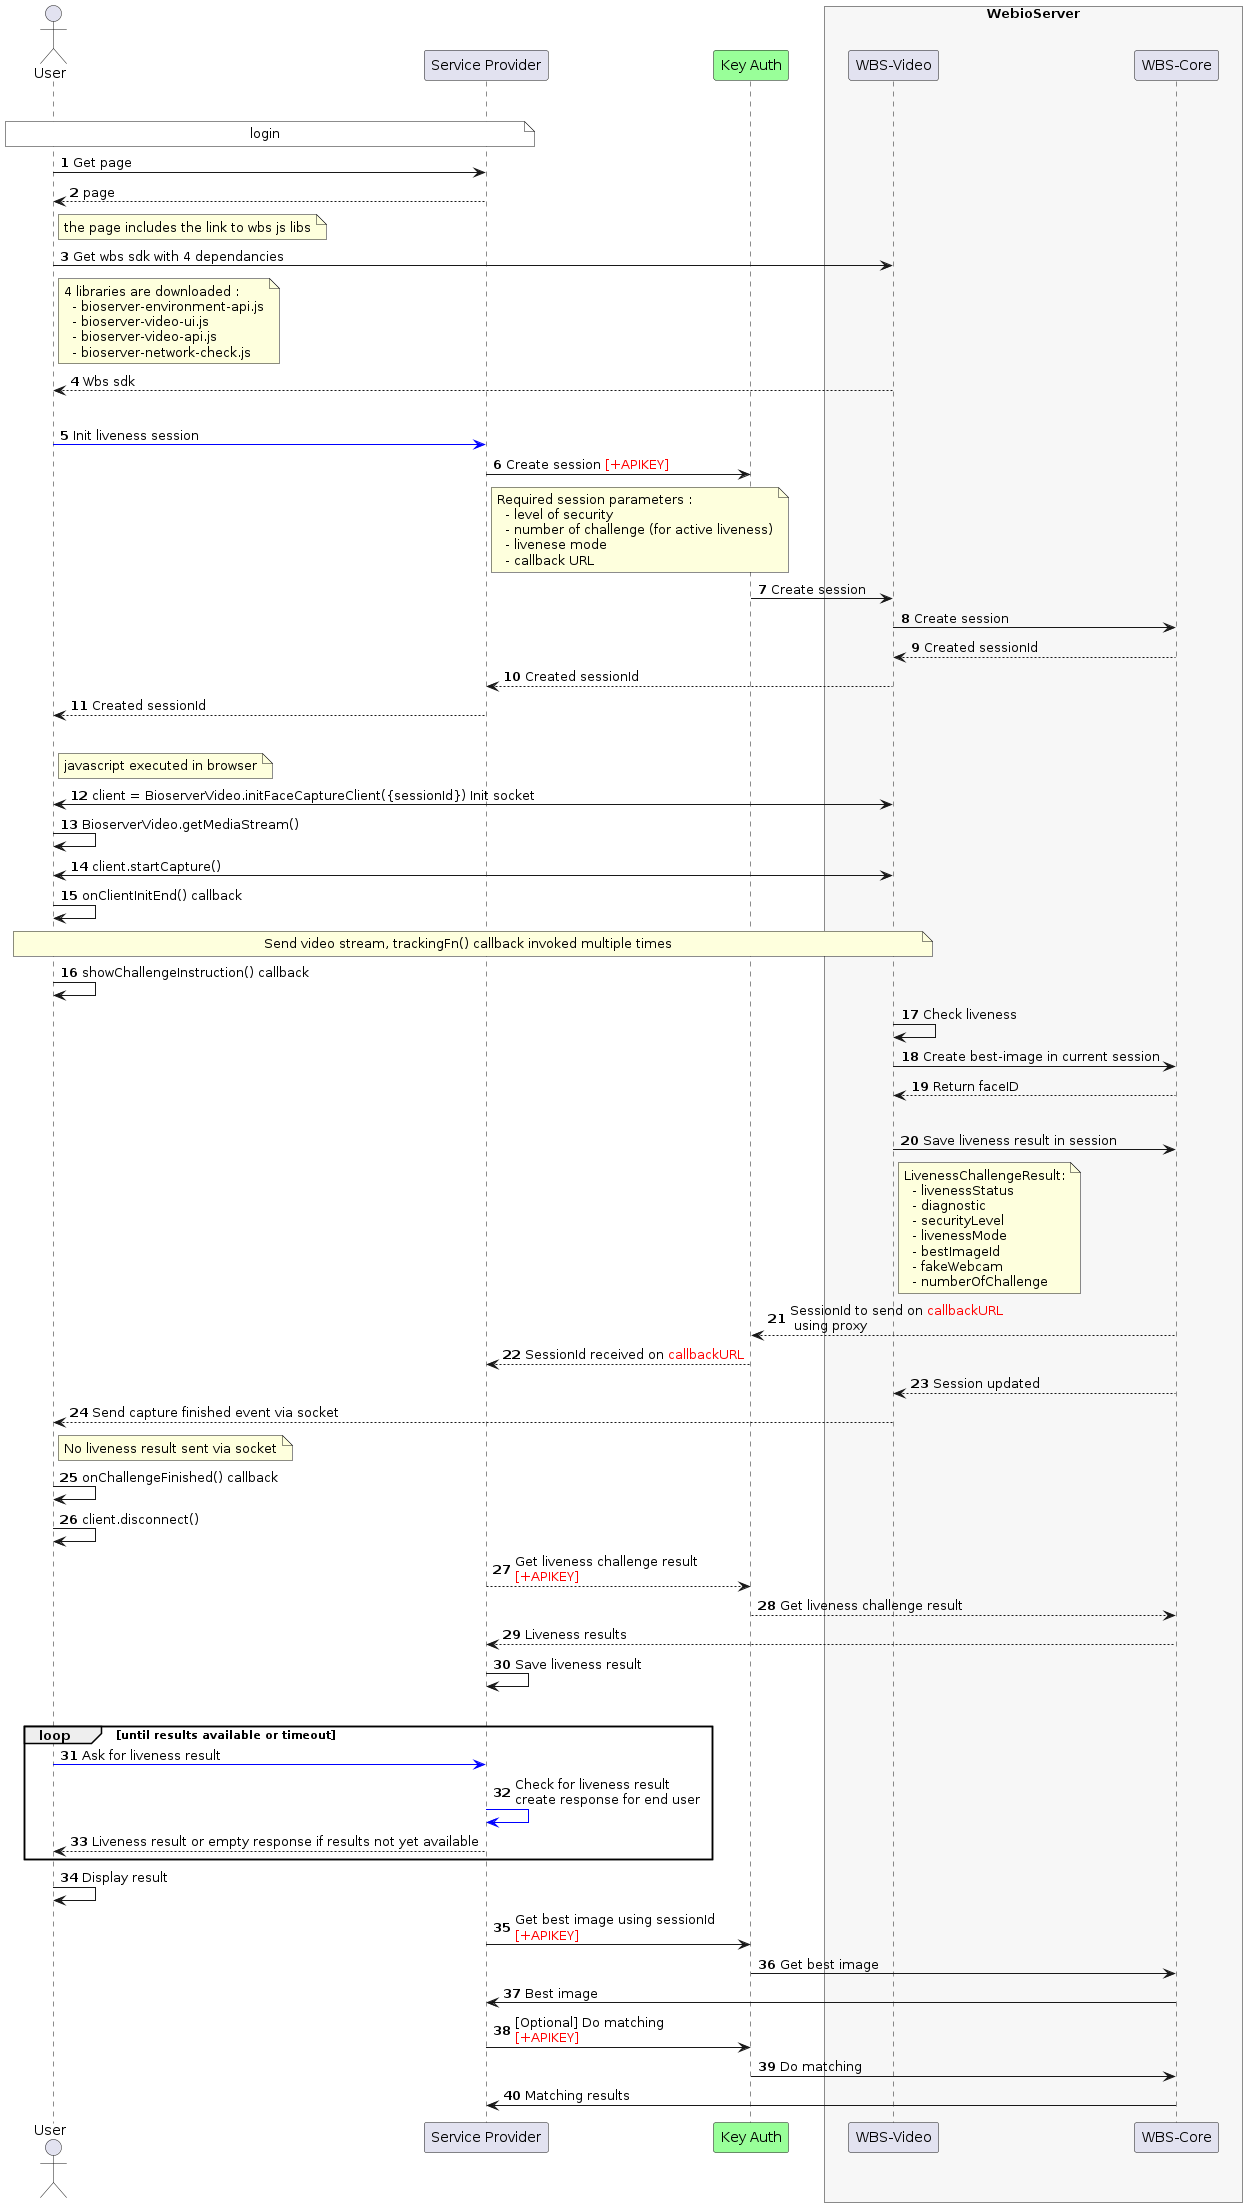
Use Case 1: Direct Integration through WebBioServer (Liveness Detection and optional matching)
API UML Diagram
The API UML diagram for the liveness detection and matching use case is shown.
Use Case Overview
This use case consists of determining that the user interacting with the application is a physically present human being and not an animated artifact:
-
If the liveness check is successful, the extracted portrait can be compared to a reference image.
-
A Service Provider (SP) is an entity developing applications and use cases on top of the Biometric WebCapture Server.
-
The WebCapture Server doesn't know the users and doesn't keep any user's data. Users are managed by the SP.
API Process Steps
Step 1: Load web application with WebCapture JavaScript SDK
This step is described in the API UML Diagram on lines 1 to 4 above:
-
A user is asked for a face biometric authentication via a web application developed by SP.
-
The user launches the web application with a compatible browser.
By this action, all the JavaScript libraries required to interact with the web capture server are loaded in the browser and become ready to use as described in the section below:
HTML1<script src="$URL-WBS/video-server/bioserver-video-api.js"></script>2<script src="$URL-WBS/video-server/bioserver-environment-api.js"></script>3<script src="$URL-WBS/video-server/bioserver-network-check.js"></script>4<script src="$URL-WBS/video-server/bioserver-video-ui.js"></script>
Step 2: Initialize a liveness session
This step is described in the API UML Diagram on lines 5 to 11:
-
The user asks for a face liveness capture session.
-
The web application of SP handles the request and uses Rest API initLivenessSession of the Biometric WebCapture Server.
This request creates a new session with the liveness verification settings.
Step 3: Initialize a face capture
This step is described in the API UML Diagram on line 12:
-
The user uses the SDK JavaScript function to initialize a face capture client.
-
initFaceCaptureClient is a JavaScript function executed in the browser that creates a capture client with a specific configuration that determines the behavior of the client when certain events occur during the capture.
These events can be:
- Tracking events that trace the position of the end user's face
- Instructions for completing a challenge
- End of capture event
- Error events
-
The face capture client is a websocket client.
Step 4: Retrieve a video stream
This step is described in the API UML Diagram on line 13:
-
The user uses the SDK JavaScript function to retrieve a video stream of the selected device.
-
getMediaStream is a JavaScript function executed in the browser that requests access to the given audio-input and camera devices and returns the associated media stream.
-
When opening a media stream a specific configuration can be applied to define capture conditions such as camera resolution and frame rate.
Step 5: Start the face capture
This step is described in the API UML Diagram on line 14:
-
The returned face capture client allows the ability to start and stop the face capture on a given video stream, catch face tracking info, manage challenges, and handle errors.
-
The startCapture JavaScript function is used to start the capture by establishing a peer-to-peer communication between the client (browser) and the server located in the Capture server.
-
When calling startCapture, wait until receiving the onClientInitEnd before displaying the video stream to the enduser.
Step 6: Complete the challenge by following the server instructions
This step is described in the API UML Diagram under the note Send video stream. Depending on the verification level configured, instructions are sent back to the user to perform challenges.
Step 7: End the capture process
This step is described in the UML API Diagram on lines 17 to 26. The capture can end in several ways:
-
The liveliness verification is completed (success or failure) on the server side. The server stops the process and sends a 'stop video capture' message to the client.
-
The capture timeout is reached and then the server stops the process and sends a stop video capture message to the client.
-
The client can then use the
stopJavaScript function to stop the communication and close the camera.
Step 8: Ask for a liveness detection result
This step is described in the UML API Diagram on lines 27 to 34. To retrieve the result of the capture and liveness check, two modes are available:
-
Polling on Biometric Services Rest API: getLivenessChallengeResult URL.
-
Using Biometric Services WebHook: After the capture is done, the SP's server will receive a notification indicating the result is available.
Retrieving the Capture
The SP's server uses the Biometric Services Rest API getLivenessChallengeResult URL to retrieve the capture, and RHWN presents it to the user.
Returning the Results
At the end of the capture, if the verification was successful, the server returns the following to the SP:
-
The result of the biometric liveness verification:
SUCCESS: the liveness test completed.FAILED: the liveness test did not complete; a technical error occurred.ERROR: the liveness test did not complete; a technical error occurred.SPOOF: the liveness test was not a success; a deception (spoof) was suspected.TIMEOUT: the liveness test was not completed within the time permitted.
-
The identifier of the best captured image and whether the verification was successful
Step 9: Ask for the best face image captured
This step is described on the sequence diagram on the lines 35 to 37.
The Service Provider's server can use the Biometric Services Rest API getFaceImage
- getFaceImage: retrieves the best image captured and stored into Biometric service session as the face resource.
Step 10: Match the best image against the reference image
This step is described in the API UML Diagram on lines 38 to 40:
-
In addition to face detection, there is the possibility to verify an identity by using biometric matching between the captured face and the reference portrait.
-
The SP can authenticate a captured image by matching it against a reference image from a database or a selfie captured online.
This uses the Biometric Services Rest API below:
- getMatches: the reference face is compared to the captured image created in the Biometric service session. The result of the comparison is called a “match”.
- The match is composed of the reference face, a candidate face, a matching score, and a false acceptance rate.
- The check is successful if the matching score is above a threshold defined by configuration.
For more information regarding biometric matching, see Matches APIs
Biometrics REST APIs
This section of the document is a brief summary of the REST APIs called in the current use case.
Description | Link |
|---|---|
| Initiate liveness session | initLivenessSession |
| Get liveness result | getLivenessChallengeResult |
| Get face image | getFaceImage |
| Get matches result | getMatches |
JavaScript APIs
This section of the document is a brief summary of the JavaScript APIs called in the current use case.
Description | Link |
|---|---|
| Initiate client | initFaceCaptureClient |
| Get media stream | getMediaStream |
| Start capture | startCapture |
Use Case 2: Integration through ID&V (Liveness Detection)
ID&V (Identity Proofing and Verification) offers a global identity service for capturing and validating a user's portrait. This service:
- Captures the user's portrait during a video stream
- Verifies that the user is a live person
- Verifies that the face corresponds to the face that is displayed on a reference identity document (evidence). That reference identity document will have been previously verified by the service.
The liveness portrait video capture uses the WebCapture SDK for face and liveness detection:
-
The liveness portrait video is acquired from the browser
-
The liveness capture with Challenge/Response is performed (user has to move their head with movement determined by the service provider)
-
The best portrait image is extracted
This best image will be used internally in ID&V, in the same way that a selfie capture image for biometric user verification is used during the ID&V biometric matching.
Requirements
To execute the scenarios, the client application needs API Keys and URLs to access the ID proofing service and the Biometric WebCapture Server:
- GIPS-RS key for back-end–to–back-end communication
- GIPS-UA key for the user-facing application to ID Proofing back-end communication
- An API key and a URL to access the WebCapture Server
- An API key and a URL to access the Biometric Services REST API.
See the provided sample web application in Getting Started for more details.
Details about the Identity Verification with the ID&V service are available in the Identity Document Capture and Verification (ID&V) Guide.
API UML Diagram
The API UML diagram below details how a client application can verify an identity document and a user's portrait using the Biometric WebCapture Server to verify the liveness of the user's portrait.
There are two ways of capturing a self-portrait image for an individual:
- Selfie capture
- Liveness video capture
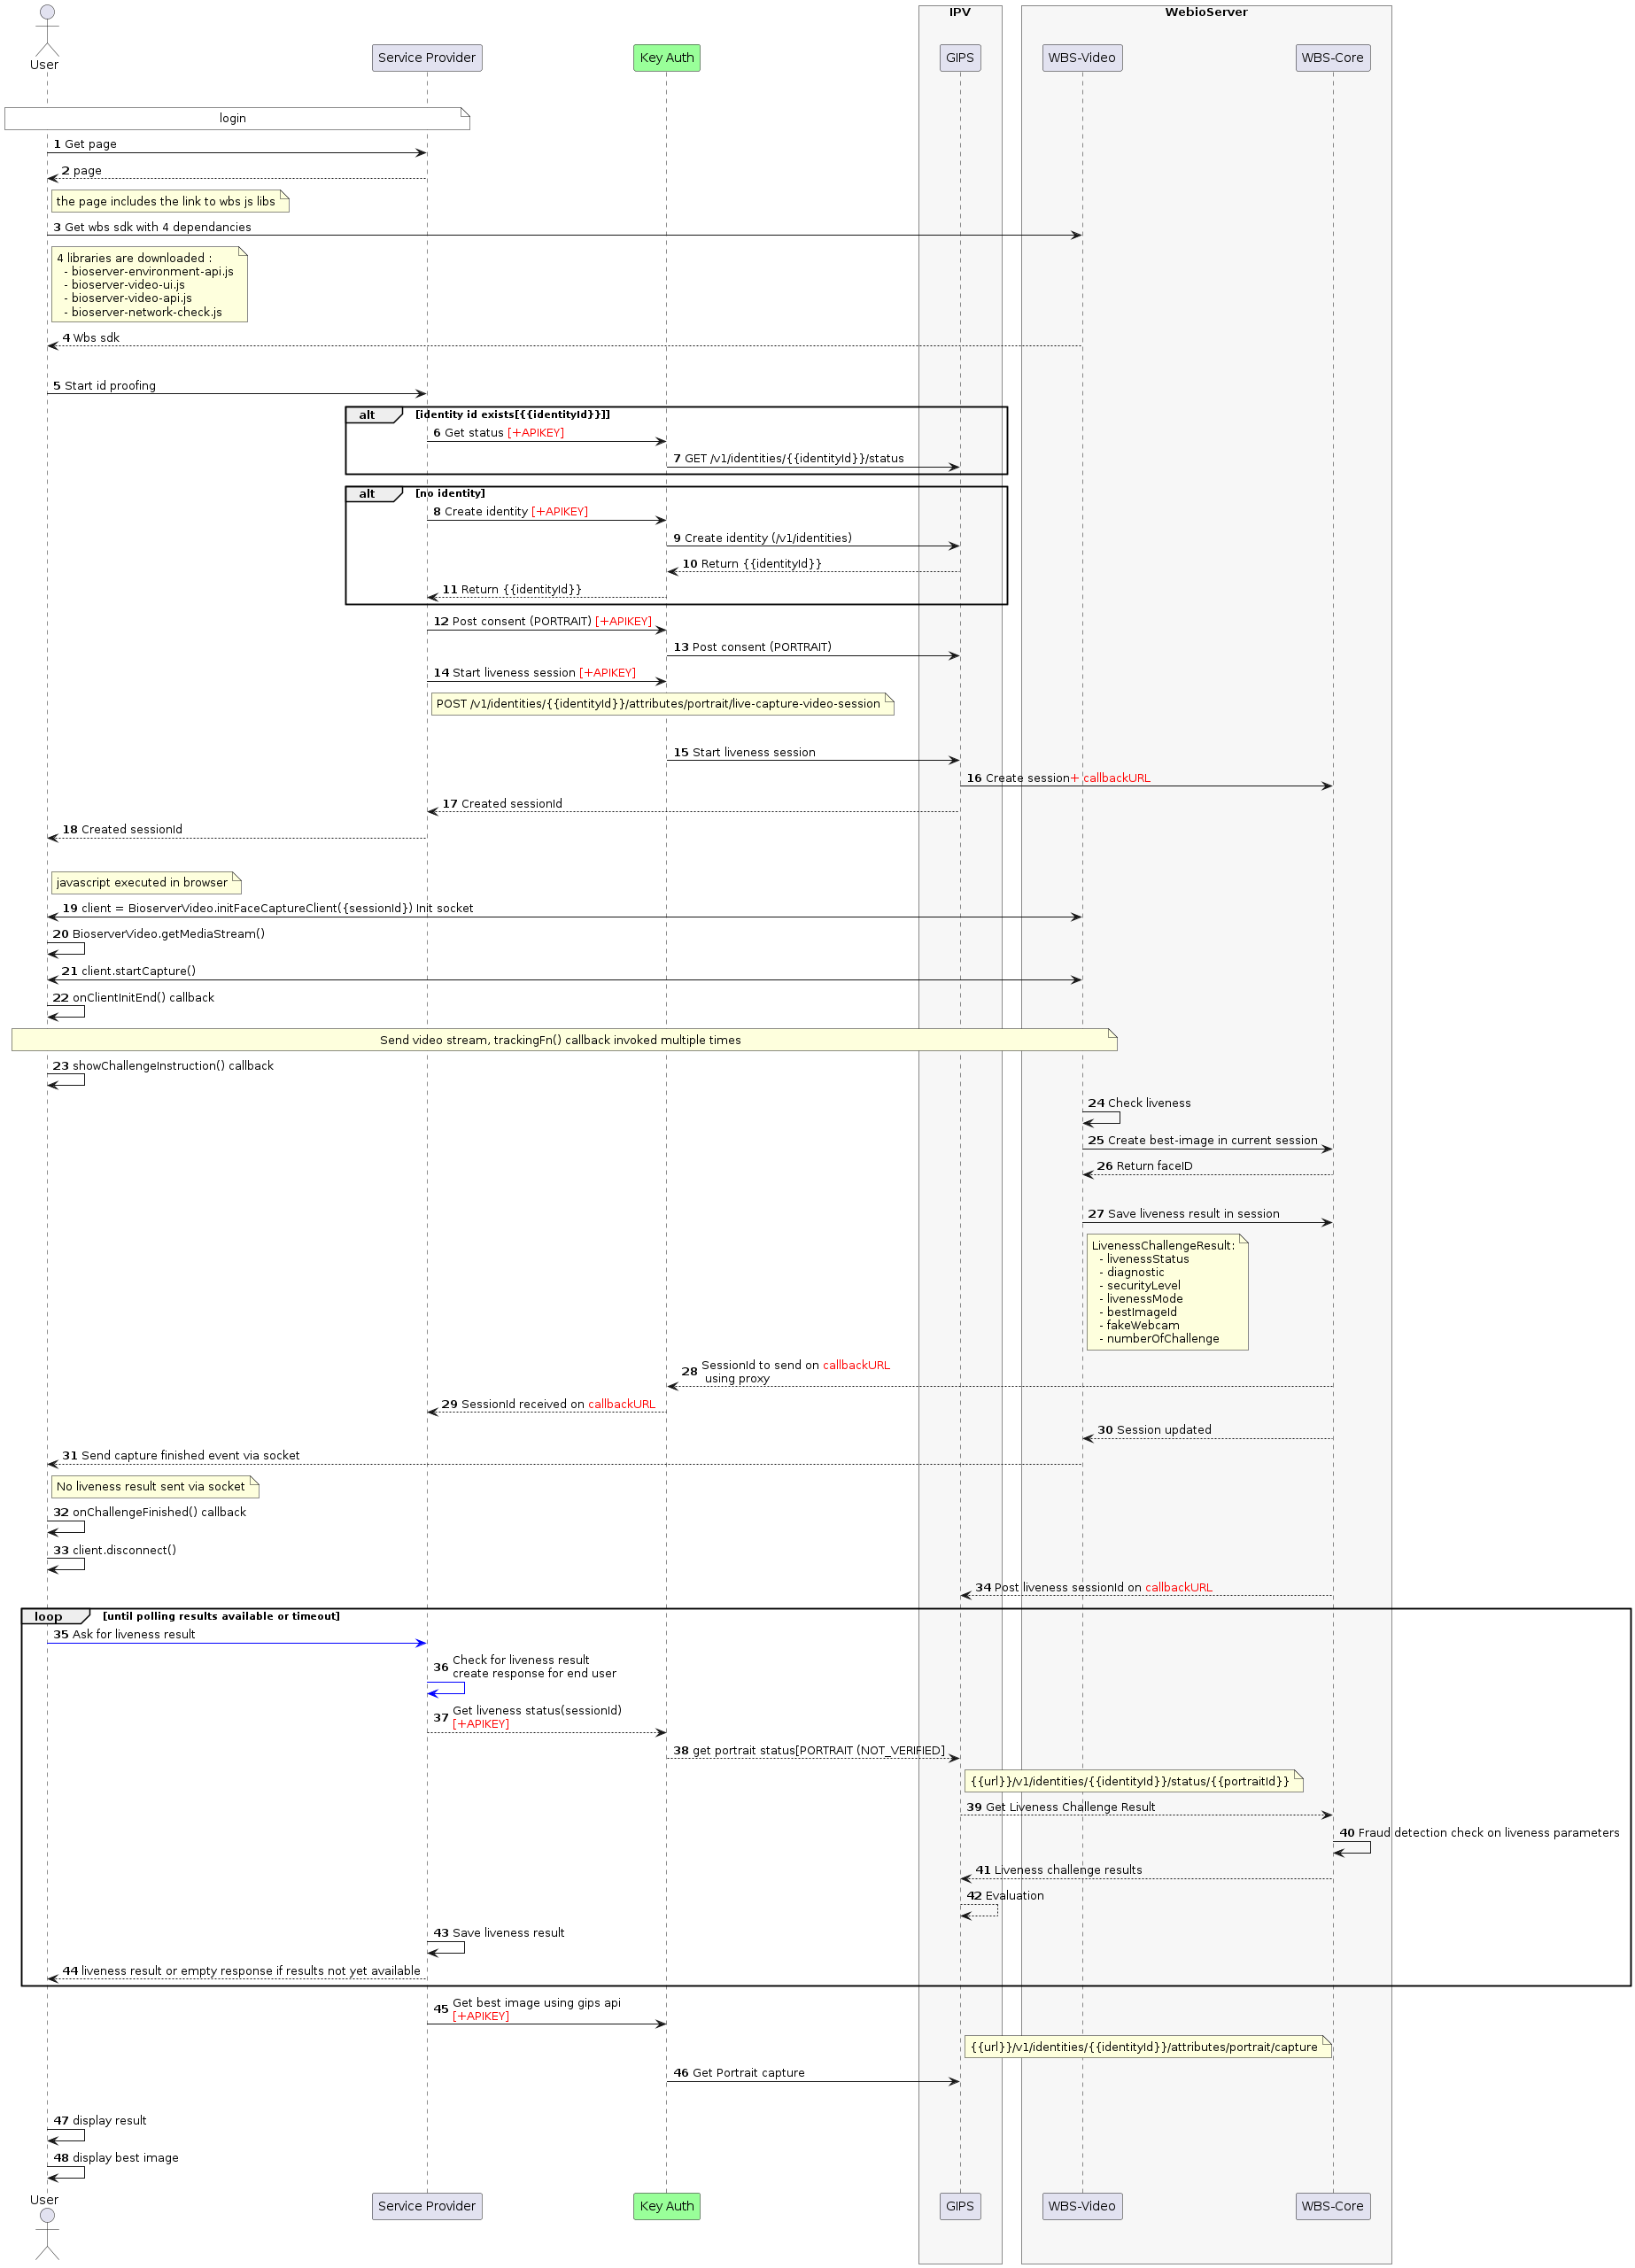
API Process Steps
Step 1: Load the client application with the WebCapture JavaScript SDK and ID&V REST service client
This step is described in the sequence diagram on lines 1 to 4:
-
A user is asked for a face biometric authentication via a web application developed by the Service Provider (SP).
-
The user launches the web application with a compatible browser.
By this action, all the JavaScript libraries required to interact with the web capture server are loaded in the browser and become ready to use as described in the section below:
HTML1<script src="$URL-WBS/video-server/bioserver-video-api.js"></script>2 <script src="$URL-WBS/video-server/bioserver-environment-api.js"></script>3 <script src="$URL-WBS/video-server/bioserver-network-check.js"></script>4 <script src="$URL-WBS/video-server/bioserver-video-ui.js"></script>
Step 2: Start the identity proofing on the ID&V server
This step is described in the sequence diagram on lines 5 to 14 as shown in the sections below:
-
Create Identity
This creates an identity on the ID&V server that will receive all of the data and gather the verification results related to this identity.
-
Submit Consent
This notifies the ID proofing service of the different verifications the user has consented to. In this case, a biometric verification.
-
Start Liveness Session
The client application sends a request to ID&V to start a live video capture. ID&V will ask for a session creation on the Biometrics Server via the Rest API. The stage of face detection and liveliness verification from video streams can begin.
Step 3: Initialize a liveness session
This step is described in the sequence diagram on lines 15 to 18:
-
The user asks for a face liveness capture session.
-
The web application of the SP handles the request and uses the Rest API
initLivenessSessionof the Web Capture server. -
This request creates a new session with the liveness verification settings.
Step 4: Initialize a face capture
This step is described in the sequence diagram on line 19:
-
The user uses the SDK JavaScript function to initialize a face capture client.
-
initFaceCaptureClient is a JavaScript function executed in the browser that creates a capture client with a specific configuration that determines the behavior of the client when certain events occur during a capture.
These events can be:
- Tracking events that trace the position of the end user's face
- Instructions for completing a challenge
- End of capture event
- Error events
The face capture client is a websocket client.
Step 5: Retrieve the video stream
This step is described in the sequence diagram on line 20:
-
The user uses the SDK JavaScript function to retrieve the video stream of the selected device.
-
getMediaStream is a JavaScript function executed in the browser that requests access to the given audio-input/camera devices and returns the associated media stream.
-
When opening the media stream, a specific configuration can be applied to define capture conditions such as the camera resolution and frame rate.
Step 6: Start a face capture
This step is described in the sequence diagram on line 21:
-
The returned face capture client allows the ability to start and stop the face capture on a given video stream, catch face tracking info, manage challenges, and handle errors.
-
The startCapture JavaScript function is used to start the capture by establishing a peer-to-peer communication between the client (browser) and the server located in the Web Capture server.
Step 7: Complete the challenge by following the server instructions
This step is described in the sequence diagram under the note 'Send video stream'.
Depending on the verification level configured, instructions are sent back to the user to perform challenges.
Step 8: Ask for the face and liveness detection result
To retrieve the result of capture and liveness check, two modes are proposed:
-
Polling on the ID&V Rest API
Get portrait statusURL. -
Using ID&V WebHook feature: after the capture is done, the SP server will receive a notification indicating the result is available.
The client application uses the ID&V Rest API Get portrait status URL to retrieve the capture results and presents it to the user.
At the end of the capture, if the verification was successful, the server returns to the client application:
- The result of the biometric liveness verification
- and the identifier of the portrait captured and whether the verification was successful.
Step 9: Ask for the best portrait captured
The client application uses the ID&V Rest API Get Portrait capture to retrieve the best image captured and stored into the ID&V identity related to the user.
JavaScript APIs
This section of the document is a brief summary of the JavaScript APIs called in the current use case.
Description | Link |
|---|---|
| Initiate client | initFaceCaptureClient |
| Get media stream | getMediaStream |
| Start capture | startCapture |
ID&V REST APIs
This section is a short brief summary of ID&V API used in the current use case.
Details about the ID&V web service calls are available in the Using ID&V for Face Liveness Detection Guide.
The variables used in the request URLs are:
Variable | Meaning |
|---|---|
URL_MAIN_PART | The ID&V domain. |
APIKEY_VALUE | Client application API key as provided by portal administrator(s). |
IDENTITY_ID | The value obtained from the IDENTITY_ID request. This should be the id value from the Create Identity response message. |
Create an Identity
This web service call creates an identity ID that will be used to identify the current transaction in other requests.
Sample Request
This request initiates the verification process with ID&V as shown in the snippet:
Shell1curl -X POST https://[URL_MAIN_PART]/gips/v1/identities \2 -H 'Content-Type: application' \3 -H 'apikey: [APIKEY_VALUE]'
Sample Response
When the request is sent, the ID&V response contains an id field as shown in the snippet:
Note: The value of that field replaces
IDENTITY_IDin subsequent requests.
JSON1{2 "id": "d4eee197-69e9-43a9-be07-16cc600d04e8",3 "status": "EXPECTING_INPUT",4 "levelOfAssurance": "LOA0",5 "creationDateTime": "2018-11-20T13:41:00.869",6 "evaluationDateTime": "2018-11-20T13:41:00.883",7 "upgradePaths": {8 // ...9 }10}
Parameters
The parameters used are described in the table. Details about the parameters description are available in the Javascript API section.
Variable | Description |
|---|---|
id | The identity ID that will be used to identify the current transaction in other requests |
status | Status of the transaction |
levelOfAssurance (LOA) | Level of trust of the current identity |
creationDateTime | Identity creation date |
evaluationDateTime | Last date on which the identity was evaluated |
upgradePaths | List of possible submissions that would increase LOA |
Submit Consent
Consent is a notification from the client application to ID&V that the user consents to sharing their personal information (the portrait image and biometrics) being processed by ID&V for a given period.
Example Request
In this request, the client application notifies ID&V that the user has consented to ID&V using biometric matching as shown in the snippet:
Shell1curl -X POST \2 https:// [URL_MAIN_PART]/gips/v1/identities/[IDENTITY_ID]/consents \3 -H 'Content-Type: application/json' \4 -H 'apikey: [APIKEY_VALUE]' \5 -d '[{6 "approved": true,7 "type": "PORTRAIT"8}]'
Example Response
This response sends the consentId and approval as shown in the snippet:
JSON1{2 "consentId": "05248dc7-5687-4a95-a127-514829e9b68c",3 "approved": true,4 "type": "GIV",5 "validityPeriod": {6 "to": "2019-11-13"7 }8}
Parameters
The parameters used are described in the table. Details about the parameters description are available in the Javascript API section.
Variable | Description |
|---|---|
consentId | The consent ID that might be used to identify the submitted consent. |
approved | Boolean indicating status of the consent (true/false). |
type | Type of consent submitted (possible values may be: PORTRAIT, GIV). The enumerated value can be found under the section API Docs in the Portal. |
validityPeriod | The period for which the consent is considered valid. |
to | The date at which the consent will expire and will not be considered valid anymore. |
Start a Live Capture Session
With the live-capture-video-session request, the client application starts a live capture video session of the person in order to capture the best quality image that will be compared with a portrait extracted from an evidence reference (a VERIFIED identity document).
This web service call is done in synchronous mode. Upon ID&V receipt, this request, a Biometric service session, will be created. ID&V will provide, in the response, a Biometric service session identifier that will be used by the service provider for initializing the video stream between the browser and the Biometric service.
Example Request
The live-capture-video-session request to start a live capture video session is shown in the snippet:
Shell1curl -X POST \2 https://[URL_MAIN_PART]/gips/v1/identities/[IDENTITY_ID]/attributes/portrait/live-capture-video-session \3 -H 'Content-Type: multipart/form-data' \4 -H 'apikey: [APIKEY_VALUE]'
Example Response
The response from the live-capture-video-session request is shown in the snippet:
JSON1{2 "status": "PROCESSING",3 "type": "PORTRAIT",4 "id": "2d5e81c6-a600-47ed-aa22-2101b940fed6",5 "sessionId": "891a6728-1ac4-11e7-93ae-92361f002671"6}
Parameters
The parameters used are described in the table. Details about the parameters description are available in the Javascript API section.
Variable | Description |
|---|---|
id | The user portrait identifier that will be used in future requests. |
status | Status of the portrait. |
sessionId | The Biometric Service session identifier related to the same ID&V identity. |
Check Status of the Portrait
With this request, the client application checks the status of the submitted portrait.
Ask for Face and Liveness Detection Result
The client application can use this API to implement polling and go to the next steps only when being certain the portrait’s status is VERIFIED or prompt the user to retry with another portrait capture.
Example Request
The live-capture-video-session request to start a live capture video session is shown in the snippet:
Shell1curl -X GET \2 https://[URL_MAIN_PART]/gips/v1/identities/[IDENTITY_ID]/status/[PORTRAIT_ID] \3 -H 'apikey: [APIKEY_VALUE]'
Parameters
The parameters used are described in the table. Details about the parameters description are available in the Javascript API section.
Variable | Description |
|---|---|
URL_MAIN_PART | The ID&V domain. |
APIKEY_VALUE | Client application API key as provided by your administrator(s). |
IDENTITY_ID | Value obtained after performing Step 1. This value should be the id value from the Create Identity response message. |
PORTRAIT_ID | Value obtained after performing Step 6. The content of this value should be taken from the id value of the Evaluate a Portrait response message. The client application can use this API to implement polling and go to next steps only when certain that the portrait's status is VERIFIED, otherwise it will prompt the user to retry with another portrait capture. |
Example Response
The live-capture-video-session request to start a live capture video session is shown in the snippet:
JSON1{2 "status": "INVALID",3 "type": "PORTRAIT",4 "id": "97d8354e-7297-4eba-be39-1569d4c6342b"5}
Parameters
The parameters used are described in the table. Details about the parameters description are available in the Javascript API section.
Variable | Description |
|---|---|
id | The portrait's ID. |
type | Type of the evidence (here PORTRAIT). |
status | Status of the portrait processing. |
Values for status can be:
-
VERIFIED- means that document/face has successfully been verified. When VERIFIED, a Document/Face is scored on a scale of 1 to 4.LEVEL1: low confidenceLEVEL2: medium confidenceLEVEL3: high confidenceLEVEL4: very high confidence
-
INVALID- means that the document/face is considered invalid after the checks performed -
NOT_VERIFIED- means that the document/face was processed, but not enough checks were performed to take a decision, most of the time due to bad quality of the image, or an unsupported document type -
PROCESSING- means that the evidence is currently being processed by the service -
ADJUDICATION- means that the evidence is currently reviewed by a human expert
Get Portrait Capture
This retrieves the portrait image capture for this identity.
Example Request
The request to retrieve the portrait image capture is shown in the snippet:
Shell1curl -X POST https://[URL_MAIN_PART]/gips/v1/identities/attributes/portrait/capture \2 -H 'Content-Type: application' \3 -H 'apikey: [APIKEY_VALUE]'
When this request is sent, the ID&V response is multi-parts data with image binary content.
Example Response
The response for the portrait image capture is shown in the snippet:
Script1--1b817195-cbe4-485f-90fd-4ed6f27f54a8--2Content-Disposition: form-data; name="Portrait"3Content-Type: application/octet-stream4...5...6--1b817195-cbe4-485f-90fd-4ed6f27f54a8--
In order to see the included display image, the response must be updated.
- At the beginning of the response, delete the multipart header:
Script1--1b817195-cbe4-485f-90fd-4ed6f27f54a8--2Content-Disposition: form-data; name="Portrait"3Content-Type: application/octet-stream
- At the end of the response, delete the multi-part footer:
Script1--1b817195-cbe4-485f-90fd-4ed6f27f54a8--
- Save the modifications brought and the open response with an HTML image element:
HTML1<img src="..." alt="success" />
REST API
This section describes two kinds of REST APIs:
- Biometric WebCapture Rest API
- Biometric Services Rest API
Biometric WebCapture Rest API
initLivenessSession
Endpoint
This function creates a new session with the liveness parameters of the challenge as shown in the snippet. The SESSION_ID will be defined inside location response header.
Shell1curl -X POST \2 https://[URL_MAIN_PART]/video-server/init-liveness-session \3 -H 'Content-Type: application/json' \4 -H 'apikey: [APIKEY_VALUE]' \5 -d '{6 "livenessMode": "LIVENESS_PASSIVE_VIDEO",7 "callbackURL" : "https://service-provider-site.com/transactions/891a6728-1ac4-11e7-93ae-92361f002671/liveness-result"8 }'
Permissions
The APIkey is the API key unique identifier used to authenticate requests and track and control API usage.
Header Fields
The table shows the header values for initLivenessSession to create a new session.
Name | Type | Description |
|---|---|---|
apikey | This header will contain the APIKEY value provided to the service provider | |
Content-Type | application/json |
Request Body Fields
The table shows the parameters for initLivenessSession to create a new session.
Name | Type | Description |
|---|---|---|
livenessMode | String | The type of liveness to be applied during a liveness challenge session. Allowed values: LIVENESS_ACTIVES,LIVENESS_PASSIVE,LIVENESS_PASSIVE_VIDEO. For LIVENESS_PASSIVE nothing is required from the user. This is a similar experience as when autocapturing from a selfie. LIVENESS_MEDIUM is now not supported anymore. With LIVENESS_ACTIVE, which is an active liveness, the user needs to move their head with specific head rotation driven by the back end. |
securityLevel (optional) | String | The security level applied on fraud detection. The higher the level, the stricter the fraud verification. Allowed values: LOW, MEDIUM,HIGH. Recommendation: HIGHlevel for all liveness modes. By default value is set to HIGH |
correlationId (optional) | String | Custom identifier provided by the service provider (could be Service Provider (SP) transaction id). Regex authorized : alpha-numeric with underscore and hyphen, minimum lenght is 5 chars, maximum lenght is 50 chars. |
evidenceId (optional) | String | Custom identifier provided by the service provider (ID&V). Regex authorized : alpha-numeric with underscore and hyphen, minimum lenght is 5 chars, maximum lenght is 50 chars. |
ageThreshold (optional) | Integer | Activate age estimation for the current liveness session and set the corresponding threshold. eature is available by configuration. |
callbackURL (optional) | URL | The URL used to notify the service provider that liveness check results are available. |
- Request example without the securityLevel field
1apikey: c87f4339-97ca-11c4-9bfd-7ccd673abc58 (if api key enabled)2Content-Type: application/json
- Request example with the securityLevel field
1apikey: c87f4339-97ca-11c4-9bfd-7ccd673abc58 (if api key enabled)2Content-Type: application/json
- Request example with the ageThreshold field
1apikey: c87f4339-97ca-11c4-9bfd-7ccd673abc58 (if api key enabled)2Content-Type: application/json
Response Example
The 201 status code indicates that the bio-session was successfully created. It also return a Location header of the URI to use for future requests related to the created session. This URI contains the created SESSION_ID.
Name | Type | Description |
|---|---|---|
Location | String | Header containing the URI of created the bio-session. SESSION_ID can be extracted alone if needed from location value. |
The returned Location string is shown in the snippet :
HTTP1HTTP/1.1 201 Created2Location: /v2/bio-sessions/0991cedc-9111-4b9d-9e4e-8d6eb4db488f
In order to extract SESSION_ID, we can use a regex to remove the everything before the uuid (example of regex : "^.*/(.*)").
On the previous example, we have SESSION_ID = 0991cedc-9111-4b9d-9e4e-8d6eb4db488f
Error Response
Below are the status codes and descriptions that will be returned if the initLivenessSession request generates an error.
Name | Description |
|---|---|
400 | Something is wrong with the request (correlationId or ageThreshold has not the proper format) |
401 | Authentication is required |
403 | Missing permissions to create the bio-session |
429 | Server is currently experiencing high demand. Request can be sent again after few seconds. |
500 | Internal error |
getLivenessSession
Endpoint
This function retrieves the new liveness session created.
Shell1curl -X GET \2 https://[URL_MAIN_PART]/video-server/init-liveness-session/{sessionId} \3 -H 'apikey: [APIKEY_VALUE]'
Permissions
The APIkey is the API key unique identifier used to authenticate requests and track and control API usage.
Header Fields
The table shows the header values for getLivenessSession to retrieve the session.
Name | Type | Description |
|---|---|---|
apikey | This header will contain the APIKEY value provided to the service provider |
Response Body Fields
Name | Type | Description |
|---|---|---|
id | String | The liveness session unique identifier generated by Websdk Services |
correlationId (optional) | String | Custom identifier provided by the service provider (could be Service Provider (SP) transaction id). Regex authorized : alpha-numeric with underscore and hyphen, minimum lenght is 5 chars, maximum lenght is 50 chars. |
evidenceId (optional) | String | Custom identifier provided by the service provider (ID&V). Regex authorized : alpha-numeric with underscore and hyphen, minimum lenght is 5 chars, maximum lenght is 50 chars. |
callbackURL (optional) | URL | The URL used to notify the service provider that liveness check results are available. |
imageStorageEnabled (optional) | Boolean | This specifies if images need to be stored for this bio-session; if this parameter is set to true, then the image used to create a face resource can be retrieved using GetFaceImage. The default value is false. |
livenessMode | String | The type of liveness to be applied during a liveness challenge session. Allowed values: LIVENESS_ACTIVES,LIVENESS_PASSIVE,LIVENESS_PASSIVE_VIDEO. For LIVENESS_PASSIVE nothing is required from the user. This is a similar experience as when autocapturing from a selfie. LIVENESS_MEDIUM is now not supported anymore. With LIVENESS_ACTIVE, which is an active liveness, the user needs to move their head with specific head rotation driven by the back end. |
numberOfChallenge (optional) | String | The security level applied on fraud detection. The higher the level, the stricter the fraud verification. Allowed values: LOW, MEDIUM,HIGH. Recommendation: HIGHlevel for all liveness modes. By default value is set to HIGH |
securityLevel (optional) | String | The security level applied on fraud detection. The higher the level, the stricter the fraud verification. Allowed values: LOW, MEDIUM,HIGH. Recommendation: HIGHlevel for all liveness modes. By default value is set to HIGH |
created | Datetime | The date on which the bio-session is created |
expires | Datetime | The date after which the bio-session will expire and will be removed from the server |
ttlSeconds (optional) | Number | This specifies a time-to-live value in seconds after which this bio-session is automatically ended. If it is not specified by CreateBioSession, the ttlSeconds will be set to the configured default. An error will occur if ttlSeconds is set higher than the configured max. |
Response Example
HTTP1HTTP/1.1 2002{3 "id": "6217fd4f-9710-49f4-88fd-188cd082927d",4 "correlationId": "postman-video-correlationId",5 "evidenceId": "postman-video-evidenceId",6 "callbackURL": "https://localhost/demo-server/liveness-result-callback",7 "ttlSeconds": 1800,8 "imageStorageEnabled": true,9 "livenessMode": "LIVENESS_PASSIVE",10 "numberOfChallenge": 2,11 "securityLevel": "HIGH",12 "created": "2025-06-20T06:32:21.326Z",13 "expires": "2025-06-20T07:02:21.326Z"14}
Error Response
Below are the status codes and descriptions that will be returned if the get liveness session request generates an error.
Name | Description |
|---|---|
401 | Authentication is required |
404 | Get liveness session failed |
500 | Internal error |
Callback Rest API
videoLivenessCallback
WebCapture SDK uses the callbackURL, if provided, within initLivenessSession to POST sessionId to the Service Provider (SP), as shown in the snippet:
Endpoint
HTTP1POST https://service-provider-domain/callback-url
Request Body Fields
The parameters for are shown in the table.
Name | Type | Description |
|---|---|---|
sessionId | String | The identifier of the session |
Request Example
JSON1{2 "sessionId": "7b4e38f6-de53-4dd5-a8b8-985833f771d2"3}
Response Example
The success HTTP code expected from the backend is 200 :
HTTP Code | Description |
|---|---|
200 | Request sent to the service provider |
HTTP Error Codes
The error response codes for CallbackSP are shown in the table.
Code | Description |
|---|---|
404 | Unable to reach the endpoint |
500 | Server error |
getCapabilities (HealthCheck)
Endpoint
Get capabilities of the server, along with the version number and the supported algorithms. It acts also as a health check.
It is shown in the snippet:
Shell1curl -X GET \2 https://[URL_MAIN_PART]/video-server/v2/capabilities \3 -H 'apikey: [APIKEY_VALUE]'
Permissions
The APIkey is the API key unique identifier used to authenticate requests and track and control API usage.
Header Fields
Name | Type | Description |
|---|---|---|
apikey | This header will contain the APIKEY value provided to the service provider |
Response Body Fields
If the getCapabilities request is successful then the success 200 status code will be returned with the values shown in the table.
Field | Type | Description |
|---|---|---|
version | String | The version of the bioserver-video |
bioserver-core | Object | Details of the bioserver-core |
bioserver-core.version | String | The version of the bioserver-core |
bioserver-core.currentMode | Array | The list of matching algorithms enabled |
Response Example
The success response is shown in the snippet:
JSON1{2 "version": "3.25.0",3 "bioserver-core": {4 "version": "3.25.0",5 "currentMode": [6 "F6_2_VID65"7 ]8 }9}
Error Response
Below are the status codes and descriptions that will be returned if the getCapabilities request generates an error.
Name | Description |
|---|---|
401 | Authentication is required |
404 | The instance is not working properly. |
500 | One or several components are not healthy |
Biometric Services Rest API
getLivenessChallengeResult
Endpoint
This API retrieves the face and liveness detection result as shown in the header snippet:
Shell1curl -X GET \2 https://[URL_MAIN_PART]/bioserver-app/v2/bio-sessions/{bioSessionId}/liveness-challenge-result \3 -H 'apikey: [APIKEY_VALUE]'
Warning: The service used in this part is located on the Biometric Services Rest API, so you must be careful about the URL that you use.
Permissions
The APIkey is the API key unique identifier used to authenticate requests and track and control API usage.
Header Fields
The table shows the header parameters for the getLivenessChallengeResult function.
Field | Description |
|---|---|
URL_MAIN_PART | The domain of the Biometric Service for face coding and matching. |
APIKEY_VALUE | The client application API key as provided by portal administrator(s). |
URI Fields
The table shows the URI parameters for the getLivenessChallengeResult function.
Field | Type | Description |
|---|---|---|
bioSessionId | String | The identifier of the bio-session that contain livenessParameter. |
Response Body Fields
If the getLivenessChallengeResult request is successful then the success 200 status code will be returned with the values shown in the table.
Field | Type | Description |
|---|---|---|
livenessStatus | String | Status of liveness challenge result. Allowed values: SUCCESS, FAILED, SPOOF, ERROR, TIMEOUT |
diagnostic (optional) | String | Diagnostic in case of liveness failure. |
bestImageId | String | The ID of the stored best-image in the session. |
livenessMode | String | The liveness mode used during face capture. Allowed values: LIVENESS_PASSIVE, LIVENESS_PASSIVE_VIDEO, LIVENESS_ACTIVE. Recommendation: LIVENESS_PASSIVE_VIDEO mode. |
securityLevel | String | The security level applied on fraud detection. The higher the level, the stricter the fraud verification. Allowed values: LOW, MEDIUM,HIGH. Recommendation: HIGHlevel for all liveness modes. By default value is set to HIGH |
numberOfChallenge (optional) | Integer | The number of challenges for active liveness (to avoid any fraud). This value is returned only if the liveness mode is LIVENESS_ACTIVE. |
deviceInfo (optional) | DeviceInfo | Mobile information from nativeSDK. |
imageStorage (optional) | ImageStorage | Storage information regarding the best image. This field is not linked to imageRetrievalDisabled field. |
videoStorage (optional) | VideoStorage | If the video recording is enabled on AWS S3, storage information regarding the video generated is available only if the feature is enabled on the backend configuration |
age (optional) | AgeEstimated | If the age estimation computation is enabled, age estimation information |
signature (optional) | String | A digital signature (JWS) of the response. Authentication and integrity can be verified afterward using the Biometric Services public certificate. |
Response Example
The success response is shown in the snippet:
JSON1{2 "livenessStatus": "SUCCESS",3 "bestImageId": "5597f426-3863-4fa1-b4ff-76a957913f39",4 "livenessMode": "LIVENESS_ACTIVE",5 "numberOfChallenge": 2,6 "securityLevel": "HIGH",7 "deviceInfo": {8 "deviceModel" : "SM-G935F",9 "osType" : "Android",10 "osVersion": "7.0",11 "browserName": "Chrome",12 "browserVersion": "18.0.2"13 },14 "videoStorage": {15 "region": "eu-central-1",16 "bucketName": "wbs-video-storage",17 "key": "f89021ba2912/60805e9d-d024-4434-aa3b-8529c36a17f8/60805e9d-d024-4434-aa3b-8529c36a17f8.mp4",18 "hash": "b470657d8163673e827f43aae57204b9ee440923c21fb0e3c2ab4dd270e31f33",19 "hashAlgorithm": "SHA_256",20 "contentType": "video/mp4"21 },22 "imageStorage": {23 "region": "eu-central-1",24 "bucketName": "wbs-video-storage",25 "key": "f89021ba2912/60805e9d-d024-4434-aa3b-8529c36a17f8/60805e9d-d024-4434-aa3b-8529c36a17f8.jpeg",26 "hash": "b470657d8163673e827f43aae57204b9ee440923c21fb0e3c2ab4dd270e31f33",27 "hashAlgorithm": "SHA_256",28 "contentType": "image/jpeg"29 },30 "age": {31 "aboveThreshold": true,32 "ageEstimated": 29.1,33 "threshold": 1834 },35 "signature": "eyJhbGciOiJSUzI1NiJ9.ew0KogImFhMGJkNmNhL…ogIClbmRseU5hbWUoroAE_oxDF_ZtH-E"36}
HTTP Error Codes
Below are the 400 status codes and descriptions that will be returned if the initLivenessSession request generates an error.
Name | Description |
|---|---|
400 | Something is wrong with the request |
401 | Authentication is required |
403 | Forbidden |
404 | Unable to find a bio-session for the given identifier |
500 | Internal error |
getFaceImage
This function retrieves the image that has been used to create a face resource. This is only possible if the image storage has been enabled for the bio-session as shown in the snippet:
Endpoint
Shell1curl -X GET \2 https://[URL_MAIN_PART]/bioserver-app/v2/bio-sessions/{bioSessionId}/faces/{faceId}/image?compression=true \3 -H 'apikey: [APIKEY_VALUE]'
Warning: The service used in this part is located on the Biometric Services Rest API. You have to be careful about the URL you use.
Permissions
The APIkey is the API key unique identifier used to authenticate requests and track and control API usage.
Header Fields
The table shows the header values for getFaceImage used to create a face resource.
Field | Description |
|---|---|
URL_MAIN_PART | The domain of the Biometric Service for face coding and matching. |
APIKEY_VALUE | Client application API key as provided by portal administrator(s). |
URI Fields
Field | Type | Description |
|---|---|---|
bioSessionId | String | The identifier of the bio-session containing the face. |
faceId | String | The identifier of the face resource for which the image needs to be retrieved. |
compression (optional) | Boolean | To enable image jpeg compression. Default value: false |
Response Example
Name | Description |
|---|---|
200 | The image has been successfully retrieved. |
204 | Storage is not enabled for the bio-session. |
HTTP1HTTP/1.1 200 OK2Content-Type: image/jpeg3(image)
HTTP Error Codes
Name | Description |
|---|---|
400 | Something is wrong with the request |
401 | Authentication is required |
403 | Missing permissions to retrieve the face image |
404 | Unable to find a bio-session or a face for the given identifier |
500 | Internal error |
getMatches
The getMatches function retrieves a list of ordered matches (best scores come first) for a given face.
The reference face is compared to the captured face created in the bio-session.
The result of each comparison is called a “match”. Each match is composed of the reference face, a candidate face, a matching score, and a false acceptance rate.
Warning: The service used in this part is located on the Biometric Services Rest API. You have to be careful about the URL you use.
Endpoint
Shell1curl -X GET \2 https://[URL_MAIN_PART]/bioserver-app/v2/bio-sessions/{bioSessionId}/faces/{referenceFaceId}/matches \3 -H 'apikey: [APIKEY_VALUE]'
Permissions
The APIkey is the API key unique identifier used to authenticate requests and track and control API usage.
Header Fields
The table shows the header parameters for the getMatches function.
Field | Description |
|---|---|
URL_MAIN_PART | The domain of the Biometric Service for face coding and matching. |
APIKEY_VALUE | Client application API key as provided by portal administrator(s). |
URI Fields
The table shows the URI parameters for the getMatches function.
Field | Type | Description |
|---|---|---|
bioSessionId | String | The identifier of the bio-session containing the faces. |
referenceFaceId | String | The identifier of the reference face. |
Response Body Fields
The success status code 200 means the results have been successfully retrieved.
Field | Type | Description |
|---|---|---|
reference | Face | The reference face. |
candidate | Face | A candidate face. |
score | Number | The matching score. |
falseAcceptanceRate | Number | The false acceptance rate, or FAR: measure of the likelihood that the Biometric Services will incorrectly return a match when the faces do not actually belong to the same person. For instance, "100" means there is no chance the two faces belong to the same person, "0.000000000028650475" means there is almost no chance Biometric Services can be wrong. |
correlationId (optional) | String | A custom identifier coming from the caller and currently associated with the bio-session. |
evidenceId (optional) | String | A custom identifier coming from the caller (ID&V) |
created | Datetime | The date on which the match has been created. |
expires | Datetime | The date after which the match will expire and will be removed from the server. |
signature (optional) | String | A digital signature (JWS) of the response. Authentication and integrity can be verified afterward using the Biometric Services public certificate. |
Response Example
JSON1[2 {3 "reference": {4 "id": "aa0bd6ca-1206-415b-af94-8d2c18aa9c70",5 "friendlyName": "Portrait of Jane Doe",6 "digest": "39bd0d9606a772b1e7076401f32f14bdde403b9608e789e0771b90fb79b664a4",7 "mode": "F6_4_VID60X",8 "imageType": "SELFIE",9 "quality": 295,10 "landmarks": {11 "eyes": {12 "x1": 1191.4584,13 "y1": 582.79565,14 "x2": 1477.8955,15 "y2": 580.332416 },17 "box": {18 "x": 961,19 "y": 388,20 "width": 506,21 "height": 67422 }23 }24 },25 "candidate": {26 "id": "6e1741f1-3715-416a-bfc6-4fc381d228a3",27 "friendlyName": "Portrait of Jane Doe",28 "digest": "94d1b6ff2acf368c3e0ccaebe1d8e447ed1ccd7b596dc5cac3c13a4822b256c6",29 "mode": "F6_4_VID60X",30 "imageType": "ID_DOCUMENT",31 "quality": 186,32 "landmarks": {33 "eyes": {34 "x1": 141.83296,35 "y1": 217.47075,36 "x2": 241.09653,37 "y2": 216.056838 },39 "box": {40 "x": 61,41 "y": 153,42 "width": 253,43 "height": 37044 }45 }46 },47 "score": 7771.43408203125,48 "falseAcceptanceRate": 0.000000000028650475616752694,49 "correlationId": "891a6728-1ac4-11e7-93ae-92361f002671",50 "created": "2017-05-18T12:41:09.58Z",51 "expires": "2017-05-18T12:42:00.844Z",52 "signature": "eyJhbGciOiJSUzI1NiJ9.ew0KICAicm…0NCiAgICB9DQHSQfU7Q"53 }54]
HTTP Error Codes
Name | Description |
|---|---|
400 | Something is wrong with the request |
401 | Authentication is required |
403 | Missing permissions to retrieve the matches |
404 | Unable to find a bio-session or a face for the given identifier |
500 | Internal error |
Objects
Face
The Face object describes face characteristics.
Parameters
The parameters for Face are shown in the table.
Name | Type | Description |
|---|---|---|
id | String | The face unique identifier generated |
friendlyName (optional) | String | Friendly name for the face |
digest (optional) | String | SHA-256 digest of the image file from which the face has been created for confidentiality and verification purposes |
mode | String | Biometric algorithm used to create the face biometric template |
imageType | String | Image type |
quality (optional) | Number | Biometric template quality — a good quality template is a template with a quality superior to 100; if the quality is negative, then the face needs to be sent again |
landmarks (optional) | Landmarks | Landmarks detected on the face |
Example usage
An example usage for Face is shown in the snippet:
JSON1{2 "id": "6e1741f1-3715-416a-bfc6-4fc381d228a3",3 "friendlyName": "Portrait of Jane Doe",4 "digest": "94d1b6ff2acf368c3e0ccaebe1d8e447ed1ccd7b596dc5cac3c13a4822b256c6",5 "mode": "F6_4_VID60X",6 "imageType": "ID_DOCUMENT",7 "quality": 186,8 "landmarks": {9 "eyes": {10 "x1": 141.83296,11 "y1": 217.47075,12 "x2": 241.09653,13 "y2": 216.056814 },15 "box": {16 "x": 61,17 "y": 153,18 "width": 253,19 "height": 37020 }21 }22}
Landmarks
The Landmarks object describes the Landmarks detected on the face.
Parameters
The parameters for Landmarks are shown in the table.
Name | Type | Description |
|---|---|---|
eyes (optional) | LandmarksEyes | Eye detection information |
box (optional) | LandmarksBox | Face position inside a box |
Example usage
An example usage for Landmarks is shown in the snippet"
JSON1{2 "eyes": {3 "x1": 581.0,4 "y1": 270.0,5 "x2": 695.0,6 "y2": 266.07 },8 "box": {9 "x": 465,10 "y": 149,11 "width": 348,12 "height": 44113 }14}
LandmarksEyes
The LandmarksEyes object describes the eye detection information
Parameters
The parameters for LandmarksEyes are shown in the table.
Name | Type | Description |
|---|---|---|
x1 | number | The x-coordinate of the first eye |
y1 | number | The y-coordinate of the first eye |
x2 | number | The x-coordinate of the second eye |
y2 | number | The y-coordinate of the second eye |
Example usage
An example usage for LandmarksEyes is shown in the snippet"
JSON1{2 "x1": 581.0,3 "y1": 270.0,4 "x2": 695.0,5 "y2": 266.06}
LandmarksBox
The LandmarksBox object describes the face position inside a box
Parameters
The parameters for LandmarksBox are shown in the table.
Name | Type | Description |
|---|---|---|
x | number | The x-coordinate of the top left corner |
y | number | The y-coordinate of the top left corner |
width | number | The width of the box |
height | number | The height of the box |
Example usage
An example usage for LandmarksBox is shown in the snippet"
JSON1{2 "x": 465,3 "y": 149,4 "width": 348,5 "height": 4416}
AgeEstimated
The AgeEstimated object describes the age estimation information if the feature is enabled, as shown in the snippet:
Parameters
The parameters for AgeEstimated are shown in the table.
Name | Type | Description |
|---|---|---|
aboveThreshold | Boolean | Whether the age estimated is equal or greater than the threshold value. |
ageEstimated | Float | Age estimated. In case of error or if image has not good quality (check with core), so value is -1. |
threshold | Integer | Threshold value set when the session is initialised. |
Example usage
An example usage for AgeEstimated is shown in the snippet:
JSON1{2 "aboveThreshold": true,3 "ageEstimated": 29.1,4 "threshold": 185}
VideoStorage
The VideoStorage object describes the storage information of the recorded video of the document captured if the video recording is enabled on AWS S3, as shown in the snippet:
Parameters
The parameters for VideoStorage are shown in the table.
Name | Type | Description |
|---|---|---|
region | String | Region (S3, Minio) where the media is stored. |
key | String | Path (S3, Minio) where the media is storied. |
bucketName | String | Bucket (S3, Minio) where the media is stored. |
hash | String | Hash of the stored media. |
hashAlgorithm | String | Hash algorithm used to hash the data. |
contentType | String | Content type of the media. |
Example usage
An example usage for VideoStorage is shown in the snippet:
JSON1{2 "region": "eu-central-1",3 "bucketName": "wbs-video-storage",4 "key": "doc-dev/11b57ca2-7798-4c9d-8ab9-3099506d221e/0dec15a2-0ea1-49b2-baf0-812048f9e6da.webm",5 "hash": "d32c4ff2770a4f9d4d10d048492dbb456fb153153db5ae5f1454d1442d488093",6 "hashAlgorithm": "SHA_256",7 "contentType": "video/webm"8}
ImageStorage
The ImageStorage object describes the storage information of the best image of a document side.
Parameters
The parameters for ImageStorage are shown in the table.
Name | Type | Description |
|---|---|---|
region | String | Region (S3, Minio) where the media is stored. |
key | String | Path (S3, Minio) where the media is storied. |
bucketName | String | Bucket (S3, Minio) where the media is stored. |
hash | String | Hash of the stored media. |
hashAlgorithm | String | Hash algorithm used to hash the data. Available value is : SHA_256 |
contentType | String | Content type of the media. |
Example usage
An example usage for ImageStorage is shown in the snippet:
JSON1{2 "region": "eu-central-1",3 "bucketName": "wbs-video-storage",4 "key": "doc-dev/11b57ca2-7798-4c9d-8ab9-3099506d221e/0dec15a2-0ea1-49b2-baf0-812048f9e6da.png",5 "hash": "ff2c4ff2770a4f004dffd048492dbb_ç6fb153153db5ae5f1454d1442d4880(è",6 "hashAlgorithm": "SHA_256",7 "contentType": "image/png"8}
DeviceInfo
The DeviceInfo object describes device information.
Parameters
The parameters for DeviceInfo are shown in the table.
Name | Type | Description |
|---|---|---|
deviceModel (optional) | String | Phone model. For iPhone devices, a group of device models separated by comma can be returned such as iPhone SE 2022,iPhone SE 2020,iPhone 8,iPhone 7,iPhone 6s,iPhone 6 |
osType (optional) | String | Mobile OS type (Android or iOS). |
osVersion (optional) | String | Version of phone OS. |
browserName (optional) | String | Browser Name . |
browserVersion (optional) | String | Browser Version. |
Example usage
An example usage for DeviceInfo is shown in the snippet:
JSON1{2 "deviceModel" : "SM-G935F",3 "osType" : "Android",4 "osVersion": "7.0",5 "browserName": "Chrome",6 "browserVersion": "18.0.2"7}
Managing Backpressure During High Demand
When our platform experiences peak traffic, attempts to process a liveness might result in a 429 Too Many Requests HTTP response. This indicates our current request volume exceeds the server's processing capacity. Our system automatically scales to increase capacity, but this scaling requires a brief period to complete.
Key Advice for Handling 429 Responses :
- Prompt User Notification: Inform users of the high demand affecting the system and suggest they retry their request after a brief interval.
Recommended Message for Users :
"We're currently managing increased traffic and are working to accommodate all requests. Please try again shortly. Thank you for your patience."
This approach helps navigate the challenges of backpressure, ensuring users are aware of the current state and know to retry their requests after a short pause.
JavaScript API
This section discusses the JavaScript API.
EnvironmentDetection
This section discusses detecting and managing various environments.
detection
This function detects if the current environment (OS/browser) is supported. If the environment is not supported, the response contains a list of supported browsers according to the current OS (parameter supportedBrowser).
JavaScript1BioserverEnvironment.detection()
Note: If Document WebCapture SDK is also integrated, calling this method may be omitted as the
DocserverEnvironment.detection()variant is stronger.
Usage Example
A detection request for BioserverEnvironment.detection to verify both the OS and browser are supported is shown in the snippet:
JavaScript1// request if current environment (OS/browser) is supported2var env = BioserverEnvironment.detection();3if (!env.envDetected) { console.log('env detection failed with error: ' + env.message); return }45var envOS = env.envDetected.os;6if (!envOs.isSupported) { console.log('env detection error: ' + env.message + ', Supported OS list:', envOs.supportedList); return }78var envBrowser = env.envDetected.browser;9if (!envBrowser.isSupported) { console.log('env detection error: ' + env.message + ', Supported Browsers:', envBrowser.supportedList); return }
Response Fields
The parameters used are described in the table. Details about the parameters description are available in the Javascript API section.
Field | Type | Description |
|---|---|---|
envDetected | Object | Object that contains the result of the environment detection |
envDetected.os | Object | Object that contains the result the OS support |
envDetected.os.isSupported | Boolean | Boolean indicating if the OS is supported (true if supported) |
envDetected.os.supportedList | String[] | The list of supported OS, if the OS is not supported |
envDetected.os.isMobile | Boolean | Boolean indicating if the OS is a Mobile (true if the OS is a mobile) |
envDetected.browser | Object | Object that contains the result the browser support |
envDetected.browser.isSupported | Boolean | Boolean indicating if the OS is supported (true if supported) |
envDetected.browser.supportedList | Object[] | The list of supported browsers according to the current OS if the browser is not supported |
envDetected.browser.supportedList[i].name | String | Browser name supported |
envDetected.browser.supportedList[i].minimumVersion. | String | Minimun version of the browser supported |
envDetected.message | String | Message if current environment is not supported |
Example Success Response
A success response for BioserverEnvironment.detection that verifies both the OS and browser are supported is shown in the snippet:
JSON1{2 "envDetected": {3 "os": {4 "isSupported": true,5 "supportedList": [],6 "isMobile": false7 },8 "browser": {9 "isSupported": true,10 "supportedList": []11 }12 },13 "message": ""14}
Example Error Response
A success response for BioserverEnvironment.detection that verifies the OS is supported and the browser is not supported is shown in the snippet:
JSON1{2 "envDetected": {3 "os": {4 "isSupported": true,5 "supportedList": []6 },7 "browser": {8 "isSupported": false,9 "supportedList": [10 {11 "name": "Chrome",12 "minimumVersion": "56"13 },14 {15 "name": "Firefox",16 "minimumVersion": "50"17 },18 {19 "name": "Opera",20 "minimumVersion": "47"21 },22 {23 "name": "Edge",24 "minimumVersion": "17"25 },26 {27 "name": "HuaweiBrowser",28 "minimumVersion": "12"29 }30 ]31 }32 },33 "message": "You seem to be using an unsupported browser."34}
The previous JSON response is an example of what WebBioServer could return. In order to have the exact requirement, please consult Requirements.
NetworkCheck
This section discusses how to check that the user's network connectivity is good enough to perform video functions.
connectivityMeasure
If the user's network connection does not meet latency and speed specifications, the video capture will fail. The connectivityMeasure API checks whether the user's network connection is adequate to proceed. If any of the verifications fails, the API returns an error message.
Verifications are performed in this order:
-
Latency: Verifies that the latency is within range. If so, the API proceeds to perform the next check; if not, it returns a latency failure without checking the upload speeds.
-
Upload speed: Verifies that the upload speed is fast enough. If so, it returns the results; if not, it returns an upload failure.
JavaScript1BioserverNetworkCheck.connectivityMeasure({2 uploadURL: urlBasePath + '/network-speed',3 latencyURL: urlBasePath + '/network-latency',4 onNetworkCheckUpdate: onNetworkCheckUpdate,5 errorFn: () => console.log('Failed to check user connectivity requirements')6})
Request Parameters
The parameters used are described in the table. Details about the parameters description are available in the Javascript API section.
Field | Type | Description |
|---|---|---|
latencyURL | String | URL that will be used for latency check. |
uploadURL | String | URL that will be used for upload check. |
onNetworkCheckUpdate | Function | Callback function fired with check results. |
errorFn | Function | (Optional) The callback to handle error. If the callback is not provided, the onNetworkCheckUpdate will be called after the timeout. |
Usage example
The onNetworkCheckUpdate request to check network connectivity results is shown in the snippet:
JavaScript1// call it once document loaded2window.onload = () => {3 function onNetworkCheckUpdate(networkCheckResults) {4 console.log({networkCheckResults});5 if (!networkCheckResults.goodConnectivity) {6 console.log('BAD user connectivity');7 if (networkCheckResults.upload) {8 console.log('Upload requirements not reached');9 console.log('Upload speed threshold is ' + BioserverNetworkCheck.UPLOAD_SPEED_THRESHOLD);10 } else if (networkCheckResults.latencyMs) {11 console.log('Latency requirements not reached');12 console.log('Latency speed threshold is ' + BioserverNetworkCheck.LATENCY_SPEED_THRESHOLD);13 } else {14 console.log('Failed to check user connectivity requirements');15 }16 // STOP user process and display error message17 }18 }19 const urlBasePath = '/demo-server';20 BioserverNetworkCheck.connectivityMeasure({21 uploadURL: urlBasePath + '/network-speed',22 latencyURL: urlBasePath + '/network-latency',23 onNetworkCheckUpdate: onNetworkCheckUpdate,24 errorFn: (e) => {25 console.error('An error occurred while calling connectivityMeasure: ', e);26 }27 });28}
Response Fields
If the NetworkCheckUpdate was successfully, then the 200 success code will be returned with the following parameters.
The table shows the parameters returned if the request is successful.
Field | Type | Description |
|---|---|---|
goodConnectivity | Boolean | The value false if connectivity requirements are not reached |
latencyMs | Number | The value of current latency in milliseconds. |
upload | Number | The value of current upload speed (Kbits/s). |
- Result of
onNetworkCheckUpdatewith good connectivity
A true response for goodConnectivity is shown in the snippet:
JSON1{2 "goodConnectivity": true,3 "latencyMs": 44,4 "upload": 53915}
- Result
onNetworkCheckUpdatewith bad connectivity
A false response for goodConnectivity is shown in the snippet:
JSON1{2 "goodConnectivity": false,3 "latencyMs": 44,4 "upload": 0 // upload speed check not done5}
UIExtensions
This set of API are UI helpers to be used with ACTIVE and PASSIVE_VIDEO liveness
Active Liveness
Active Liveness: resetLivenessActiveGraphics
This function resets the Join the dots challenge graphics.
Example Usage With Custom Graphic Options
Graphic options for the onStartCaptureClick function are shown in the snippet:
JavaScript1BioserverVideoUI.resetLivenessActiveGraphics();
JavaScript1function onStartCaptureClick() {2 // change color of challenge Points3 // and enable tooltip option4 const graphicOptions = {5 tooltip: {6 enabled: true,7 backgroundColor:"DarkTurquoise",8 text: 'Move the line gently with your head to this point',9 duration: '4' //toggle tooltip for 4 seconds or use 0 to disable toggling10 },11 controlledPoint: {radius: 40,color: "blue", borderSize: "3",borderColor: "white"},12 challengePoint: {13 "done": {"color": "OrangeRed"},14 "target": {"color": "DarkTurquoise"}15 },16 challengeLines: {17 "done": {"color": "OrangeRed", "dashed": false},18 "target": {"color": "DarkTurquoise"}19 },20 }21 BioserverVideoUI.resetLivenessActiveGraphics(graphicOptions);22}
Request Parameters
The parameters used are described in the table. Details about the parameters description are available in the Javascript API section.
Field | Type | Description |
|---|---|---|
tooltip (optional) | Object | Graphic options to show tooltips near challenge points (tooltips contain user instructions) |
tooltip.enabled (optional) | Boolean | Enables showing tooltips on challenge points; Default value: false |
tooltip.backgroundColor (optional) | String | Tooltip background color; Default value: #ff6700 |
tooltip.width (optional) | String | Tooltip width. Default value: 200px |
tooltip.fontSize (optional) | String | Tooltip font size; Default value: 0.8em |
tooltip.fontColor (optional) | String | Tooltip text color; Default value: white |
tooltip.duration (optional) | String | Toggles the tooltip using the given duration in seconds. (eg: show it for 4s hide it for 4s) Default value: 4. |
tooltip.text (optional) | String | Tooltip text (user instructions). Default value: Move the line gently with your head to this point. |
controlledPoint (optional) | Object | Graphic options for the starting point by user face movement. |
controlledPoint.radius (optional) | String | Radius of the starting point. Default value: 40. |
controlledPoint.color (optional) | String | Background color of the starting point. Default value: black. |
controlledPoint.borderSize (optional) | String | Border size of the starting point. Default value: 3. |
controlledPoint.borderColor (optional) | String | Border color of the starting point. Default value: white. |
challengePoint (optional) | Object | Challenge points graphic options. |
challengePoint.done (optional) | Object | Graphics of done challenge points. |
challengePoint.done.color (optional) | String | The background color of the challenge point. Default value: Lavender. |
challengePoint.done.borderSize (optional) | String | Border size of the challenge point. Default value: 3. |
challengePoint.done.borderColor (optional) | String | Border color of the challenge point. Default value: white. |
challengePoint.done.textColor (optional) | String | Challenge number text color. Default value: white. |
challengePoint.done.textFont (optional) | String | Challenge number text font. Default value: Helvetica. |
challengePoint.done.dashed (optional) | String | Whether or not the challenge point border is dashed. Default value: false. Allowed values: false, number. |
challengePoint.target (optional) | Object | Graphics of a targeted challenge point. |
challengePoint.target.color (optional) | String | The background color of the challenge point. Default value: DarkOrchid. |
challengePoint.target.borderSize (optional) | String | Border size of the challenge point. Default value: 3. |
challengePoint.target.borderColor (optional) | String | Border color of the challenge point. Default value: white. |
challengePoint.target.textColor (optional) | String | Challenge number text color. Default value: white. |
challengePoint.target.textFont (optional) | String | Challenge number text font. Default value: Helvetica. |
challengePoint.target.dashed (optional) | String | Whether or not the challenge point border is dashed. Default value: false. Allowed values: false, number. |
challengeLines (optional) | Object | Challenge lines graphic options. |
challengeLines.done (optional) | Object | Graphics of lines connecting done-challenge points. |
challengeLines.done.color (optional) | String | The background color of the challenge point. Default value: Lavender. |
challengeLines.done.size (optional) | String | Border size of the challenge point. Default value: 5. |
challengeLines.done.dashed (optional) | String | Whether or not the line will be dashed. Default value: 10. Allowed values: false, number. |
challengeLines.target (optional) | Object | Graphics of lines connecting last-done challenge point with the starting circle. |
challengeLines.target.color (optional) | String | The background color of the challenge point. Default value: DarkOrchid. |
challengeLines.target.size (optional) | String | Border size of the challenge point. Default value: 5. |
challengeLines.target.dashed (optional) | String | Whether or not the line will be dashed. Default value: 10. Allowed values: false, number. |
Active Liveness: updateLivenessActiveGraphics
This function adds the Join the dots challenge graphics to the UI.
JavaScript1BioserverVideoUI.updateLivenessActiveGraphics(videoElementId, trackingData);
Request Parameters
The parameters used are described in the table. Details about the parameters description are available in the Javascript API section.
Field | Type | Description |
|---|---|---|
videoElementId | String | The ID of the video in which the user camera is displayed. |
trackingData | Object | The tracking data received from the tracking callback function. |
Usage example
A sample success response is shown in the snippet:
1<!-- below the html sample before calling the UI lib -->2<div class="wrapper">3 <video id="user-video" autoplay playsinline></video>4</div>5<!-- below the html sample after calling the UI lib -->6<!-- BioserverVideoUI.updateLivenessActiveGraphics('user-video', trackingData) -->78<div class="wrapper">9 <div id="wbs-video-wrapper" style="position: relative;">10 <video id="user-video" autoplay playsinline></video>11 <div id="wbs-graphics-wrapper">12 <div id="wbs-tooltip"></div>13 <svg id="wbs-graphics-overlay" style="...">14 <!-- (...) -->15 </svg>16 </div>17 </div>18</div>
Passive video Liveness
Passive video Liveness : initPassiveVideoGraphics
This function initializes the passive video liveness graphics.
Example Usage
JavaScript1BioserverVideoUI.initGraphics('user-video', {2 oval: {3 borderSize: 8,4 borderColor: 'white',5 animatedBorderColor: '#FFA000',6 },7 backgroundColor: 'rgba(21, 51, 112, 0.8)'8})
Request Parameters
The parameters used are described in the table.
Field | Type | Description |
|---|---|---|
videoElement | String | Identifier of HTML VideoElement that displays the user camera |
graphicOptions (optional) | Object | Graphic options : css customization |
Graphic options are :
Field | Type | Description |
|---|---|---|
oval (optional) | Object | Information about oval graphics |
oval.borderSize (optional) | Boolean | Border size of the oval. By default 8 |
oval.borderColor (optional) | String | CSS color of the oval border. By default #FFFFFF |
oval.animatedBorderColor (optional) | String | CSS color of the animated oval border. By default #FFA000 |
backgroundColor (optional) | String | CSS color for the background color outside the oval. By default rgba(21, 51, 112, 0.8) |
Passive video Liveness: displayPassiveVideoAnimation
This function display the passive video liveness graphics.
Example Usage
JavaScript1const faceCaptureOptions = {2 trackingFn: function(trackingInfo) {3 BioserverVideoUI.displayPassiveVideoAnimation(trackingInfo);4 // ...5 },6 // ...7}8BioserverVideo.initFaceCaptureClient(faceCaptureOptions)
Request Parameters
The parameters used are described in the table.
Field | Type | Description |
|---|---|---|
trackingInfo | Object | Object trakcingInfo as sent by the server to the callback trackingFn() |
Response Parameters
In case of error :
Field | Type | Description |
|---|---|---|
error | Object | Error object |
error.message | String | Error message. Example : "Failed to display animation" |
Passive video Liveness : stopPassiveVideoAnimation
This function removes the passive video liveness graphics.
Example Usage
JavaScript1const faceCaptureOptions = {2 showChallengeResult: (result) => {3 BioserverVideoUI.stopAnimation();4 // ...5 },6 errorFn: (error) => {7 BioserverVideoUI.stopPassiveVideoAnimation();8 // ...9 }10 // ...11}12BioserverVideo.initFaceCaptureClient(faceCaptureOptions)
Response Parameters
In case of error :
Field | Type | Description |
|---|---|---|
error | Object | Error object |
error.message | String | Error message. Example : "Failed to stop animation" |
Passive video Liveness : displayPassiveVideoBestImage
This function display the best image extracted from a passive video liveness.
Usage Example
JavaScript1const faceCaptureOptions = {2 showChallengeResult: async (challengeResult) => {3 const bestImgBlob = await requestBestImageFromBackend();4 BioserverVideoUI.displayPassiveVideoBestImage(bestImgBlob, challengeResult, "best-image-wrapper", {5 oval: {6 borderSize: 5,7 borderColor: "#41B16E"8 },9 })10 // ...11 }12 // ...13}14BioserverVideo.initFaceCaptureClient(faceCaptureOptions)
Request Parameters
The parameters used are described in the table.
Field | Type | Description |
|---|---|---|
bestImage | Blob | Best image blob as retrieved by server |
challengeResult | Object | Parameters passed to showChallengeResult callback |
BestImageElement | String | Identifier of HTML best image Element that displays the best image |
graphicOptions | Object | Graphic options : css customization |
Graphic options are :
Field | Type | Description |
|---|---|---|
oval (optional) | Object | Information about oval graphics |
oval.borderSize (optional) | Boolean | Border size of the oval. By default 8 |
oval.borderColor (optional) | String | CSS color of the oval border. By default #FFFFFF |
Response Parameters
In case of error :
Field | Type | Description |
|---|---|---|
error | Object | Error object |
error.message | String | Error message. Example : "Failed to display animation" |
Passive video Liveness : resetBestImage
This function display the passive video liveness graphics.
Usage Example
JavaScript1BioserverVideoUI.resetBestImage();
Response Parameters
In case of error :
Field | Type | Description |
|---|---|---|
error | Object | Error object |
error.message | String | Error message. Example : "Failed to reset image" |
Passive video Liveness : displayBestImage
This function display the best image extracted from a passive video liveness without any additional graphics.
Usage Example
JavaScript1const faceCaptureOptions = {2 showChallengeResult: async (challengeResult) => {3 const bestImgBlob = await requestBestImageFromBackend();4 BioserverVideoUI.displayBestImage(bestImgBlob, challengeResult, "best-image-wrapper")5 // ...6 }7 // ...8}9BioserverVideo.initFaceCaptureClient(faceCaptureOptions)
Request Parameters
The parameters used are described in the table.
Field | Type | Description |
|---|---|---|
bestImage | Blob | Best image blob as retrieved by server |
challengeResult | Object | Parameters passed to showChallengeResult callback |
BestImageElement | String | Identifier of HTML best image Element that displays the best image |
Global Error Codes
The table shows the global error codes for Biometric video-server javascript part (Web SDK).
Code | Description |
|---|---|
400 | Invalid Input : missing input or wrong input. Input didn't pass the validation process on backend. |
429 | Maximum captures attempt reached. If several incorrect liveness attempts are done, the liveness service is disabled for a given period to the user. Fingerprinting feature should be enable on backend. |
500 | Internal Error. |
503 | The server is overloaded. Try again in few seconds. |
1100 | Biometric services are not fully functional. |
1200 | Internal error. An error occurred while initializing. |
1201 | Internal error. An error occurred while tracking the face. |
1301 | Video Capture timeout: No face detected during liveness step. |
1303 | Poor video quality. |
1304 | No active video stream found. Allow device usage. |
2000 | Internal Error. |
FaceCapture
This section discusses FaceCapture functionalities.
getMediaStream
This function requests access to the given camera devices and returns the associated MediaStream.
This function prompts the user for permission to use the requested media.
Warning: Except for the back cameras of smartphones, the webcam-camera video and smartphones front-cameras video stream are inverted/flipped. Depending on the camera used, you may have to apply a CSS style transform:scale(-1,1) on the video wrapper element in order to create a mirror effect on the video stream.
JavaScript1BioserverVideo.getMediaStream(mediaObjectInput)
This API could face errors primarily due to the user denying camera access.
To handle exceptions resulting from this issue, a simple catch mechanism should be implemented around the API call.
Example: Get Video Stream
JavaScript1// Requests video stream from the default camera device2// HTML Code: <video id="user-video" autoplay playsinline></video>3const videoStream = await BioserverVideo.getMediaStream({videoId: 'user-video'});4// Assign stream to srcObject (mandatory)5videoElement.srcObject = videoStream;
Parameters
Field | Type | Description |
|---|---|---|
mediaObjectInput | Object | Input Object currently containing only the video identifier |
mediaObjectInput.videoId | String | Video identifier refers to the ID attribute of the video tag on an HTML page, which is used to display the user's video stream. |
Error Response
Field | Type | Description | Example |
|---|---|---|---|
code | Object | Error code from server | 1304 |
name | String | Constraint property whose string value is the name of a constraint which was impossible to meet. Exception are retrieved from getUserMedia javascript native API. | NotAllowedError |
error | String | Human readable error message from server containing the name and the message. | NotAllowedError : The user has denied permission to use the camera. |
initFaceCaptureClient
This function initializes a face capture client with the given configuration. The returned client will let you start and stop the face capture on a given video stream, capture face-tracking info, manage challenges, and handle errors.
Recommendation: Do not use optional parameters in order to have best setting within your web app.
JavaScript1BioserverVideo.initFaceCaptureClient(options)
Example Usage
JavaScript1// get liveness session id from Location header provided by backend API call2const sessionId = await initLivenessSession();3// init a face capture client4const faceCaptureOptions = {5 wspath: 'video-server/engine.io',6 bioserverVideoUrl: '$URL-WBS',7 bioSessionId: sessionId,8 onClientInitEnd: () => { console.log("Init ended. Remove loading for video") },9 trackingFn: (trackingInfo) => { console.log("onTracking", trackingInfo) },10 errorFn: (error) => { console.log("face capture error", error) },11 showChallengeInstruction: (challengeInstruction) => { console.log("challenge instructions", challengeInstruction) },12 showChallengeResult: () => { console.log("call back the backend to retrieve liveness result"); }13};1415// Show loader on GUI16const faceCaptureClient = await BioserverVideo.initFaceCaptureClient(faceCaptureOptions);
Parameters
The parameters used are described in the table. Details about the parameters description are available in the Javascript API section.
Field | Type | Mandatory | Description |
|---|---|---|---|
bioserverVideoUrl | String | No | The Base URL of video-server used to construct the websocket URL. If not provided, the same url of the browser will be used assuming that client is on the same server as video-server backend. Example : "https://$myserver:443" |
wspath | String | No | The webSocket path used to communicate with the server via websocket in additional to 'bioserverVideoUrl' base URL. Default value: "/video-server/engine.io" |
bioSessionId | String | Yes | The bio-session 'id' in which the user images will be temporarily stored during the capture process. |
onClientInitEnd | Function | Yes | When invoked, it notifies the end of the initialization from startCapture call to allow to display the video stream to the enduser. |
trackingFn | Function | Yes | The callback that handles the face tracking information per frame. It is fired on each video frame with face tracking information. |
showChallengeInstruction | Function | Yes | The callback to handle challenge instructions for all liveness. On every liveness : 'TRACKER_CHALLENGE_PENDING' message indicate that the final image is being computing so video stream from GUI should be hidden by a loader (or a black screen will appear, see FAQ) . On 'LIVENESS_PASSIVE' and 'LIVENESS_PASSIVE_VIDEO' : 'TRACKER_CHALLENGE_DONT_MOVE' message can appear to share with client that user should not move. On 'LIVENESS_ACTIVE' : 'FACEFLOW_CHALLENGE_2D' message can appear to start the challenge part of the active liveness. 'BioserverVideoUI' Library is highly recommended to be integrated in order to display correctly challenges to the user. |
showChallengeResult | Function | Yes | This callback is fired once the challenge is done. The results have to be requested by the Service Provider (SP). |
errorFn | Function | Yes | The callback to handle video capture errors. It is fired when an error happens during the capture process. See the table in Global Error Codes section for more details. |
Tracking Info
Field | Type | Description |
|---|---|---|
phoneNotVertical | Boolean | Phone position is not correct. |
tooClose | Boolean | Phone is too close. |
tooFar | Boolean | Phone is too far. |
faceh | Integer | If faceh === 0, user is not moving his head or moving his phone. |
facew | Integer | If facew === 0, user is not moving his head or moving his phone. |
livenessActive.stillFace | Boolean | User is not moving his head. |
livenessActive.movingPhone | Boolean | User is not moving his phone. |
livenessActive.positionInfo | String | Instructions to the user. |
uploadProgress | Float | Floating number from 0 to 1 representing the percentage of the uploaded results to backend. |
downloadProgress | Float | Floating number from 0 to 1 representing the percentage of the downloading data from backend before starting the liveness process. |
uploadProgress:
uploadProgress can be handled optionally by the client application to show a progress bar after capture is performed, and before the server gives final result.
When uploadProgress reaches the value 1, means all the data expected by the server has been received. The client application will now wait for the server result callback.
Example:
JavaScript1{ uploadProgress: 0.238 }
Here 23.8 % of data has been received so far by the server.
downloadProgress:
downloadProgress can be handled optionally by the client application to show a progress bar before capture is performed.
When downloadProgress reaches the value 1, means all the data expected from the server has been received on client side. The client application is now ready to launch the liveness process.
Example:
JavaScript1{ downloadProgress: 0.238 }
Here 23.8 % of data has been received so far from server.
livenessActive:
Instructions from livenessActive.positionInfo are for example :
Enumeration | Description |
|---|---|
TRACKER_POSITION_INFO_MOVE_BACK_INTO_FRAME | No head detected. |
TRACKER_POSITION_INFO_STAND_STILL | Stand still. |
TRACKER_POSITION_INFO_CENTER_MOVE_BACKWARDS | Move away from the camera. |
TRACKER_POSITION_INFO_CENTER_MOVE_FORWARDS | Move closer to the camera. |
For more information, please consult the demo on gitHub : https://github.com/idemia/WebCaptureSDK
startCapture
This example shows an autocapture of a FACE selfie without any liveness verification.
JavaScript1const faceCaptureClient = await BioserverVideo.initFaceCaptureClient(faceCaptureOptions);23// getMediaStream call to retrieve stream from SDK4// start face capture (ex: when user click on capture button)5faceCaptureClient.startCapture({stream: videoStream});6// wait the callback from onClientInitEnd before displaying the stream to enduser78// stop face capture (ex: when user click on stop capture button)9faceCaptureClient.cancel();
The media stream should only be shown to the end-user upon receiving the onClientInitEnd callback from the server. Failure to implement or properly use onClientInitEnd may result in visual glitches. To prevent such issues, ensure the stream is displayed exclusively after the callback is received.
User access blocking
After too many liveness incorrect attempts, the liveness service is disabled for a given period to the user. Goal is to limit liveness spoofing attempts. In this case, the server will return a status code ‘429’.
JSON1{2 "code": 429,3 "error": "Maximum captures attempt reached",4 "unlockDateTime": "2021-01-14T14:30:05.643Z"5}
This response can be returned by server on 2 calls from client: initFaceCaptureClient and start call from client. The initFaceCaptureClient is now creating the connection with the back end and send user information for validation. Call can take a bit longer than before, for proper integration, add a loading page on the UX (See our sample-app integration).
Here is an example of the client integration of FP functionality.
Sample code:
JavaScript1const faceCaptureOptions = {2 wspath: wspath,3 bioserverVideoUrl: bioserverVideoUrl,4 showChallengeInstruction: (challengeInstruction) => {5 // custom code6 },7 onClientInitEnd: () => {8 // custom code9 },10 showChallengeResult: async () => {11 // custom code12 },13 trackingFn: () => {14 // custom code15 },16 errorFn: (error) => {17 if (error.code && error.code === 429) { // user is blocked18 // we reset the session when we finished the liveness check real session19 resetLivenessDesign();20 document.querySelectorAll('.step').forEach((step) => step.classList.add('d-none'));2122 // the lock counter is displayed to the user23 userBlockInterval(new Date(error.unlockDateTime));24 document.querySelector('#step-liveness-fp-block').classList.remove('d-none');25 }26 // custom code27 }28}29client = await BioserverVideo.initFaceCaptureClient(faceCaptureOptions);30client.startCapture({stream: videoStream});31// both of previous call can raise the 429 error message
trackingFn() without challenge
Example of response containing user face tracking information:
JSON1{2 "facex": 217.82150268554688,3 "facey": 175.0970458984375,4 "facew": 218.2180938720703,5 "faceh": 218.2180938720703,6 "positionInfo": "TRACKER_POSITION_INFO_MOVING_TOO_FAST",7 "distance": true, // User face is too far = display "Move closer" message8 "w": 1280,9 "h": 720,10 "timestamp": 153633505711}
tracking() WITH LIVENESS_ACTIVE mode
Example of response containing face-tracking information when the LIVENESS_ACTIVE challenge is requested:
JSON1{2 "faceh": 275.3572082519531,3 "facew": 275.3572082519531,4 "facex": 143.19139099121094,5 "facey": 128.05934143066406,6 "w": 1280,7 "h": 720,8 "timestamp": 1549893651,9 "distance": true, // User face is too far = display "Move closer" message10 "livenessHigh": {11 "controlledPoint": {"x": 299,"y": 236},12 "targetChallengeIndex": 2,13 "challengeCircles": {14 "0": {"x": 199,"y": 97,"r": 91},15 "1": {"x": 344,"y": 291,"r": 91},16 "2": {"x": 99,"y": 296,"r": 91},17 "3": {"x": 536,"y": 247,"r": 91}18 }19 },20 "livenessActive": {21 "controlledPoint": {"x": 299,"y": 236},22 "targetChallengeIndex": 2,23 "challengeCircles": {24 "0": {"x": 199,"y": 97,"r": 91},25 "1": {"x": 344,"y": 291,"r": 91},26 "2": {"x": 99,"y": 296,"r": 91},27 "3": {"x": 536,"y": 247,"r": 91}28 }29 }30}
showChallengeInstruction()
Here are the possible values of the parameter and the corresponding explanation. It is expected to display a relevant message / instruction / screen to the end user.
JavaScript1// if LIVENESS_ACTIVE mode is requested:2"FACEFLOW_CHALLENGE_2D" // End user shall move its face following the pattern34// if LIVENESS_PASSIVE or LIVENESS_PASSIVE_VIDEO mode is requested:5"TRACKER_CHALLENGE_DONT_MOVE" // End user shall not move its face67// if challenge is finished on every liveness:8"TRACKER_CHALLENGE_PENDING" // UX should be hidden with a loader until reception of 'showChallengeResult' callback. Video channel must not be closed during the final image computation.
errorFn()
The error response handled by the callback errorFn(), if defined, otherwise by an exception with a JSON format. For example:
JSON1{2 "code": "1031",3 "error": "Video Capture TimeOut: No face detected!"4 }
See the table in Global Error Codes section for more details.
Sample Face Capture
This section describes a face capture sample.
SimpleClient - Face Capture Example
This is an example of a simple client making a face capture using the video capture library.
Refer to the sample application for more details.
SimpleClient.html
HTML1<!DOCTYPE html>2<html lang="en">3<head>4 <meta charset="UTF-8">5 <title>Simple Client</title>6 <style>#video{width: 400px; border: 1px solid black;}</style>7</head>8<body>9 <video id="user-video" autoplay playsinline style="transform: scaleX(1);"></video>10 <br/>11 <button id="capture">Capture face</button>12 <button id="stop">stop Capture face</button>1314 <script src="$URL-WBS/video-server/bioserver-video-api.js"></script>15 <script src="$URL-WBS/video-server/bioserver-environment-api.js"></script>16 <script src="$URL-WBS/video-server/bioserver-network-check.js"></script>17 <script src="$URL-WBS/video-server/bioserver-video-ui.js"></script>18 <script src="SimpleClient.js"></script>19</body>20</html>
SimpleClient.js
JavaScript1let client, videoStream;2async function init() {3 // get liveness session id from backend4 const sessionId = await initLivenessSession();5 // initialize the face capture client with callbacks6 const faceCaptureOptions = {7 wspath: 'video-server/engine.io',8 bioserverVideoUrl: '$URL-WBS',9 bioSessionId: sessionId,10 onClientInitEnd: () => { console.log("Init ended. Remove loading for video") },11 trackingFn: (trackingInfo) => { console.log("tracking", trackingInfo) },12 errorFn: (error) => { console.log("got error", face) },13 showChallengeInstruction: (challengeInstruction) => { console.log("got challenge instruction", challengeInstruction) },14 showChallengeResult: () => { console.log("got challenge result -> callBackend to fetch result") }15 };16 client = await BioserverVideo.initFaceCaptureClient(faceCaptureOptions);17 // get user camera video18 // HTML Code: <video id="user-video" autoplay playsinline></video>19 videoStream = await BioserverVideo.getMediaStream({videoId: 'user-video'});20 // display the video stream21 document.querySelector('#user-video').srcObject = videoStream;22}23document.querySelector('#capture').addEventListener('click', async () => {24 if (client) client.startCapture({stream: videoStream});25});26document.querySelector('#stop').addEventListener('click', async () => {27 if (client) client.cancel();28});2930async function initLivenessSession () {31 console.log('init liveness session');32 return new Promise((resolve, reject) => {33 const xhttp = new window.XMLHttpRequest();34 let path = '$URL-INTEGRATOR-BACK-END/video-server/init-liveness-session/'; // please fill with your backend endpoint35 xhttp.open('GET', path, true);36 xhttp.responseType = 'json';37 xhttp.onload = function () {38 if (this.status >= 200 && this.status < 300) {39 resolve(xhttp.response);40 } else {41 console.error('initLivenessSession failed');42 reject();43 }44 };45 xhttp.onerror = function () {46 reject();47 };48 xhttp.send();49 });50}5152init();
FAQ
What are the recommended liveness settings?
Recommended liveness settings are :
- Mode :
LIVENESS_PASSIVE_VIDEO - Security level :
HIGH
Where can I find sample source code showing API integration?
A demo app is available to showcase the integration of IDEMIA Web CaptureSDK for IDEMIA Identity offering.
Github repository: https://github.com/idemia/WebCaptureSDK
Section: Face autocapture with liveness detection
How to run sample source code from GitHub?
-
Install npm on your machine
-
Download GitHub sources
-
Update demo configuration : /server/config/defaults.js
JavaScript1// Remote server to call2BIOSERVER_CORE_URL: '<URL_FROM_EXPERIENCE_PORTAL>/bioserver-app/v2',3BIOSERVER_VIDEO_URL: '<URL_FROM_EXPERIENCE_PORTAL>',4WEB_SDK_LIVENESS_ID_DOC: '<WEBC_SDK_APIKEY_FROM_EXPERIENCE_PORTAL>'
You can also enable ID&V Demo integration
JavaScript1// ID&V Demo integration2GIPS_URL: '<URL_FROM_EXPERIENCE_PORTAL>/gips',3GIPS_RS_API_Key: '<GIPS_RS_APIKEY_FROM_EXPERIENCE_PORTAL>',4IDPROOFING: false, // Enable ID&V Demo integration : true or false
- Go to GitHub sources root and install npm (do it only once)
Shell1npm i --verbose
Run the demo (to do each time you want start the demo)
Shell1npm run start
- Now you can open a browser with the following link:
For more details, please consult the section how to deploy sample app and the section how to test sample app
How to test sample source code from GitHub with an Android phone?
-
Run sample source code from GitHub on your local machine
-
Setup your phone
- Download and install 'scrcpy' here: https://github.com/Genymobile/scrcpy#get-the-app
- Enable developer options on Android phone: https://developer.android.com/studio/debug/dev-options
- Enable 'debugging': https://developer.android.com/studio/debug/dev-options#debugging
- Plug usb cable to your phone and select 'file sharing' USB mode or similar
- Always accept the certificate or key from the computer when prompted on the device
Open a terminal, go to the installation folder and launch once:
Shell1adb devices
This will start the 'adb' deamon once and display the status of the device connected.
Shell1* daemon not running; starting now at tcp:50372* daemon started successfully3List of devices attached4XXXX128PX device
If you don't see your device :
- try unplug / plug the USB cable
- set proper USB mode
- check if debugging option is enabled on device
- Redirect the mobile port to local machine port
Shell1adb reverse tcp:[device port] tcp:[machine port]
Example :
Shell1adb reverse tcp:9943 tcp:9943
This will forward all mobile connections on port 9943 to local machine port 9943. So if you open a browser with 'http://localhost:9943', all requests will be sent to your local server running on port 9943.
- Display phone screen on local machine launching the command:
Shell1scrscpy
Now the device screen should be displayed on the local machine.
How to debug sample source code from GitHub with broswer console?
-
Follow procedure regarding how to test sample source code from GitHub with an Android phone.
-
Open chrome on you local machine and go to : chrome://inspect/#devices
Click on "inspect"
If you have an issue, check port settings and target settings

- Open https://localhost:9943/demo-server/ on your smartphone chrome browser On you local machine, look at console traces (section Console). You are are also able to add break-points on section Sources.
How to debug sample source code from GitHub with an IDE?
- Open the project /face-autocapture-with-liveness-detection with an IDE. We'll be using the Intellij IDE in the rest of the description.
- Open Run/Debug Configurations
- Add a Node.js Configuration as follows
- Click on Apply and OK
- Set breakpoints under the folder /server
- Launch the projet with debug icon
Why a black screen is visible at the end of the autocapture?
This black screen is present for security reasons. During this time, the final best image of the person will be computed so the video stream must not be stopped. The black screen should be hidden inside the webpage that is in charge of the autocapture UX.
When 'TRACKER_CHALLENGE_PENDING' message under showChallengeInstruction callback is received, a loader should be displayed to the end user so he understands that the capture is yet finished and that he should wait for his results. This good practice is already implemented inside our 'demo-server' sample app available in github : https://github.com/idemia/WebCaptureSDK
Why do I have spoof responses during development?
WebCaptureSDK is not allowing to use some development tools for security reasons – such as using the debugger during the autocapture, simulating a device. When that is happening, the liveness check will be rejected.
Why does a pop-up window open at the beginning of the capture about my camera using Edge and Chrome on ios??
Using Edge and Chrome on ios generates a pop-up for a few seconds when the camera is opened. This may degrade the user experience by temporarily hiding part of the screen and possibly the user instructions. This behavior is inerent to iOS on these two browsers.
Why does my camera preview shake at the beginning of capture with an iPhone Pro?
During the focus, the camera changes and creates this visual effect. This behavior is inerent to iPhone Pro. This only affects this iphone range. This is not affecting the autocapture performances.
How to generate a self-signed certificate?
Install openssl and execute:
Bash1openssl req -x509 -newkey rsa:2048 -keyout key.pem -out cert.pem -days 3650 -subj '/CN=demo-server' -config openssl.cnf -extensions v3_req -nodes
Then import your private key and certificate into a PKCS#12 keystore file:
Bash1openssl pkcs12 -export -out demo-server.p12 -inkey key.pem -in cert.pem -keypbe AES-256-CBC -certpbe AES-256-CBC
Note: This configuration is for development only. In production, you must obtain your server certificate from a public trusted authority and use a domain name you own.
Configuration can be found here: https://github.com/idemia/WebCaptureSDK/blob/master/face-autocapture-with-liveness-detection/server/config/certs/openssl.cnf
How to integrate the SDK in a WebView?
When integrating the WebCapture SDK in a WebView, it is important to configure some settings of the Android or iOS app. Not following the recommendations will lead to unexpected behaviors or errors such as fatal exceptions, camera preview not displayed...
Android WebView
- One must add the CAMERA permission in the app's AndroidManifest.xml file:
XML1<uses-permission android:name="android.permission.CAMERA"></uses-permission>
- After creating the WebView object, one must modify the default WebSettings as follows:
Java1// webView object has been instantiated2WebSettings webSettings = webView.getSettings();3webSettings.setJavaScriptEnabled(true);4webSettings.setDomStorageEnabled(true);5webSettings.setMediaPlaybackRequiresUserGesture(false); // CRITICAL
iOS WKWebView
- One must include the NSCameraUsageDescription property in the App's Info.plist file
- When creating the WKWebView instance, it must be configured as follows:
JavaScript1let prefs = WKWebpagePreferences()2prefs.allowsContentJavaScript = true3let configuration = WKWebViewConfiguration()4configuration.defaultWebpagePreferences = prefs5configuration.allowsInlineMediaPlayback = true // CRITICAL6let webView = WKWebView(frame: .zero, configuration: configuration)