Document WebCapture SDK
Overview
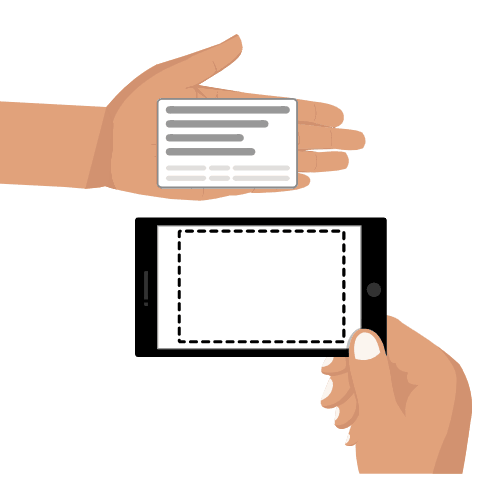
Document WebCapture SDK is a JavaScript SDK that autocaptures any identity document, including passports, identity cards, driver's licenses, and resident identity permits in ID1, ID2, or ID3 format.
Document WebCapture SDK selects the best image within a video stream using artificial intelligence and machine learning algorithms based on the following standards:
- There is no web browser extension required.
- The computation is done within the back end, and minimal resources from the user's smartphone are required.
- The autocaptured image must be suitable for document authentication (verification that the document is a genuine document) using DocAuth Services as part of IDEMIA's solutions.
Document WebCapture SDK provides dynamic and post capture guidance to the user to help autocapture a good quality image by alerting on the following issues:
- Correct camera distance for the smartphone/document (subject is not too far or too close)
- Glare detection
- Too much angle during the capture (trapezoid form)
- Too dark/insufficient lighting
- Document is blurry
Document WebCapture SDK has MRZ capability via PDF417 barcode extraction.
A demo app is available to showcase the integration of IDEMIA Web CaptureSDK for IDEMIA Identity offer in the following repository:
Github repository: https://github.com/idemia/WebCaptureSDK Section: ID Document Autocapture
Requirements
Minimal connectivity upload/download: 1.5 Mbps (means Wifi, 4G, regular 3G)
Maximal connectivity latency: 500ms
Minimal supported resolution: Video resolution FullHD (1080 pixels * 1920 pixels)
Supported browsers:
-
Android: Chrome 60+, FireFox 79+, Opera 57+, Samsung Internet 9+, HuaweiBrowser 12+, Brave 110+, Edge 127+
-
iOS: Safari 15+, Chrome 120+, FireFox 129+, Opera Touch 5+, Edge 125+
Note : If the device has several back cameras, HuaweiBrowser and Opera are not supported on Android.
Note : Using Edge and Chrome on ios generates a pop-up for a few seconds when the camera is opened. This may degrade the user experience by hiding part of the screen and possibly user instructions.
- Desktop (Windows, Mac OS, Linux): not supported
WebView:
WebCapture SDK supports:
-
Chrome WebView (v57+) on Android
-
WKWebView on iOS (v14+)
In order to integrate properly the SDK in a WebView it is mandatory to follow the recommendations. See the FAQ section for integration details.
WebCam: not supported
Services
Document WebCapture SDK is a JavaScript SDK hosted within a back end. This SDK brings in live identity document detection from video streams. This SDK allows an integrator to acquire a best-image from a video stream of an identity document (ID), such as a passport, identity card, or driver's license.
It supports two kinds of readings:
-
PDF417: Stacked linear barcode format
-
MRZ: Machine readable zone
As an integrator, you can follow the three steps below (approximately 15 minutes) to test and use Document WebCapture SDK.
Getting started
The Document WebCapture SDK is designed for service providers to build identity proofing services for their users. It is a JavaScript SDK hosted on a backend server and allows ID document capture from video streams.
The main services are:
- Performing an ID document capture
JavaScript Files SDK
This SDK is not a downloadable toolkit, but rather a set of JavaScript files that must be integrated into a client web application.
To include the JavaScript files in the main HTML page of the client application:
-
Use a for each JavaScript file
-
Set the
srcattribute to the location of the .js file
Environment Check
HTML1<script src="$URL-WDS/doc-server/docserver-environment-api.js"></script>
This script checks whether the current environment (OS/browser) is supported. If not, the response will include a list of supported browsers based on the current OS (parameter supportedBrowser).
For more details, please refer to : Environment Check
Network Check
HTML1<script src="$URL-WDS/doc-server/docserver-network-check.js"></script>
This JavaScript library checks the user's connectivity requirements for video capture by calculating latency and upload speeds.
For more details, please refer to : Network Check
Document Capture
HTML1<script src="$URL-WDS/doc-server/docserver-video-api.js"></script>
This JavaScript library enables access to the user's camera through the browser and facilitates real-time communication using WebSocket.
For more details, please refer to : JavaScript APIs
Integrate Sample App
Steps for downloading and installing the Document WebCapture SDK sample application are described below.
1. Requirements:
Required systems
- OS: Linux or Windows
- Memory: At least 8GB of RAM (recommended minimum)
- CPU: 2.5 GHz (recommended minimum)
Install Node.js
To facilitate integration with Document WebCapture SDK, we provide a web application in source code as an integration good practice example. This sample application is developed in Node.js.
Install Node.js for your operating system:
- Linux: Download & install https://nodejs.org/dist/v16.17.1/node-v16.17.1-linux-x64.tar.gz
- Windows: Download & install https://nodejs.org/dist/v16.17.1/
Node installation process installs also npm.
Integration Environment
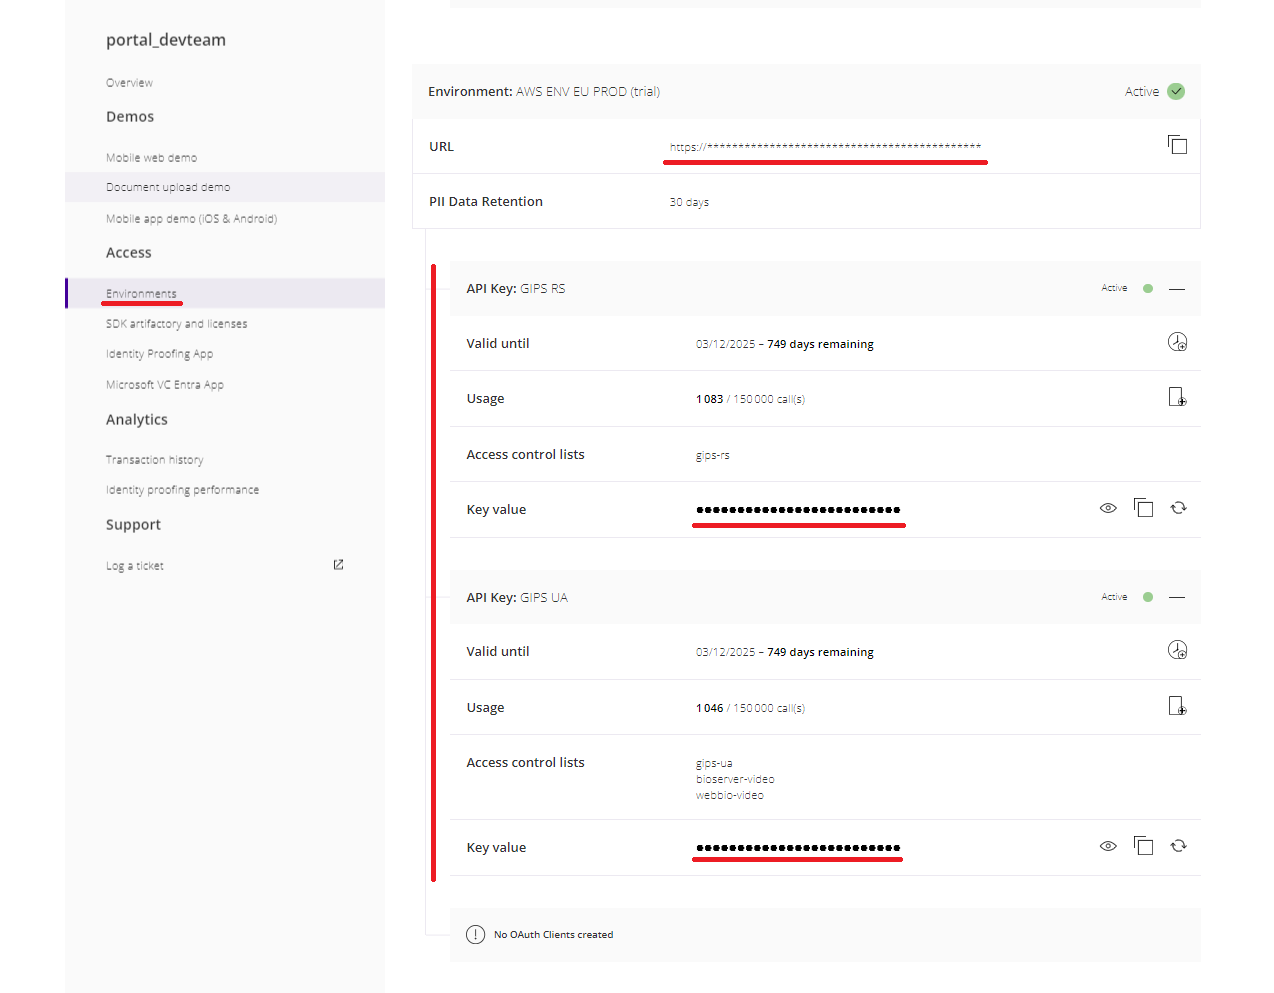
In order to start the integration, you need an API key and a sandbox environment. You can obtain these by registering at:
On the previous link, click on 'My Dashboard' then select 'Environment' and finally choose either 'Trial' or 'Production' for your tests.
From the displayed dashboard, retrieve the following information required to connect to the testing environment:
- The unique URL for the Docserver (SDK backend) and ID&V services
- Two API keys for secure backend connections:
JavaScript1`GIPS RS` // API key for ID&V services2`GIPS UA` // API key for Docserver (SDK backend)
2. Deploy Sample App
- Download the latest sample web application from the GitHub repository.
Github Repository: https://github.com/idemia/WebCaptureSDK
-
Unzip the archive and navigate to the root folder.
-
Go to the folder id-document-autocapture. It contains Document Capture Sample App.
-
Edit the file 'server/config/default.js' and update the configuration variables to set your environment :
- Document Capture credentials
- Document Capture Services URL
- Activate or deactivate ID&V workflow
- ID&V credentials and URL (if ID&V workflow is enabled)
- Update your Document Capture credential with the API key available from your portal account.
JavaScript1WEB_SDK_LIVENESS_ID_DOC: '<WEB_SDK_APIKEY_FROM_EXPERIENCE_PORTAL>'
- Update Document Capture Services URL using your the environment available from your portal account.
JavaScript1DOCSERVER_VIDEO_URL: '<URL_FROM_EXPERIENCE_PORTAL>' // Document Capture SDK
- Activate or deactivate ID&V workflow. If configuration value is true, ID&V workflow is enabled. If configuration value is false, ID&V workflow is disabled.
Warning: ID&V workflow disabled is not currently documented.
JavaScript1IDPROOFING: true
- If ID&V workflow is enabled, update your ID&V credentials and URL with the information available from your portal account.
JavaScript1GIPS_URL: '<URL_FROM_EXPERIENCE_PORTAL>/gips',2 GIPS_RS_API_Key: '<GIPS_RS_APIKEY_FROM_EXPERIENCE_PORTAL>',
- Create a TLS keypair and certificate. You can also convert an existing key/certificate in PEM format into PKCS#12 file format, or use an existing one. Then fill the values in the server/config/defaults.js file with the corresponding location.
An example snippet is shown below:
JavaScript1TLS_KEYSTORE_PATH: path.join(__dirname, 'certs/demo-doc.p12'),2TLS_KEYSTORE_PASSWORD: loadSecretFromFile(path.join(__dirname, 'secrets/tls_keystore_password.txt')),
The password of this keystore should be filled inside the default file at 'secrets/tls_keystore_password.txt'
Notes: Alternatively, for a quick local deployment, you can disable TLS and deploy the demo server on a HTTP port. Set the keys as shown below to deploy the server on http only:
JavaScript1HTTP_SERVER_PORT: 8080,2TLS_API_PORT: null,
3. Run and Test Sample App
-
Open a terminal to the root folder.
-
Check your version of npm and Node.js
Shell1node -v2npm -v
- Launch the following command to load the dependencies as shown in the snippet:
Shell1npm install --verbose
- Launch the following command to run the sample application as shown in the snippet:
Shell1npm run start
-
Please note that desktop browsers are not supported. For testing sample source code from GitHub with an Android phone please consult FAQ section.
-
Now you can open a browser on our mobile device with the following link:
Note: Alternatively, for a quick local deployment, if you have previously set 8080 as the HTTP port and disabled TLS, you can open a browser with the following link:
Note: If you can't access the URLs set by the portal and you are under a proxy, add the following key to your Sample App configuration and restart.
JavaScript1PROXY_URL: 'http://[ip_or_servername]:[port]'
Warning: Since the front-end sources and the back-end sources are located under this same package, everything should be protected behind an authentication tool (except for local test purposes). The defaults.js source file should not be exposed at any time to the world (it contains the API key used to communicate with the Document WebCapture SDK). A good practice is to use an external tool to retrieve the API key and any sensitive information, such as KMS or VAULT.
Use case 1: Docserver Component Usage
Warning: Not currently documented.
Use case 2: ID&V Integration with ID&V workflow
-
Deploy Sample App as described above: link to the section.
-
Enable ID&V workflow and update Sample App configuration as follows :
JavaScript1IDPROOFING: true,2GIPS_URL: '<URL_FROM_EXPERIENCE_PORTAL>/gips',3GIPS_RS_API_Key: '<GIPS_RS_APIKEY_FROM_EXPERIENCE_PORTAL>',
Update your ID&V credentials and URL with the information available from your portal account.
- Run and Test Sample App as described above : link to the section.
Sample App Configuration
All configuration variables from the demonstration code are described below.
Variable | Description | Value |
|---|---|---|
DOCSERVER_VIDEO_URL | This server is used by the WebSDK for document live capture | <URL_FROM_EXPERIENCE_PORTAL> |
WEB_SDK_LIVENESS_ID_DOC | This represents the API key value sent via the APIkey header to access the document SDK endpoints. | ******************** |
DISABLE_CALLBACK | This option disables the callback functionality from WebDocServer. The callback is triggered by WebDocServer when document capture is completed. Callback URL format: SERVER_PUBLIC_ADDRESS + BASE_PATH + LIVENESS_RESULT_CALLBACK_PATH. Default value: true. | |
SERVER_PUBLIC_ADDRESS | Used in a callback URL to receive results from WebDocServer (See DISABLE_CALLBACK) | https://[ip_or_servername]:[port] For example, https://localhost:9943 |
LIVENESS_RESULT_CALLBACK_PATH | Used in callback URL to receive results from WebDocServer (See DISABLE_CALLBACK) | /liveness-result-callback |
TLS_API_PORT | The port of TLS server | 9943 |
HTTP_SERVER_PORT | The port of HTTP server | null |
BASE_PATH | The base path of the server | /demo-doc |
SUPPORTED_LANGUAGES | The supported language of UX | en,es,fr |
IDPROOFING | To link sample application server with ID&V | false |
GIPS_URL | ID&V API URL | <URL_FROM_EXPERIENCE_PORTAL>/gips/rest |
GIPS_RS_API_Key | API key value sent to ID&V | ******************** |
PROXY_URL | Proxy | http://[ip_or_servername]:[port] |
Files from Sample App
Descriptions of the files from the source code are shown below.
Filename | Description |
|---|---|
| ./index.js | The Node.JS index file that initializes front-end endpoints and calls the file ./server/httpEndpoints.js for back-end endpoints |
| ./package.json | The Node.JS dependencies |
| ./GettingStarted.md | The README markdown file |
| ./licenses/* | The licenses from the demonstration project |
| ./server | The back-end side package |
| ./server/webdoc-api.js | Allows communication with the WebDocserver API |
| ./server/packer.js | Prepares the front-end source to be exposed |
| ./server/httpEndpoints.js | Back-end endpoint (used by the front end to reach WebDocserver) |
| ./server/httpUtils.js | Creates an agent to be used by node-fetch with connection and TLS configuration |
| ./server/gips-api.js | Allows communication with the ID&V API |
| ./server/config/index.js | Reads the Server configuration file and sets defaults keys |
| ./server/config/countries.js | Retrieve the three-character string corresponding to the country of the user |
| ./server/config/rules.js | Retrieve the rules to apply depending on the user's document and country selection |
| ./server/config/defaults.js | Server configuration file |
| ./server/config/certs/* | Procedure for TLS certificate generation |
| ./server/config/i18n/* | Translation files (Spanish/ French/ Japanese) |
| ./server/config/secrets/* | Secret files |
| ./front | Front-end side package |
| ./front/utils/* | Common resources called by front-end JS |
| ./front/templates | Front-end sources |
| ./front/templates/doc-auth/index.js | All the JS source code to integrate the demo-doc is present here |
| ./front/templates/doc-auth/index.html | All the html source code to integrate the demo-doc is present here |
| ./front/templates/doc-auth/detect-env.js | Environment detection using webDocserver library |
| ./front/templates/doc-auth/country-doc-selection.js | Documents selection |
| ./front/templates/doc-auth/statics/* | Assets: images, logos, fonts, CSS |
| ./front/templates/doc-auth/animations/* | JSON animation files (alternative to .gif) |
Definitions
Some definitions used in this documentation are described below.
Document Session
The document session is an in-memory session stored within the back end that is accessed by the service provider using APIs:
- It is related to one document type; for example, a US driver's license
- It is used to store all user captures of their identity document
- The user cannot modify or retrieve the document session content
Autocapture
The capture of an identity document is the result of capturing each of its sides through a video stream. The end-user is guided to capture the best possible images of the sides of his document.
Manual capture
The manual capture of an identity document is the result of capturing each of its sides through a photo taken by the end-user himself.
The end-user is guided to capture the best possible images of the sides of his document.
Document Capture status
A document capture goes through different statuses during its life cycle in the session as described in the table.
Status | Description |
|---|---|
IN_PROGRESS | The user starts streaming video capture to webDocServer |
DONE | A capture is done and identity information is extracted (depending on the applied rules) |
TIMEOUT | webDocServer is unable to detect a document from the user video stream within a configured timeout |
FAILED | webDocServer fails to extract the identity information from the detected document |
ERROR | A technical error has occurred during the document capture |
Best image
The best image represents the best detected frame of the document among all video frames during the document capture.
Capture rules
A capture rule is a data extraction feature used by webDocServer to extract identity information from the user document capture.
Rules supported by webDocServer are shown in the table.
Rule | Description |
|---|---|
MRZ | This extracts identity information from the MRZ of the document. |
PDF417 | This extracts identity information from the barcode of the document. |
NONE | No identity information will be extracted. |
Use cases with Identity Proofing & Verification
Requirements
The Service Provider must write its application to facilitate integration within the Document WebCapture SDK. A web application must be developed to allow the user to reach and use the Document WebCapture server.
Note: Refer to the provided sample web application described in Getting Started for more details.
To enable identity document (ID) detection via WebCapture SDK, the client application must be configured with:
- API keys provided by portal administrator(s) to access the Rest API services
- The URL to access the WebCapture Server and SDK
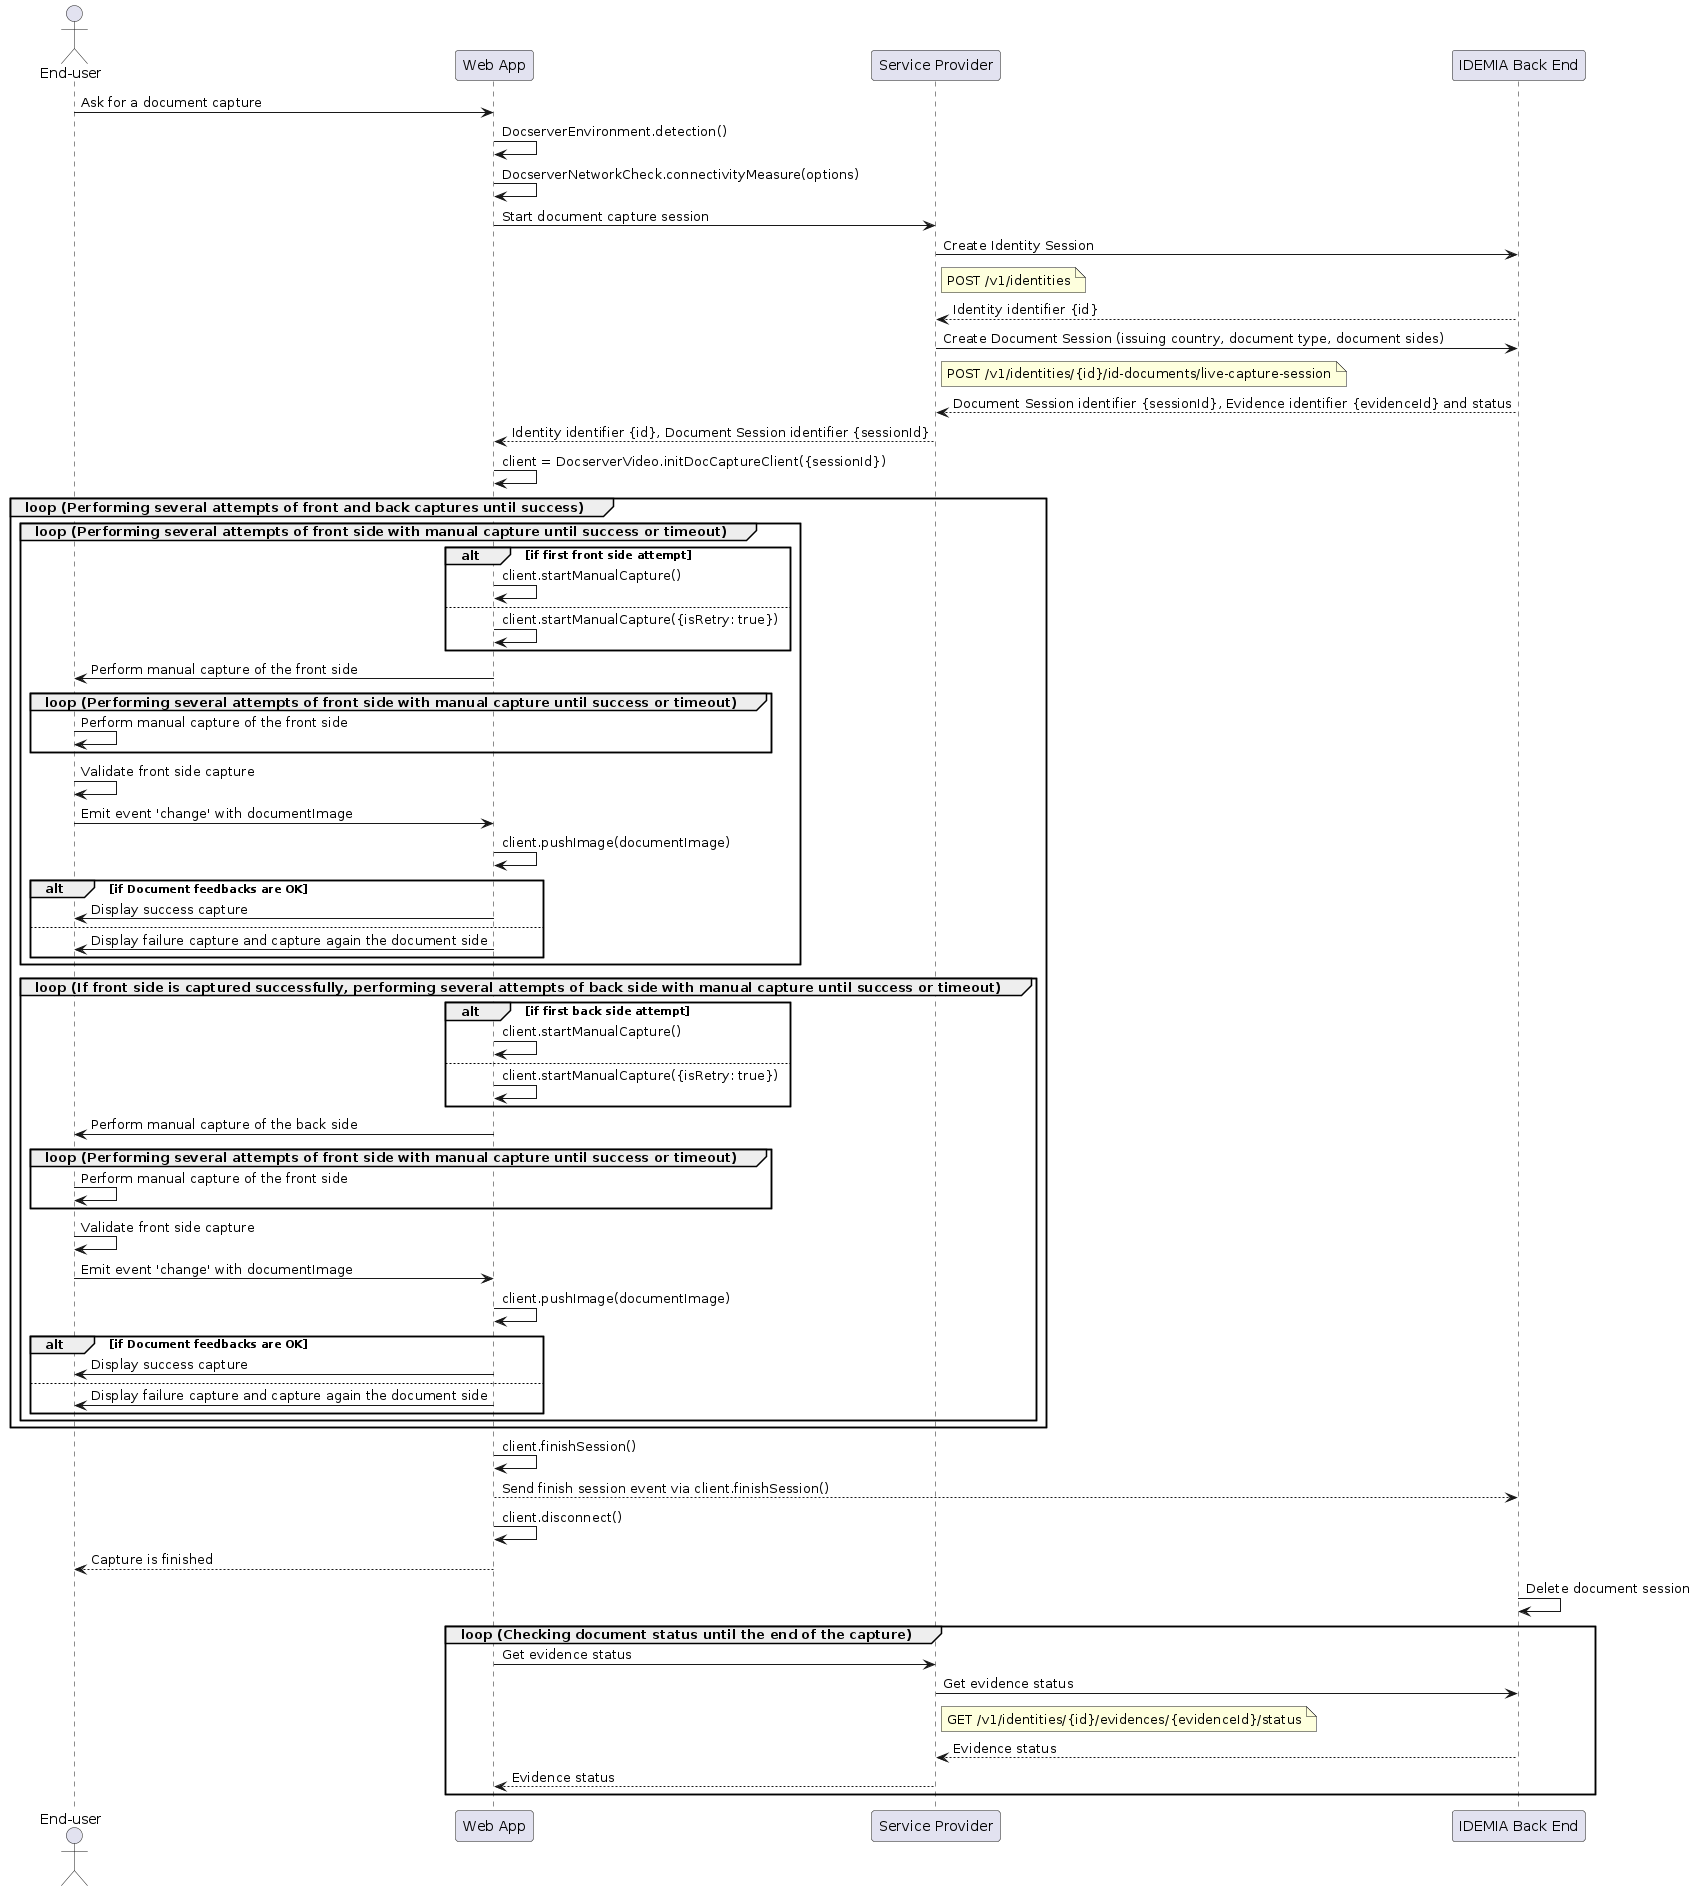
Use case 1: Document Autocapture (Web SDK workflow)
This use case applies when Identity Proofing & Verification (ID&V) solution is used to autocapture a high quality identity document. The issuing country of the document, the type of document, and the sides to capture are known.
UML diagram for identity document autocapture
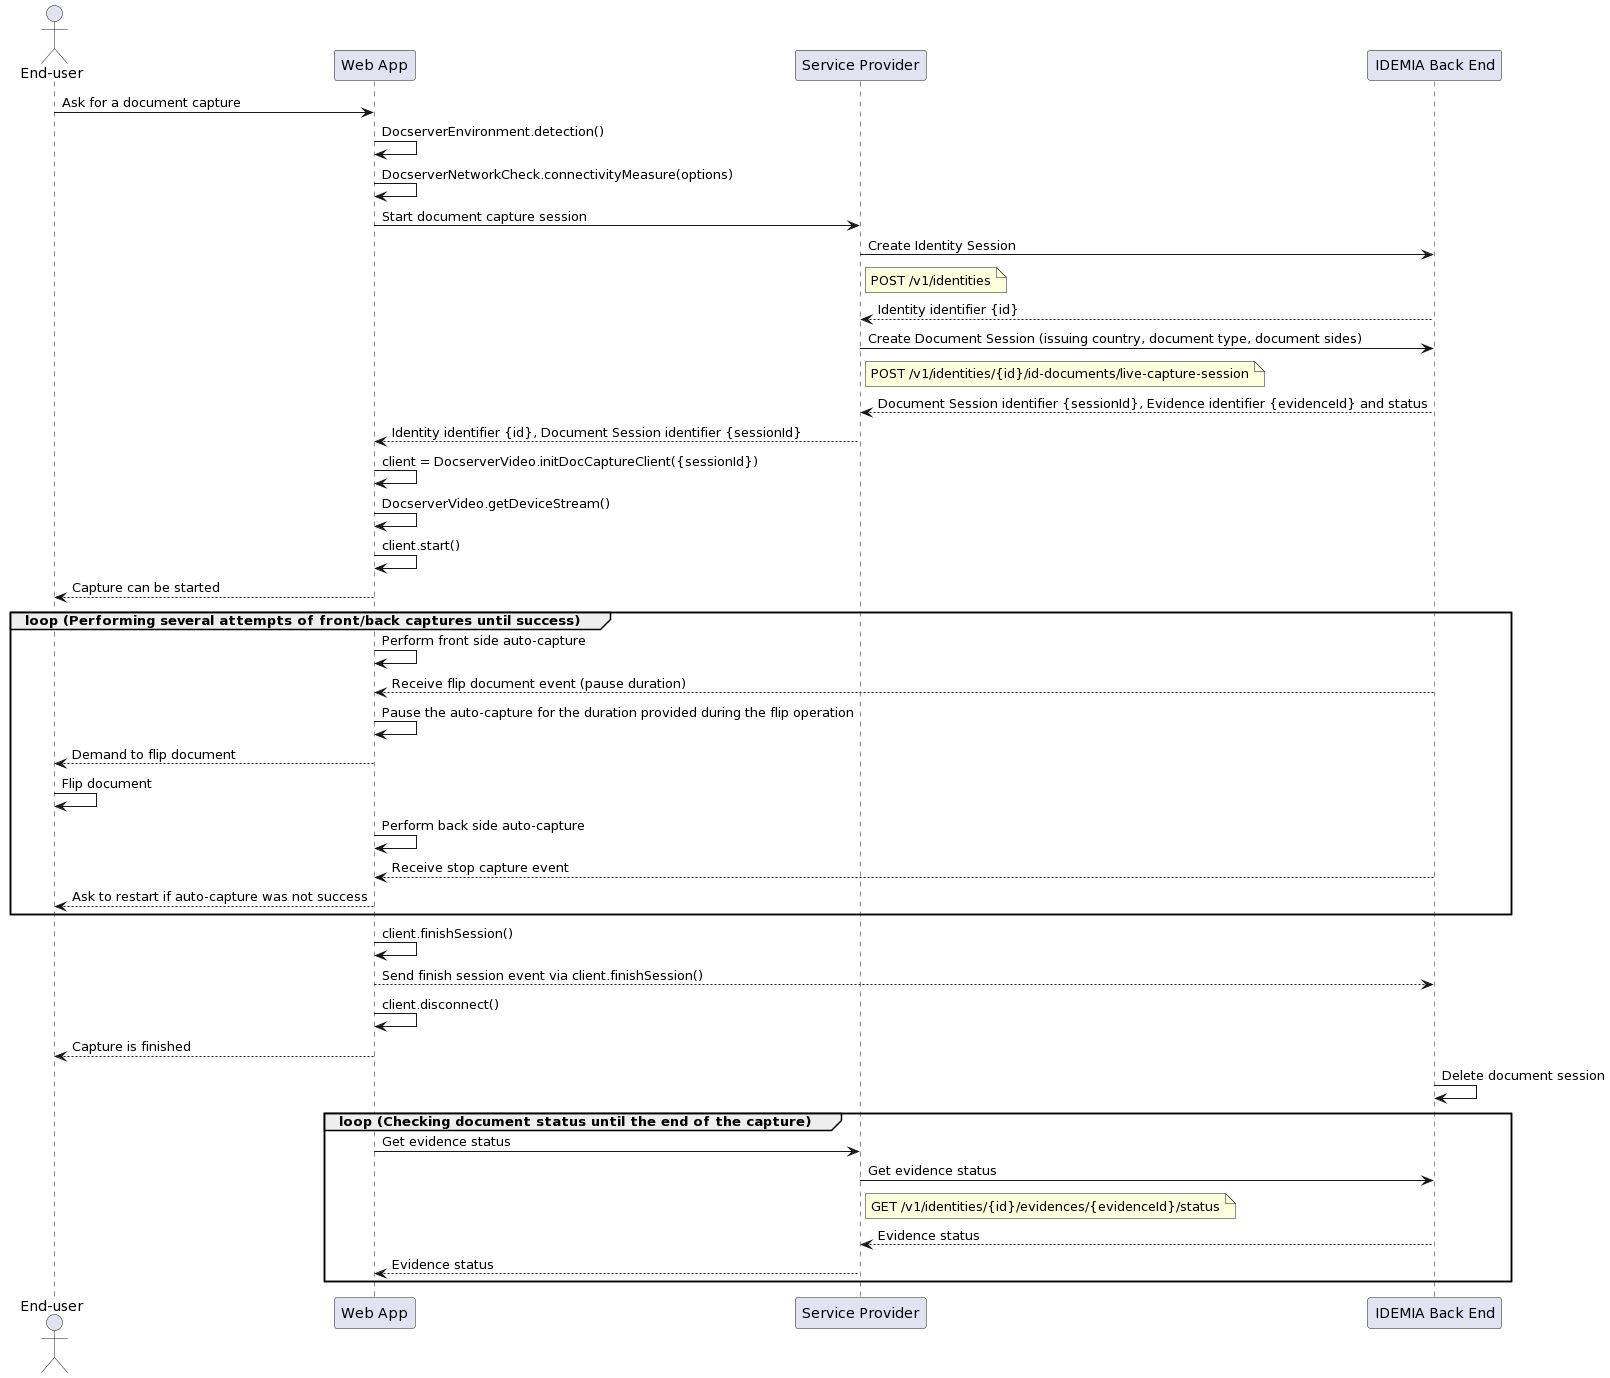
Step 1: Load the web application with the WebCapture JavaScript SDK
- A user is asked for an identity document (ID) authentication via a web application developed by the Service Provider.
- The user launches the web application with a compatible browser (detection API) and a compatible connectivity (connectivityMeasure API)
- The user selects either the country of issue of the document and the type of document to be captured, or the capture rules for each side of the document.
Step 2: Initiate the session
- The web application of the Service Provider handles the request and initiation of a document session.
- This request returns the new session identifier.
Note: Consult ID&V REST API for the integration.
Step 3: Initiate the DocCaptureClient
The web browser uses the Web Capture SDK JavaScript initDocCaptureClient function to retrieve the device's camera device. This is executed in the browser.
- Initialize a doc capture client with the given configuration.
- The returned client lets you start and stop the doc capture on a given video stream, to catch doc tracking info and manage any errors.
Step 4: Get the device stream
The web browser uses the SDK JavaScript function getDeviceStream to retrieve the video stream of the selected device. This is executed in the browser.
- This function both requests and returns the associated media stream.
- When opening a media stream, a specific configuration can be applied to define the capture conditions such as camera resolution and frame rate.
Step 5: Start the capture
The web browser uses the start SDK JavaScript function to initialize a doc capture client. This is executed in the browser and starts a capture client and a document capture for a specific capture identifier in the given session.
- The user video is streamed to the server and exchanges live tracking info of the document with the server.
- Front side is captured
- The document server finds the best image (front side) from the video stream.
- The server asks the user to flip the document
- Back side is captured
- The document server finds the best image (back side) from the video stream.
- The document server extracts the identity information depending on requested rules.
- The document status is updated at the end of the process.
- The document server stops the capture via websocket, and returns document data (status, identity, images).
- Once the document capture is validated by the user, the web browser uses the SDK JavaScript function finishSession.
Step 6: Poll for results
- The document server asynchronously notifies ID&V.
- The document status is retrieved from ID&V by the Service Provider.
- The web browser display the result to the user.
Use case 2: Document Autocapture (Native SDK workflow)
This use case applies when document capture is performed by the native SDK.
UML diagram for identity document autocapture
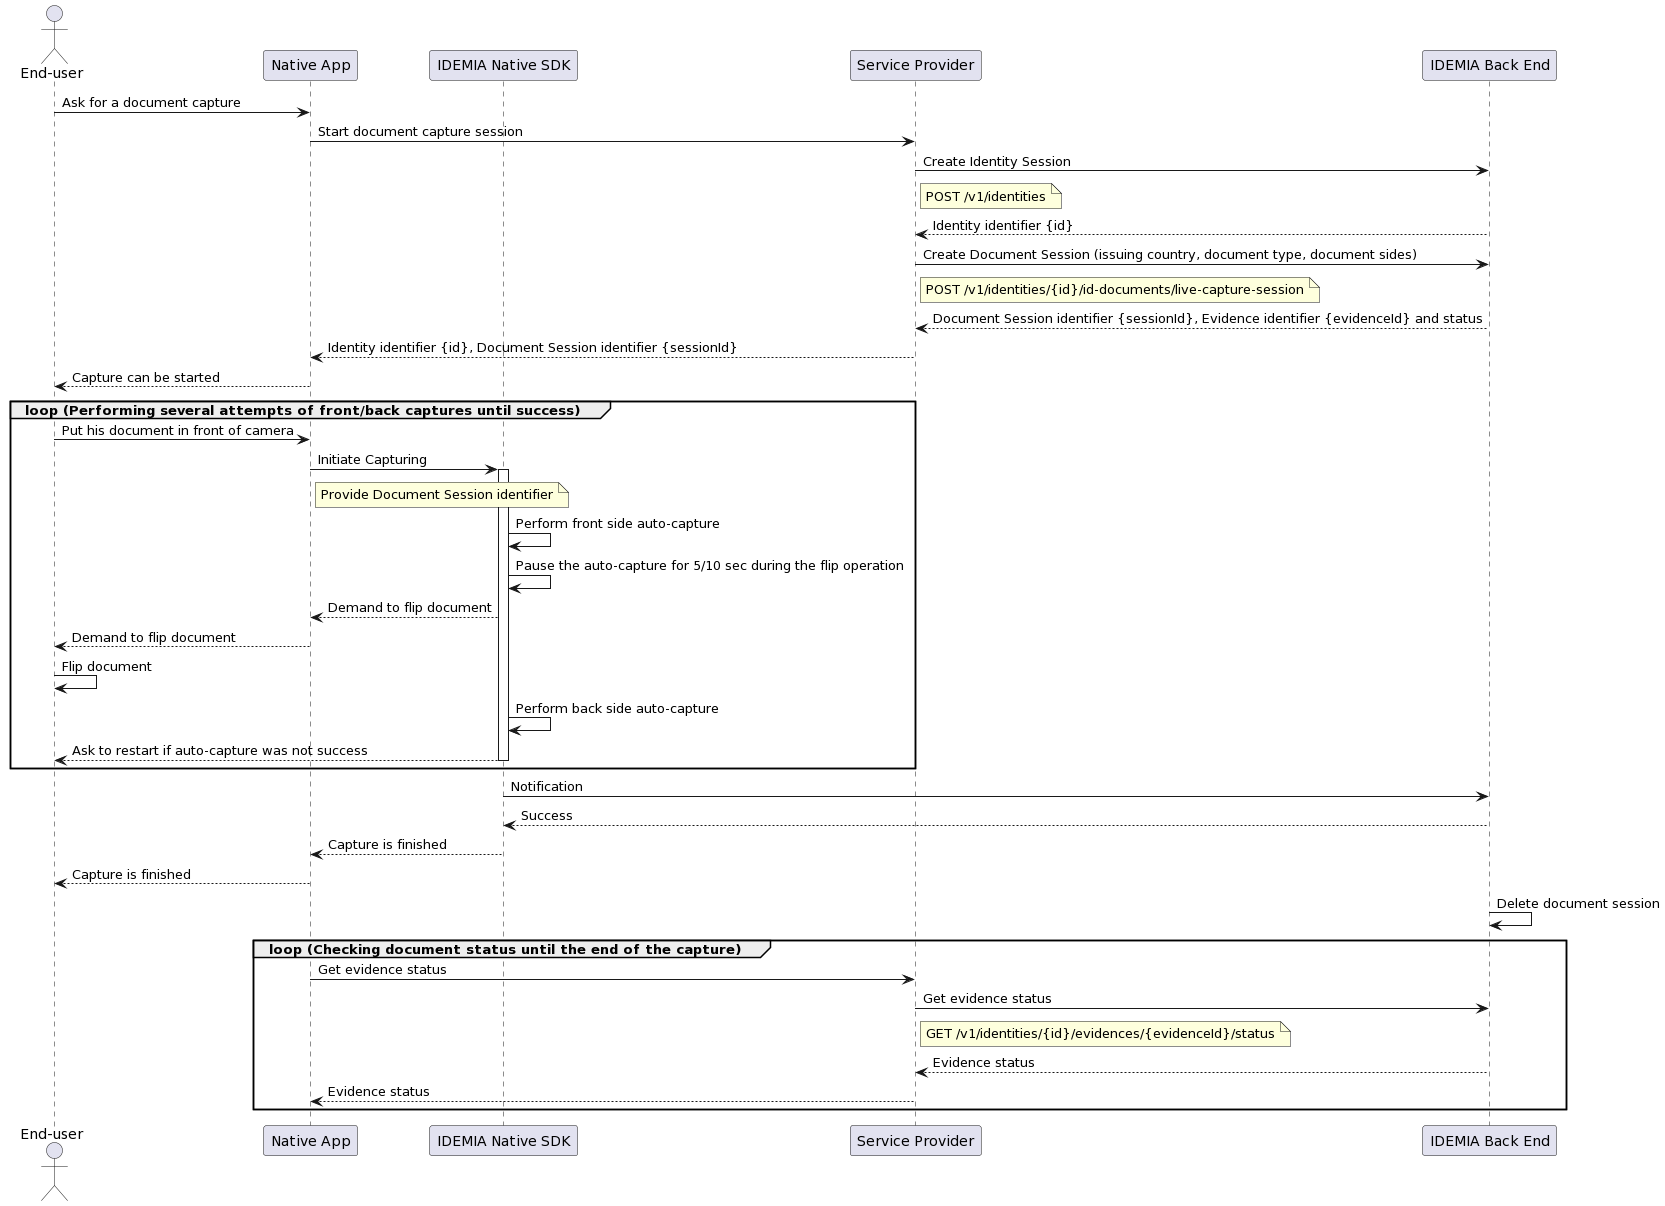
Step 1: Initiate the session
- The user selects either the country of issue of the document and the type of document to be captured, or the capture rules for each side of the document.
- The web application of the Service Provider handles the request and initiation of a document session.
- This request returns the new document session identifier.
Note: Consult ID&V REST API for the integration.
Step 2: Autocapture the document with Native SDK
- The native SDK requests the document session identifier generated.
- The native SDK preforms the front side autocapture.
- The native SDK asks the user to flip the document to capture the other side of the document. Autocapture is paused during a specific time.
- The native SDK preforms the back side autocapture.
- The native SDK asks the user to validate the autocapture of the document.
- The native SDK sends the front and back best images to the back end.
Step 3: Finish the capture
- The native SDK notifies the document server of the end of the document capture.
Step 4: Poll for results
- The document server asynchronously notifies ID&V.
- The document status is retrieved from ID&V by the Service Provider.
- The web browser displays the result to the user.
Use case 3: Document Manual Capture (Web SDK workflow)
This use case applies when Identity Proofing & Verification (ID&V) solution is used to capture manually a high quality identity document. If autocapture is not possible due to device video resolution is not enough or connectivity is not enough etc. Instead of rejecting the capture we will go through manual capture. Manual capture can also be directly proposed without trying autocapture workflow.
UML diagram for manual capture of an identity document
Step 1: Load the web application with the WebCapture JavaScript SDK
- A user is asked for an identity document (ID) authentication via a web application developed by the Service Provider.
- The user selects either the country of issue of the document and the type of document to be captured, or the capture rules for each side of the document.
Step 2: Initiate the session
- The web application of the Service Provider handles the request and initiation of a document session.
- This request returns the new session identifier.
Note: Consult ID&V REST API for the integration.
Step 3: Initiate the DocCaptureClient
The web browser uses the Web Capture SDK JavaScript initDocCaptureClient function to retrieve the device's camera device. This is executed in the browser.
- Initialize a doc capture client with the given configuration.
- The returned client lets you start and stop the doc capture on a given video stream, to catch doc tracking info and manage any errors.
Step 4: Manual capture of the front side
- Start manual capture of the front of the document using Web Capture SDK JavaScript startManualCapture function.
- End-user takes the picture of the front of the document.
- Image is pushed to the server using Web Capture SDK JavaScript pushImage function.
- The document server extracts the identity information depending on requested rules.
- The end user receives feedback on the side: document side is too close, all corners are not visible ...
- In case of issue, the end user can take again a picture with startManualCapture function and push it again with pushImage function for a new analysis by the backend.
Step 5: Manual capture of the back side
- Manual capture of the back side of the document is carried out in the same way as for the front side.
Step 6: Finish the capture
- Once the document capture is validated by the user, the web browser uses the SDK JavaScript function finishSession.
Step 7: Poll for results
- The document server asynchronously notifies ID&V.
- The document status is retrieved from ID&V by the Service Provider.
- The web browser displays the result to the user.
Rest APIs
Warning: APIs documentation is not currently available except for monitoring endpoint.
Health Check / Monitoring
The GetHealthCheck function monitors the server states (ok/ko) and return the Web Document server version as shown in the snippet:
Endpoint
HTTP1GET https://[URL_MAIN_PART]/doc-server/v2/healthcheck
Request header
The request header for GetHealthCheck is shown in the table.
Name | Type | Description |
|---|---|---|
apikey | The API key or the identifier that is used to authenticate requests associated with the service provider. |
Response Body Fields
The success response for GetHealthCheck is shown in the table.
Type | Description |
|---|---|
| HealthCheckTypes | a server status and the server version |
Response Example
- Failure response example
A failure response example for GetHealthCheck is shown in the snippet:
JSON1{2 "version": "1.2.0",3 "status": "ko"4}
- Success response example
A success response example for GetHealthCheck is shown in the snippet:
JSON1{2 "version": "1.2.0",3 "status": "ok"4}
HTTP Error Codes
The HTTP error response parameters for GetHealthCheck are shown in the table.
Code | Description |
|---|---|
400 | Something is wrong with the request |
404 | Provided County is not supported |
401 | Authentication is required |
403 | Missing permissions to create the doc-session |
500 | Internal error |
Rest Objects
HealthCheckTypes
The HealthCheckTypes object describes the state (ok or ko) and the version of Web document server as shown in the snippet:
Parameters
The parameters for HealthCheckTypes are shown in the table.
Name | Type | Description |
|---|---|---|
version | String | The version of Web document server running |
status | String | The Web document server state: running or not running |
Example usage
An example usage for HealthCheckTypes is shown in the snippet:
JSON1{2 "version": "1.2.0",3 "status": "ok"4}
JavaScript APIs
The JavaScript APIs are comprised of a JavaScript library that provides a rich set of client-side functionalities to perform the following:
- Manage the user's camera to send the video stream of the document capture to the Document WebCapture SDK
- Guide the user during a document capture via an exchange of live feedback
Environment Check
detection
The DocserverEnvironment.detection() function detects if the current environment (OS and browser) is supported.
The code is shown in the snippet:
JavaScript1DocserverEnvironment.detection(detectMultipleCamera, callback);
If the environment is not supported, the response contains a list of supported browsers according to the current OS (the parameter supportedBrowser is returned).
DocserverEnvironment.detection() is asynchronous when parameter detectMultipleCamera is true and takes a callback parameter that is executed once the check is done.
Parameters
The parameters for the detection function are shown in the table.
Name | Type | Description |
|---|---|---|
detectMultipleCamera | Boolean | Recommended value: true. It will allow to refuse a device where multiple back camera has been found with unreadable camera labels. |
callback | Function | Mandatory if detectMultipleCamera is true, optional otherwise. Callback that will receive the result |
Example code usage
An example of the DocserverEnvironment.detection() function that detects the current environment (OS and browser) is shown in the snippet:
JavaScript1function envCheckCb(env) {2 if (!env.envDetected) {3 console.log("env detection failed with error:" + env.message);4 return5 }6 var envOS = env.envDetected.os;7 if (!envOs.isSupported) {8 console.log("env detection error: ", env.message , "Supported OS list", envOs.supportedList);9 return10 }11 var envBrowser = env.envDetected.browser;12 if (!envBrowser.isSupported) {13 console.log("env detection error: ", env.message , "Supported Browsers", envBrowser.supportedList);14 return15 }16}1718DocserverEnvironment.detection(true, envCheckCb); // << async check with new callback param
Success response example
Result: OS and browser supported
An example success response for DocserverEnvironment.detection() that detects the OS and browser are supported is shown in the snippet:
JSON1{2 "envDetected": {3 "os": {4 "isSupported": true,5 "supportedList": [],6 "isMobile": false7 },8 "browser": {9 "isSupported": true,10 "supportedList": []11 }12 },13 "message": ""14}
Error response example
Result: Browser not supported
An example success response for DocserverEnvironment.detection() that detects that the browser is not supported is shown in the snippet:
JSON1{2 "envDetected": {3 "os": {4 "isSupported": true,5 "supportedList": []6 },7 "browser": {8 "isSupported": false,9 "supportedList": [10 {11 "name": "Chrome",12 "minimumVersion": "56"13 },14 {15 "name": "Firefox",16 "minimumVersion": "50"17 },18 {19 "name": "Opera",20 "minimumVersion": "47"21 },22 {23 "name": "Edge",24 "minimumVersion": "17"25 }26 ]27 }28 },29 "message": "You seem to be using an unsupported browser."30}
Network Check
This section discusses how to check that the user's network connectivity is good enough to perform video functions.
connectivityMeasure
The connectivityMeasure API allows the ability to check user connectivity requirements for video capture by calculating the latency and upload speed.
The connectivityMeasure function is shown in the snippet:
JavaScript1DocserverNetworkCheck.connectivityMeasure({2 uploadURL: urlBasePath + '/network-speed',3 latencyURL: urlBasePath + '/network-latency',4 onNetworkCheckUpdate: onNetworkCheckUpdate,5 errorFn: (e) => {6 console.error('An error occurred while calling connectivityMeasure: ', e);7 }8});
Verifications are performed in this order:
-
Latency: This checks the latency to verify if it is good do the next check. If not, it returns latency failure without doing a download and upload speed check.
-
Upload speed: This verifies the upload speed and returns the results.
Parameters
The parameters for the connectivityMeasure function are shown in the table.
Name | Type | Description |
|---|---|---|
settings | Object | Input parameter object. |
settings.latencyURL | String | URL that will be used for latency check. |
settings.uploadURL | String | URL that will be used for upload check. |
settings.onNetworkCheckUpdate | Function | Callback function fired with check results. |
settings.errorFn | Function | (Optional) The callback to handle errors. If the callback is not provided, the onNetworkCheckUpdate will be called after the timeout. |
Examples usage
An example code usage for connectivityMeasure is shown in the snippet:
JavaScript1// call it once document loaded2window.onload = () => {3 function onNetworkCheckUpdate(networkCheckResults) {4 console.log({networkCheckResults});5 if (!networkCheckResults.goodConnectivity) {6 console.log('BAD user connectivity');7 if (networkCheckResults.upload) {8 console.log('Upload requirements not reached');9 console.log('Upload speed threshold is ' + DocserverNetworkCheck.UPLOAD_SPEED_THRESHOLD);10 } else if (networkCheckResults.latencyMs) {11 console.log('Latency requirements not reached');12 console.log('Latency speed threshold is ' + DocserverNetworkCheck.LATENCY_SPEED_THRESHOLD);13 } else {14 console.log('Failed to check user connectivity requirements');15 }1617 // STOP user process and display error message18 }19 }20 const urlBasePath = '/demo-doc';21 DocserverNetworkCheck.connectivityMeasure({22 uploadURL: urlBasePath + '/network-speed',23 latencyURL: urlBasePath + '/network-latency',24 onNetworkCheckUpdate: onNetworkCheckUpdate,25 errorFn: (e) => {26 console.error('An error occurred while calling connectivityMeasure: ', e);27 }28 });29}
Response
Success response
If connectivityMeasure was successful, then the response will display with the parameters in the table.
Name | Type | Description |
|---|---|---|
networkCheckResults | Object | The results of the connectivity check. |
networkCheckResults.goodConnectivity | Boolean | The value false if connectivity requirements are not reached |
networkCheckResults.latencyMs | Number | The value of current latency in milliseconds |
networkCheckResults.upload | Number | The value of current upload speed (Kbits/s) |
Result of onNetworkCheckUpdate with good connectivity
A true response for goodConnectivity is shown in the snippet:
JSON1{2 "goodConnectivity": true,3 "latencyMs": 44,4 "upload": 53915 }
Result onNetworkCheckUpdate with bad connectivity
A false response for goodConnectivity is shown in the snippet:
JSON51{2 "goodConnectivity": false,3 "latencyMs": 44,4 "upload": 0 // upload speed check not done5}
Initiate session
The initDocCaptureClient function initializes a document capture client with the given configuration.
The returned client lets you start and stop the document capture on a given video stream, catch document tracking information, and manage errors as shown in the snippet:
JavaScript1DocserverVideo.initDocCaptureClient
This JS function has to be called before getDeviceStream function to improve 4K phone capture coverage.
Example parameters usage
An example usage of the parameters for initDocCaptureClient is shown in the snippet:
JavaScript1// init a doc capture client2const docCaptureOptions = {3 docserverVideoUrl: 'doc_server_endpoint',4 fullDocCapture: true,5 sessionId: sessionId,6 onChangeDocumentSide: (data) => {7 console.log('onChangeDocumentSide: ', data);8 // Handle the flip of the document9 },10 onClientInitEnd: () => {11 console.log("Init ended. Remove loading for video")12 // display the video stream to the user13 },14 trackingFn: (trackingInfo) => { console.log("onTracking", trackingInfo) },15 onDocCaptured: (doc) => {16 console.log("onDoc", doc);17 console.log('Full Document ID: ' + doc.id);18 console.log('Full Document status: ', doc.status);19 // Handle the end of capture and capture status analysis20 // Disconnect the client21 },22 errorFn: (error) => { console.log("doc capture error", error) },23};24const docCaptureClient = await DocserverVideo.initDocCaptureClient(docCaptureOptions);
Parameters
The parameters for initDocCaptureClient are shown in the table.
Name | Type | Description |
|---|---|---|
docserverVideoUrl | URI | Server URI |
fullDocCapture | Boolean | Ability to capture all sides of the document in the same stream. Must equal true. |
sessionId | String | The identifier of the session |
onChangeDocumentSide | Function | The callback that handles the start and the duration of the flip of the document |
onClientInitEnd | Function | When invoked, it notifies the end of the initialization from start call to allow to display the video stream to the enduser. |
trackingFn | Function | The callback that handles the document tracking information |
onDocCaptured | Function | The callback that handles the captured document from the video stream. The end of capture and capture status analysis are handled on onDocCaptured callback. This callback is called when global status of a side capture is different to IN_PROGRESS. |
errorFn | Function | The callback to handle video capture errors |
OnChangeDocumentSide Info
The content of the callback onChangeDocumentSide() is shown in the table :
Field | Type | Description |
|---|---|---|
delay | Integer | Hidden timeout in millisecondsapplied during the flip animation display. After the front capture, the back capture starts only after this period. |
OnClientInitEnd Info
The onClientInitEnd() callback has no content. After invoking initDocCaptureClient and receiving the client in response on the JavaScript side, and once the end-user is prepared for document autocapture, a loading animation should be displayed on the interface.
Following this, open the video stream with getDeviceStream and initiate the capture process with client.start. It is essential to wait for the onClientInitEnd callback before displaying the video preview from the end-user. Failure to implement or properly use onClientInitEnd may result in visual glitches.
Tracking Info
The content of the callback trackingFn() is shown in the table :
Field | Type | Description |
|---|---|---|
position.noDocument | Boolean | No document is detected. |
position.wrongOrientation | Boolean | Wrong orientation is detected. |
position.tooClose | Boolean | Camera is too close to the document. |
position.tooFar | Boolean | Camera is too far from the document. |
position.lowlight | Boolean | Frame has low light. |
position.holdStraight | Boolean | The document isn’t positioned straight in the frame. |
position.badFraming | Boolean | The document is misaligned within the frame. |
position.glare | Boolean | Frame shows some glare/reflection. |
position.pdf417 | Boolean | The PDF417 barcode isn't being detected properly within the frame. |
position.mrzDecoding | Boolean | The MRZ isn't being detected properly within the frame, and the bottom of the document is unreadable. |
position.blur | Boolean | The document within the frame appears blurry. |
corners | Boolean | Document corners {w,h,x0,y0,x1,y1,x2,y2,x3,y3} |
pending | Boolean | Waiting for results |
uploadProgress | Float | The ratio of the data received by the server to the total amount of data to be sent is optional when the client uploads images and videos. It's represented as a floating-point number with three decimal digits precision, ranging from 0 to 1. |
uploadProgress:
uploadProgress can be handled optionally by the client application to show a progress bar after capture is performed, and before the server gives final result. When uploadProgress reaches the value 1, means all the data expected by the server has been received. The client application will now wait for the server result which will happen in onDocCaptured() callback.
Example:
JavaScript1{ uploadProgress: 0.238 }
Here 23.8 % of data has been received so far by the server.
Note: For more information, please consult the demonstration on GitHub: https://github.com/idemia/WebCaptureSDK
OnDocCaptured Info
The content of the callback onDocCaptured() is shown in the table and almost similar to the response of the API GetDocSessionDocumentById :
Field | Type | Description |
|---|---|---|
id | String | Identifier of the captured document |
status | DocumentCaptureStatus | Status of the document capture |
startTime | String | Document capture start time |
endTime | String | Document capture end time |
manual | Boolean | (Optional) If true, document is captured manually. Otherwise, document is autocaptured. |
captures | CaptureDataJS[] | (Optional) List the capture sides of the document |
Success response
If the initDocCaptureClient request is successful then the parameters in the table will be returned.
Name | Type | Description |
|---|---|---|
docCaptureClient | object | The capture client to start/stop a document capture. |
docCaptureClient.start | function | Starts a new document capture. |
docCaptureClient.disconnect | function | Stops the current document capture. |
docCaptureClient.finishSession | function | Document capture is validated. Service provider can manage the data. This function will allow to proceed to several retries before sending the final capture data. |
Error codes
Error codes related to this API are listed in the section [Global Error Codes](#Global Error Codes)
Autocapture
getDeviceStream
This request provides access to the given camera device and returns the associated MediaStream in order to launch an autocapture of the document as shown in the snippet:
JavaScript1DocserverVideo.getDeviceStream
Make sure that JavaScript initDocCaptureClient function was already called before calling this function.
Parameters
The parameters for the getDeviceStream function are shown below.
Name | Type | Description |
|---|---|---|
mediaObjectInput | Object | (Optional) Input Object currently containing only the errorFn callback |
mediaObjectInput.errorFn | Function | (Optional) The callback to handle errors while accessing the user device |
Example usage
Example code usage 1
An example usage for getDeviceStream is shown in the snippet:
JavaScript1// be sure to initialize the client first2const docCaptureClient = await DocserverVideo.initDocCaptureClient(docCaptureOptions);3// request the video stream of the default camera device4const videoStream = await DocserverVideo.getDeviceStream();
Example code usage 2
An example usage for getDeviceStream is shown in the snippet:
JavaScript1// be sure to initialize the client first2const docCaptureClient = await DocserverVideo.initDocCaptureClient(docCaptureOptions);3// request video stream of the default camera device with error callback handler4const videoStream = await DocserverVideo.getDeviceStream({errorFn: (err) => {console.debug("get User Media Stream failed", err);}})
Success response
If the getDeviceStream request is successful then the parameter below will be returned.
Name | Type | Description |
|---|---|---|
| MediaStream | Object | The user media stream |
Error codes
Error codes related to this API are listed in the section Global Error Codes
start
The start function uses the capture client to start a document autocapture, as shown in the snippet:
JavaScript1start
The sessionId that was pushed during initialization phase will be automatically used.
Parameters
The parameters for the start function are shown in the table.
Name | Type | Description |
|---|---|---|
stream | MediaStream | Returned user camera stream by the getDeviceStream function |
Example usage
An example usage of how to start a document capture session for a specific capture identifier is shown in the snippet:
JavaScript1// Init a doc capture client2const docCaptureClient = await DocserverVideo.initDocCaptureClient(docCaptureOptions);34// Get a videoStream5const videoStream = await DocserverVideo.getDeviceStream();67// start capture session8docCaptureClient.start({9 stream: videoStream10});
Error codes
Error codes related to this API are listed in the section [Global Error Codes](#Global Error Codes)
Manual Capture
startManualCapture
The startManualCapture function uses the capture client to start a manual capture of a document side, as shown in the snippet:
JavaScript1startManualCapture
The sessionId that was pushed during initialization phase will be automatically used.
Parameters
The parameters for the start function are shown in the table.
Name | Type | Description |
|---|---|---|
isRetry | Boolean | Allow to notifiy the SDK that the current capture side is the same at the last pushed. This field is only mandatory when enduser wants to retry his current side. |
Example usage
An example usage of how to startManualCapture a manual capture without any retry is shown in the snippet:
JavaScript1const docCaptureClient = await DocserverVideo.initDocCaptureClient(docCaptureOptions);23// Capture of the front side4await docCaptureClient.startManualCapture({ isRetry: false })5// Wait for document image retrieval6await docCaptureClient.pushImage(documentImage)78// Capture of the back side9await docCaptureClient.startManualCapture({ isRetry: false })10// Wait for document image retrieval11await docCaptureClient.pushImage(documentImage)
An example usage of how to startManualCapture a manual capture with several retries retry is shown in the snippet:
JavaScript1// Init a doc capture client2const docCaptureClient = await DocserverVideo.initDocCaptureClient(docCaptureOptions);34// Capture of the front side5await docCaptureClient.startManualCapture({ isRetry: false })6// Wait for document image retrieval7await docCaptureClient.pushImage(documentImage)89// Capture of the front side again10await docCaptureClient.startManualCapture({ isRetry: true })11// Wait for document image retrieval12await docCaptureClient.pushImage(documentImage)1314// Capture of the back side15await docCaptureClient.startManualCapture({ isRetry: false })16// Wait for document image retrieval17await docCaptureClient.pushImage(documentImage)
Error codes
Error codes related to this API are listed in the section [Global Error Codes](#Global Error Codes)
pushImage
The pushImage function uses the capture client to push the image of the document side captured manually, as shown in the snippet:
JavaScript1pushImage
The sessionId that was pushed during initialization phase will be automatically used.
Parameters
The parameters for the start function are shown in the table.
Name | Type | Description |
|---|---|---|
documentImage | Binary | Allow to provide the manual captured image to SDK. |
Example usage
An example usage of how to pushImage is shown in the snippet:
1 <input id="upload-document-photo" type="file" accept="image/png, image/jpeg" capture="environment" hidden>
Result
The result of the image processing is returned through the onDocCaptured callback, defined in the options provided to initDocCaptureClient().
JavaScript1onDocCaptured: async (result) => {2// Display the image and processing result to the user3// Allow the user to confirm or retake the photo4}
Error codes
Error codes related to this API are listed in the section [Global Error Codes](#Global Error Codes)
Finish session
The finishSession function notifies a back end that full capture of a document is complete even if the user made multiple attempts to capture his document.
The API can be called at any moment after session creation except during a capture document side. After calling this API, no more captures are authorized and this API cannot be called again for the session.
Note that only the last captured document will be taken into account.
JavaScript1finishSession
Example usage
An example usage is shown in the snippet:
JavaScript1// Init client, get a video stream, start and proceed capture2// ...34// Finish the document capture session5await docCaptureClient.finishSession();
Error codes
Error codes related to this API are listed in the section [Global Error Codes](#Global Error Codes)
Disconnect
The disconnect function is called to stop the document capture.
JavaScript1disconnect
Example usage
An example usage is shown in the snippet:
JavaScript1// Init client, get a video stream, start and proceed capture2// ...34// Stop the document capture session5docCaptureClient.disconnect();
Error codes
Error codes related to this API are listed in the section [Global Error Codes](#Global Error Codes)
JS Objects
CaptureDataJS
Parameters
The parameters for CaptureDataJS are shown in the table.
Name | Type | Description |
|---|---|---|
id | String | The identifier generated by the server for the document capture; capture_Allowed values: Format UUID |
documentId | String | Identifier of the full document capture (FRONT+BACK) |
status | DocumentCaptureStatus | The status of the capture. |
side | DocumentSide | The document side on which the capture was done. |
corners | Array<Integer[]> | (Optional) The detected corners of the captured document. The corners object represents the coordinates [x,y] of the four corners of the document in the form of an array. Examples: [1,2], [2,3], [3,4], [4,5] |
image | String | (Optional) The best image of the document during the video capture image encoded in base64 |
diagnostic | CaptureDiagnostic | (Optional) An indication of the position of the document that was captured in the best image. |
rules | CaptureRule[] | The list of rules that was applied to this capture. |
manual | Boolean | (Optional) If true, the document side is captured manually; otherwise, it is auto-captured. |
Success example usage
- An example of a successful manual capture of a front side is shown in the snippet:
JSON1{2 "id": "631e660f-fc17-4795-801a-ba2d6d306c26",3 "status": "DONE",4 "startTime": "2025-06-02T11:07:24.477Z",5 "endTime": "2025-06-02T11:07:42.661Z",6 "documentId": "5d35822d-5cd9-45ac-bb32-53297f6b5d07",7 "side": {8 "name": "FRONT"9 },10 "manual": true,11 "imageStorage": {12 "region": "eu-central-1",13 "bucketName": "wbs-video-storage",14 "key": "all/4513a621-1630-4795-b235-2c3a084d873e/5d35822d-5cd9-45ac-bb32-53297f6b5d07/631e660f-fc17-4795-801a-ba2d6d306c26.jpeg",15 "hash": "655c51a1facecbed3df2f6f01cc98bb2bfd1fadfc223cc7e7eebf906fe7b1342",16 "hashAlgorithm": "SHA_256",17 "contentType": "image/jpeg"18 },19 "corners": [ [ 359, 139 ], [ 1559, 107 ], [ 1622, 971 ], [ 323, 990] ],20 "rules": [21 {22 "name": "MRZ",23 "status": "DONE",24 "result": {25 "rawData": "[\"PENLDDE<BRUIJN<<WILLEKE<LISELOTTE<<<<<<<<<<<\",\"SPECI20142NLD6503101F1406090999999990<<<<<80\"]",26 "identity": {27 "gender": "F",28 "fullName": "WILLEKE LISELOTTE DE BRUIJN",29 "surname": "DE BRUIJN",30 "dateOfBirth": "1965-03-10"31 },32 "documentInfo": {33 "documentNumber": "SPECI2014",34 "dateOfExpiry": "2014-06-09",35 "issuingCountry": "NLD",36 "mrz": [37 "PENLDDE<BRUIJN<<WILLEKE<LISELOTTE<<<<<<<<<<<",38 "SPECI20142NLD6503101F1406090999999990<<<<<80"39 ]40 }41 }42 }43 ]44}
Failure example usage
- The capture of a front side failed below because the end user may has captured twice the same side and one rule was required. An example is shown in the snippet:
JSON1{2 "id":"9b844aa6-fbbc-45b0-8902-2d151209cd14",3 "status":"FAILED",4 "startTime":"2022-09-06T15:46:09.397Z",5 "endTime":"2022-09-06T15:46:14.003Z",6 "documentId":"82544ddf-9cde-4077-a5b5-6e4d5363da32",7 "side":{8 "id":"SIDE1",9 "name":"FRONT"10 },11 "image":"imageB64",12 "corners":[ [ 92, 84 ], [ 3150, 160 ], [ 2982, 1934 ], [164, 1960] ],13 "rules":[14 {15 "name":"MRZ",16 "status":"FAILED",17 "diagnostic":{18 "duplicateRules":true19 },20 "result":{21 "rawData":"[\"IDFRASMITH<<<<<<<<<<<<<<<<<<775005\",\"0000005000600JOHN<<BOB7006061F8\"]",22 "identity":{23 "gender":"M",24 "fullName":"JOHN BOB SMITH",25 "givenNames":[26 "JOHN",27 "BOB"28 ],29 "surname":"SMITH",30 "dateOfBirth":"1986-12-02"31 },32 "documentInfo":{33 "documentNumber":"110677502568",34 "issuingCountry":"FRA",35 "mrz":[36 "IDFRASMITH<<<<<<<<<<<<<<<<<<775005",37 "0000005000600JOHN<<BOB7006061F8"38 ]39 }40 }41 }42 ],43 "diagnostic":{44 "duplicateRules":true45 }46}
- The capture of a back side failed below because the end user may has captured twice the same side and two rules were required. An example is shown in the snippet: :
JSON1{2 "id":"64b95cd3-efbf-46e4-8066-618bcbf7f366",3 "status":"FAILED",4 "startTime":"2022-09-06T16:52:30.519Z",5 "endTime":"2022-09-06T16:52:35.670Z",6 "documentId":"1d2f5c9a-3c11-4139-8832-7712580f39e9",7 "side":{8 "id":"SIDE2",9 "name":"BACK"10 },11 "image":"imageB64",12 "corners":[ [ 92, 84 ], [ 3150, 160 ], [ 2982, 1934 ], [164, 1960] ],13 "rules":[14 {15 "name":"PDF417",16 "status":"FAILED",17 "diagnostic":{18 "duplicateRules":true19 },20 "result":{21 "rawData":"rawDataB64"22 }23 },24 {25 "name":"MRZ",26 "status":"FAILED",27 "diagnostic":{28 "missingRules":true29 }30 }31 ],32 "diagnostic":{33 "missingRules":true,34 "duplicateRules":true35 }36}
- The capture of a front side exceeded the capture timeout. It was not possible to detect any document. An example is shown in the snippet:
JSON1{2 "id": "d939cd53-d781-4661-b129-58883f948875",3 "status": "TIMEOUT",4 "side": { "id": "SIDE1", "name": "FRONT" },5 "diagnostic": { "tooFar": "true" },67 "rules": [{8 "name": "MRZ",9 "status": "TIMEOUT"10 }]11 }
CaptureDiagnostic
The CaptureDiagnostic object describes the diagnostic quality of the capture as shown in the snippet.
Parameters
The parameters for CaptureDiagnostic are shown in the table.
Name | Type | Description |
|---|---|---|
badFraming | Boolean | (Optional) Only part of the document has been detected. |
blur | Boolean | (Optional) Blurry image captured. |
glare | Boolean | (Optional) Glare/reflection detected on captured document. |
tooClose | Boolean | (Optional) Document was too close to camera when captured. |
tooFar | Boolean | (Optional) Document was too far from camera when captured. |
holdStraight | Boolean | (Optional) Document is not straight to camera when captured (wrong perspective, trapezoid form). |
lowlight | Boolean | (Optional) Low light detected on document. |
mrzDecoding | Boolean | (Optional) MRZ is not correctly decoded. |
missingRules | Boolean | (Optional) A certain rule (MRZ or PDF417) is applied. Reason: The user may have captured the same side twice, or they may have captured the document with poor quality, or they may have captured the wrong document. Recommendation: Request recapture. |
duplicateRules | Boolean | (Optional) A specific rule (MRZ or PDF417). Reason: The user may have captured the same side twice, or they may have captured the wrong document. Recommendation: Request recapture |
pfd417 | Boolean | (Optional) PDF417 is not correctly decoded. |
mrzDecoding | Boolean | The MRZ is not correctly detected within the frame, and the bottom of the document is unreadable. |
noDocument | Boolean | (Optional) No document side found during the capture. |
wrongOrientation | Boolean | (Optional) Enduser is performing vertical acquisition. |
Example usage
An example usage for CaptureDiagnostic is shown in the snippet:
- The document is captured with a bad quality :
JSON1{2 "blur": "true",3 "tooFar": "true",4 "glare": "true"5}
- The user may have captured the same document side twice is indicated by the absence of an MRZ (Machine Readable Zone) detection.
JSON1{2 "missingRules": "true"3}
- The user may have captured the same document side twice is indicated by the absence of an MRZ (Machine Readable Zone) detection.
JSON1{2 "duplicateRules": "true"3}
CaptureRule
The CaptureRule object describes the capture rule name, status, and result as shown in the snippet:
Parameters
The parameters for CaptureRule are shown in the table.
Name | Type | Description |
|---|---|---|
name | CaptureRuleName | (Optional) The rule name |
status | CaptureRuleStatus | (Optional) The rule status |
result | CaptureRuleResult | (Optional) The rule result |
Example usage
An example usage for CaptureRule is shown in the snippet:
JSON1{2 "name": "MRZ",3 "status": "DONE",4 "result": {5 "rawData": "[\"IDFRAX4RTBPFW46<<<<<<<<<<<<<<<\",\"9007138F3002119FRA<<<<<<<<<<<6\",\"MARTIN<<MAELYS<GAELLE<MARIE<<<\"]",6 "identity": {7 "gender": "F",8 "fullName": "MAELYS GAELLE MARIE MARTIN",9 "surname": "MARTIN",10 "dateOfBirth": "1990-07-13"11 },12 "documentInfo": {13 "documentNumber": "X4RTBPFW4",14 "dateOfExpiry": "2030-02-11",15 "issuingCountry": "FRA",16 "mrz": [17 "IDFRAX4RTBPFW46<<<<<<<<<<<<<<<",18 "9007138F3002119FRA<<<<<<<<<<<6",19 "MARTIN<<MAELYS<GAELLE<MARIE<<<"20 ]21 }22 }23 }
CaptureRuleResult
The CaptureRuleResult object describes information extracted from the captured document as shown in the snippet:
Parameters
The parameters for CaptureRuleResult are shown in the table.
Name | Type | Description |
|---|---|---|
documentInfo | DocumentInfo | (Optional) The extracted info about document |
identity | Identity | (Optional) The extracted identity of the credential holder |
rawData | String | (Optional) The raw data containing the identity |
Example usage
An example usage for CaptureRuleResult is shown in the snippet:
- PDF417 rule result
JSON1{2 "rawData": "QAoeDUFOU0kgNjM2MDQxMDQwMDAySUQwMDQxMDIyN1pNMDI2ODAwMzdJRERBUTczMTIzNTMKRENTRE9FCkRERVUKREFDTUFSWQpEREZVCkRBREpBTkUKRERHTgpEQkQwNDAxMjAxNQpEQkIwOTA4MTk5OApEQkEwNDAxMjAxOQpEQkMyCkRBVTA3NiBpbgpEQVlCUiAKREFHMjIyIEVMTSBSRApEQUlPTEQgVE9XTgpEQUpNRQpEQUsxMjM0NTAwMDAgIApEQ0ZOT05FCkRDR1VTQQpEQVcxMTAKREFaR1IKRENLRjE1MDkxNzMxMjM1MzcwMDEKRERBTgpEREIwOTAzMjAxMApEREQxDVpNWk1BWQpaTUJVMTgwOTA4MjAxNgpaTUNVMjEwOTA4MjAxOQ0=",3 "identity": {4 "gender": "F",5 "fullName": "MARY JANE DOE",6 "givenNames": [7 "MARY",8 "JANE"9 ],10 "surname": "DOE",11 "dateOfBirth": "1998-09-08",12 "completeAddress": "222 ELM RD, OLD TOWN, ME",13 "address": {14 "streets": [15 "222 ELM RD"16 ],17 "city": "OLD TOWN",18 "state": "ME",19 "postalCode": "123450000 "20 }21 },22 "documentInfo": {23 "documentNumber": "7312353",24 "dateOfIssuance": "2015-04-01",25 "dateOfExpiry": "2019-04-01",26 "issuingCountry": "USA"27 }28}
- MRZ rule result
JSON1{2 "rawData": "[\"IDFRASAMPLE<<<<<<<<<<<<<<<<<<775005\",\"9906995099998TEST<<JEAN9612021M8\"]",3 "identity": {4 "gender": "M",5 "fullName": "TEST JEAN SAMPLE",6 "givenNames": [7 "TEST",8 "JEAN"9 ],10 "surname": "SAMPLE",11 "dateOfBirth": "1996-12-02"12 },13 "documentInfo": {14 "documentNumber": "990699509999",15 "issuingCountry": "FRA",16 "mrz" : [17 "IDFRASAMPLE<<<<<<<<<<<<<<<<<<775005",18 "9906995099998TEST<<JEAN8612021F8"19 ]20 }21}
DocumentSide
The DocumentSide object describes extracted information related to the side of the document being captured during the document session.
Parameters
The parameters for DocumentSide are shown in the table.
Name | Type | Description |
|---|---|---|
id | String | The identifier of the side (ex: SIDE1, SIDE2, SIDE3..); Size range: ..50_ |
name | DocumentSideName | The name of the document side |
Example usage
An example usage for DocumentSide is shown in the snippet:
JSON1{2 "id": "SIDE1",3 "name":"FRONT"4}
DocumentInfo
This object describes extracted information related to the side of the document being captured during the document session.
Parameters
The parameters for DocumentInfo are shown in the table.
Name | Type | Description |
|---|---|---|
documentNumber | String | (Optional) The id number of document. Size range: ..100 |
dateOfIssuance | Date | (Optional) The document date of issuance; Allowed values: Format YYYY-MM-dd |
dateOfExpiry | Date | (Optional) The document date of expiry. Allowed values: Format YYYY-MM-dd |
issuingCountry | String | (Optional) The code of the country in alpha-3 format; Size range: ..3 |
mrz | String[] | (Optional) MRZ of the document. Only available with the MRZ rule |
issuingAuthority | String | (Optional) The Issuing Authority of document; Size range: ..100 |
issuingJuridiction | String | (Optional) The issuing Jurisdiction of document; Size range: ..100 |
Example usage
An example usage for DocumentInfo is shown in the snippets:
JSON1{2 "documentNumber": "180978453573",3 "dateOfIssuance": "2015-10-30",4 "dateOfExpiry": "2025-10-30",5 "issuingCountry": "USA"6}
JSON1{2 "documentNumber": "1999979925688",3 "dateOfIssuance": "2015-10-30",4 "dateOfExpiry": "2025-10-30",5 "issuingCountry": "FRA",6 "mrz": [7 "IDFRAVALXXXL<<<<<<<<<<<<<<<<<<445115",8 "1999979925688ARMELIA<<MXXCE9912991F8"9 ]10}
Identity
The Identity object describes information that is extracted about the user's identity from the captured document.
Parameters
The parameters for Identity are shown in the table.
Name | Type | Description |
|---|---|---|
gender | String | Gender extracted from document; Allowed values: M, F, Not specified |
fullName | String | (Optional) The personal full name extracted from document; Size range: ..100 |
givenNames | String[] | (Optional) The personal given names extracted from document |
surname | String | (Optional) The surname extracted from document; Size range: ..100 |
dateOfBirth | Date | (Optional) The date of birth extracted from document; Allowed values: Format YYYY-MM-dd |
placeOfBirth | String | (Optional) The place of birth extracted from document; Size range: ..100 |
completeAddress | String | (Optional) The complete address as extracted from document; Size range: ..100 |
address | IdentityAddress[] | (Optional) The address details extracted from the document. |
Example usage
An example usage for Identity is shown in the snippet:
JSON1{2 "fullName": "John Doe",3 "dateOfBirth": "1979-01-31",4 "placeOfBirth": "New York",5 "gender": "M",6 "completeAddress": "06 NEEDHAM STREET, NEWTON, MA 024611638",7 "address": {8 "streets": ["06 NEEDHAM STREET", "APT # 555"],9 "city": "NEWTON",10 "state": "MA",11 "postalCode": "024611638"12 }13}
IdentityAddress
The IdentityAddress object describes information that is extracted about the user's identity from the captured document.
Parameters
The parameters for IdentityAddress are shown in the table.
Name | Type | Description |
|---|---|---|
streets | String[] | (Optional) The array containing street portion of the address |
city | String | (Optional) The city name; Size range: ..10 |
state | String | (Optional) The state name; Size range: ..10 |
postalCode | String | (Optional) The postal code; Size range: ..15 |
Example usage
An example usage for IdentityAddress is shown in the snippet:
JSON1{2 "address": {3 "streets": ["06 NEEDHAM STREET", "APT # 555"],4 "city": "NEWTON",5 "state": "MA",6 "postalCode": "024611638"7 }8}
Global Error Codes
The table below shows the global error codes for Javascript APIs in the Document WebCapture SDK:
Code | Description |
|---|---|
400 | Invalid Input : missing input or wrong input. Input didn't pass the validation process on backend. |
404 | Provided session not found. |
409 | In case of Native SDK integration, one of the mandatory data were not pushed (front/back image or record file) |
500 | Internal Error. |
503 | The server is overloaded. Try again in few seconds. |
1304 | No active video stream found. Allow device usage. |
2000 | Internal Error. |
Enums
CaptureRuleName
The CaptureRuleName extracts the rule name at the end of the autocapture as shown in the snippet:
The parameter values for CaptureRuleName are described in the table.
Name | Type | Description |
|---|---|---|
CaptureRuleName | String | Allowed values: NONE, MRZ,PDF417 |
The allowed values are:
MRZ: The Machine Readable Zone (MRZ) content is extracted at the end of the autocapture.PDF417: Autocapture continues until a valid barcode is decoded or until the timeout expiration.
CaptureRuleStatus
The CaptureRuleStatus sends a status response for the rule name extraction at the end of the autocapture as shown in the snippet:
The parameter values for CaptureRuleStatus are shown in the table.
Name | Type | Description |
|---|---|---|
CaptureRuleStatus | String | Allowed values: IN_PROGRESS, DONE,FAILED,TIMEOUT,ABORTED ,ERROR |
The allowed values are:
IN_PROGRESS: The user starts streaming video capture to webDocServerDONE: A capture is done and identity information is extracted depending on the applied rulesFAILED: Unable to extract the identity information from the detected documentTIMEOUT: Unable to detect a document from user video stream within a configured timeoutABORTED: The user aborted the sessionERROR: A technical error has occurred during document capture
DocumentCaptureStatus
The DocumentCaptureStatus function returns the status of the document capture as shown in the snippet:
The parameter values for DocumentCaptureStatus are shown in the in the table.
Name | Type | Description |
|---|---|---|
DocumentCaptureStatus | String | Allowed values: IN_PROGRESS, DONE,FAILED,TIMEOUT,ABORTED ,ERROR |
The allowed values are:
IN_PROGRESS: The user starts streaming video capture to webDocServerDONE: A capture is done and identity information is extracted depending on the applied rulesFAILED: Unable to extract the identity information from the detected documentTIMEOUT: Unable to detect a document from user video stream within a configured timeoutABORTED: The user aborted the sessionERROR: A technical error has occurred during document capture
DocumentSideName
The DocumentSideName function describes the physical side of the document that is being captured as shown in the snippet:
The parameter values for DocumentSideName are described in the table.
Name | Type | Description |
|---|---|---|
DocumentSideName | String | Allowed values: UNKNOWN, FRONT,BACK,INSIDE_PAGE |
The allowed values are:
FRONT: Front of the documentBACK: Back of the documentINSIDE_PAGE: Used for passport-like documents
FAQs
Where can I find sample source code showing API integration?
A demo app is available to showcase the integration of IDEMIA WebCapture SDK for IDEMIA Identity offer:
- GitHub Repository: https://github.com/idemia/WebCaptureSDK
- Section: ID Document Autocapture
How do I run sample source code from GitHub?
-
Install npm on your machine
-
Download the GitHub sources.
-
Update the demo configuration /server/config/defaults.js
JavaScript1// Remote server to call2DOCSERVER_VIDEO_URL: '<URL_FROM_EXPERIENCE_PORTAL>',3WEB_SDK_LIVENESS_ID_DOC: '<WEB_SDK_APIKEY_FROM_EXPERIENCE_PORTAL>'
You can also enable ID&V Demo integration as shown in the snippet:
JavaScript1// ID&V Demo integration2GIPS_URL: '<URL_FROM_EXPERIENCE_PORTAL>/gips',3GIPS_RS_API_Key: '<GIPS_RS_APIKEY_FROM_EXPERIENCE_PORTAL>',4IDPROOFING: false // Enable ID&V Demo integration : true or false
- Go to GitHub sources root and install npm (only once) as shown in the snippet:
Shell1npm i --verbose
Run the demo (to do each time you want start the demo) as shown in the snippet:
Shell1npm run start
-
Please note that desktop browsers are not supported. For testing sample source code from GitHub with an Android phone please consult FAQ section.
-
Now you can open a browser on our mobile device with the following link:
For more details, please consult the section how to deploy sample app and the section how to test sample app
How to test sample source code from GitHub with an Android phone?
-
Run sample source code from GitHub on your local machine.
-
Setup your phone:
- Download and install scrcpy: https://github.com/Genymobile/scrcpy#get-the-app
- Enable developer options on Android phone: https://developer.android.com/studio/debug/dev-options
- Enable the Debugging option: https://developer.android.com/studio/debug/dev-options#debugging
- Plug the USB cable into your phone and select the File Sharing USB mode or similar
- Always accept the certificate or key from the computer when prompted on the device
Open a terminal, go to the the installation folder, and launch it once as shown in the snippet:
Shell1adb devices
Start the adb deamon once and display the status of the connected device as shown in the snippet:
Shell1* daemon not running; starting now at tcp:50372* daemon started successfully3List of devices attached4XXXX128PX device
If you don't see your device:
- Try to unplug or plug the USB cable
- Set the proper USB mode
- Check if the debugging option is enabled on device
- Redirect the mobile port to your local machine port as shown in the snippet:
Shell1adb reverse tcp:[device port] tcp:[machine port]
Sample App is opened with the port 9943:
Shell1adb reverse tcp:9943 tcp:9943
This will forward all mobile connections on port 9943 to local machine port 9943. All requests will be sent to your local server running on port 9943. So if you open a browser with :
Sample App is opened with the port 8080:
Shell1adb reverse tcp:8080 tcp:8080
This will forward all mobile connections on port 9943 to local machine port 9943. All requests will be sent to your local server running on port 9943. So if you open a browser with :
- Display the phone screen on the local machine launching the command as shown in the snippet:
Shell1scrscpy
The device screen should now be displayed on your local machine.
How to debug sample source code from GitHub with broswer console?
-
Follow procedure regarding how to test sample source code from GitHub with an Android phone.
-
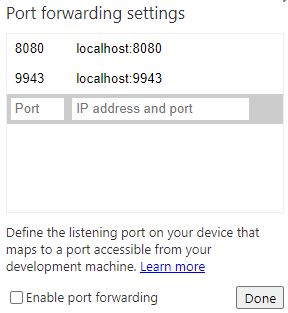
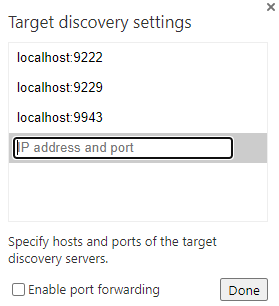
Open the Chrome browser on you local machine and go to: chrome://inspect/#devices.
-
Click inspect.
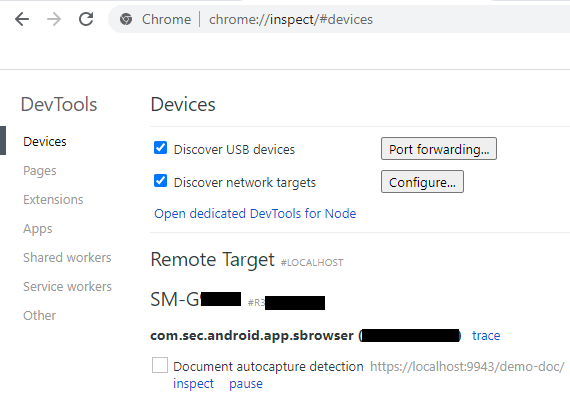
If you have an issue, check port settings and target settings as shown:
- Open https://localhost:9943/demo-doc/ on your smartphone's Chrome browser.

On you local machine, look at console traces (section Console). You are are also able to add break-points on section Sources.
How to debug sample source code from GitHub with an IDE?
- Open the project /face-autocapture-with-liveness-detection with an IDE. We'll be using the Intellij IDE in the rest of the description.
- Open Run/Debug Configurations
- Add a Node.js Configuration as follows
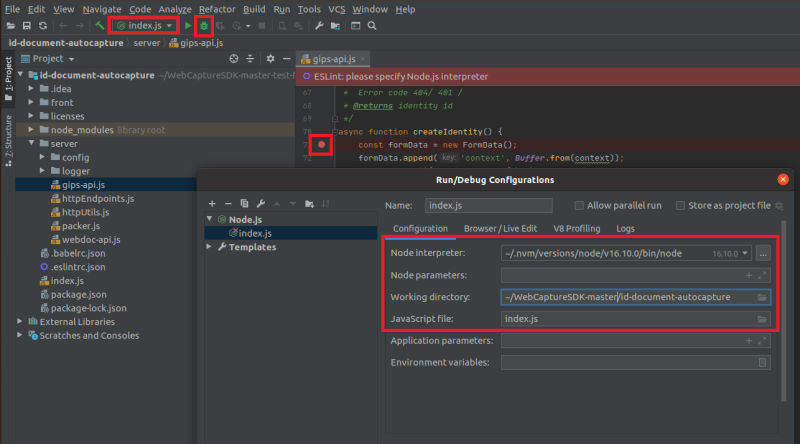
- Click on Apply and OK
- Set breakpoints under the folder /server
- Launch the projet with debug icon
Why a black screen is visible at the end of the autocapture?
The presence of a black screen serves security purposes. During this period, the system will compute the final best image of the person, and the video stream must remain uninterrupted. To ensure a seamless user experience, the black screen should be concealed within the webpage responsible for the autocapture user interface.
Upon receiving the 'pending' message in the trackingFn callback, it's essential to display a loader to the end user. This informs them that the capture process is still ongoing, and they should patiently await their results. This best practice is already incorporated within our 'demo-server' sample application, is accessible on GitHub at: https://github.com/idemia/WebCaptureSDK
Why does a pop-up window open at the beginning of the capture about my camera using Edge and Chrome on ios??
Using Edge and Chrome on ios generates a pop-up for a few seconds when the camera is opened. This may degrade the user experience by hiding part of the screen and possibly user instructions. This behavior is inerent to iOS on these two browsers.
Why does my camera preview shake at the beginning of capture with an iPhone Pro?
During the focus, the camera changes and creates this visual effect. This behavior is inerent to iPhone Pro. This only affects this iphone range. This is not affecting the autocapture performances.
How do I generate a self-signed certificate?
- Install openssl and execute the command as shown in the snippet:
Bash1openssl req -x509 -newkey rsa:2048 -keyout key.pem -out cert.pem -days 3650 -subj '/CN=demo-doc' -config openssl.cnf -extensions v3_req -nodes
- Import your private key and certificate into a PKCS#12 keystore file as shown in the snippet:
Bash1openssl pkcs12 -export -out demo-doc.p12 -inkey key.pem -in cert.pem -keypbe AES-256-CBC -certpbe AES-256-CBC
Note: This configuration is for development only. In production, you must obtain your server certificate from a public trusted authority and use a domain name you own.
Configuration can be found here: https://github.com/idemia/WebCaptureSDK/blob/master/face-autocapture-with-liveness-detection/server/config/certs/openssl.cnf
How to integrate the SDK in a WebView?
When integrating the WebCapture SDK in a WebView, it is important to configure some settings of the Android or iOS app. Not following the recommendations will lead to unexpected behaviors or errors such as fatal exceptions, camera preview not displayed...
Android WebView
- In the app's AndroidManifest.xml file, one must add the CAMERA permission and declare a file provider in the application section:
XML1<uses-permission android:name="android.permission.CAMERA"></uses-permission>23<application>4 <provider5 android:name="androidx.core.content.FileProvider"6 android:authorities="${applicationId}.provider"7 android:exported="false"8 android:grantUriPermissions="true">9 <meta-data10 android:name="android.support.FILE_PROVIDER_PATHS"11 android:resource="@xml/file_paths"/>12 </provider>13</application>
In the res/xml folder, create file_paths.xml with content:
XML1<?xml version="1.0" encoding="utf-8"?>2<paths>3 <external-cache-path name="images" path="."/>4</paths>
- Within your application, perform the following actions:
- Check the runtime permission CAMERA
- Set the mandatory webview settings, see initWebView()
- Override WebChromeClient:
- Override onPermissionRequest() to grant RESOURCE_VIDEO_CAPTURE permission for autocapture
- Override onShowFileChooser() for manual capture
The following sample shows a possible implementation:
Kotlin1package com.example.webviewtest23import android.Manifest4import android.annotation.SuppressLint5import android.content.Intent6import android.content.pm.PackageManager7import android.net.Uri8import android.os.Bundle9import android.provider.MediaStore10import android.util.Log11import android.webkit.PermissionRequest12import android.webkit.ValueCallback13import android.webkit.WebChromeClient14import android.webkit.WebView15import android.webkit.WebViewClient16import androidx.activity.result.contract.ActivityResultContracts17import androidx.appcompat.app.AppCompatActivity18import androidx.core.content.ContextCompat19import androidx.core.content.FileProvider20import com.example.webviewtest.databinding.ActivityMainBinding21import java.io.File22import java.io.IOException232425class MainActivity : AppCompatActivity() {26 companion object {27 private val TAG: String = MainActivity::class.java.simpleName28 }2930 private lateinit var binding: ActivityMainBinding31 private var mFilePathCallback: ValueCallback<Array<Uri>>? = null32 private var mCameraPhotoPath: String? = null3334 override fun onCreate(savedInstanceState: Bundle?) {35 super.onCreate(savedInstanceState)36 binding = ActivityMainBinding.inflate(layoutInflater)37 setContentView(binding.root)38 // Cleanup existing photos in cache39 deleteFiles(this@MainActivity.externalCacheDir!!.absolutePath, "jpeg")40 if (ContextCompat.checkSelfPermission(this@MainActivity, Manifest.permission.CAMERA) == PackageManager.PERMISSION_GRANTED) {41 // Permission already granted, init & load wv content42 initWebView()43 } else {44 // Ask the user to grant permission45 requestPermissionLauncher.launch(Manifest.permission.CAMERA)46 }47 }4849 override fun onDestroy() {50 super.onDestroy()51 // Cleanup existing photos in cache52 deleteFiles(this@MainActivity.externalCacheDir!!.absolutePath, "jpeg")53 }5455 /**56 * Register the permissions callback, which handles the user's response to the system permissions dialog57 */58 private val requestPermissionLauncher =59 registerForActivityResult(ActivityResultContracts.RequestPermission()) { isGranted: Boolean ->60 if (isGranted) {61 // Permission is granted62 initWebView()63 } else {64 Log.e(TAG, "Mandatory permission not granted")65 // Display user message...66 }67 }6869 /**70 * Register the activity result callback which will be called after the native camera returns (in manual capture)71 */72 private val resultLauncher =73 registerForActivityResult(ActivityResultContracts.StartActivityForResult()) { result ->74 if (mFilePathCallback != null) {75 var results: Array<Uri>? = null76 // Check that the response is a good one77 if (result.resultCode == RESULT_OK && mCameraPhotoPath != null) {78 results = arrayOf(Uri.parse(mCameraPhotoPath))79 }80 mFilePathCallback!!.onReceiveValue(results)81 mFilePathCallback = null82 }83 }8485 @SuppressLint("SetJavaScriptEnabled")86 private fun initWebView() {87 val webView = binding.webView88 // Set mandatory settings89 webView.settings.javaScriptEnabled = true90 webView.settings.domStorageEnabled = true91 webView.settings.mediaPlaybackRequiresUserGesture = false // CRITICAL92 // Use a custom chrome client to handle permission & native camera app93 webView.webChromeClient = MyWebChromeClient()94 // Instantiate a webview client to avoid launching external browser during a redirection fo95 webView.webViewClient = WebViewClient()96 webView.loadUrl("https://<server-path>")97 }9899 internal inner class MyWebChromeClient : WebChromeClient() {100101 /**102 * Grant permission for autocapture103 */104 override fun onPermissionRequest(request: PermissionRequest?) {105 val requestedResources = request!!.resources106 for (r in requestedResources) {107 if (r == PermissionRequest.RESOURCE_VIDEO_CAPTURE) {108 request.grant(arrayOf(PermissionRequest.RESOURCE_VIDEO_CAPTURE))109 break110 }111 }112 }113114 /**115 * Override the default file chooser to launch directly the native camera and handle image returned (manual capture)116 */117 override fun onShowFileChooser(webView: WebView, filePathCallback: ValueCallback<Array<Uri>>, fileChooserParams: FileChooserParams): Boolean {118 // Double check that we don't have any existing callbacks119 if (mFilePathCallback != null) {120 mFilePathCallback!!.onReceiveValue(null)121 mFilePathCallback = null122 }123 // Create the temporary file where the photo will be saved124 val photoFile: File?125 try {126 photoFile = File.createTempFile(System.currentTimeMillis().toString(), ".jpeg", this@MainActivity.externalCacheDir)127 } catch (ex: IOException) {128 // Error occurred while creating the file129 Log.e(TAG, "Unable to create image file", ex)130 // Cancel the request131 filePathCallback.onReceiveValue(null)132 return true133 }134 // Save callback path which will be reused with the result135 mFilePathCallback = filePathCallback136 // Save photo path which will be used after the camera app returns137 mCameraPhotoPath = "file:" + photoFile.absolutePath138 // Use our defined FileProvider to build uri so that the camera app can write the photo data into139 val uri = FileProvider.getUriForFile(this@MainActivity, BuildConfig.APPLICATION_ID + ".provider", photoFile)140 val intent = Intent(MediaStore.ACTION_IMAGE_CAPTURE)141 intent.putExtra(MediaStore.EXTRA_OUTPUT, uri)142 resultLauncher.launch(intent)143 return true144 }145 }146147 private fun deleteFiles(folder: String, ext: String) {148 val dir = File(folder)149 if (!dir.exists()) {150 return151 }152 val files = dir.listFiles { _, name -> name.endsWith(ext) }153 files?.forEach { file ->154 if (!file.isDirectory) {155 file.delete()156 }157 }158 }159}
A full demo application project may be found here: https://github.com/idemia/WebCaptureSDK/tree/master/webview-demo
iOS WKWebView
- One must include the NSCameraUsageDescription property in the app's Info.plist file
- When creating the WKWebView instance, it must be configured as follows:
Swift1let prefs = WKWebpagePreferences()2prefs.allowsContentJavaScript = true3let configuration = WKWebViewConfiguration()4configuration.defaultWebpagePreferences = prefs5configuration.allowsInlineMediaPlayback = true // CRITICAL6let webView = WKWebView(frame: .zero, configuration: configuration)