How to integrate the App
Overview
Identity Proofing Application (IPA) is an application that verifies the Identity of your Users.
It can be integrated in your own application in 2 possible ways :
Standard IPA, where at the end of the process you get a Verified Identity of your User to proceed further with their on-boarding process.
IPA for Microsoft ENTRA, where your User gets a Verifiable Credential with their Identity provisioned in their Microsoft Authenticator App, that they can share with you to finish their on-boarding process.
Standard IPA Integration
Creation of an IPA Application
First you must create an application in the Experience Portal. The configurator guides you through the necessary steps to adapt the application to your requirements.
Once the application is created, some identifiers and secrets are generated and made available through the Experience portal. These identifiers enable your application to establish connectivity with IPA.
1. Create the IPA App
Go to 'Access -> Identity Proofing App' page and click 'Create new app'.
2. IPA Configuration
Choose application name.
Select environment.
Select a country and document types.
Choose one of the possible face capture options:
none- no face verificationPassive Video Liveness- Simple selfie capture (recommended)Active Liveness- face capture with active challenge ( face movements requested, recommended for high security applications only).
Customize look & feel of your application.
Confirm on summary screen.
3. Experience your IPA configuration
Once you have created your application, the following options are available to you :
Generate QR code - you can test your IPA configuration. Just scan the QR code with your smart phone's camera and experience the User's Journey by yourself. You can check the verification details of your tests in the Transactions History section of the Experience Portal
Display Endpoint details - get the necessary connectivity details to integrate your IPA configuration into your own Application
clientID
secretKey
Cognito URL
Create Session URL
Delete/Edit configured application.
Integrating IPA in your Application
Integration endpoint details provide the necessary identifiers to establish connectivity between your own backend application and IPA. They must not be embedded in the end-user Front End application.
First you need to engage with your End User through the method of your choice, and expose your Terms of Use of the service to gather user consent.
Then you can initiate the IPA flow as detailed below.
Here is a flow diagram detailing each step of the process. It is divided in 5 Steps.
Obtain an access token
Create IPA Session
User performs Identity Proofing Process
Receive End of Process Notification
Retrieve Verified Identity and redirect the user to the next step

Step 1: Obtain application access token
First, your back end application must obtain an access token to the IPA application using the Cognito URL, secretKey and clientID.
Example request
Shell1curl -X POST --location '[COGNITO_URL]/oauth2/token' \2 --header 'Content-Type: application/x-www-form-urlencoded' \3 --data-urlencode 'grant_type=client_credentials' \4 --data-urlencode 'client_id=[CLIENT_ID]' \5 --data-urlencode 'client_secret=[SECRET_KEY]'6
Request Variables
Variable | Type | Mandatory/Optional | Description | Example Value |
|---|---|---|---|---|
COGNITO_URL | string | Mandatory | Cognito URL value from Endpoint details screen | https://prod-devportal-entra.auth.us-east-2.amazoncognito.com |
CLIENT_ID | string | Mandatory | clientID value from Endpoint details screen | 3mnh1qsn5hmtogpes1gqo3lto0 |
SECRET_KEY | string | Mandatory | secretKey value from Endpoint details screen | 1thkkchj0lnvaj9ivtgv4ne501r0vi38gpe3pp2fl7u |
Example Response
JSON1{2 "access_token":"[ACCESS_TOKEN]",3 "expires_in":3600,4 "token_type":"Bearer"5}6
Response Variables
Variable | Description |
|---|---|
access_token | Access token value |
expires_in | Duration of your token in seconds (3600) |
token_type | Access token type, always Bearer |
Step 2: Create session
Then, with the access token received from the previous step, create an IPA application session.
This is where you define the callback endpoint to which your backend service is going to receive end of process notification, and where the user will be redirected to, once the Identity Proofing session is over.
Once created, the session will expire automatically after 30 minutes.
IPA Create Session URL
Get the Create Session URL from the Endpoint screen. Create Session URL
Example request
Shell1curl -X POST --location 'https://rp-handler.did.idemia.io/api/v1/sessions' \2 --header 'Content-Type: application/json' \3 --header 'Authorization: Bearer [ACCESS_TOKEN]' \4 --data '{5 "callbackUrl" : "[CALLBACK_URL]",6 "gotoUrl" : "[GOTO_URL]"7 }'8
Request Variables
Variable | Type | Mandatory/Optional | Description | Example Value |
|---|---|---|---|---|
ACCESS_TOKEN | string | Mandatory | Access token value from the previous request (Step 1) | |
CALLBACK_URL | string | Optional | URL to the endpoint exposed by the integrator's backend to receive the notification when End User's IPA session is finished ( Step 4). | https://mycompany.myservice.com/webhooks/idemia/ipa |
GOTO_URL | string | Optional | URL where the End User will be redirected to at the end of the IPA session (Step 5). | https://mycompany.myservice.com/signup/confirm |
Note : Both callbackUrl and gotoUrl are optional parameters. If no callbackUrl and/or gotoUrl is provided, there will be no callback request, or user redirection performed at the end of the process.
Response
The response payload contains the IPA Session Identifier to be used during the rest of the sequence.
Example Response
JSON1{2 "sessionId":"[SESSION_ID]"3}4
Response Variables
Variable | Description |
|---|---|
sessionId | IPA sessionId |
Step 3: User performs the Identity Proofing Process with IPA
Once you have received the IPA sessionId from the previous step, craft the IPA session's URL and transmit it to your user, so they can start the IPA from their own device.
This URL can be transmitted in multiple ways, like in the form a QR code to scan, a text message, or an email.
This URL is composed of IPA URL and sessionId.
IPA End User Application URL
https://rp-handler.did.idemia.io/api/v1/ipa/start
IPA End User Session URL example :
https://rp-handler.did.idemia.io/api/v1/ipa/start?session-id=[SESSION_ID]
Variables
Variable | Description |
|---|---|
SESSION_ID | IPA "sessionId" value from the previous request (Step 2) |
At the moment the User clicks on the link that you transmitted in step 3, they start the Identity Proofing Process.
The Application automatically checks the device's configuration and informs the User if it does not meet the requirements. Refer to 'Device minimal requirements' for more details.
The process is then conducted autonomously by the User through their device's browser.
Step 4: Receive End of Process Notification
When the User has completed the Identity Proofing Process, you receive an "end of process notification" to your backend's callback URL defined in step 2.
Your callback endpoint must be able to accept the following request :
Example request
Shell1curl -X POST --location [CALLBACK_URL] \2 --header 'Content-Type: application/json' \3 --data '{4 "applicationId": "[APPLICATION_ID]",5 "identityId": "[IDENTITY_ID]",6 "sessionId": "[SESSION_ID]",7 "status" : "[STATUS]",8 "proofUrl": "[PROOF_URL]",9 "timestamp": [TIMESTAMP]10 }'11
Request Variables
Variable | Type | Mandatory/Optional | Description | Example |
|---|---|---|---|---|
APPLICATION_ID | string | Mandatory | ID of the IPA application configured from Experience Portal | 1l5lv91ugi401pieqpcd77bc1l |
IDENTITY_ID | string | Optional | ID of the Identity in the ID&V platform. If no Identity was created during the session, this field does not appear. | gips-2d4ac3d2-053c-4f9e-9ef0-c9a0f251c667 |
SESSION_ID | string (UUID) | Mandatory | IPA sessionId created during Step 2, to be used to correlate this request with the End User's session | ba7ce9dc-c182-4907-875c-ce1942239099 |
PROOF_URL | string | Optional | URL to the ID&V platform to get the Identity proof file. If no Identity was created during the session, this field does not appear. | https://proofing.idemia.io/gips/v1/identities/gips-2d4ac3d2-053c-4f9e-9ef0-c9a0f251c667/proof |
TIMESTAMP | float (Unix Time EPOCH) | Mandatory | Timestamp of the callback request creation time | 1733294237.9188666 |
STATUS | string | Optional | Status of the session in case of unexepected end of Session. Possible Value are ERROR in case of application error or user abort, or HEARTBEAT_TIMEOUT when session was not started, or user dropped off. If the session ended properly, this field does not appear | ERROR |
Response
It is expected that the Integrator's service returns an HTTP code 2XX with an empty response body to this request.
In case of unexpected HTTP response code received (different from 2XX), the IPA service will send up to 2 more attempts with a delay of 1 second.
Step 5: Retrieve Verified Identity and redirect the User to the next step
Retrieve User's verified Identity using the IdentityId or getProofURL received in the callback.
Use your ID&V REST API endpoint and GIPS-RS API key to do so. In parallel, the User is redirected to the gotoURL defined in Step 2 to proceed with the rest of your User's on-boarding Journey, using the results of the Identity Proofing session.
Option 1 : Retrieving the Proof file
The proof file is a zip archive containing a comprehensive output of the Identity Proofing session. It contains the Identity payload, the images captured by the user and a full audit trail of the verifications performed during the session. For further details, refer to the 'Proof File specifications' and 'Identity Proofing API Documentation'.
Request Example
Shell1curl -X GET --location [PROOF_URL]2--header 'Content-Type: application/json' \3--header 'apikey: [GIPS-RS_API_KEY]' \4--output proof.tar.gz5
Request Variables
Variable | Description |
|---|---|
PROOF_URL | Location of the Identity proof file from step 4 |
GIPS-RS_API_KEY | Backend to backend (GIPS-RS) API key of your ID&V 'Environment' |
Response
In response you receive an Identity Proof file containing the Verified Identity of the User as well as all submitted evidence and verification methods detailed results.
Option 2 : Retrieving the Identity payload
The Identity payload contains the detailed results of the Identity proofing session such as :
- Level of Assurance (LOA)
- Identity Attributes (names, date of birth etc...) extracted from the Identity Documents
- Status and error codes of the different evidence captured during the proofing session
For further details refer to the 'API Explorer section of the Identity Proofing & Verification API' and look for the GET /v1/identities/{id} endpoint.
Request Example
Shell1curl -X GET --location https://[IDV_URL]/gips/v1/identities/[IDENTITY_ID] \2--header 'Content-Type: application/json' \3--header 'apikey: [GIPS-RS_API_KEY]'4
Request Variables
Variable | Description |
|---|---|
IDV_URL | URL of the proofing platform corresponding to your 'Environment' |
IDENTITY_ID | ID of the Identity in the ID&V platform from step 4 |
GIPS-RS_API_KEY | Backend to backend (GIPS-RS) API key of your ID&V 'Environment' |
Response
In response you receive the Identity payload JSON file containing the Verified Identity of the User.
Integrate using Microsoft VC ENTRA Application
Azure configuration
In order to get your Identity Proofing Application integrated with Microsoft ENTRA Verified ID, you must have a valid tenant on your Azure Cloud account.
We recommend you to follow the tutorial from Microsoft: Configure your tenant for Microsoft ENTRA Verified ID.
You have to create the resources described below:
Azure Active Directory. Subscription.
Azure Key Vault (under Resource Group or directly under Subscription).
App Registration (under Azure Active Directory).
Access Policy allowing to trigger VC presentation request (under App Registration).
Verified ID Service (under Azure Active Directory).
You need to get a unique set of OAuth2 Client ID and Client secret credentials from App Registration process which is used in "Client Credentials" flow to obtain an Access Token as explained on the following page: Request Service REST API.
This access token allows to call VC presentation API: Configure Microsoft ENTRA Verified ID verifier.
Moreover, your system needs have a valid domain registered that is verified by Azure Verified ID Service according to DID (Decentralized Identity) policy. Following descriptor files has to be exposed:
/.well-known/did.json
/.well-known/did-configuration.json
These descriptors are obtained from Verified ID Service.
After that setup, you have to select IDEMIA as provider of the trusted credentials which can be located using:
{region}.did.idemia.io domain ({region}.did-{stage}.idemia.io for lower stages):
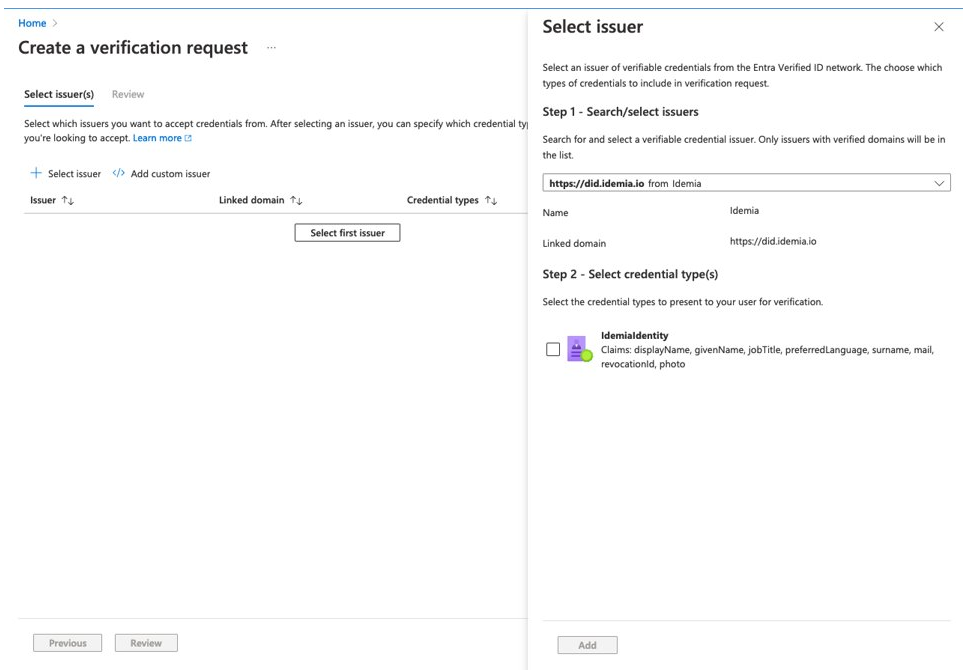
Please note that if you want to authenticate end users across multiple regions, it is required to trust multiple credentials. This is related to Microsoft ENTRA Verified ID service design that controls PII processing according to AD setup location.
Microsoft provides the entire process including usage of the sample app in this tutorial: Configure Microsoft ENTRA Verified ID verifier.
Microsoft VC ENTRA Application flow diagram

Creation of IPA for ENTRA application
In order to use ENTRA, you must create an application in Experience Portal and obtain an integration endpoint details, which will be used to communicate with our servers. Those details are secret and should not be exposed by your Front End application.
1. Create the IPA App
Go to 'Access -> Microsoft VC ENTRA App' page and Click 'Create new app'.
2. Fill out the form
Choose application name.
Select environment.
Select a country and document types.
Choose one of the possible liveness options:
none- no face verificationPassive Video Liveness- Simple selfie capture (recommended)Active Liveness- face capture with active challenge (face movements requested, recommended for high security applications only).
Choose VC claims
- Add optional deep-link prefix in case the Microsoft Authenticator SDK is embedded into your own native application.
Customize look & feel of your application.
Customize landing page and the Terms & Conditions.
Confirm on summary screen.
3. Submit form
After form submission, an application will be created.
Afterward you can:
Generate test QR code - scan the QR code and test document verification yourself without any integration. (You can check the verification details later on the Transactions History page.)
Display endpoint details - it will allow you to integrate your own application/system with your newly created ENTRA application.
Delete/Edit configured application.
Integrate IPA for ENTRA in your application
Integrating IPA for ENTRA is identical to the Standard IPA, except for Step 5 where your End User gets a Verifiable Credential provisioned in their Microsoft Authenticator App at the end of the process.
Verifying Issued Verifiable Credentials
You can now ask your End User to share their Verified Credential with you through a Presentation Request to Microsoft ENTRA. Ref : https://learn.microsoft.com/en-us/entra/verified-id/presentation-request-api.
Here are the information details related to the Issued VC to include in your presentation request :
JSON field | Value |
|---|---|
| registration.clientName | "Idemia DID" |
| authority (US platform) | "did:web:us.did.idemia.io" |
| authority (EU platform) | "did:web:eu.did.idemia.io" |
| requestedCredentials.type | "VerifiedIdentity" |