Liveness detection
This document describes how to use the IDEMIA Identity and Verification (ID&V) API for verifying an individual’s face portrait, both for liveness detection and user verification against a reference identity evidence.
Biometric services
ID&V offers a service for capturing and validating a user’s portrait. This service:
- captures the user’s portrait during a video stream.
- verifies that the user is a live person.
- verifies that the portrait corresponds to the portrait that is displayed on a reference identity document (evidence). That reference identity document will have been previously verified by the service.
The best image is extracted from a liveness portrait video capture which can be performed from a browser or from a native operating system environment. This best image will be used internally in ID&V in the same way as a selfie capture image for biometric user verification using the ID&V biometric matching functionality.
Liveness portrait video capture using a web browser
- The server initializes the liveness session.
- Liveness check is performed using the web browser to establish the video stream with the Biometric server.
- The liveness session data is collected by the server.
- The server analyzes the liveness session data, takes the decision, and extracts the best portrait image.
Liveness portrait video capture using a native SDK
The device uses a native SDK which initiates the user's liveness portrait capture. The server side makes the decision.
- The server initializes the liveness session.
- Liveness check is performed using the native SDK.
- The liveness session data is collected by the server.
- The server analyzes the liveness session data, makes the decision, and extracts the best portrait image.
Requirements
To execute the scenarios, the client application needs:
-
API keys and URLs to access the Identity Proofing service. The GIPS-RS key for back-end to back-end communication. The GIPS-UA key is for the user-facing application to Identity Proofing back-end communication.
-
In case of liveness detection by using a web browser: An API key and a URL to establish the video stream between the user-facing application and the Biometric server (BIOSERVER-VIDEO).
-
In case of liveness detection by using a native SDK: A URL to access the Identity Proofing service. This defines the liveness check configuration.
Details about the video stream creation with a web browser and the Biometric Server are available in Biometric Services SDK API Guide.
Details about face capture with the native SDK are available:
-
for
iOS: iOS Biometric Capture SDK -
for
Android: Android Biometric Capture SDK
Additionally, the client application must notify the ID&V service that it has obtained the user’s consent for processing their self-portrait image. That step will be explained in the sequence diagrams of this document.
Scenario
In this scenario, we detail how a client application verifies an identity document and a user’s portrait using a video stream to capture the face, and determine the liveness of the user.
There are two ways for capturing a self-portrait image of an individual with liveness detection:
-
Liveness video capture using a web browser
-
Liveness video capture using a native SDK
Liveness video capture using a web browser
Steps overview
- Create the identity.
- Submit consent.
- Submit an identity document capture.
- Start a liveness video capture by using the browser.
- Retreive portrait verification results and identity proof.
In the following example, we use a passport as a reference identity document.

Steps
Step 1: Create identity
Create an identity on the Identity Proofing server that will receive all of the data and gather the verification results related to this identity.
Step 2: Submit consent
Notify the Identity Proofing service of the different verifications and permissions the user has consented to.
Step 3: Submit identity document capture
Send the identity document images for verification.
-
The service performs the document authentication and extracts the user’s personally identifiable information (PII) and document information;
-
If the identity document image is usable:
-
The service performs the biometric coding of the document image to verify the quality of the portrait.
-
The service selects the document’s portrait as the reference portrait for this user.
-
If the identity document is valid, its status becomes
VERIFIEDand the identity document is assigned a score depending on the number and quality of verifications that have been performed (for example,LEVEL2).
-
Step 4: Start a liveness video capture through the web browser
Initialize a session with the service to verify a user’s liveness and capture the user’s portrait.
The client application:
-
Sends a request to the service to start a live video capture.
- The service creates a session in BioServer and returns the
sessionIdto the client application.
- The service creates a session in BioServer and returns the
-
Initializes a
peerConnectionwith BioServer for capturing the video stream. -
Receives a notification from BioServer that the liveness capture is done.
-
The service receives a callback from BioServer that the liveness capture is done.
-
The service retrieves the result of the liveness from BioServer.
-
The service gets the best image extracted from BioServer.
-
The service performs the face biometric matching between the reference image from the identity document and the best image is extracted from the liveness video capture.
Step 5: Get portrait verification result and retrieve proof
The client application can retrieve the result of the face capture and verification:
-
If the portrait images match, the portrait status is
VERIFIEDand the portrait is assigned a score equal to the score of the document from which the reference image was extracted (if the identity document score isLEVEL2, then the portrait score after successful matching will also beLEVEL2). -
If portrait image does not match the reference document, the portrait status is
INVALIDand the portrait is assigned aLEVEL0score and an error code.
The status and score of the identity document do not change.
Once the client application has reached the end of the process, it can close the transaction by retrieving the proof file that contains all of the identity verification details.
Liveness video capture using a native SDK
Steps overview
- Create the identity.
- Submit consent.
- Start a liveness video capture by using the native SDK.
- The native SDK starts the liveness metadata collection.
- Submit an identity document capture.
- Retreive portrait verification results and retrieve proof.
In the following example, we use a mobile application with a native SDK for the live video capture.

Steps
Step 1: Create identity
Create an identity on the Identity Proofing server that will receive all of the data and gather the verification results related to this identity.
Step 2: Submit consent
Notify the Identity Proofing service of the different verifications and permissions the user has consented to.
Step 3: Start a liveness video capture by using the native SDK
Create a video capture session and initialize the liveness parameters to be used for verifying a user’s liveness by using the native SDK and capture the user’s portrait.
The client application:
- Sends a request to ID&V for starting a live video capture by using the native SDK
The Identity Proofing service:
- Creates a session in BioServer
- Initializes the liveness parameters in BioServer depending on the configuration defined for the client application
- Returns to the client application the liveness session identifier to be used by the SDK to retrieve the liveness parameters and perform the liveness face capture
Step 4: The nativeSDK starts the liveness metadata collection
The client application:
-
Retreives the
liveness parametersand checks the signature of the BioServer response -
Prepare liveness metadata by submitting to BioServer the
encryptedMasterSecret,encryptedDeviceId,livenessDeviceInfoandsdkParametersto get the selfie capture permission. -
Start the selfie video capture of the user
-
Send the liveness metadata and video record information to BioServer.
Note: Details about the Replay Liveness APIs are available here: Replay Liveness APIs
The Identity Proofing service:
-
Receives a notification from BioServer that the liveness capture is done
-
Retrieves the result of the liveness verification from BioServer
-
Gets the user's portrait image extracted by BioServer
-
Performs the face biometric matching between the reference image from the identity document and the best image is extracted from the liveness video capture.
Step 5: Submit identity document capture
The client application sends the identity document images for verification.
The Identity Proofing service:
-
Performs the document authentication and extracts the user’s personally identifiable information (PII) and document information;
-
If the identity document image is usable:
-
Performs the biometric coding of the document image to verify the quality of the portrait.
-
Selects the document’s portrait as the reference portrait for this user.
-
If the identity document is valid, it status becomes
VERIFIEDand the identity document is assigned a score depending on the number and quality of verifications that have been performed (for example,LEVEL2).
-
-
Performs the face biometric matching between the reference image from the identity document and the user's portrait image is extracted from the video capture.
Step 6: Receive portrait verification result and retrieve proof
The client application can retrieve the result of the face capture and verification:
-
If the portrait images match, the portrait status is
VERIFIEDand the portrait is assigned a score equal to the score of the document from which the reference image was extracted (if the identity document score isLEVEL2, then the portrait score after successful matching will also beLEVEL2). -
If portrait image does not match the reference document, the portrait status is
INVALIDand the portrait is assigned aLEVEL0score and an error code.
The status and score of the identity document do not change.
Once the client application has reached the end of the process, it can close the transaction by retrieving the proof file that contains all of the identity verification details.
Web Service calls
There are many ways to implement the appropriate web service requests depending on your programming language. For the sake of clarity, the request examples use the cURL tool syntax.
The variables used in the request URLs are:
Variable | Meaning |
|---|---|
| URL_MAIN_PART | The ID&V domain. |
| APIKEY_VALUE | Client application API key as provided by portal administrator(s). |
| IDENTITY_ID | The value obtained after performing step 1 below. This should be the id value from the Create Identity response message. |
Create an Identity
This request initiates the verification process with ID&V.
The request looks like this:
Shell1curl -X POST https://[URL_MAIN_PART]/gips/v1/identities \2-H 'Content-Type: multipart/form-data' \3-H 'apikey: [APIKEY_VALUE]'
When this request is sent, the ID&V response contains an id field.
The value of that field replaces IDENTITY_ID in subsequent requests.
Below the globalStatus of the Identity.
Sample response:
JSON1{2 "id": "gips-c386c92e-fd7a-4024-bb41-b0f2aab7540c",3 "status": "EXPECTING_INPUT",4 "levelOfAssurance": "LOA0",5 "creationDateTime": "2022-12-20T14:46:27.2675744",6 "evaluationDateTime": "2022-12-20T14:46:27.7473597",7 "upgradePaths": {}8}
globalStatus
Variable | Type | Description |
|---|---|---|
| id | String | The identity identifier that will be used to identify the current transaction in subsequent requests. |
| status | String | Status of the transaction |
| levelOfAssurance (LOA) | String | The current Level of trust for that identity |
| creationDateTime | Datetime | Identity creation date |
| evaluationDateTime | Datetime | The date the identity was last evaluated |
| upgradePaths | Object[] | List of possible submissions that would increase LOA |
Submit consent
Consent is a notification from the client application to ID&V that the user consents to their personal information (in this case, their portrait image) being processed by ID&V for a given period.
With this request, the client application notifies ID&V that the user has consented to the biometric processing of their portrait image.
The request looks like this:
Shell1curl -X POST \2 https://[URL_MAIN_PART]/gips/v1/identities/[IDENTITY_ID]/consents \3 -H 'Content-Type: application/json' \4 -H 'apikey: [APIKEY_VALUE]' \5 -d '[{6 "approved": true,7 "type": "PORTRAIT"8}]'
Sample response:
JSON1[2 {3 "consentId": "781c83db-2b6d-462d-8225-3f2d7fe243f9",4 "approved": true,5 "type": "PORTRAIT",6 "validityPeriod": {7 "from": "2018-01-01",8 "to": "2023-06-20"9 }10 }11]
Variable | Type | Description |
|---|---|---|
| consentId | String | The consent identifier that might be used to identify the submitted consent. |
| approved | Boolean | Boolean indicating status of the consent: true or false. |
| type | String | Type of consent submitted, possible values are: PORTRAIT, GIV. |
| validityPeriod | Object | The period for which the consent is considered valid. |
| from | Date | The date at which the consent will start to be considered valid (optional, present only if provided in the request). Format: AAAA-MM-DD |
| to | Date | The date at which the consent will expire and will not be considered valid anymore. Format: AAAA-MM-DD |
Submit a document capture
With this request, the client application submits an identity document to ID&V for processing. The supported identity document types are:
-
Passport
-
Identity card
-
Driver's license
-
Resident card
The request looks like this:
Shell1curl -X POST \2https://[URL_MAIN_PART]/gips/v1/identities/[IDENTITY_ID]/id-documents/capture \3-H 'Content-Type: multipart/form-data' \4-H 'apikey: [APIKEY_VALUE]' \5-F 'DocumentFront=@[ABSOLUTE_LOCAL_PATH_TO_IDDOCUMENT_FRONT]'6-F 'DocumentBack=@[ABSOLUTE_LOCAL_PATH_TO_IDDOCUMENT_BACK]'7-F 'DocumentCaptureDetails=@[ABSOLUTE_LOCAL_PATH_TO_DOCUMENTCAPTUREDETAILS]'
Variable | Description |
|---|---|
| URL_MAIN_PART | The ID&V domain. |
| APIKEY_VALUE | Client application API key as provided by your administrator. |
| IDENTITY_ID | Value retrieved after performing step 1. This should be the id value from the Create Identity response message. |
| ABSOLUTE_LOCAL_PATH_TO_IDDOCUMENT_FRONT | Value of the absolute path to the document front image. For instance: "C:\mydocumentfront.jpg". |
| ABSOLUTE_LOCAL_PATH_TO_IDDOCUMENT_BACK | Value of the absolute path to the document back image. For instance: "C:\mydocumentback.jpg." |
| ABSOLUTE_LOCAL_PATH_TO_ DOCUMENTCAPTUREDETAILS | DocumentCaptureDetails is used to attach a JSON file containing specific information regarding the document. This is optional, but providing this information can greatly improve the quality of the ID&V response. |
DocumentCaptureDetails is a JSON file with the following format:
JSON1{2 "jurisdiction": "[COUNTRY_CODE]",3 "documentType": "[DOCUMENT_TYPE]",4 "source": "[IMAGE_SOURCE]"5}
Variable | Description |
|---|---|
| COUNTRY_CODE | Alpha-3 code from ISO 3166-1 (for example, USA for the United States, DEU for Germany) |
| DOCUMENT_TYPE | One of the supported document types, accepted values are: PASSPORT, DRIVING_LICENSE, RESIDENT_CARD, IDENTITY_CARD, TAX_CARD, VOTER_CARD. |
| IMAGE_SOURCE | Information about how the image was captured: LIVE_CAPTURE_IMAGE if the identity document image has been taken live with a Document Capture SDK, LIVE_CAPTURE_VIDEO if the identity document image was extracted during a video session. SCAN if the photo of the identity document is captured with a flat scanner, or OTHER for other source. |
Sample response:
JSON1{2 "status": "PROCESSING",3 "type": "PASSPORT",4 "id": "a5b568e5-25df-4323-b34e-c5405823b706"5}
Variable | Type | Description |
|---|---|---|
| id | String | The document identifier that will be used in all future requests (step 4). |
| status | String | Document status |
| type | String | The document type. |
Check document status
With this request, the client application checks the processing status of the submitted identity document.
The request looks like this:
Shell1curl -X GET \2https://[URL_MAIN_PART]/gips/v1/identities/[IDENTITY_ID]/status/[IDDOCUMENT_ID] \3-H 'apikey: [APIKEY_VALUE]'
Variable | Description |
|---|---|
| IDDOCUMENT_ID | The value retrieved after performing the previous step. The content of this value should be taken from the id value of the Evaluate an identity document response message. |
The client application can use this API to implement polling and proceed to the next steps only when it's certain that the document’s status is VERIFIED, or it will prompt the user to retry with another document capture.
Sample response:
JSON1{2 "status": "VERIFIED",3 "type": "PASSPORT",4 "id": "a5b568e5-25df-4323-b34e-c5405823b706"5}
Variable | Type | Description |
|---|---|---|
| id | String | The document identifier. |
| status | String | Document status |
| type | String | The document type. |
status
Values for status can be:
-
VERIFIED- document or portrait has successfully been verified. When VERIFIED, a document or portrait score on a scale of 1 to 4. -
INVALID- document or portrait is considered invalid after the checks performed -
NOT_VERIFIED- document or portrait was processed, but not enough checks were performed to take a decision, typically due to poor quality of the image, or an unsupported document type -
PROCESSING- evidence is currently being processed by the service -
ADJUDICATION- evidence is currently being reviewed by a human expert
score
LEVEL1: low confidenceLEVEL2: medium confidenceLEVEL3: high confidenceLEVEL4: very high confidence
Start a live capture video session using a browser
With this request, the client application starts a live capture video session of the person to verify the liveness of the user, and extract the user's face image that will be compared with a portrait extracted from a reference evidence such as a VERIFIED identity document's portrait.
The service provides in the response, a BioServer session identifier for initializing the video stream between the browser and the BioServer and then links the result to the rest of the user's identity.
The request looks like this:
Shell1curl -X POST \2 https://[URL_MAIN_PART]/gips/v1/identities/[IDENTITY_ID]/attributes/portrait/capture-session?mode=webSDK \3 -H 'Content-Type: application/json' \4 -H 'apikey: [APIKEY_VALUE]'
Sample response:
JSON1{2 "status": "PROCESSING",3 "type": "PORTRAIT",4 "id": "e7917cff-5727-4106-a756-1ddf4216aca6",5 "sessionId": "0991ced"6}
Variable | Type | Description |
|---|---|---|
| id | String | The user portrait identifier that will be used in future requests. |
| type | String | Evidence type (here PORTRAIT) |
| status | String | Status of the portrait |
| sessionId | String | The identifier to use during the video session with BioServer. |
Start a live capture video session using a native SDK
With this request, the client application starts a live capture video session of the person in order to verify the liveness of the user, and extract the user's face image that will be compared with a portrait extracted from a reference evidence (e.g. a VERIFIED identity document's portrait).
The service provides in the response, the liveness session identifier that will be used to initiate face capture between the native SDK and the backend server.
The request looks like this:
Shell1curl -X POST \2 https://[URL_MAIN_PART]/gips/v1/identities/[IDENTITY_ID]/attributes/portrait/capture-session?mode=nativeSDK \3 -H 'Content-Type: application/json' \4 -H 'apikey: [APIKEY_VALUE]' \5 -d '{6 "type": "LIVENESS_PASSIVE_VIDEO"7}'
The payload of this request is optional and can be empty. In that case, the default configuration is applied.
Description of JSON fields in the payload:
Variable | Mandatory | Description |
|---|---|---|
| type | false | Liveness type. LIVENESS_PASSIVE_VIDEO the user needs to move forward or backward. Liveness is assessed using multiple images. LIVENESS_ACTIVE the user needs to move its head in defined directions; This method is no longer recommended. LIVENESS_PASSIVE no user action is required; Liveness is assessed using a single image. LIVENESS_MLC (Multidimensional Liveness Check) is a BETA liveness mode, combining multiple methods for enhanced security. |
| nbChallenge | false | Number of user challenges in case liveness type is LIVENESS_ACTIVE. Between 1 and 3. Default value is 2. |
Notes:
LIVENESS_MLC (Multidimensional Liveness Check) is a BETA liveness mode only available for nativeSDK flow.
Sample response:
JSON1{2 "status": "PROCESSING",3 "type": "PORTRAIT",4 "id": "12971f18-16ce-4a10-890a-bda5ffc7ecd7",5 "sessionId": "0851de47-b98e-4526-b049-cf20c1a3bc93"6}
Variable | Type | Description |
|---|---|---|
| status | String | Status of the portrait's evidence. |
| type | String | Evidence type (here PORTRAIT). |
| id | String | The user portrait identifier that will be used in future requests. |
| sessionId | String | Identifier of the BioServer session |
Check the Status of the Portrait
With this request, the client application checks the status of the submitted portrait.
The client application can use this API to implement polling and go to the next steps only when being certain the portrait’s status is VERIFIED or prompt the user to retry with another portrait capture.
The request looks like this:
Shell1curl -X GET \2https://[URL_MAIN_PART]/gips/v1/identities/[IDENTITY_ID]/status/[PORTRAIT_ID] \3-H 'apikey: [APIKEY_VALUE]'
Variable | Description |
|---|---|
| URL_MAIN_PART | The service domain. |
| APIKEY_VALUE | Client application API key as provided by your administrator. |
| IDENTITY_ID | Value obtained after performing step 1. This value should be the id value from the Create Identity response message. |
| PORTRAIT_ID | Value obtained after performing step 6. The content of this value should be taken from the id value of the Evaluate a Portrait response message. The client application can use this API to implement polling and go to next steps only when certain that the portrait's status is VERIFIED, otherwise it will prompt the user to retry with another portrait capture. |
Sample response:
JSON1{2 "status": "VERIFIED",3 "type": "PORTRAIT",4 "id": "12971f18-16ce-4a10-890a-bda5ffc7ecd7"5}
Variable | Type | Description |
|---|---|---|
| id | String | The portrait's identifier. |
| type | String | Type of the evidence (here PORTRAIT). |
| status | String | Status of the portrait processing. |
Retrieve the user's portrait capture details
With this request, the client application retrieves the user's portrait capture details and portrait verification results for the identity.
The request looks like this:
Shell1curl -X GET \2https://[URL_MAIN_PART]/gips/v1/identities/[IDENTITY_ID]/attributes/portrait \3-H 'apikey: [APIKEY_VALUE]'
Variable | Description |
|---|---|
| URL_MAIN_PART | The service domain. |
| APIKEY_VALUE | Client application API key as provided by your administrator. |
| IDENTITY_ID | Value obtained after performing step 1. This value should be the id value from the Create Identity response message. |
Sample response:
JSON1{2{3 "globalStatus": {4 "id": "gips-c386c92e-fd7a-4024-bb41-b0f2aab7540c",5 "status": "EXPECTING_INPUT",6 "levelOfAssurance": "LOA0",7 "creationDateTime": "2020-12-08T19:54:51.2122999",8 "evaluationDateTime": "2020-12-08T19:54:51.2122999",9 "portraitReferenceEvidenceId": "a5c2134b-2d48-4fb6-bd28-7b73301a1a68",10 "upgradePaths": {}11 },12 "portrait": {13 "evidenceId": "cf4551b5-988e-4ac6-97f6-6c74f1ab908e",14 "submitDateTime": "2025-03-10T13:08:24.869786227",15 "type": "PORTRAIT",16 "evidenceStatus": {17 "evaluationDateTime": "2020-12-08T19:56:38.708744",18 "status": "NOT_VERIFIED",19 "strength": "LEVEL4",20 "score": "LEVEL0",21 "isAdjudicable": true,22 "errors": [23 {24 "code": "1609"25 }26 ],27 "positiveIndicators": [28 "BIOMETRIC_MATCHING_CHECK_OK"29 ],30 "warningIndicators": [31 "BIOMETRIC_HYPER_MATCHING_WARNING"32 ],33 "unverifiedIndicators": [34 "BIOMETRIC_LIVENESS_CHALLENGE_UNVERIFIED"35 ]36 },37 "livenessDiagnostic": "FACE_NOT_DETECTED",38 "portraitData": {39 "source": "LIVE_CAPTURE_VIDEO",40 "channel": "nativeSDK"41 }42 }43}
Variables used in the identity response as shown below.
Variable | Type | Description |
|---|---|---|
globalStatus | globalStatus | Contains status of identity and the associated response element. |
portrait | portrait | Contains the portrait processing details. |
portrait
Variables used for the portrait evidence in the identity response as shown below.
Variable | Type | Description |
|---|---|---|
evidenceId | String | The user portrait identifier in the identity. |
submitDateTime | Datetime | Date time of the evidence portrait submission |
type | String | Evidence type. |
evidenceStatus | evidenceStatus | Contains the current status of the evidence. |
portraitQuality | Boolean | Indicator of the quality of the submitted user portrait for biometric verification. |
livenessDiagnostic | String | Diagnostic code in case liveness type is LIVENESS_MLC and liveness status is inconclusive. Values are available here : Detailed liveness diagnostic codes |
portraitData | portraitData | Contains data related to the submitted user portrait. |
evidenceStatus
Variable | Type | Description |
|---|---|---|
evaluationDateTime | Timestamp | Timestamp of end of evidence evaluation. |
status | status | Status of the evidence. |
strength | String | The maximum level of trust reached by the evidence. |
score | score | The the level of trust reached by this evidence after verification. |
isAdjudicable | Boolean | States whether the evidence can be sent for adjudication. |
errors | String[] | List of errors associated with an evidence status. |
positiveIndicators | String[] | List of indicators that support evidence validity. |
warningIndicators | String[] | List of indicators that invalidate the evidence. |
blockingIndicators | String[] | List of warning indicators that do not invalidate the evidence. |
unverifiedIndicators | String[] | list of indicators whose checks have not been performed. |
portraitData
Variable | Type | Description |
|---|---|---|
source | String | Describes how the portrait was captured. |
metadata | Object[] | May contain additional information depending on use case. |
Check the status of the identity
With this request, the client application can check the status of the identity and see what level of assurance (LOA) has been reached.
The request looks like this:
Shell1curl -X GET \2https://[URL_MAIN_PART]/gips/v1/identities/[IDENTITY_ID] \3-H 'Content-Type: application/json' \4 -H 'apikey: [APIKEY_VALUE]'
Sample response:
JSON1{2 "globalStatus": {3 "id": "gips-c386c92e-fd7a-4024-bb41-b0f2aab7540c",4 "status": "EXPECTING_INPUT",5 "levelOfAssurance": "LOA1",6 "creationDateTime": "2022-12-20T14:46:27.2675744",7 "evaluationDateTime": "2022-12-20T14:55:24.927849",8 "nameReferenceEvidenceId": "a0416ffd-1ecf-4e0c-910d-b4192e963011",9 "portraitReferenceEvidenceId": "a0416ffd-1ecf-4e0c-910d-b4192e963011",10 "upgradePaths": {}11 },12 "consents": [13 {14 "consentId": "5d2a3c74-c3eb-46c9-ae00-a44eaef58399",15 "approved": true,16 "type": "PORTRAIT",17 "validityPeriod": {18 "from": "2018-01-01",19 "to": "2021-06-08"20 }21 }22 ],23 "attributes": [24 {25 "evidenceId": "f0fc970b-f584-4a7a-bb12-6a8640cc1bcc",26 "submitDateTime": "2020-12-08T19:51:36.7790737",27 "type": "ATTRIBUTES",28 "evidenceStatus": {29 "evaluationDateTime": "2020-12-08T19:56:38.708744",30 "status": "VERIFIED",31 "strength": "LEVEL5",32 "score": "LEVEL2",33 "isAdjudicable": false34 },35 "attributesData": {36 "givenNames": [37 {38 "value": "CHRISTOPHE",39 "verified": true40 }41 ],42 "surname": {43 "value": "ULYSSE",44 "verified": true45 },46 "fullname": {47 "value": "CHRISTOPHE ULYSSE",48 "verified": true49 },50 "dateOfBirth": {51 "value": "1960-04-10",52 "verified": true53 },54 "gender": {55 "value": "M",56 "verified": true57 },58 "nationality": {59 "value": "FRA",60 "verified": true61 },62 "eyeColor": {63 "value": "GRAY",64 "verified": true65 },66 "height": {67 "value": "6' 6",68 "verified": true69 }70 }71 }72 ],73 "addresses": [74 {75 "evidenceId": "cfbad0fa-0905-4059-b877-73b98fa53c6e",76 "submitDateTime": "2020-12-08T19:51:35.3634557",77 "type": "ADDRESS",78 "evidenceStatus": {79 "evaluationDateTime": "2020-12-08T19:56:38.708744",80 "status": "VERIFIED",81 "strength": "LEVEL5",82 "score": "LEVEL2",83 "isAdjudicable": false84 },85 "referenceIds": [86 "a0416ffd-1ecf-4e0c-910d-b4192e963011"87 ],88 "addressData": {89 "streetDetails": {90 "streetLines": [91 "12 COTTONWOOD RD",92 "SUITE 1001"93 ],94 "verified": true95 },96 "postcode": "12345",97 "city": "EMPIRE",98 "state": "NV",99 "country": "USA",100 "verified": true101 }102 }103 ],104 "idDocuments": [105 {106 "evidenceId": "a0416ffd-1ecf-4e0c-910d-b4192e963011",107 "submitDateTime": "2020-12-08T19:51:35.3634547",108 "type": "PASSPORT",109 "evidenceStatus": {110 "evaluationDateTime": "2020-12-08T19:56:38.708744",111 "status": "VERIFIED",112 "strength": "LEVEL4",113 "score": "LEVEL2",114 "isAdjudicable": true,115 "positiveIndicators": [116 "BIOMETRIC_MATCHING_CHECK_OK",117 "BIOMETRIC_QUALITY_CHECK_OK",118 "MODEL_RECOGNIZED_OK",119 "HIGH_TEMPLATE_OK",120 "CB2D_FIELDS_SYNTAX_OK",121 "DOCUMENT_BARCODE_PARSING_OK",122 "LOW_TEMPLATE_OK",123 "VISUAL_SECURITY_OK",124 "MRZ_CHECKSUMS_OK",125 "PHOTOCOPY_DETECTION_OK",126 "PERSONAL_NUMBER_CHECKSUMS_OK",127 "MODEL_COLOR_MATCHING_OK",128 "PORTRAIT_OK",129 "LCD_DETECTION_OK",130 "ESFX_OK",131 "OCRX_OK",132 "DOC_EXPIRATION_DATE_OK",133 "BIRTHDATE_VALID_OK",134 "DOC_ISSUING_COUNTRY_OK",135 "OCR_DOCNUM_OK",136 "EMISSION_COUNTRY_OK",137 "MRZ_PRESENCE_OK",138 "PHOTO_LOCATION_OK",139 "MRZ_FIELDS_SYNTAX_OK",140 "SIDES_MODEL_CONSISTENCY_OK",141 "DOC_NATIONALITY_OK",142 "OCR_FIRSTNAMES_OK",143 "OCR_LASTNAME_OK",144 "OCR_BIRTHDATE_OK",145 "EMISSION_DATE_OK",146 "OCR_ISSUING_DATE_OK",147 "BLUR_IMAGE_QUALITY_FRONT_OK",148 "EXPIRATION_DATE_CONSISTENCY_OK",149 "PAPER_COPY_OK",150 "OCR_EXPIRATION_DATE_OK",151 "ISSUING_DATE_VALIDITY_OK",152 "GLARE_IMAGE_QUALITY_FRONT_OK",153 "IMAGE_FRONT_DPI_CHECK_OK",154 "OCR_SEX_OK",155 "OCR_FULLNAME_OK"156 ],157 "warningIndicators": [158 "LOW_IMAGE_QUALITY_FRONT_WARNING",159 "KEYSTONE_IMAGE_QUALITY_FRONT_WARNING",160 "BLUR_IMAGE_QUALITY_BACK_WARNING",161 "GLARE_IMAGE_QUALITY_BACK_WARNING"162 ],163 "unverifiedIndicators": [164 "DOCUMENT_NUMBER_VALIDITY_UNVERIFIED",165 "COMPROMISED_DOCUMENT_CHECK_UNVERIFIED",166 "TEXTURE_ANALYSIS_UNVERIFIED",167 "MRZ_BARCODE_CROSSCHECK_UNVERIFIED"168 ]169 },170 "idDocumentData": {171 "idDocumentType": "PASSPORT",172 "idDocumentNumber": "08CD50338",173 "issuingCountry": "FRA",174 "issuingState": "WA",175 "issuingDate": "2005-09-01",176 "expiryDate": "2021-03-18",177 "personalAttributes": {178 "givenNames": [179 {180 "value": "CHRISTOPHE",181 "verified": true182 }183 ],184 "surname": {185 "value": "ULYSSE",186 "verified": true187 },188 "fullname": {189 "value": "CHRISTOPHE ULYSSE",190 "verified": true191 },192 "dateOfBirth": {193 "value": "1960-04-10",194 "verified": true195 },196 "gender": {197 "value": "M",198 "verified": true199 },200 "nationality": {201 "value": "FRA",202 "verified": true203 },204 "eyeColor": {205 "value": "GRAY",206 "verified": true207 },208 "height": {209 "value": "6' 6",210 "verified": true211 }212 },213 "address": {214 "streetDetails": {215 "streetLines": [216 "12 COTTONWOOD RD",217 "SUITE 1001"218 ],219 "verified": true220 },221 "postcode": "12345",222 "city": "EMPIRE",223 "state": "NV",224 "country": "USA",225 "verified": true226 },227 "mrz": [228 "P<FRAULYSSE<<CHRISTOPHE<<<<<<<<<<<<<<<<<<<<<",229 "08CD503380FRA6004103M1806058<<<<<<<<<<<<<<06"230 ]231 }232 }233 ],234 "portrait": {235 "evidenceId": "cf4551b5-988e-4ac6-97f6-6c74f1ab908e",236 "submitDateTime": "2020-12-08T19:54:51.2122999",237 "type": "PORTRAIT",238 "evidenceStatus": {239 "evaluationDateTime": "2020-12-08T19:56:38.708744",240 "status": "VERIFIED",241 "strength": "LEVEL4",242 "score": "LEVEL0",243 "isAdjudicable": true,244 "errors": [245 {246 "code": "1609"247 }248 ],249 "positiveIndicators": [250 "BIOMETRIC_MATCHING_CHECK_OK"251 ],252 "warningIndicators": [253 "BIOMETRIC_HYPER_MATCHING_WARNING"254 ],255 "unverifiedIndicators": [256 "BIOMETRIC_LIVENESS_CHALLENGE_UNVERIFIED"257 ]258 },259 "livenessDiagnostic": "FACE_NOT_DETECTED",260 "portraitData": {261 "source": "LIVE_CAPTURE_VIDEO",262 "channel": "nativeSDK"263 }264 }265}
Check the levelOfAssurance value to see the current score of the identity created.
The client application can also check the status of all submitted data:
-
Portrait is summarized in the “portrait” structure.
-
Identity document is summarized in the “idDocuments” structure.
The rest of the response contains various information like the upgrade path to improve LOA or attributes (personal information extracted from documents or submitted by the user).
Ending the process and retrieving the proof file
With this request, the client application terminates the proofing process and retrieves all the information that the service has gathered and generated.
In response to this request, the client application receives an archive file. The client application can archive this file for audit purposes and use its content as a reference for the user's identity.
Getting the proof terminates the transaction and the service applies the deletion policy to the personal information gathered during the session.
The request looks like this:
Shell1curl -X GET \2https://[URL_MAIN_PART]/gips/v1/identities/[IDENTITY_ID]/proof \3-H 'apikey: [APIKEY_VALUE]' -o proof
Variable | Description |
|---|---|
| URL_MAIN_PART | The service domain. |
| APIKEY_VALUE | Client application API key as provided by your administrator. |
| IDENTITY_ID | Value obtained after performing step 1. This value should be the id value from the Create Identity response message. |
API feedback
This section contains error codes and indicators.
Error codes
Error codes in relation to face matching:
Error Code | Description |
|---|---|
| 1600 | The minimal threshold is not reached when matching the user’s portrait to the document. |
| 1601 | The portrait quality is not good enough for biometric verification. |
| 1609 | Timeout occurred during live portrait capture. |
| 1610 | A technical error occurred while capturing live portrait. |
| 1611 | Failed to capture live portrait. |
| 1021 | The Biometrics verification service is not available. |
Indicators
ID&V is configured by default, with the following blocking indicators:
Indicator name | Description |
|---|---|
| BIOMETRIC_MATCHING_CHECK_FAILED | Biometric matching failed |
| BIOMETRIC_QUALITY_CHECK_FAILED | Portrait quality check failed |
| BIOMETRIC_LIVENESS_CHALLENGE_FAILED | The Biometric liveness capture failed. |
Scoring
Once a portrait has been submitted, results of the biometric matching are combined by the Identity Proofing service to increase the score of the portrait evidence.
Here is the summary of the portrait image scoring:
Evidence Type | Status | Score | Description |
|---|---|---|---|
| Portrait | NOT_VERIFIED | LEVEL0 | Portrait submission not verified |
| INVALID | LEVEL0 | Portrait submission is invalid (biometric matching failed) | |
| VERIFIED | Same score as the evidence reference | The score reached is described in the example below. |
Example:
Evidence references and their scoring and level indications:
- PASSPORT, Document Authentication only:
Passport status is
VERIFIEDatLEVEL2then Portrait status is alsoVERIFIEDatLEVEL2 - Driver's License (US), Document Authentication + Issuing Source Verification:
If Driver's License status is
VERIFIEDatLEVEL3, then Portrait status is alsoVERIFIEDatLEVEL3 - PASSPORT, Document Authentication only:
if Passport status is
VERIFIEDatLEVEL2, then Portrait status is alsoVERIFIEDatLEVEL2 - Driver's License (US), Document Authentication + Issuing Source Verification:
if Driver's License status is
VERIFIEDatLEVEL3, then Portrait status is alsoVERIFIEDatLEVEL3
Decision rules and reference portrait election
To check that the user is the same person as the person on the identity document, ID&V performs a biometric comparison between the submitted self-portrait image and all the submitted evidences that contain a portrait image (such as passport, ID card, driver’s license):
-
If the biometric matching score is above the configured tolerance threshold, then the portrait images are considered to match.
-
If not, portrait images are not considered to match.
When multiple evidences are submitted, ID&V selects the reference portrait image as follows:
-
select the evidence with the highest verification score.
-
If multiple evidences have the same verification score, then select the one with the highest coding quality score.
-
If the evidences have the same quality score too, then select the one with the highest matching score.
-
Finally, if no single evidence has been elected at this stage, select the most recently received evidence.
ID&V’s face matching process
Face Matching Configuration
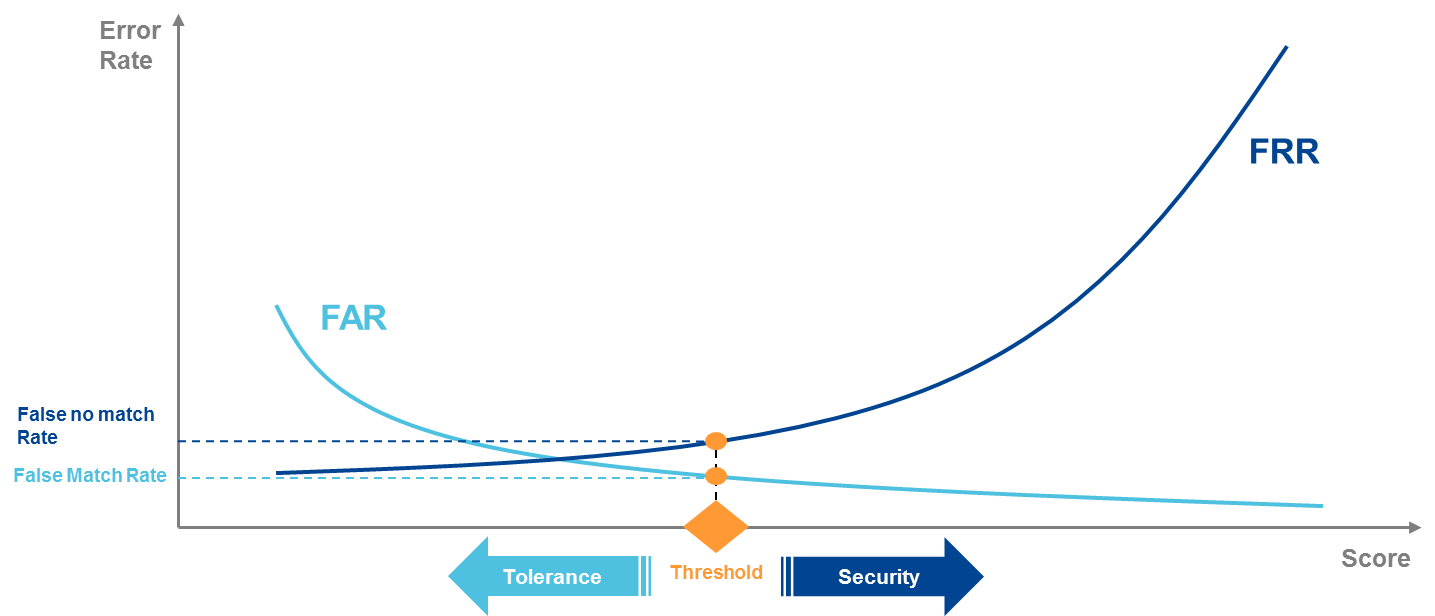
ID&V is configured with a tolerance threshold for biometric matching that determines whether a biometric comparison matches or not; and it will incur a false acceptance rate (FAR) and a false rejection rate (FRR).
Depending on use case constraints, an acceptable balance between FAR and FRR is determined using the tolerance threshold. The tolerance threshold can be configured, but should take into account the following trade-off:
-
Low FAR implies high FRR
-
Low FRR implies high FAR
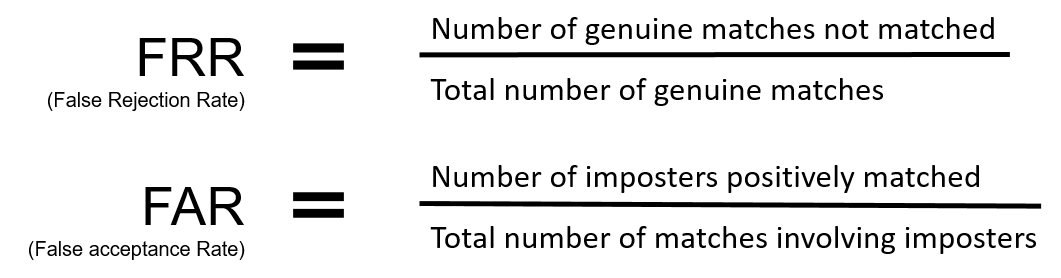
FRR and FAR defined:
Face Matching trade-off Graphical representation