IPV GIPS Postman Integration Guide
Purpose
The purpose of this document is to explain how to setup a Postman project to use and test GIPS service APIs.
This Postman project contains requests examples that can be executed against the real service to ease the integration of the service into your application.
Postman Presentation
Postman is a tool for API development. It is used as a REST and SOAP client.
It offers an intuitive user interface allowing you to:
-
Send SOAP and REST requests
-
Save requests and responses
-
Add tests
-
Create test scenarios
Important Note:
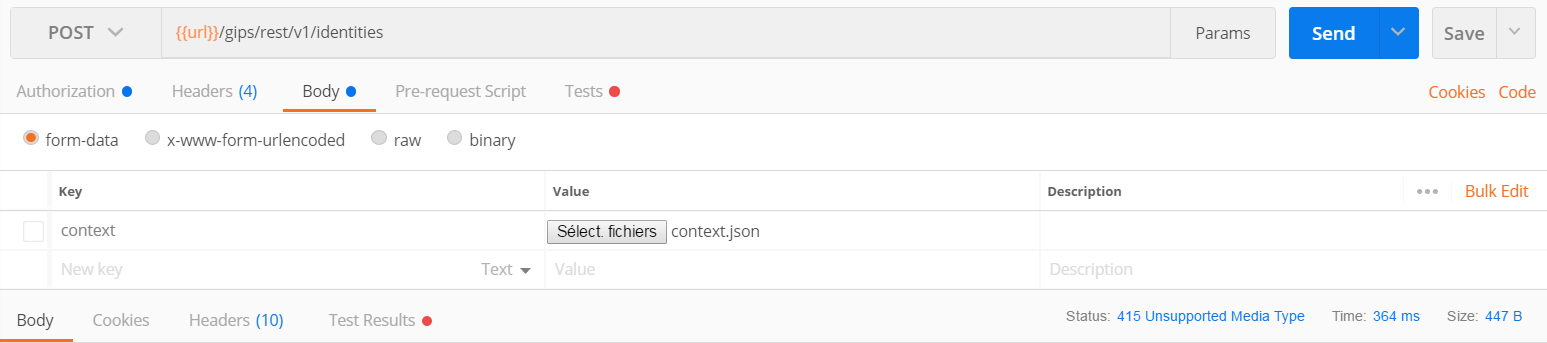
You may have a status with error 415 – Unsupported Media Type. These errors are due to the Postman version you are using, not the IPV engine itself. For example:
- Some Postman versions do not support empty Multi part request:
- Some Postman versions do not support an empty content type in the GET requests:
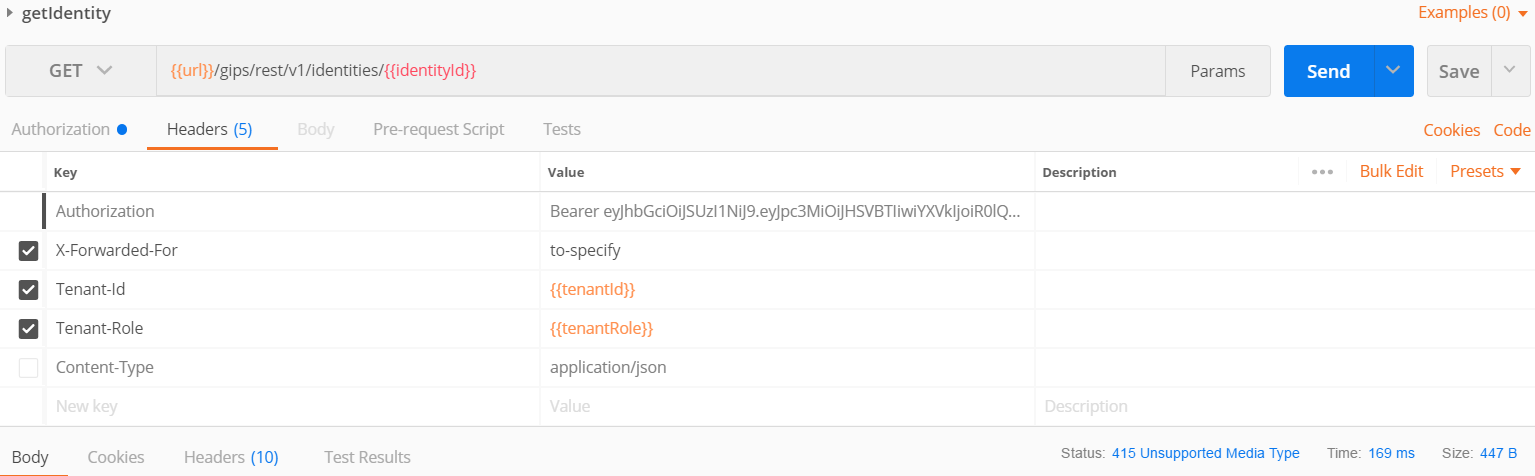
An important fix was made by the Postman team. Please use version 7.0.6 or later.
Prerequisites
-
Postman Documentation
-
GIPS API Guide
GIPS is composed of one REST API with multiple resources necessary to conduct an identity verification:
-
Identities
-
ID Documents
-
Identity attributes
-
Identity evaluation results
-
Biometrics
The full API is described in API documentation section in the portal.
-
Sequence Management
There is no imposed sequence to verify an identity with GIPS. However, it's not possible to process sensitive data without having previously notified that the user has consented to it, or make a comparison when there is not reference data submitted yet.
Here is a typical sequence:

Proof and Pause/Resume
As a reminder, GIPS allows the pause/resume identity while document being in adjudication process or and transaction lifetime has expired.
GIPS also allow the relying service to resume a transaction:

Data Retention
Data on the end-user (images and personal details for instance) are kept for the time of the ongoing transaction. As soon as the proof is requested, or as soon as the time to live of the transaction is reached, then data from the end-user are no more available on the GIPS server. The time to live of the transaction (so the time to live of the data) is configurable per tenant. When the time to live is reached, neither the relying service nor the end-user will be able to access the transaction. (The request will give back a specific http error code 404, meaning the transaction is no longer available).
Since there is no data retention on the GIPS side, the relying service is in charge of keeping the complete proof locally (in order to send it back to resume a previous transaction).
Exceptions:
-
GIPS allows a specific configuration per tenant (Activated? Retention time? Ciphered with GIPS certificate?), to keep the proof for screening and investigation reasons. When activated, the proof will be stored if:
-
A
get proofis performed by the relying service -
The transaction reaches its time to live
-
-
GIPS allows a specific configuration per tenant (Activated? Retention time? Ciphered with tenant certificate?), to keep the proof for the tenant in case transaction reaches its time to live. For example:
-
End-user starts a new process and submits a passport and a portrait.
-
End-user exits the mobile application or the browser without informing the relying service (so without informing GIPS).
-
After a configurable time to live, GIPS will close the transaction and can keep the proof.
-
If ciphered, only the relying service will be able to decipher it.
-
To retrieve a proof, the relying service has to perform a
get Proofas if the transaction was still available.
-
-
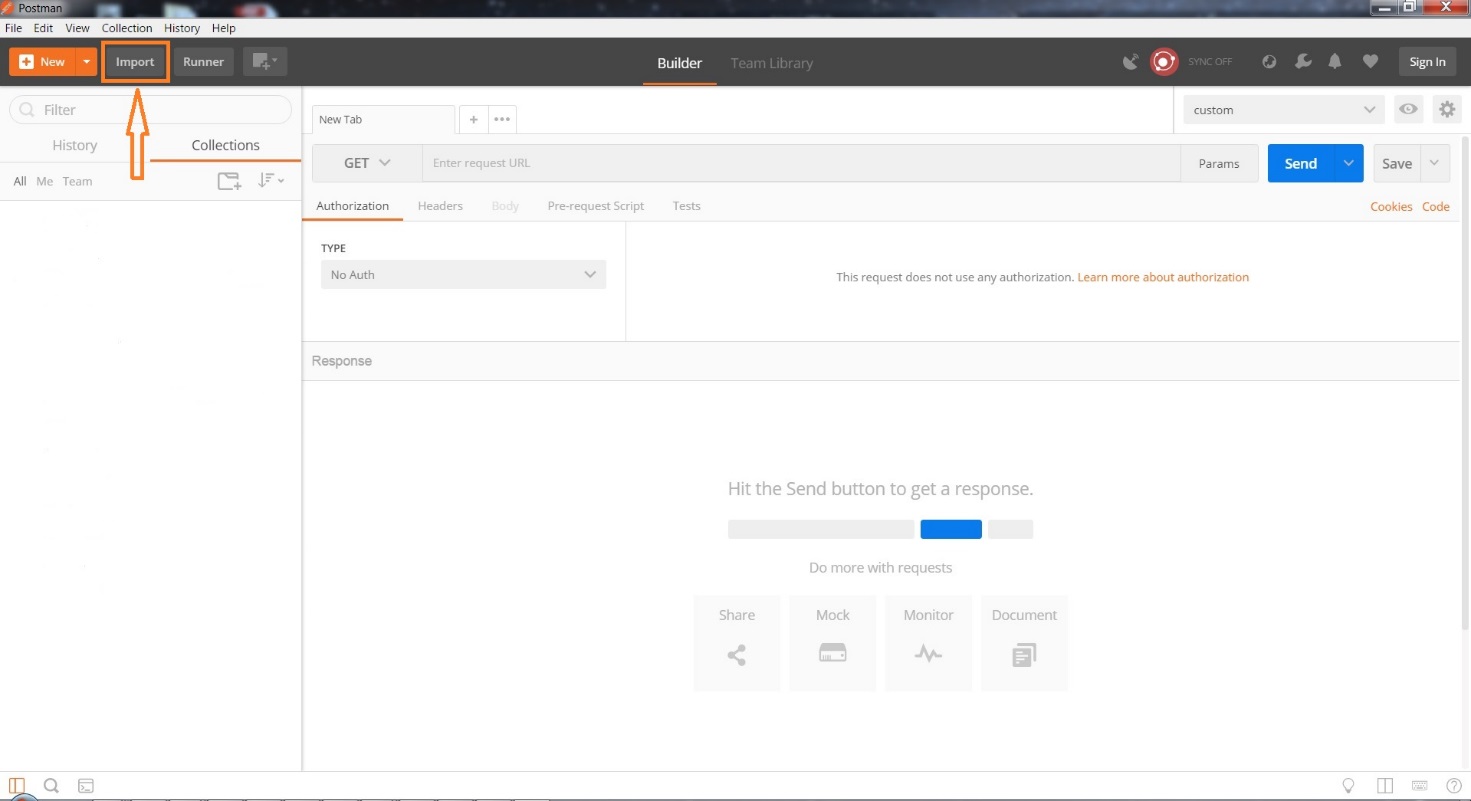
Postman Installation
Nota: Do not use the Postman chrome extension because it's not maintained anymore and does not support some functionalities like multipart. A standalone Postman application is required.
-
Go to the URL: https://www.getpostman.com/apps
-
Select the Postman version associated with your platform OS
-
Download the latest version (at least 7.0.6)
-
Click on: Execute. The installation is done automatically.
- Launch Postman by double clicking on:

Import Helper Project
To import the provided Postman project:
-
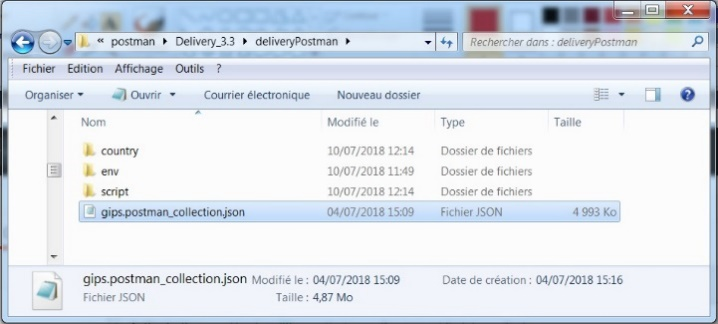
Unzip GIPS Postman delivery morpho-ipv-gips-postman.tar.gz in a folder on your computer.
-
On Postman, click on Import:
- Click on Choose Files.
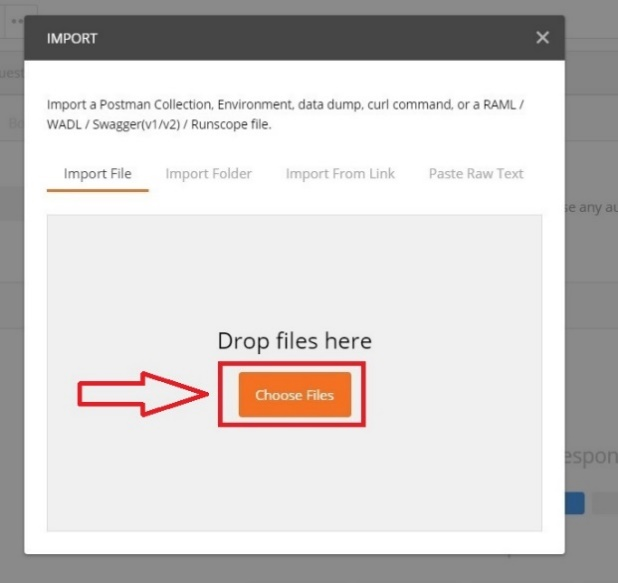
- Select project file
gips.postman_collection.jsonin the unzipped GIPS postman delivery and click on Open.
The project is now imported in the Collections section:
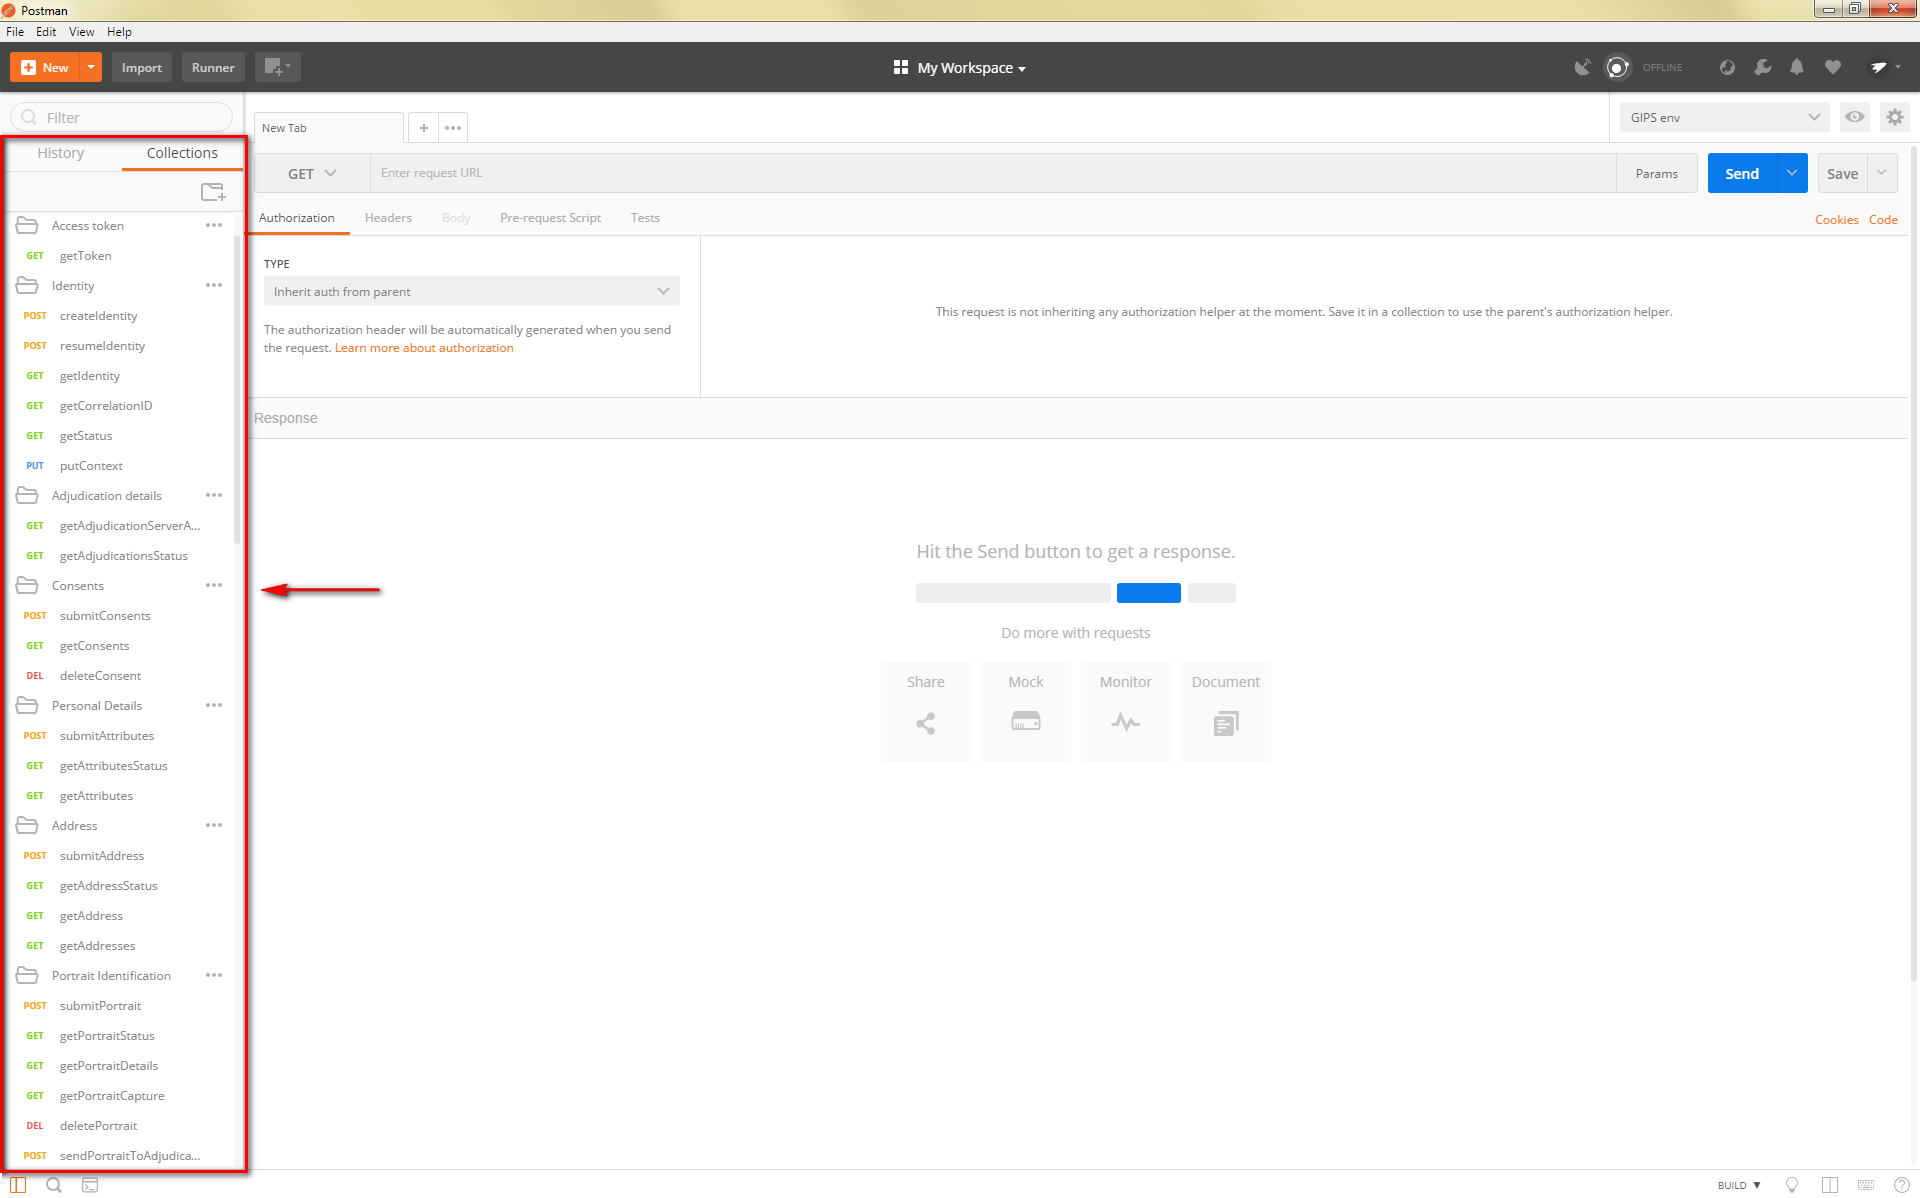
Access Configuration
Import Environment and Configuration
Before testing the GIPS service, the Postman project must be configured.
-
Click on Environment option.
-
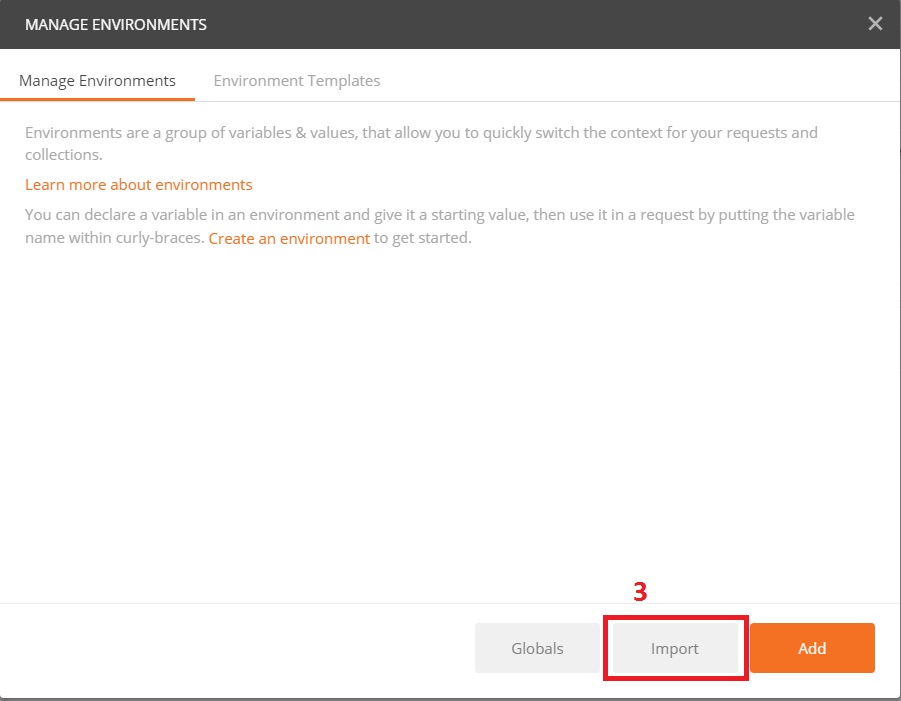
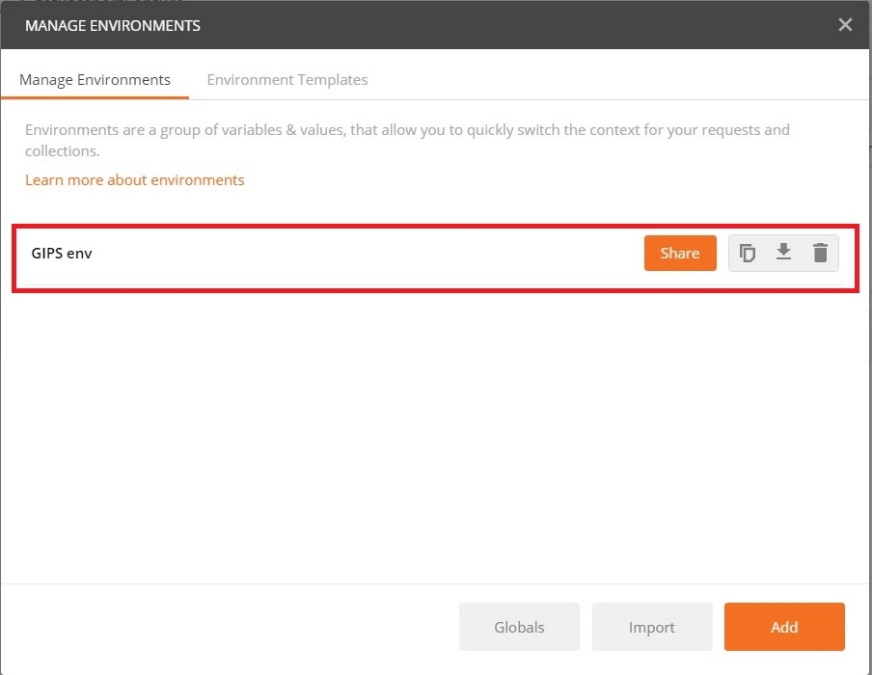
Click on Manage Environments.
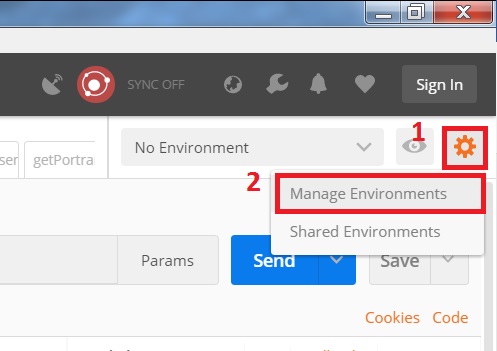
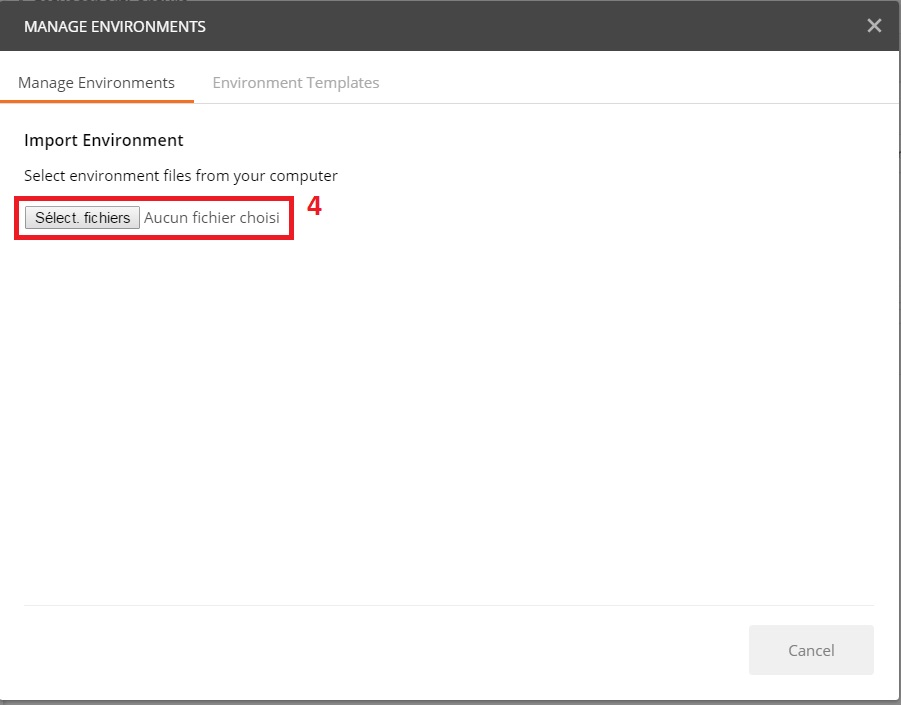
- Click on Import.
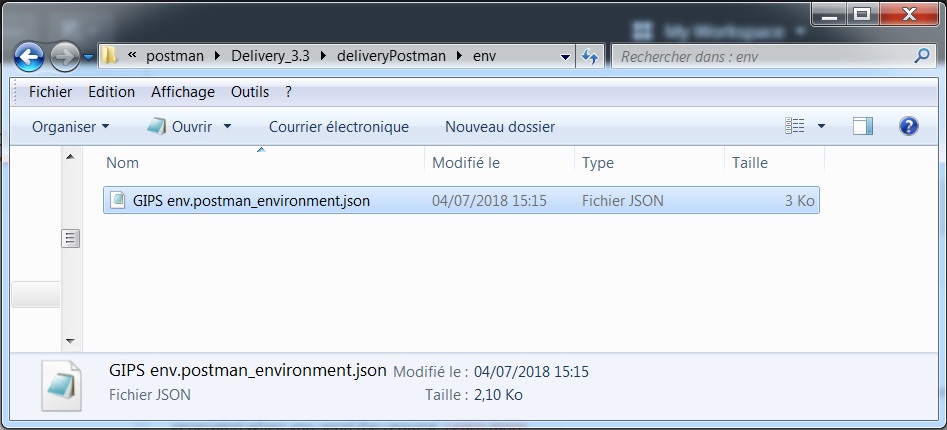
- Click on Select files. Select the environment file present in
delivery in
envfolder ofGIPS env.postman_environment.json.
The environment is then imported successfully.
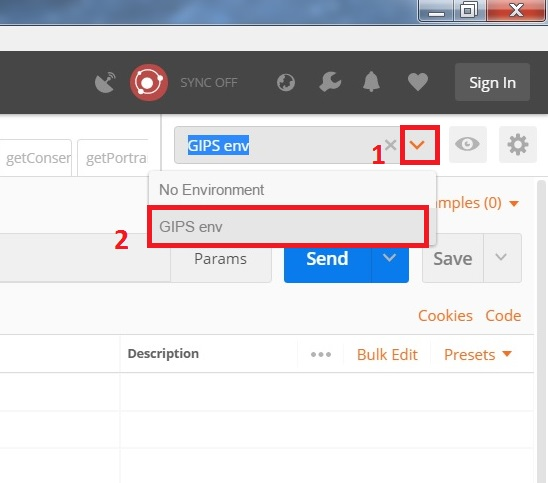
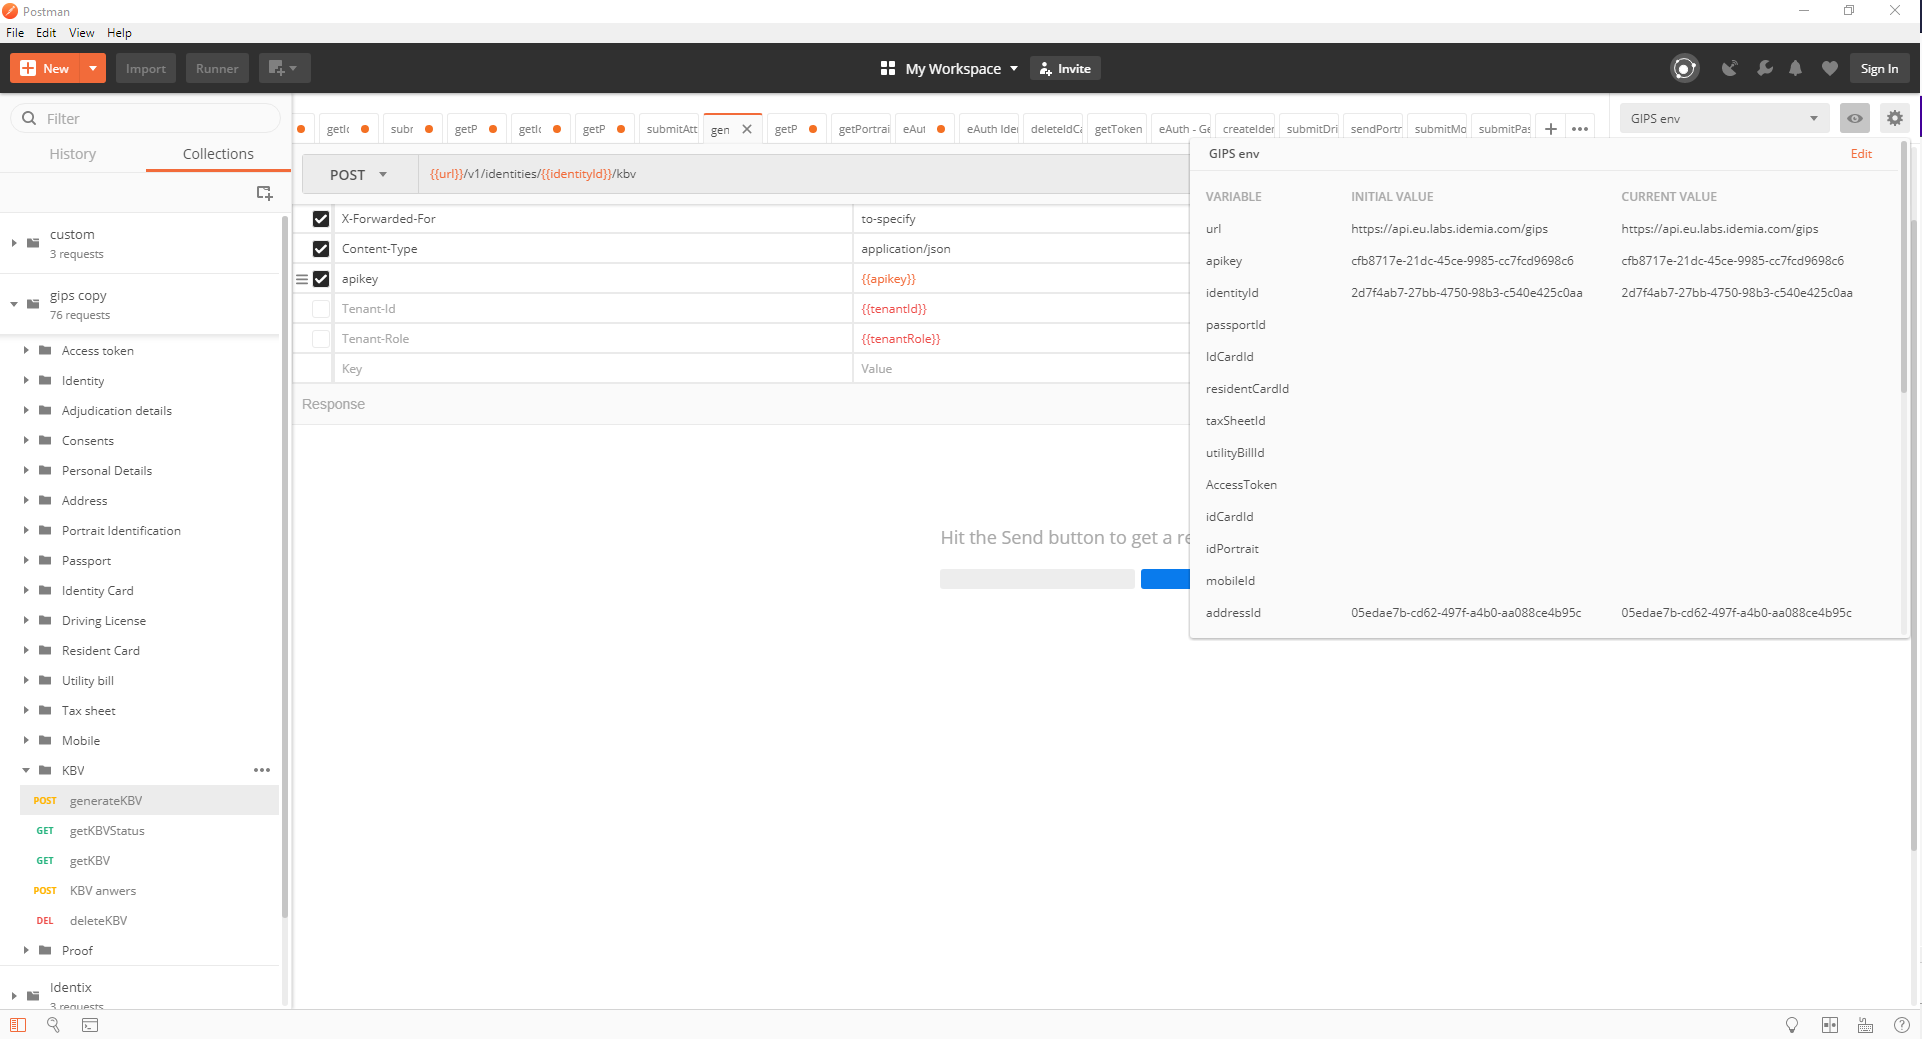
- Click on the arrow to the right of No Environment (1) and select GIPS env(2).
- Click on the eye icon called Environment quick look(1) and click on Edit in GIPS env (2).
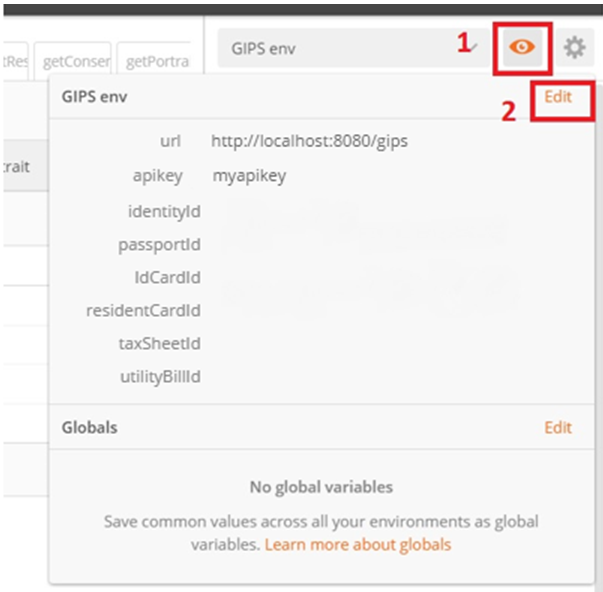
- Fill in the following fields, paying close attention.
If you use an IDEMIA private cloud:
Note: Be careful, keys are case-sensitive.
-
Update key “url”: set in the "value" field the URL of the GIPS server that has been provided to you. Example: https://myservice-intg.com/gips
-
Update key “apikey”: set in the "value" field your apikey Example: 22a79d15-3430-46c6-a21c-c266e30fbe8f
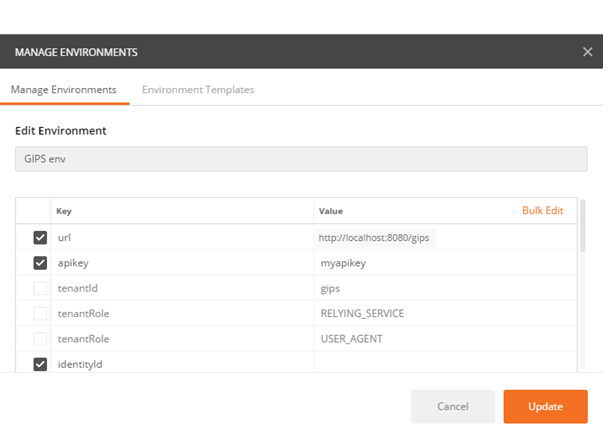
- Click on Update and then close the environment window. Other values will be filled automatically during the performed tests.
Testing: Using API Key
-
Objective: Explain how to set the apikey in a Postman environment.
-
Environment:
-
The apikey is used as a header in all requests.
-
The value is taken from configuration parameters.
-
-
Usage:
-
Open environment quick look.
-
Click on edit.
-
Edit the apikey value to the desired one.
-
Note: The apikey generated for users having a USER_AGENT role has no
access to blocking indicator information.
GIPS Tests
Now that your Postman environment is configured, you can try the proposed requests.
This chapter describes each request present in the Postman project.
Identity
The objective of this test is to
- create a new identity and initiate the verification process with IPV
- resume an identity based on a proof file
- retrieve the identity status and details
- retrieve identity status and all indicator details
- retrieve the identity status and details
- sets a new context
- delete an identity
createIdentity
This creates a new identity. This step is required before next steps.
Environment:
If you use an IDEMIA private cloud:
url,apikeyare used from the Postman environment
Usage:
-
Open the folder called
Identity. -
Click on createIdentity.
-
Optional: Add a multipart “context” metadata (key/values). The keys/values will be associated with the identity but has no impact on identity scoring or verification.
-
Optional: In the headers you can set a
correlation-id. This identifier shall be unique per identity or per transaction. It gives the ability to make the link between the GIPS internal identity ID and a customer unique ID. SeegetIdentityFromCorrelationIdfor more details.
-
-
Click Send.
Response:
-
Status shall be: 200 OK to confirm the identity has been created.
-
The response contains a JSON with identity details like the identity ID, the score, etc.
-
The identity ID is automatically filled in the Postman environment variable
identityIdand will be used on next subsequent calls. -
The response body contains a status of the created identity.
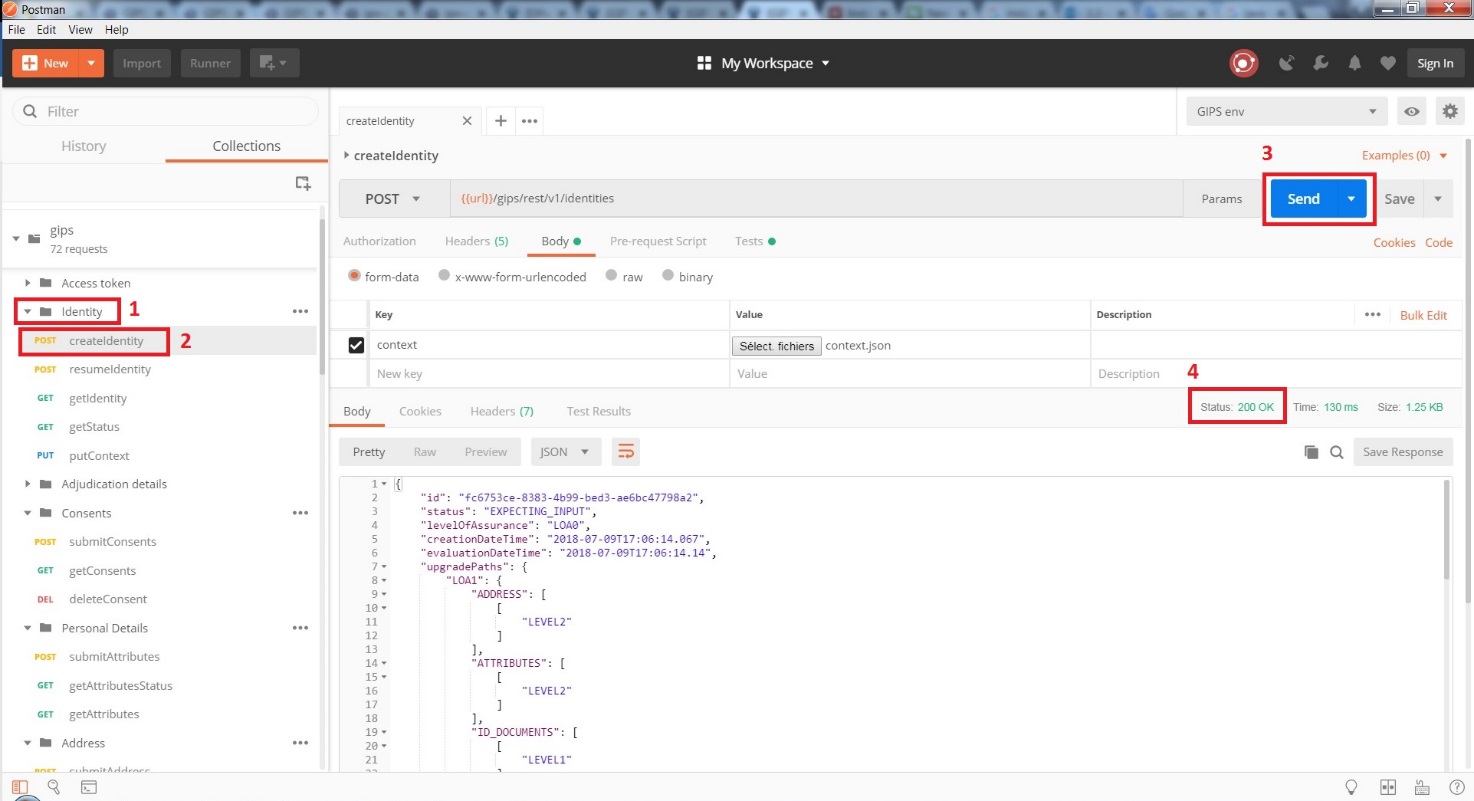
Note: Some Postman versions does not allow optional multipart (Postman issue). Please make sure you are using version 7.0.6 or later.

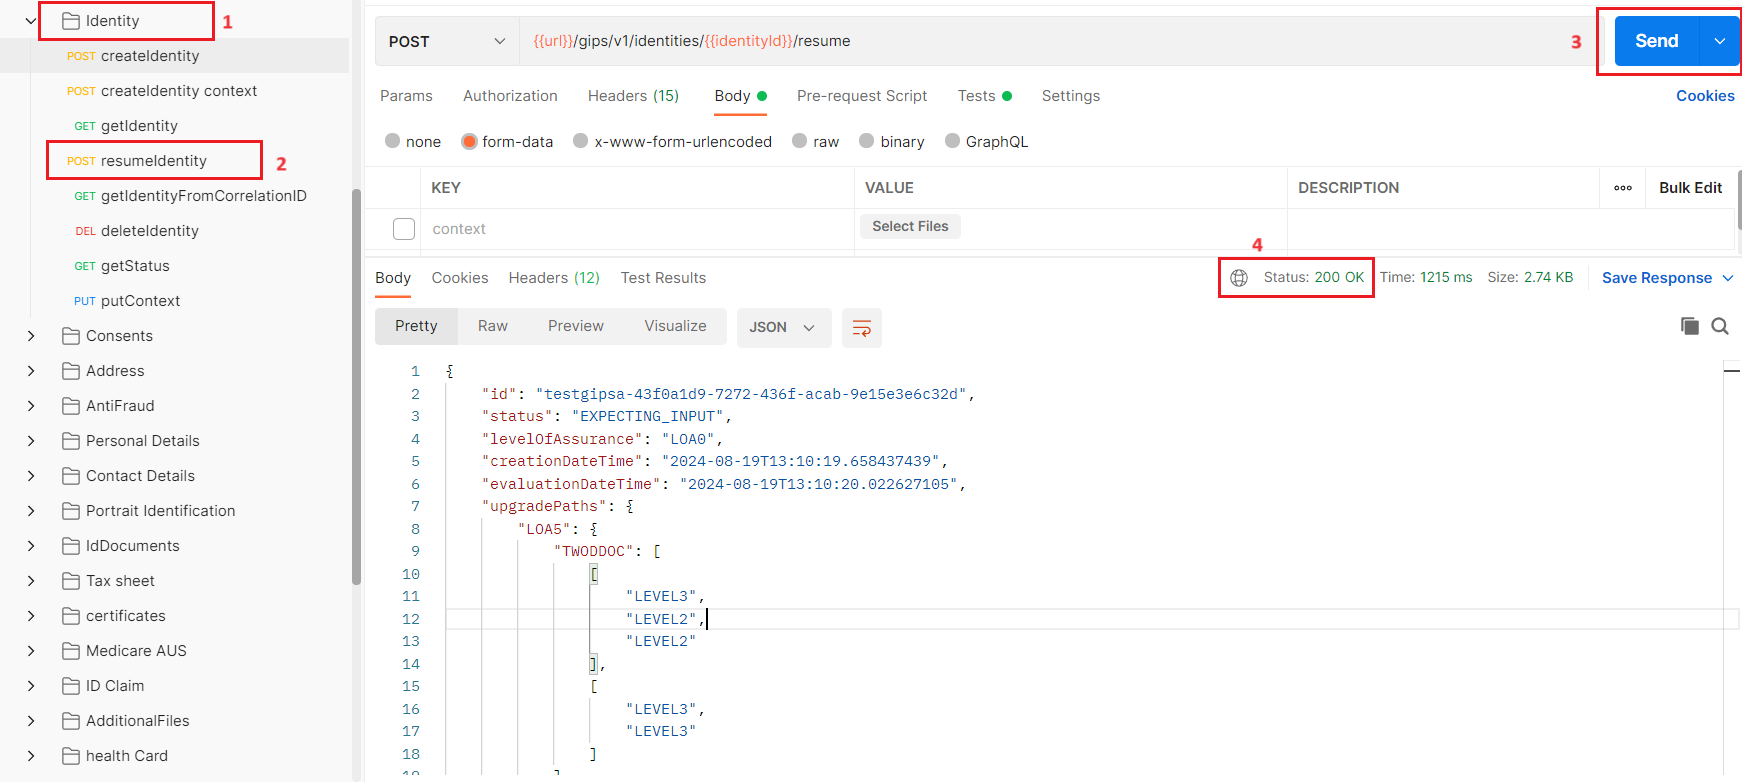
resumeIdentity
Objective: This resumes an identity based on a proof file.
Reminder: Create the
identity, submit the evidence, pause by making a get Proof (will delete data from
GIPS), and resume to send other data/evidences. The same API is used to
create an identity or to resume. To resume you need to add a multipart “proof”
as explained below.
Environment:
If you use IDEMIA private cloud:
url,apikeyare used from the Postman environment.
Usage:
-
Open the folder
Identity. -
Click on resumeIdentity.
-
Click on Body and set the parameter
proofwith a saved proof.- proof = proof saved during
getProof. See theget Proofchapter for more details.
- proof = proof saved during
-
Click on Send.
Response:
-
Status shall be 200 OK to confirm that the process has been resumed.
-
The response contains a JSON with identity details like the identity ID, the score, etc.
-
The identity ID is automatically filled in the Postman environment variable
identityIdand will be used on next subsequent calls. -
The response body contains a status of the created identity.
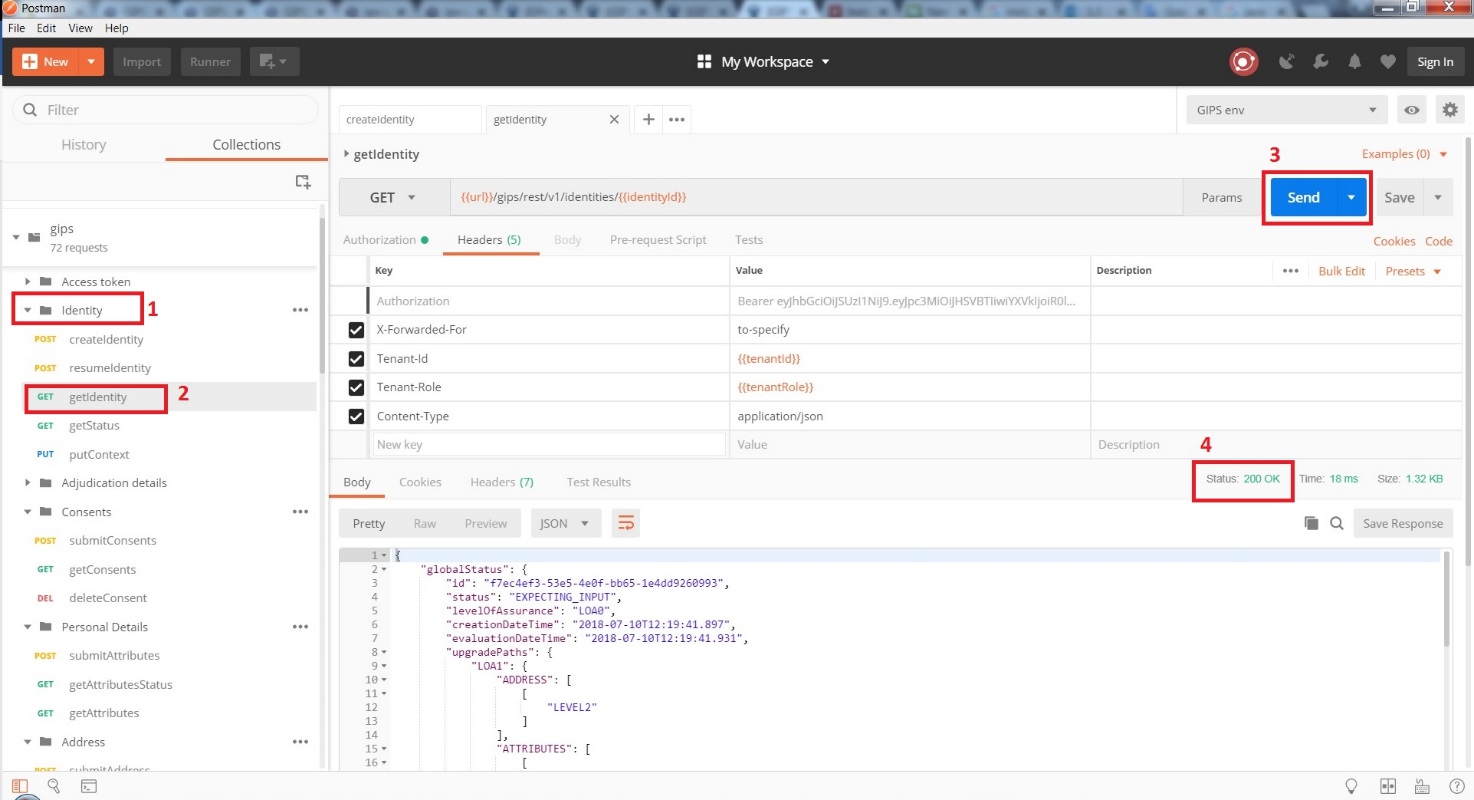
getIdentity
Objective: This retrieves the identity status and details based on its unique identifier.
Environment:
If you use an IDEMIA private cloud:
url,apikeyandidentityIdare used from the Postman environment.
Usage:
-
Open the folder
Identityand click on getIdentity. -
Click on Send.
Response:
-
Status shall be 200 OK.
-
The response contains a JSON with all the identity details linked to the provided identity ID (evidence, adjudication status, scoring, etc.)
-
The identity ID is automatically filled in the Postman environment variable
identityIdand will be used on next subsequent calls.
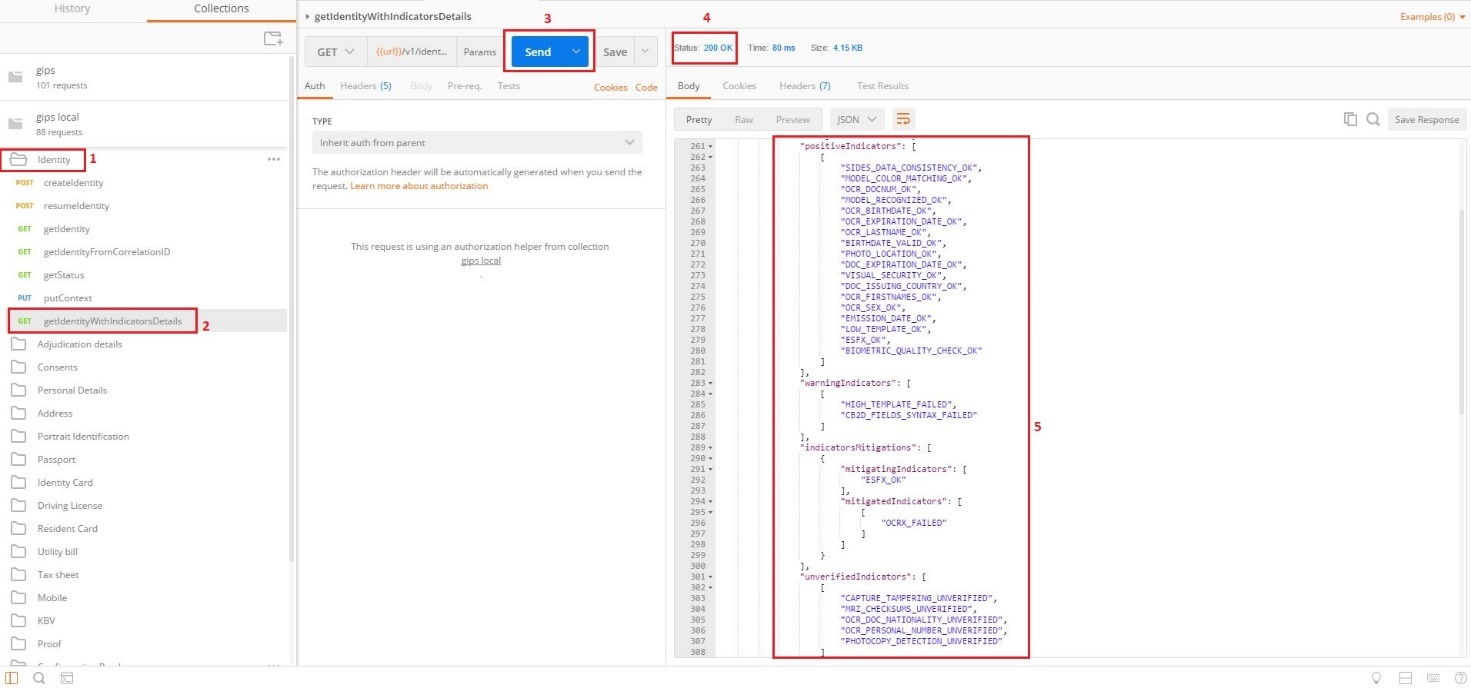
Get Identity with Indicators Details
Objective: Retrieve identity status and all indicator details based on its unique Identifier.
Environment:
If you use an IDEMIA private cloud
url,apikeyandidentityIdare used from the Postman environment.
Usage:
-
Open the folder
Identityand click on getIdentity. -
Add the
?detailed=trueto the endpoint url -
Click on Send.
Response:
-
Status shall be 200 OK.
-
The response contains a JSON with all the identity details linked to the provided identity ID (evidence, adjudication status, scoring, etc.)
-
The identity ID is automatically filled in the Postman environment variable
identityIdand will be used on next subsequent calls. -
Indicators details.
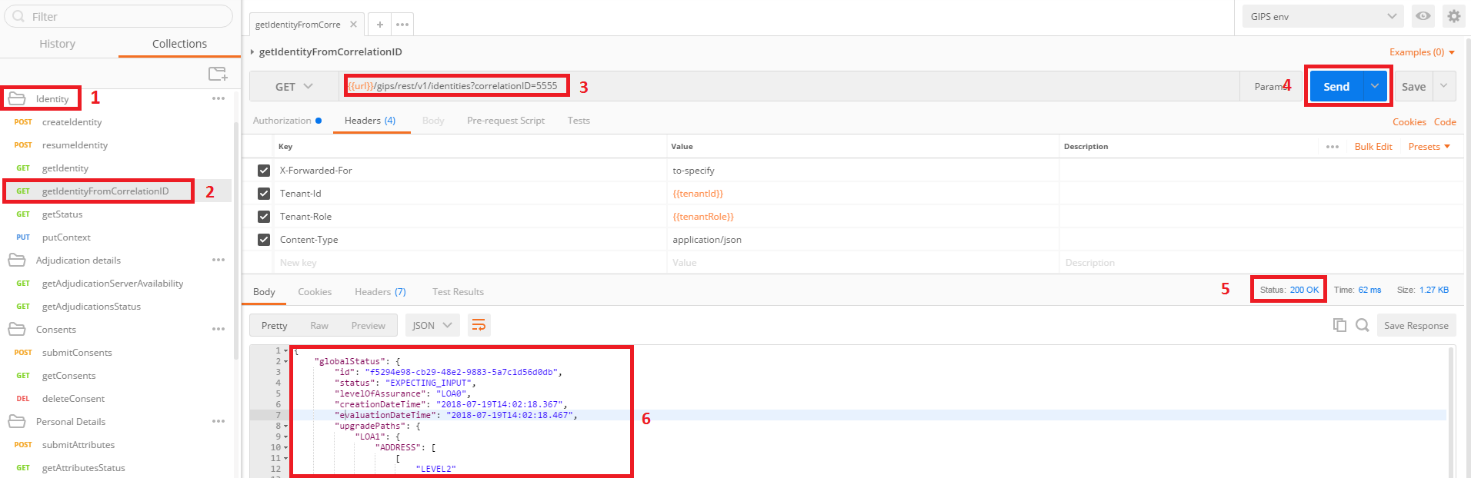
getIdentityFromCorrelationId
Objective: This retrieves the identity status and details based on its unique identifier.
Environment:
If you use an IDEMIA private cloud:
url,apikeyandidentityIdare used from the Postman environment.
Usage:
-
Open the folder
Identity. -
Click on getIdentityFromCorrelationId.
-
Set in the URL the correlation ID from which you want to retrieve the identity status and ID (meaning the one set in headers during the
createIdentitystep.) -
Click on Send.
Response:
-
Status shall be 200 OK.
-
The response contains a JSON with all the identity details linked to the provided correlation ID.
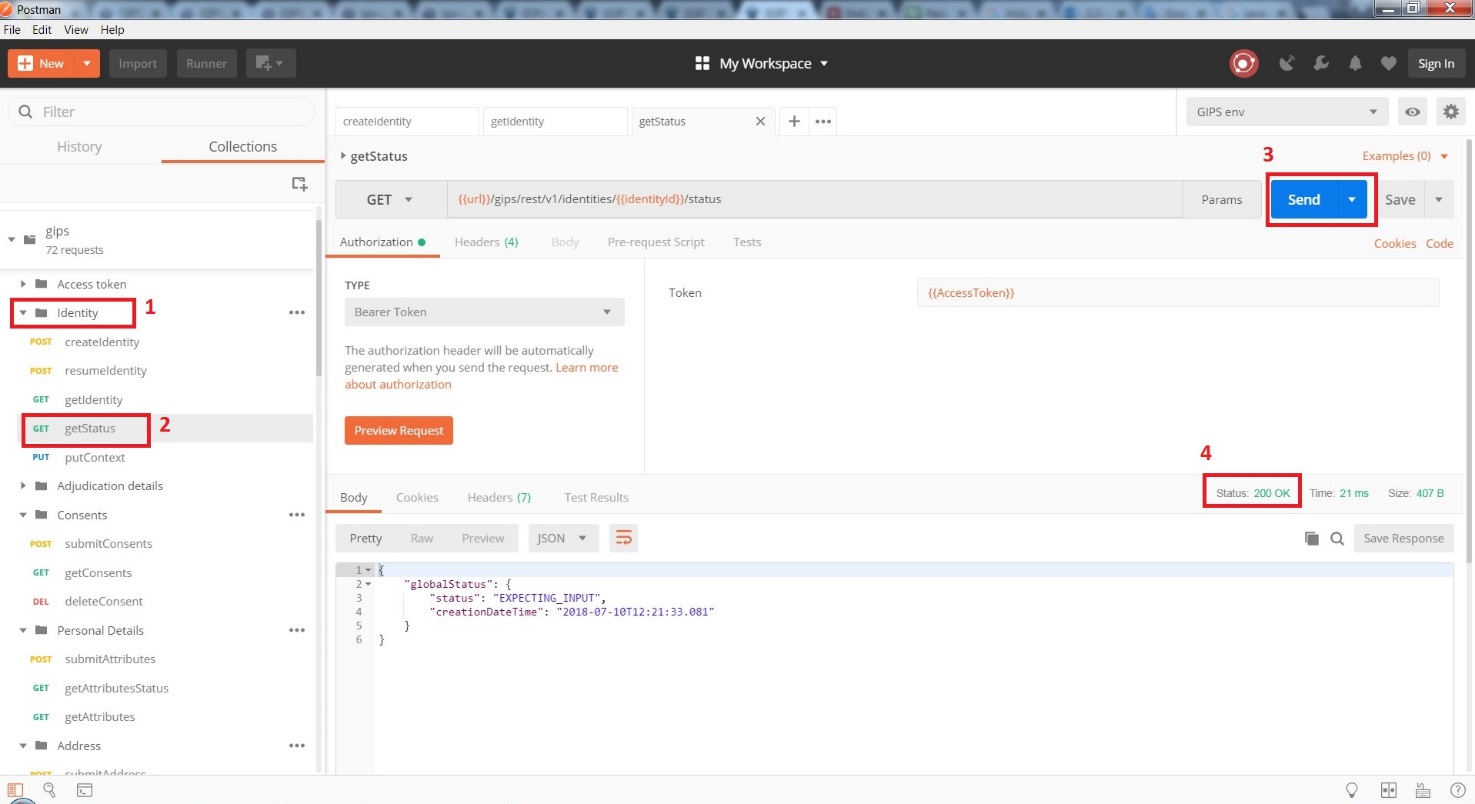
getStatus
Objective: This retrieves the status associated with the requested identity and discards data on the server.
Environment:
If you use an IDEMIA private cloud:
url,apikeyandidentityIdare used from the Postman environment.
Usage:
-
Open the folder called
Identityand click on getStatus. -
Click on the Send button.
Response:
-
Status shall be 200 OK.
-
The response contains a JSON with a light view of the identity global status (status and creation date) and for each document, the type previously submitted, the ID, and status.
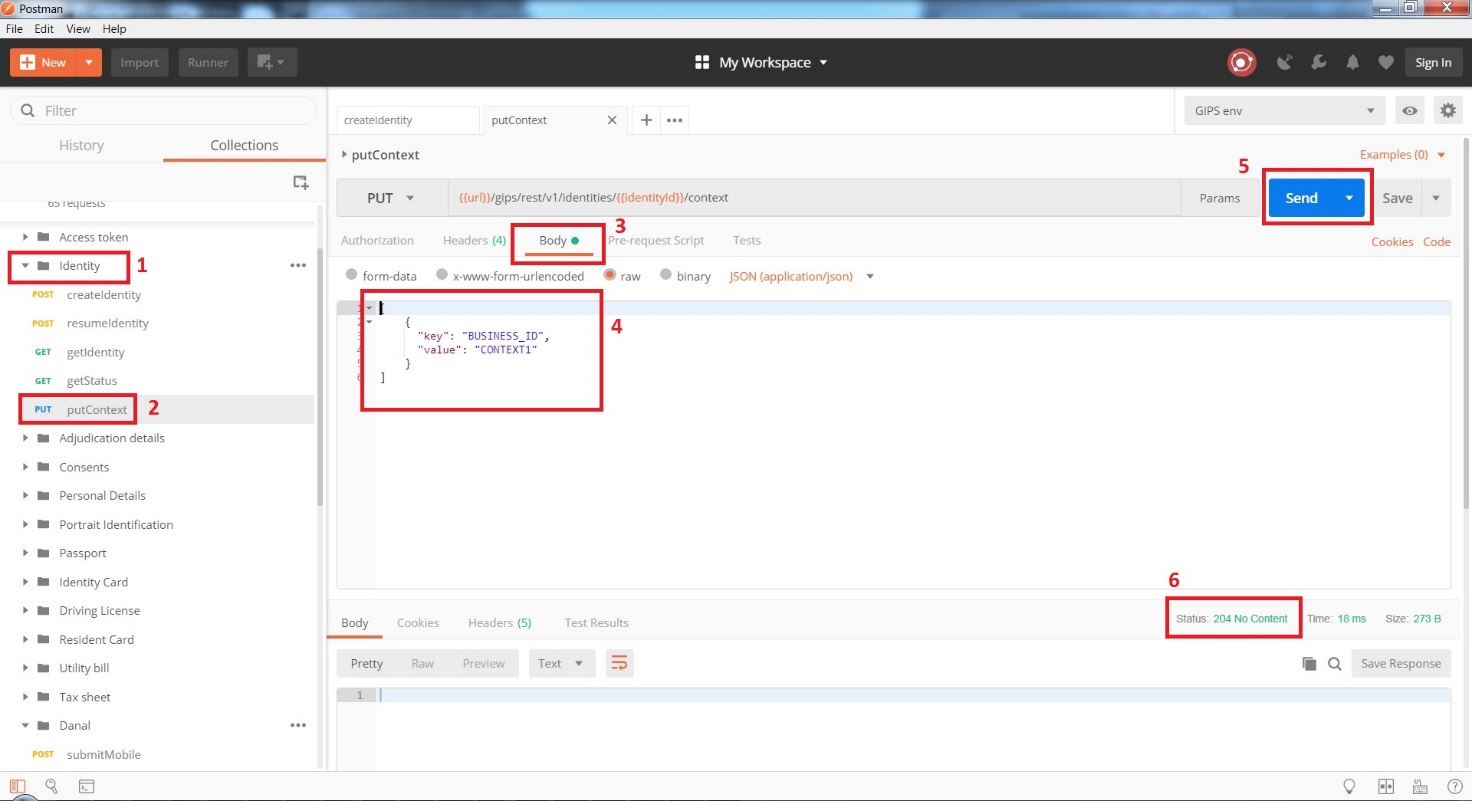
putContext
Objective: This sets a new context (previous context was provided during identity
creation or another putContext will be lost).
Environment:
If you use an IDEMIA private cloud:
url,apikeyandidentityIdare used from the Postman environment.
Usage:
-
Open the folder
Identity. -
Click on putContext.
-
Click on Body.
-
Modify the content if needed.
Example:
Example of context where the key BUSINESS_ID will be set to value CONTEXT1 :
[ { "key": “BUSINESS_ID”, "value": "CONTEXT1" } ]
- Click on the Send button.
Response:
Status shall be: 204 No Content in order to confirm the context has been replaced.
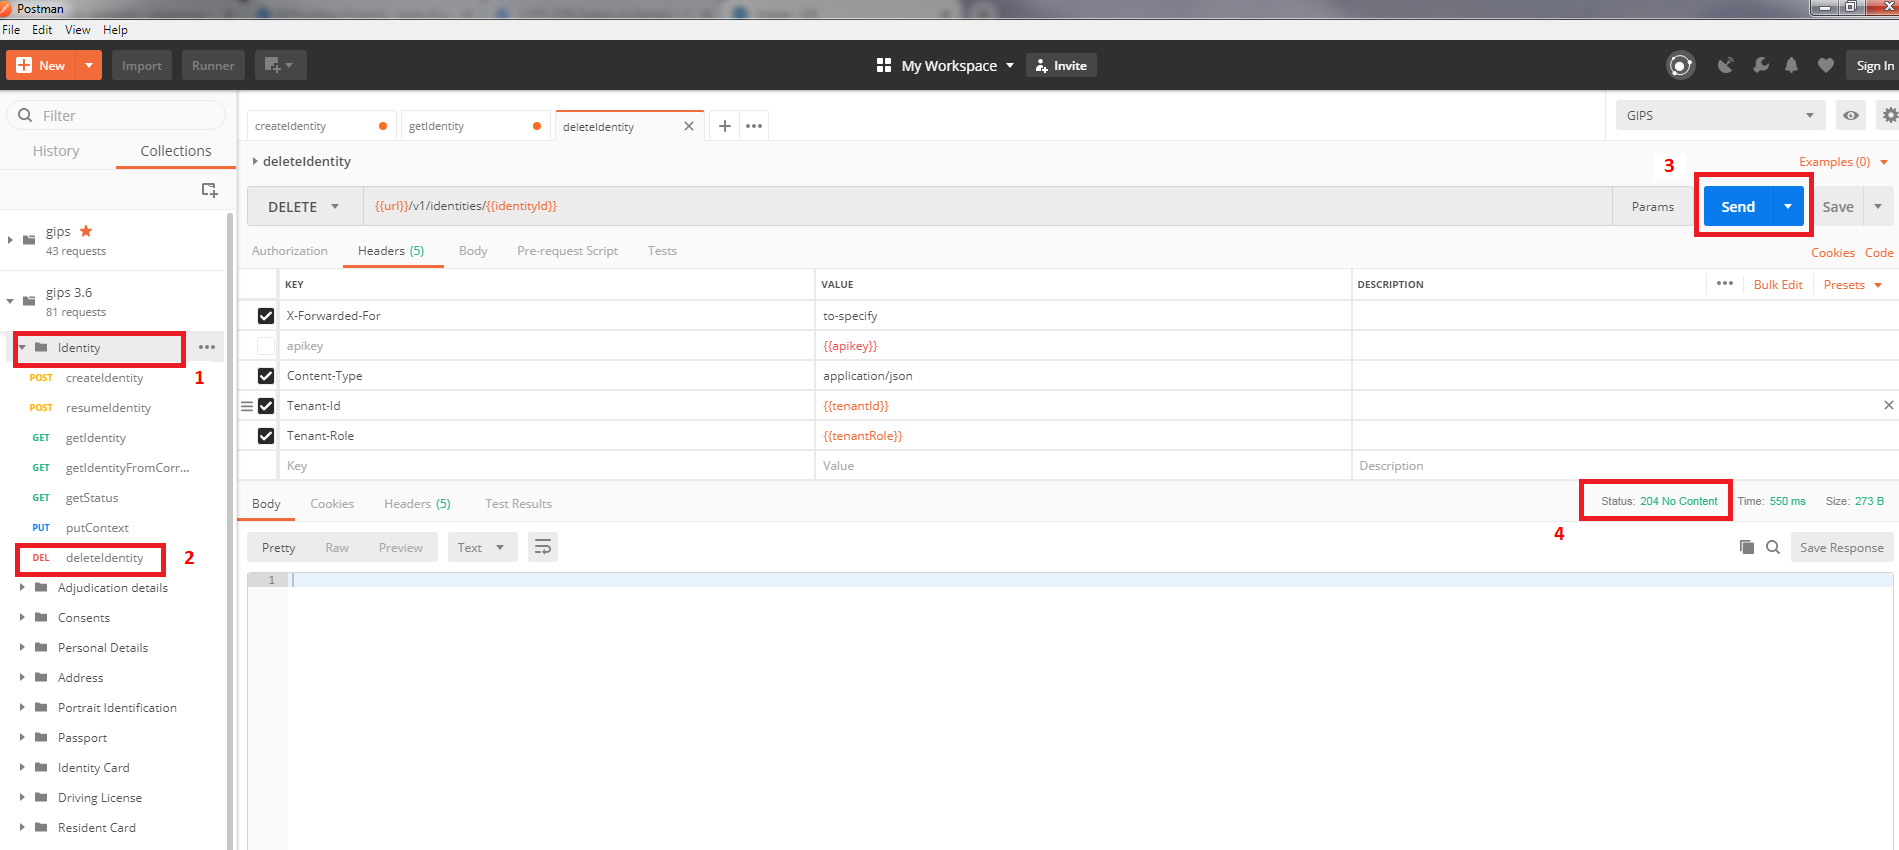
deleteIdentity
Objective: This deletes an identity based on its unique identifier.
Environment:
If you use an IDEMIA private cloud:
url,apikeyandidentityIdare used from the Postman environment.
Usage:
-
Open the folder
Identity. -
Click on deleteIdentity.
-
Click on Send.
Response:
- Status shall be 204 No Content meaning the identity has been deleted.
Consents
The objective of this test is to
- send notification that the end user consents to their identity evidence being processed by IPV
- retrieve list of previous submitted consents
- delete a previously submitted consent
submitConsents
Objective: This submits a list of consents. The consent allows you to define whether a consent is needed before a submit in order to perform verification. For example, if the consent is activated in configuration as mandatory for the portrait, then GIPS will request first an approval consent for the portrait, then GIPS will submit the portrait itself. If the portrait is sent before the approval consent is obtained, an error 3001 will be given back synchronously.
By default, consent is mandatory for only PORTRAIT evidence. For example, consent on portraits shall be sent before the portrait itself, otherwise GIPS will not process it for identity evaluation.
Environment:
If you use an IDEMIA private cloud:
url,apikeyandidentityIdare used from the Postman environment.
Usage:
-
Open the folder
Consents. -
Click on submitConsents.
-
Click on Body.
-
Modify the content if needed.
-
Click on Send.
Response:
-
Status shall be 200 OK to confirm the consent has been associated with the identity.
-
The response body contains a JSON with consent details like a consent ID per submitted consent.

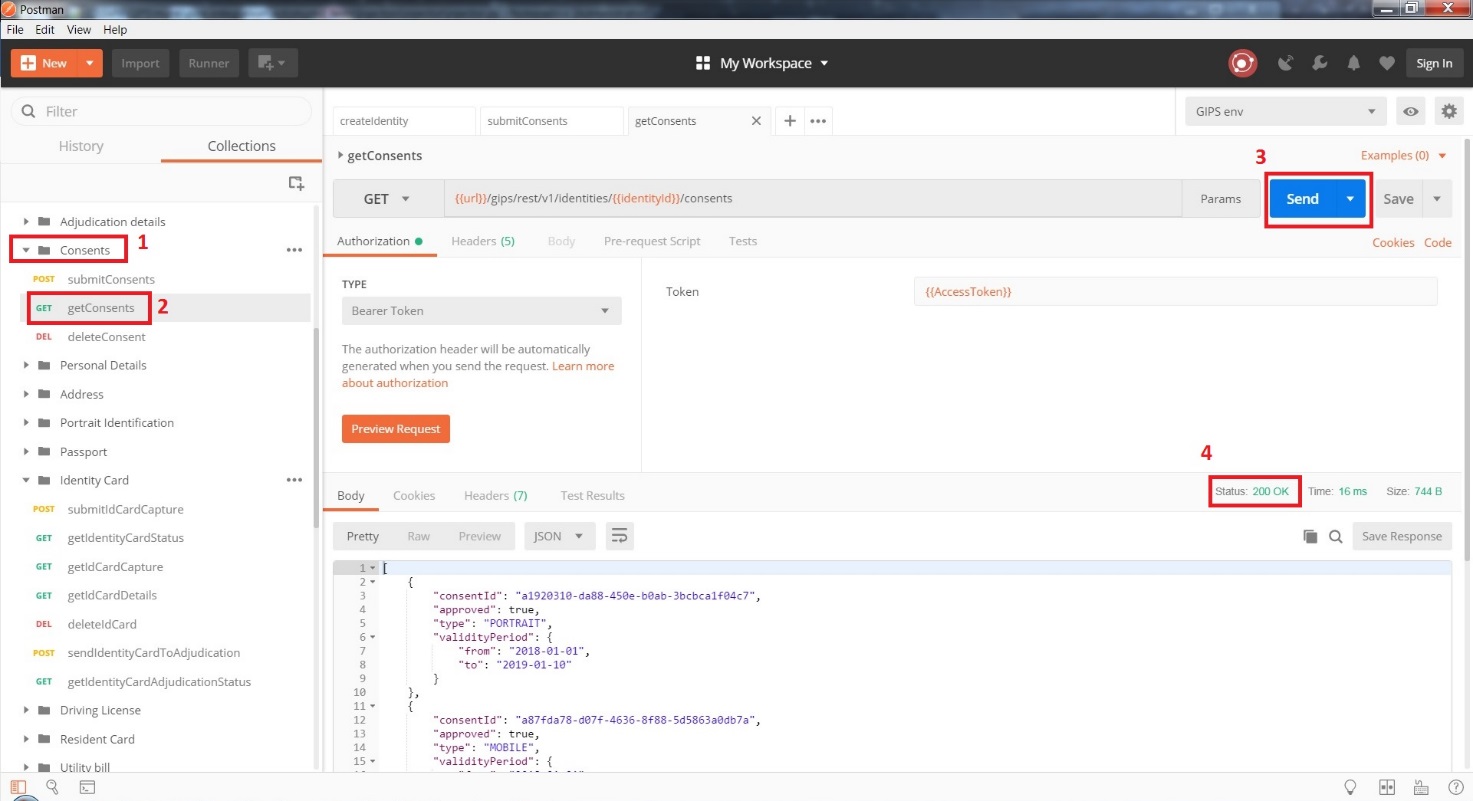
getConsents
Objective: Retrieve list of previous submitted consents.
Environment:
If you use an IDEMIA private cloud:
url,apikeyandidentityIdare used from the Postman environment.
Usage:
-
Open the folder “Consents” (1)
-
Click on: “getConsents” (2)
- Click on Send.
Response:
-
Status shall be 200 OK.
-
The response body contains a JSON with consent details like a consent ID for each consents that were previously submitted.
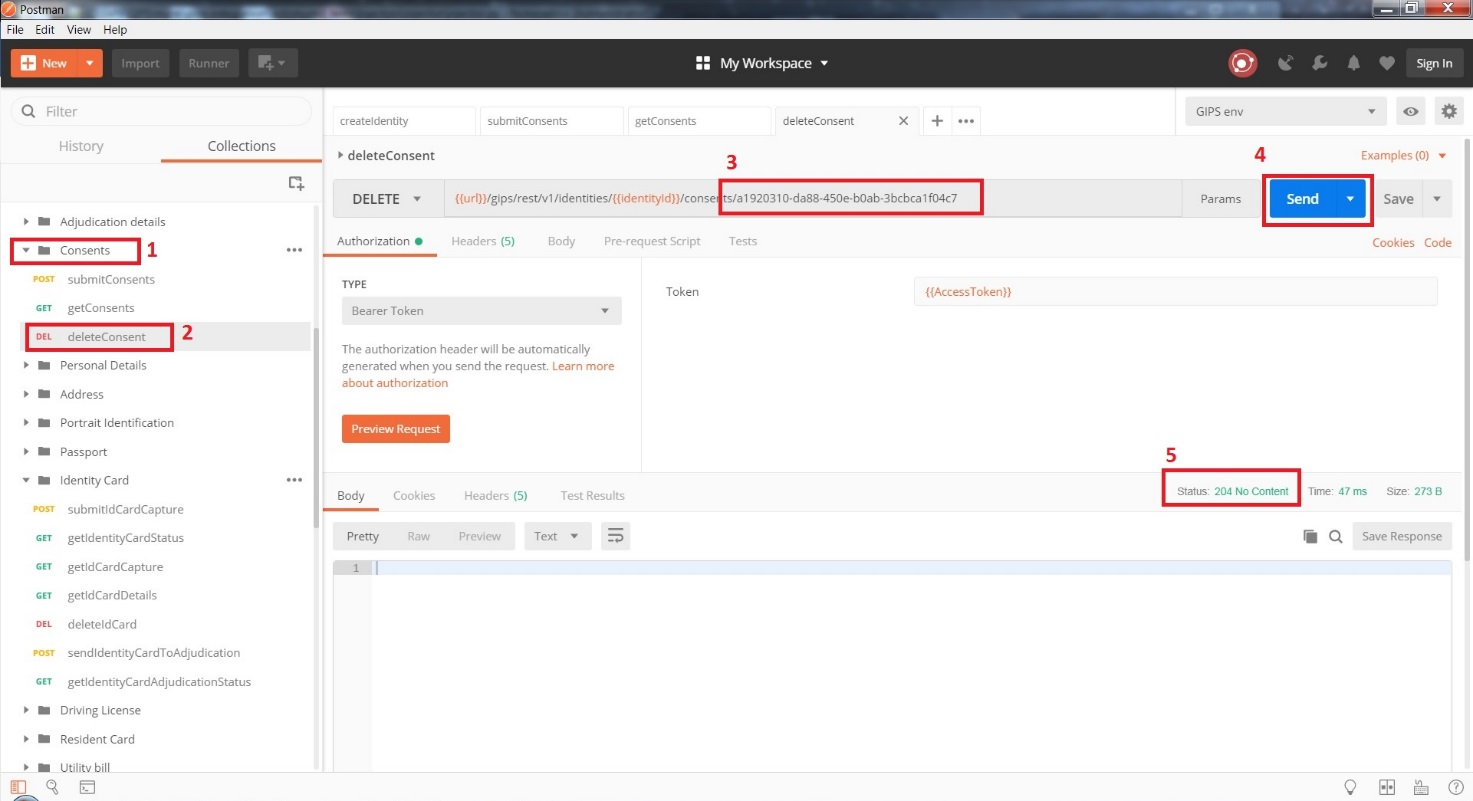
deleteConsent
Objective: This deletes a previously submitted consent based on its identifier.
Environment:
If you use an IDEMIA private cloud:
url,apikeyandidentityIdare used from the Postman environment.
Usage:
-
Open the folder
Consents. -
Click on deleteConsent.
-
In the URL set the identifier of the consent you want to delete.
-
Click on Send.
Response:
- Status shall be 204 No Content meaning the consent has been deleted.
Personal Details
The objective of this test is to
- submit identity attributes to be processed for an identity (surname, given names, date of birth, etc.).
- retrieve the evidence attributes details and status
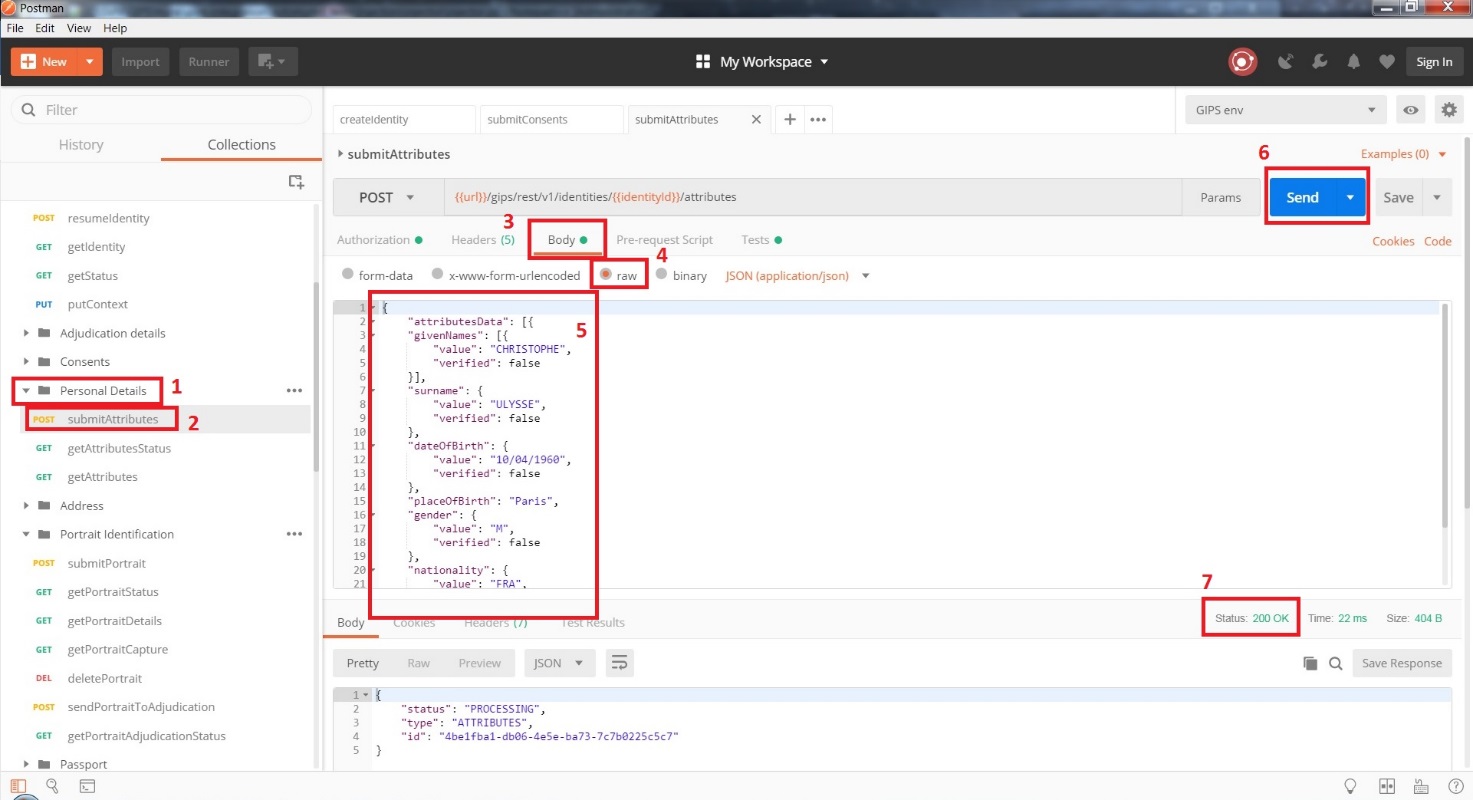
submitAttributes
Objective: This submits attributes for an identity (surname, given names, date of birth, etc.).
Environment:
If you use an IDEMIA private cloud:
url,apikeyandidentityIdare used from the Postman environment.
Usage:
-
Open the folder called
Personal Details. -
Click on submitAttributes.
-
Click on Body.
-
Make sure you are in raw mode.
-
Update the data if needed.
-
Example:
JSON1{ "attributesData":[{ "givenNames": [{ "value": "CHRISTOPHE", "verified": false }], "surname": { "value": "ULYSSE", "verified": false }, "dateOfBirth": { "value": "1960-04-10", "verified": false }, "placeOfBirth": "Paris", "gender": { "value": "M", "verified": false }, "nationality": { "value": "FRA", "verified": false } }], "score": 0 }
- Click on Send.
Note: With a RELYING_SERVICE apikey, a score up to 5 can be provided if the
attributes are already on your side. In this case, “verified” shall be set
to true for the attributes you already know (at least given names, surname, and
date of birth otherwise the score will be ignored). If the score is 5 and the given names,
surname, and date of birth are at least verified, then then end-user will have to
provide only an evidence where the name matches the evidence ATTRIBUTES. However, if the
score is 1 and the given names, surname, and date of birth at least are verified
then, if the end-user provides an evidence with an higher score (for example a
passport verified at level 2) then this evidence will become the reference and,
if the attributes does not match, the attributes will be rejected (INVALID).
Response:
-
Status shall be 200 OK to confirm the evidence has been associated with an identity.
-
The response body contains a JSON with the identity status and the attributes’ evidence details containing things like the status, the score, and the evidence unique identifier.
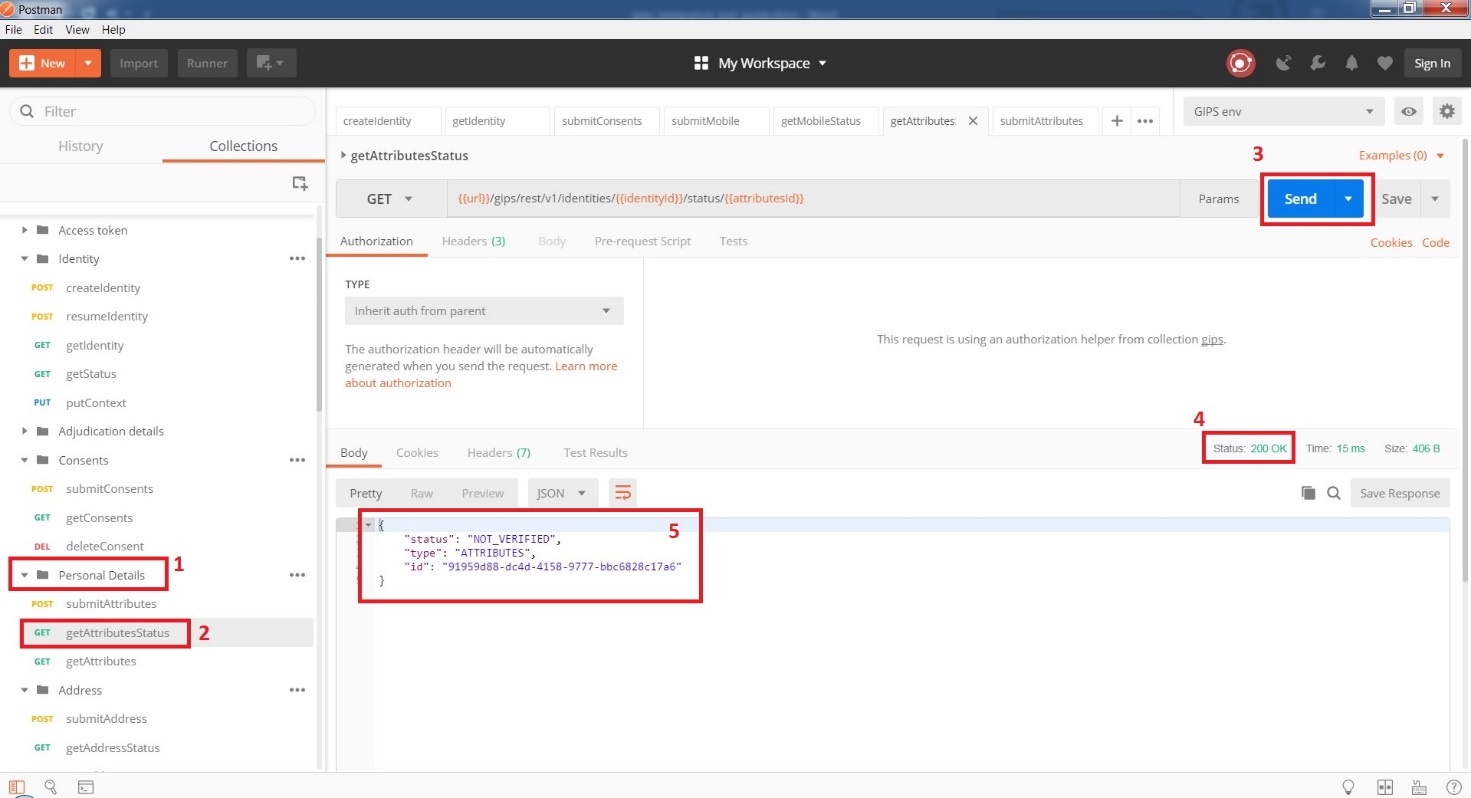
getAttributesStatus
Objective: This retrieves the evidence ATTRIBUTES based on the identity unique identifier.
Environment:
If you use an IDEMIA private cloud:
url,apikeyandidentityIdare used from the Postman environment.
Usage:
-
Open the folder
Personal Details. -
Click on getAttributesStatus.
-
Click on Send.
Response:
-
Status shall be 200 OK.
-
The response body contains the global status of the requested evidences
ATTRIBUTES.
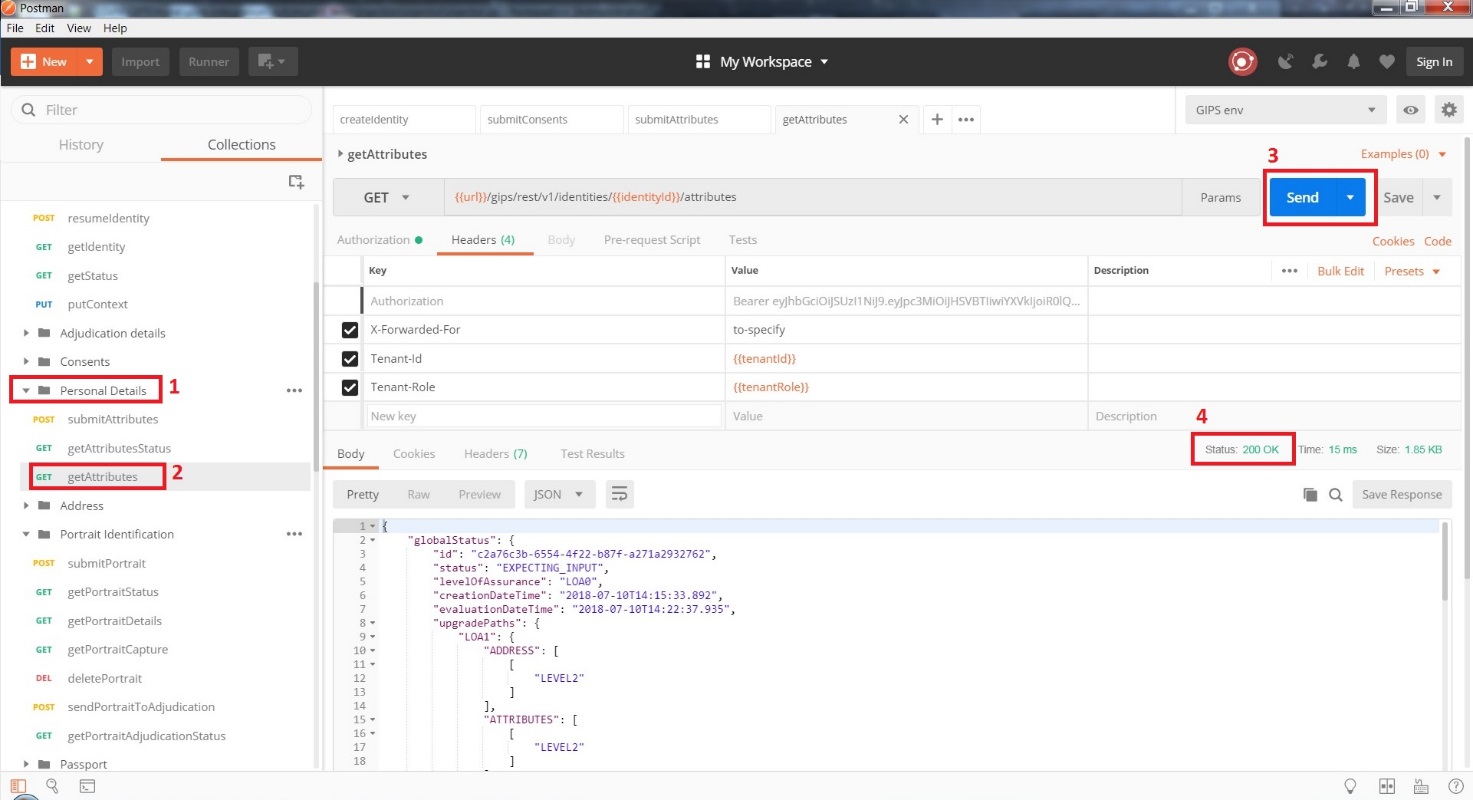
getAttributes
Objective: This retrieves the evidence ATTRIBUTES based on the identity unique identifier.
Environment:
If you use an IDEMIA private cloud:
url,apikeyandidentityIdare used from the Postman environment.
Usage:
-
Open the folder
Personal Details. -
Click on getAttributes.
-
Click on Send.
Response:
-
Status shall be 200 OK.
-
The response body contains details of the global status and evidence
ATTRIBUTESdetails.
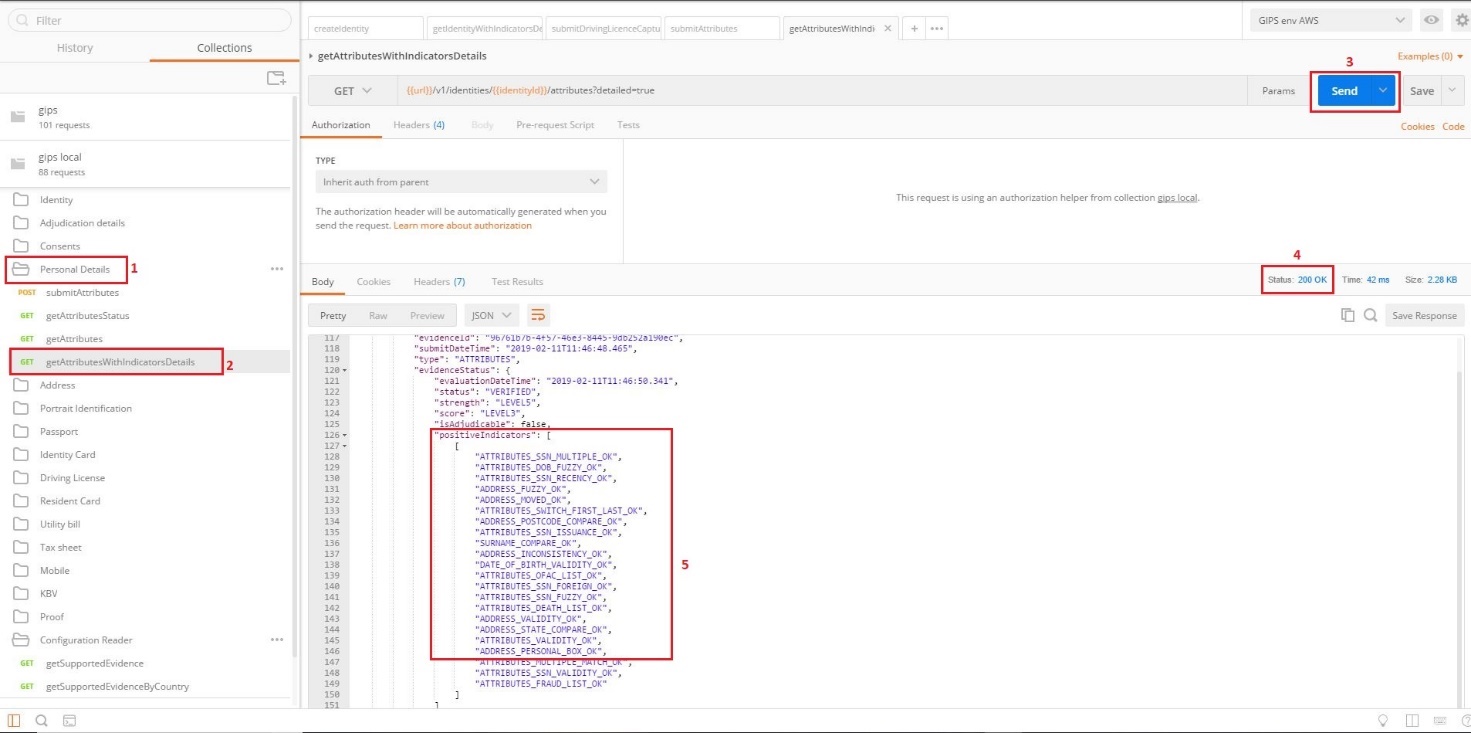
Get Attributes with Indicators Details
Objective: This retrieves the evidence ATTRIBUTES and all the indicator details based on the identity unique identifier.
Environment:
If you use an IDEMIA private cloud:
url,apikeyandidentityIdare used from the Postman environment.
Usage:
-
Open the folder
Personal Details. -
Click on getAttributesWithIndicatorsDetails.
-
Click on Send.
Response:
-
Status shall be 200 OK.
-
The response body contains details the global status and the evidence
ATTRIBUTESdetails. -
Indicators details.
Address
The objective of this test is to
- send the address for verification of the identity attributes
- retrieve the address details and status
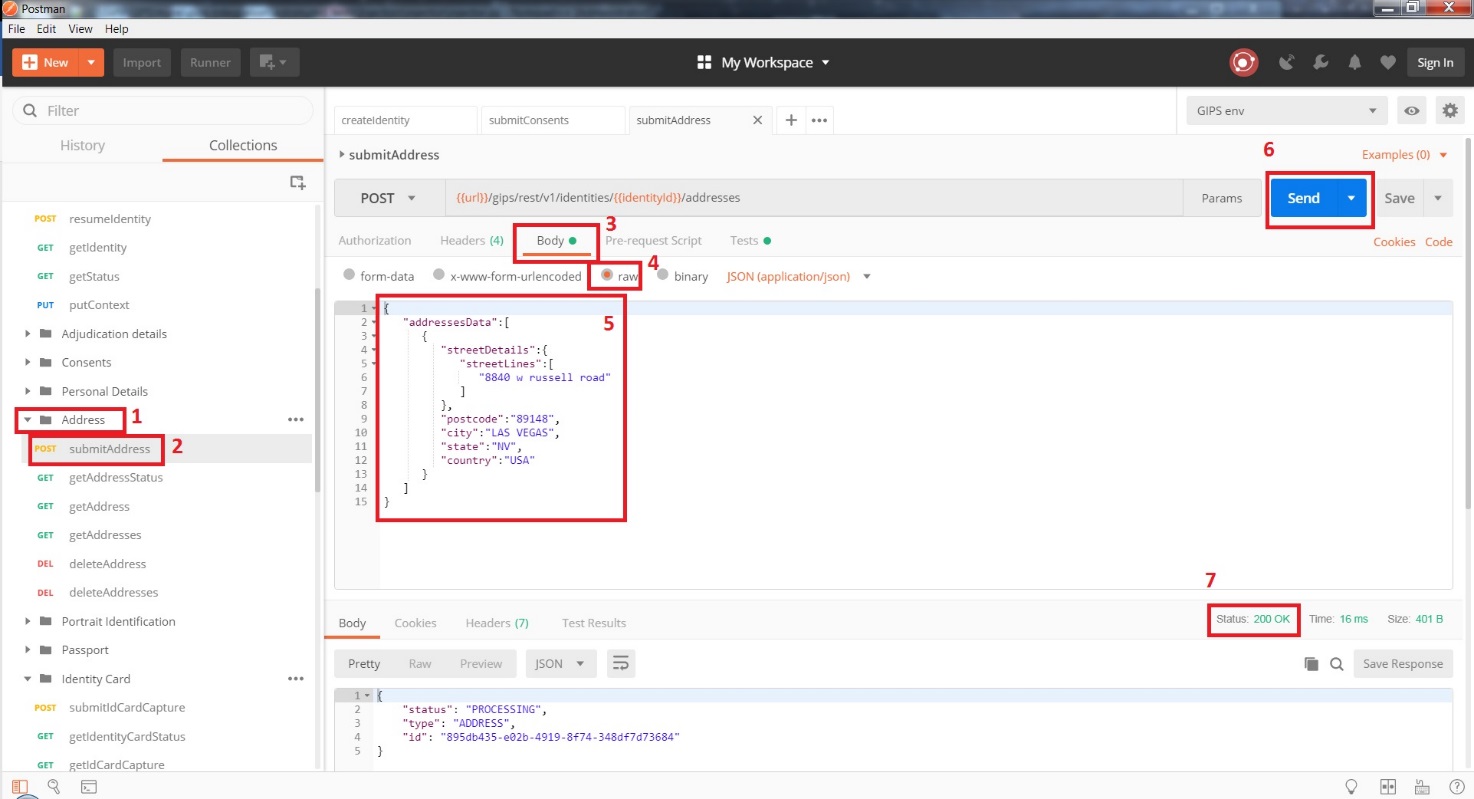
submitAddress
Objective: This sends the address for verification of the identity attributes.
Environment:
If you use an IDEMIA private cloud:
url,apikeyandidentityIdare used from the Postman environment.
Usage:
-
Open the folder
Address. -
Click on submitAddress.
-
Click on Body” and replace the parameter.
-
Make sure you are in raw mode.
-
Update the data if needed.
-
Example:
JSON1{ "addressesData":[ { "streetDetails":{ "streetLines":[ "8840 w russell road" ] }, "postcode":"89148", "city":"LAS VEGAS", "state":"NV", "country":"USA" } ] }
- Click on Send.
Response:
-
Status shall be 200 OK to confirm that the evidence has been associated with an identity.
-
The response body contains the address status.
-
An environment variable
addressIdis set and will be used forGETandDELETEoperations.
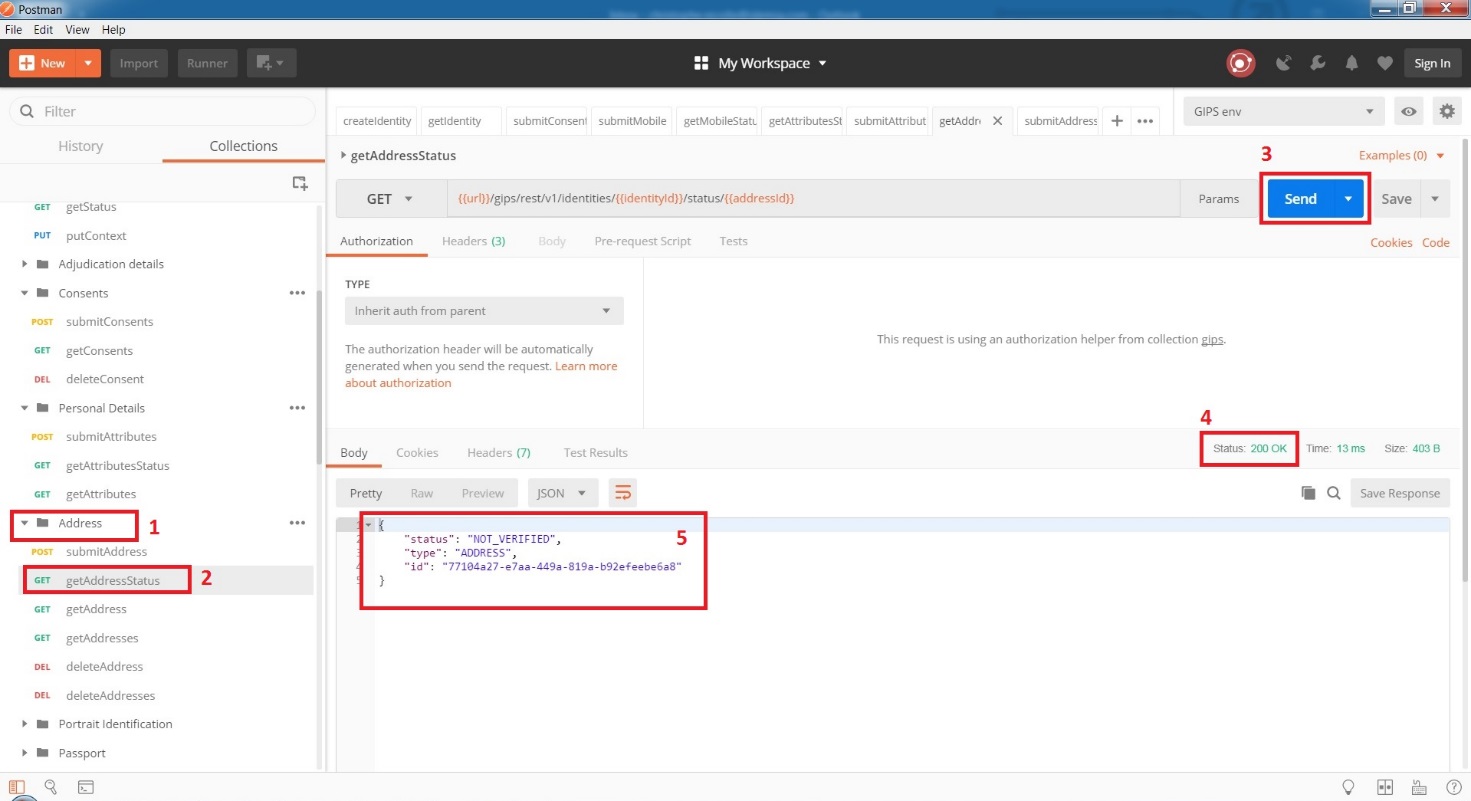
getAddressStatus
Objective: This retrieves the address status based on its unique identifier.
Environment:
If you use an IDEMIA private cloud:
url,apikey, andidentityIdare used from the Postman environment.
Usage:
-
Open the folder
Address. -
Click on getAddressStatus.
-
Click on Send.
Response:
-
Status shall be 200 OK.
-
The response body contains the status of the requested
ADDRESSevidence.
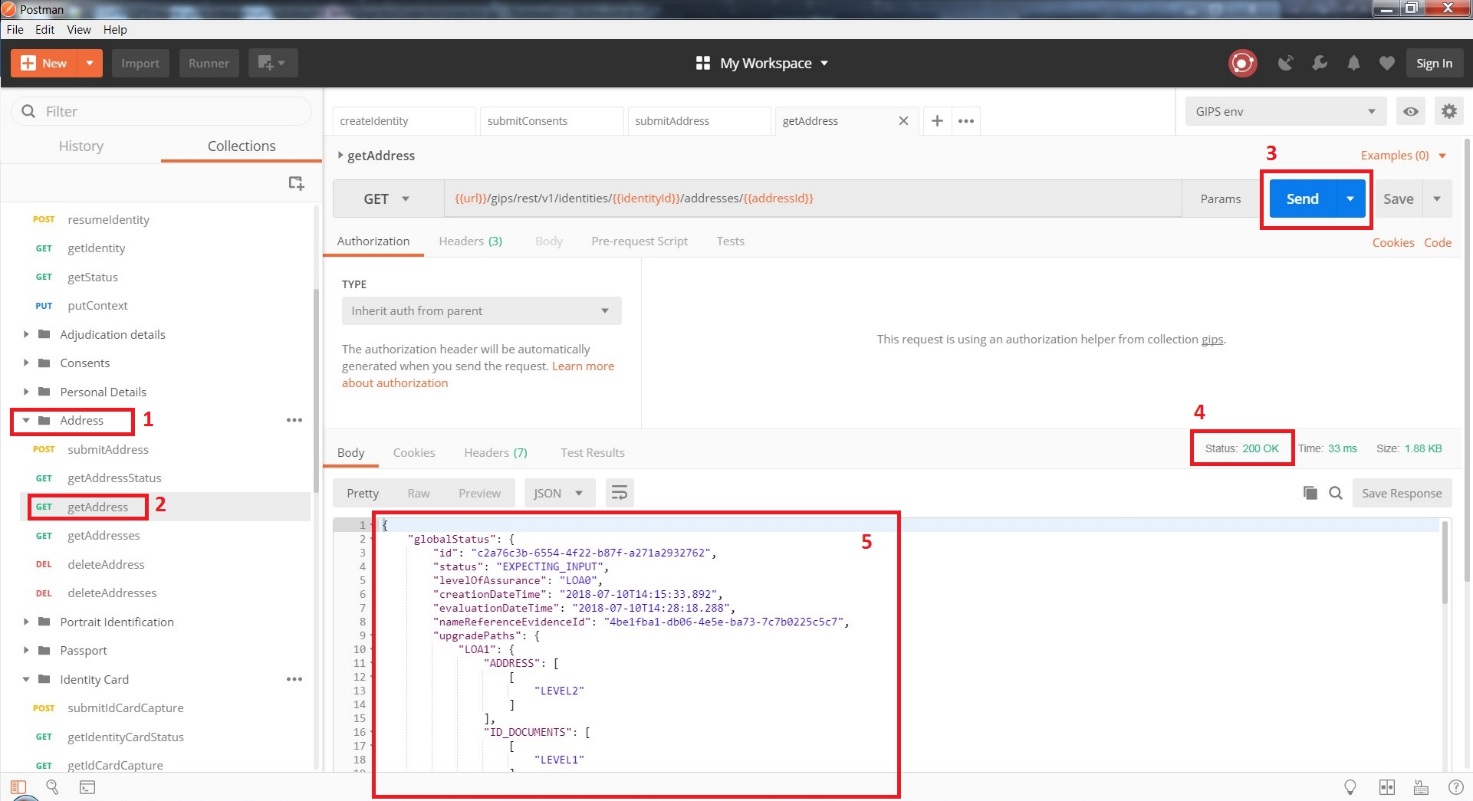
getAddress
Objective: This retrieves the details of a specific address based on its unique identifier.
Environment:
If you use an IDEMIA private cloud:
url,apikey, andidentityIdare used from the Postman environment.
Usage:
-
Open the folder Address.
-
Click on getAddress.
-
Click on Send.
Response:
-
Status shall be 200 OK.
-
The response body contains the global status of identity and details on the
ADDRESSevidence associated with a given identifier like status and score.
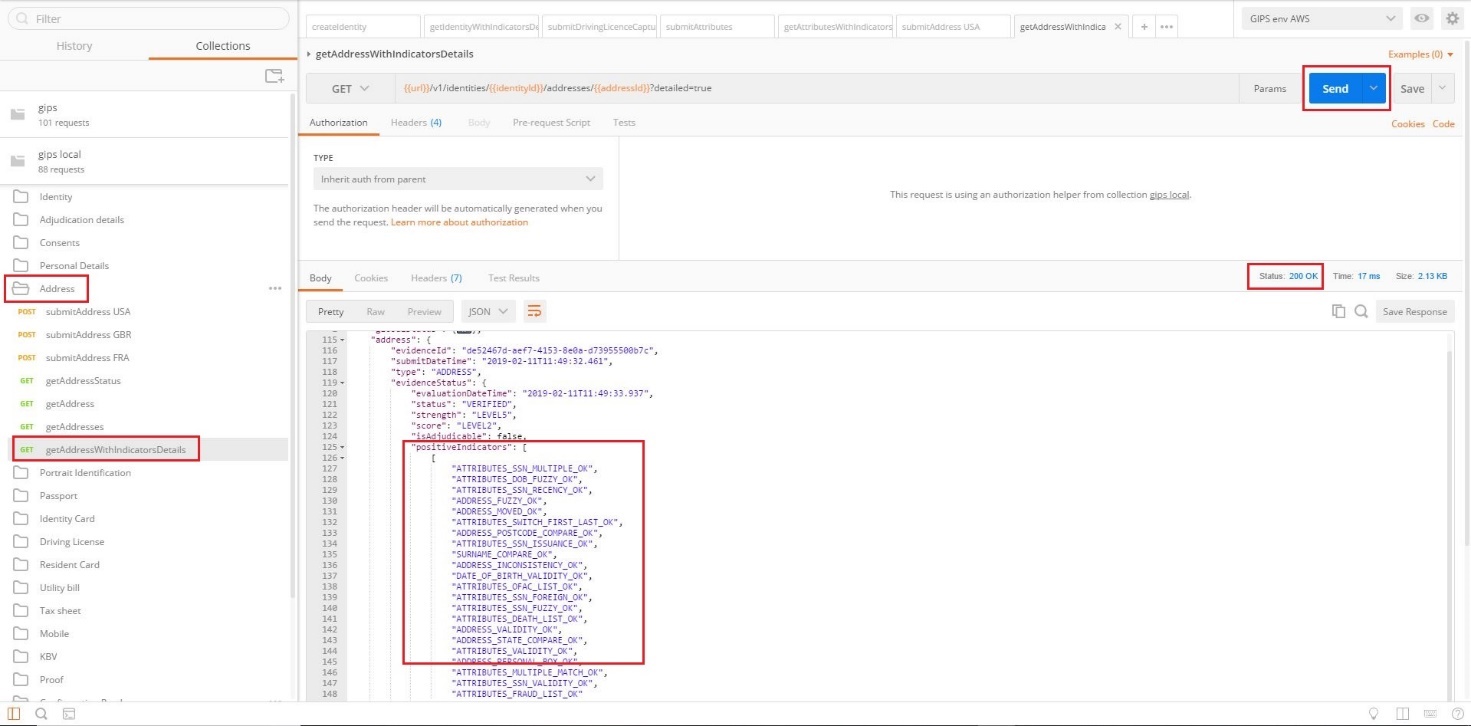
Get Address with Indicators Details
Objective: This retrieves details and all the indicators of a specific address based on its unique identifier.
Environment:
If you use an IDEMIA private cloud:
url,apikey, andidentityIdare used from the Postman environment.
Usage:
-
Open the folder
Address. -
Click on getAddressWithIndicatorsDetails.
-
Click on Send.
Response:
-
Status shall be 200 OK.
-
The response body contains the global status of identity and details on the
ADDRESSevidence associated with a given identifier like status and score. -
Indicators details.
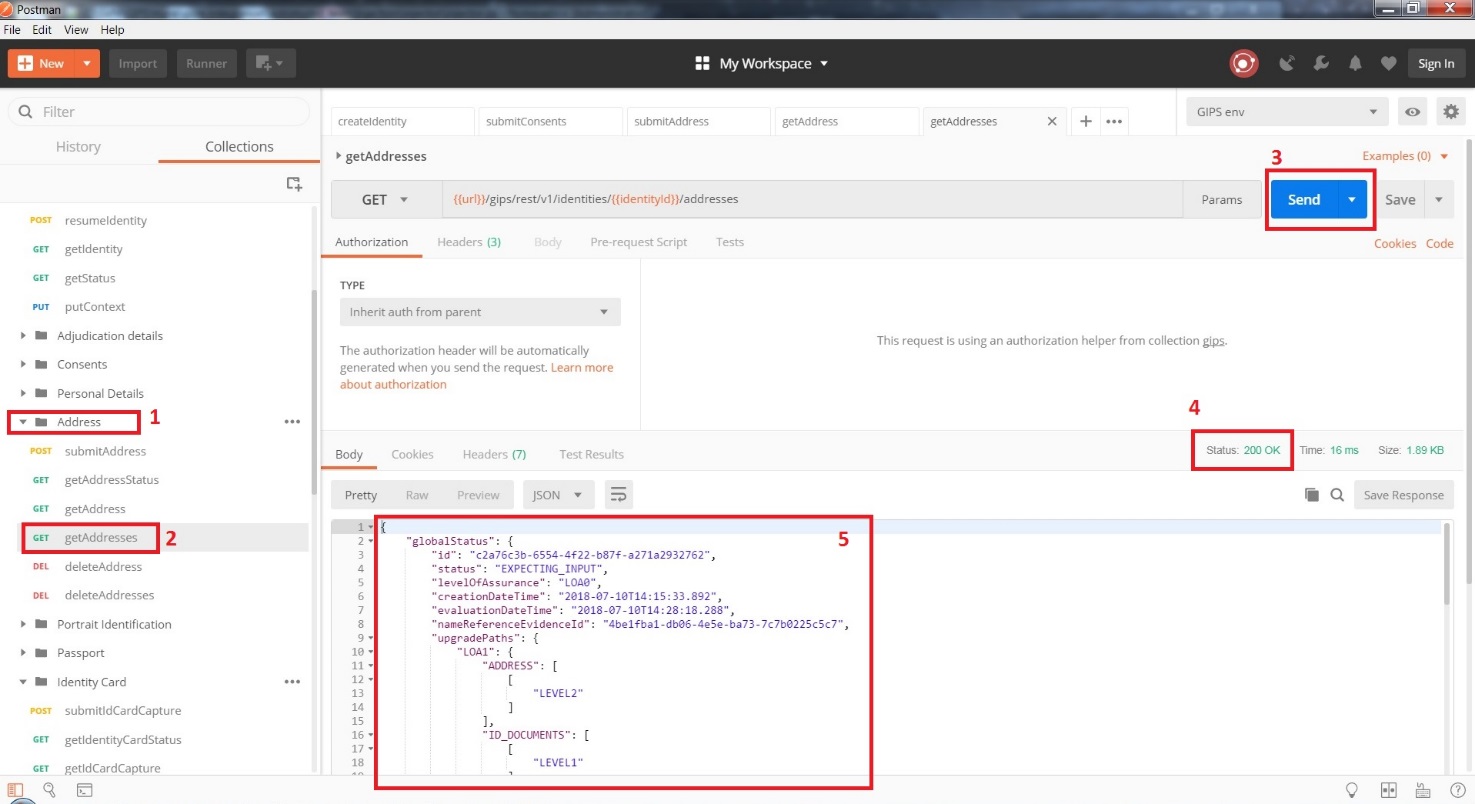
getAddresses
Objective: This retrieves details for all addresses.
Environment:
If you use an IDEMIA private cloud:
url,apikeyandidentityIdare used from the Postman environment.
Usage:
-
Open the folder Address.
-
Click on getAddresses.
-
Click on Send.
Response:
-
Status shall be 200 OK.
-
The response body contains the global status of identity and the details on all address evidence like status and score.
Portrait Identification
The objective of this test is to
- submit the portrait of the person for verification against a document photography
- retrieve the portrait identification details and status
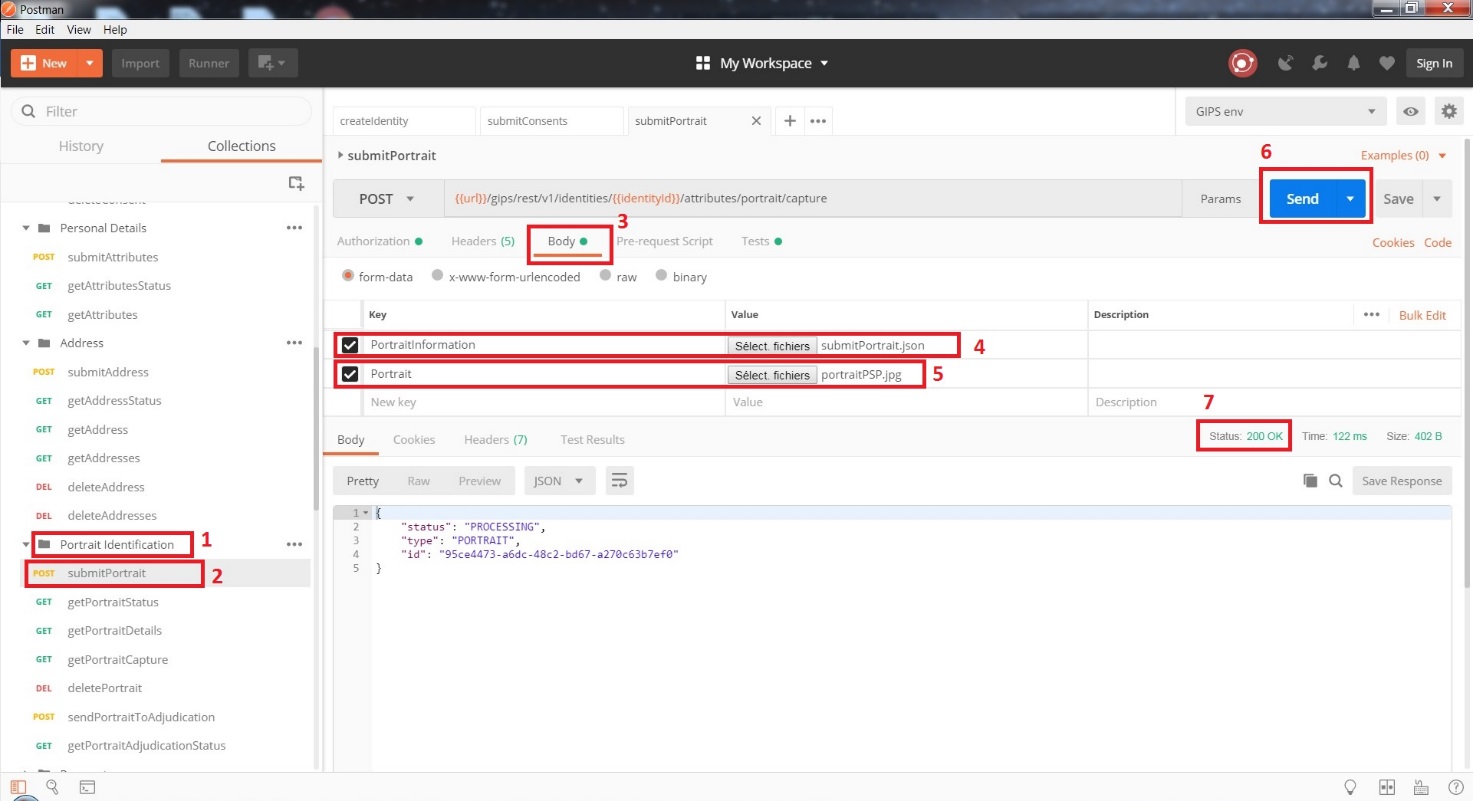
submitPortrait
Objective: This submits the portrait of the person for verification (matching against an identity document’s photography if any already provided and verified). The identity document can be sent before or after the portrait. Reminder: consent is required by default for a portrait.
Environment:
If you use an IDEMIA private cloud:
url,apikeyandidentityIdare used from the Postman environment.
Usage:
-
Open the folder
Portrait Identification. -
Click on submitPortrait.
-
Click on Body and replace the parameters:
-
Portrait: the portrait capture image, a selfie for example. -
PortraitInformation: known details on the portrait capture like the source used to take the picture and the metadata. See provided example in Postman delivery:submitPortrait.json.
-
Example:
JSON1source: from enumeration "LIVE_CAPTURE_IMAGE", “LIVE_CAPTURE_VIDEO”, “SCAN”, “DOCUMENT_CROP”, “OTHER” | { "source": "LIVE_CAPTURE_IMAGE", "metadata": [{ "key": "KEY1", "value": "value1" },{ "key": "KEY2", "value": "value2" }] }
metadata: a list of metadata
- Click on Send.
Response:
-
Status shall be 200 OK to confirm the evidence has been associated with the identity.
-
The response body contains the identity global status and evidence
PORTRAITdetails like the evidence unique identifier, the status, and score. -
On response, the environment variable
portraitIdis set on Postman with the portrait evidence identifier.
getPortraitStatus
Objective: This retrieves the status of the portrait evidence. This allows the ability to
perform polling on the evidence status. As soon as a status is finished PROCESSING, you
can perform (see next chapter) a getPortraitDetails to get the status and score
for example.
Environment:
If you use an IDEMIA private cloud:
-
url,apikeyandidentityIdare used from the Postman environment. -
The evidence unique ID is also used:
portraitId
Usage:
-
Open the folder
Portrait Identification. -
Click on getPortraitStatus.
-
Click on Send.
Response:
-
Status shall be 200 OK.
-
The response contains the status of the portrait. As soon as status is finished
PROCESSING, you can get the portrait details.

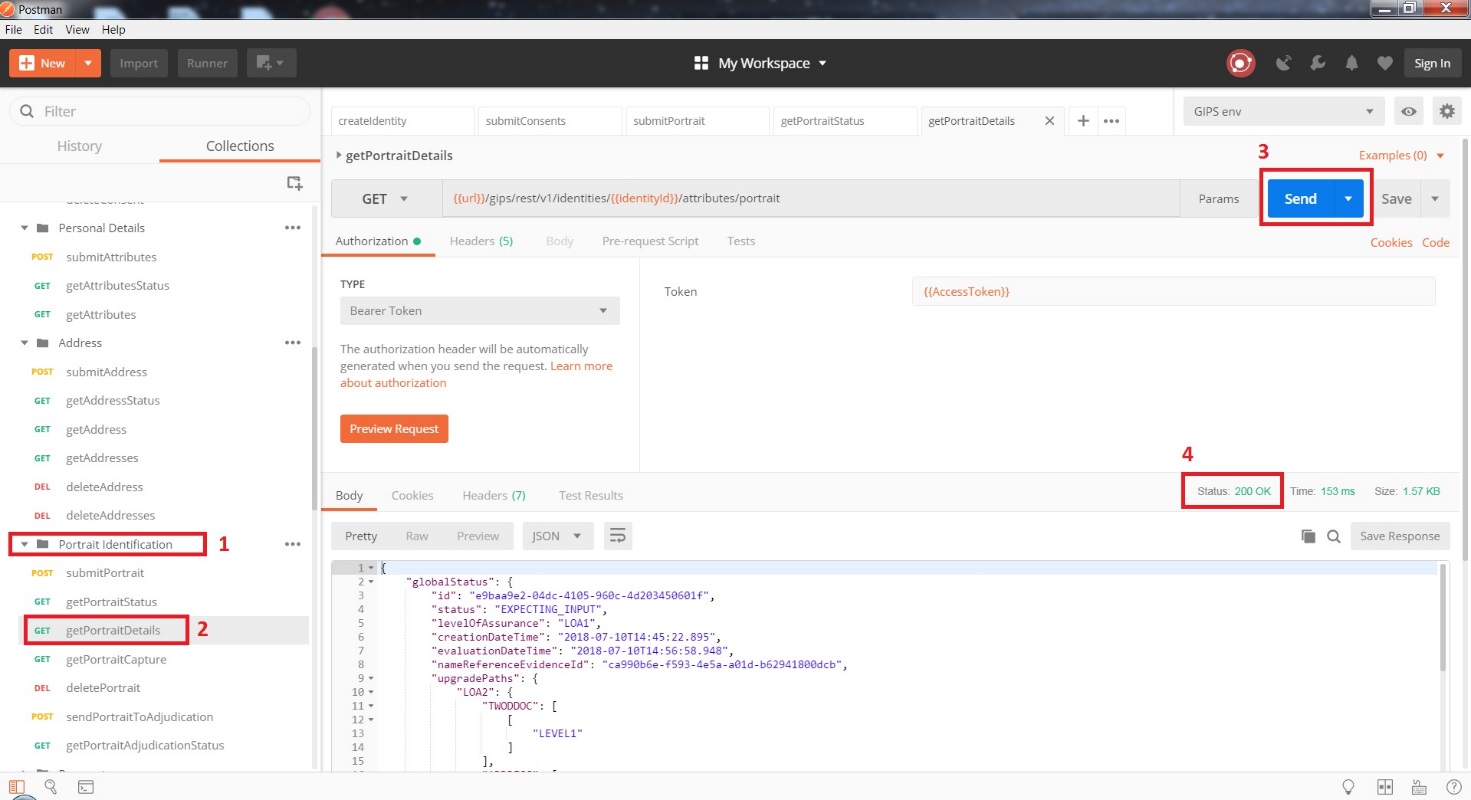
getPortraitDetails
Objective: This retrieves the portrait details based on its unique identifier.
Environment:
If you use an IDEMIA private cloud:
-
url,apikeyandidentityIdare used from the Postman environment. -
The evidence unique ID is also used:
portraitId.
Usage:
-
Open the folder
Portrait Identification. -
Click on getPortraitDetails.
-
Click on Send.
Response:
-
Status shall be 200 OK.
-
The response body contains the global status of identity and details on the portrait evidence like status and score.
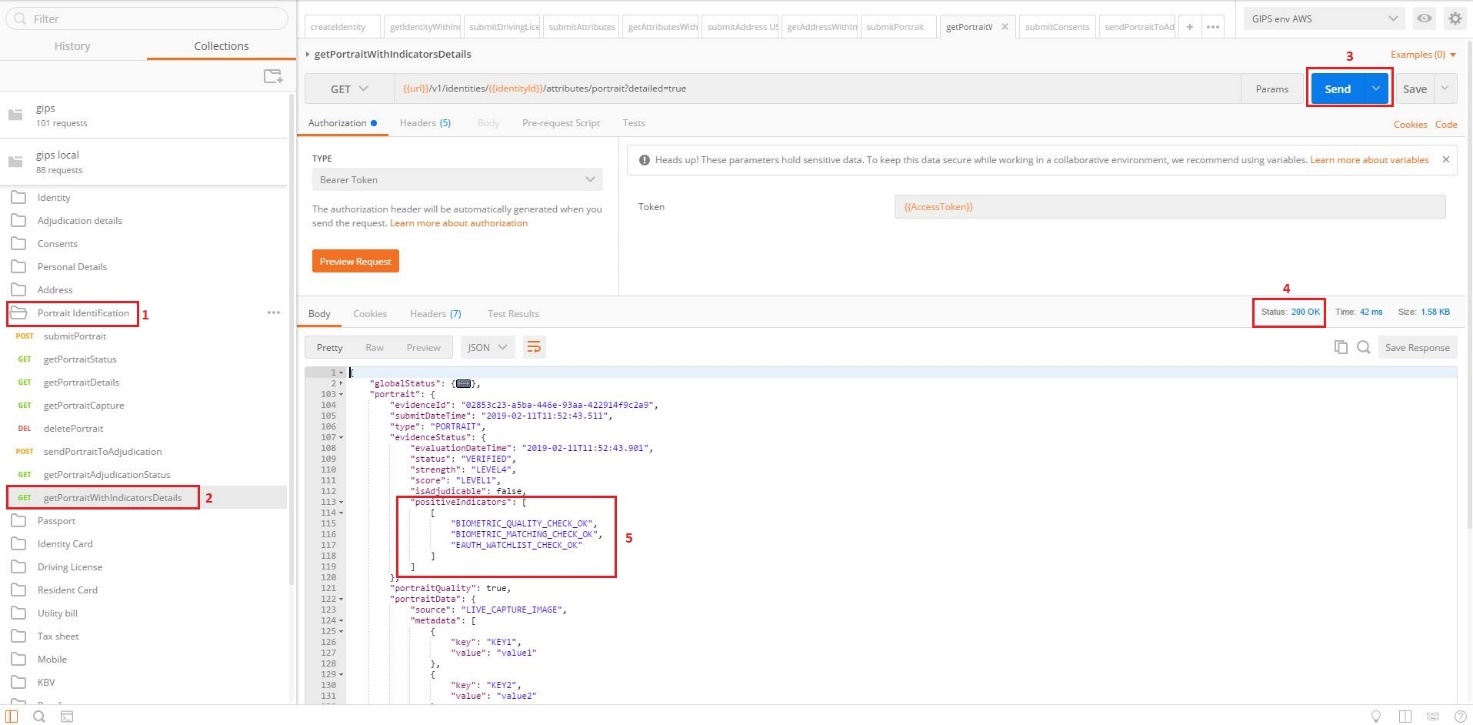
Get Portrait with Indicators Details
Objective: This retrieves the portrait details and all the indicators based on its unique identifier.
Environment:
If you use an IDEMIA private cloud:
-
url,apikeyandidentityIdare used from the Postman environment. -
The evidence unique ID is also used:
portraitId.
Usage:
-
Open the folder
Portrait Identification. -
Click on getPortraitWithIndicatorsDetails.
-
Click on Send.
Response:
-
Status shall be 200 OK.
-
The response body contains a global status of identity and details on the portrait evidence like status and score.
-
Indicators details.
getPortraitCapture
Objective: This retrieves the portrait image sent previously.
Environment:
If you use an IDEMIA private cloud:
url,apikeyandidentityIdare used from the Postman environment.
Usage:
-
Open the folder
Portrait Identification. -
Click on getPortrait.
-
Click on the arrow to the right of the Send button.
-
Choose Send and Download. When the popup is displayed, chose a directory and a name to save returned part on file system.
Response:
- Status shall be 200 OK.
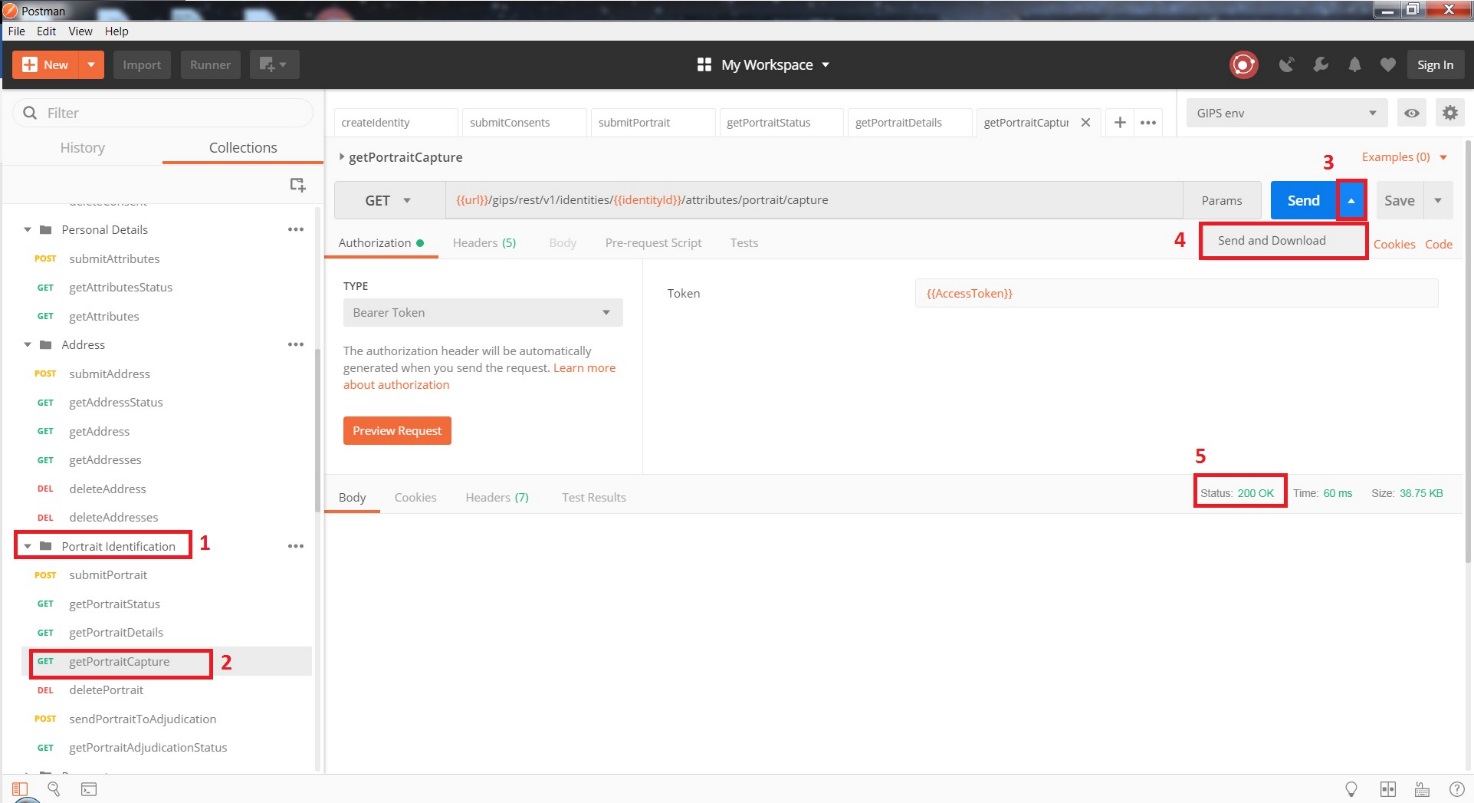
-
The saved content is a multipart response: the file shall be edited to remove the multipart header and footer.
-
Edit the saved file with file editor (notepad++ for example).
-
At beginning of the file, delete the multipart header:
-
Language not specified1*--1b817195-cbe4-485f-90fd-4ed6f27f54a8*2*Content-Disposition: form-data; name="Portrait"*3*Content-Type: application/octet-stream*4At the end of the file, delete multipart footer:5*--1b817195-cbe4-485f-90fd-4ed6f27f54a8--*
- Save modifications brought and open file with a photo editor.
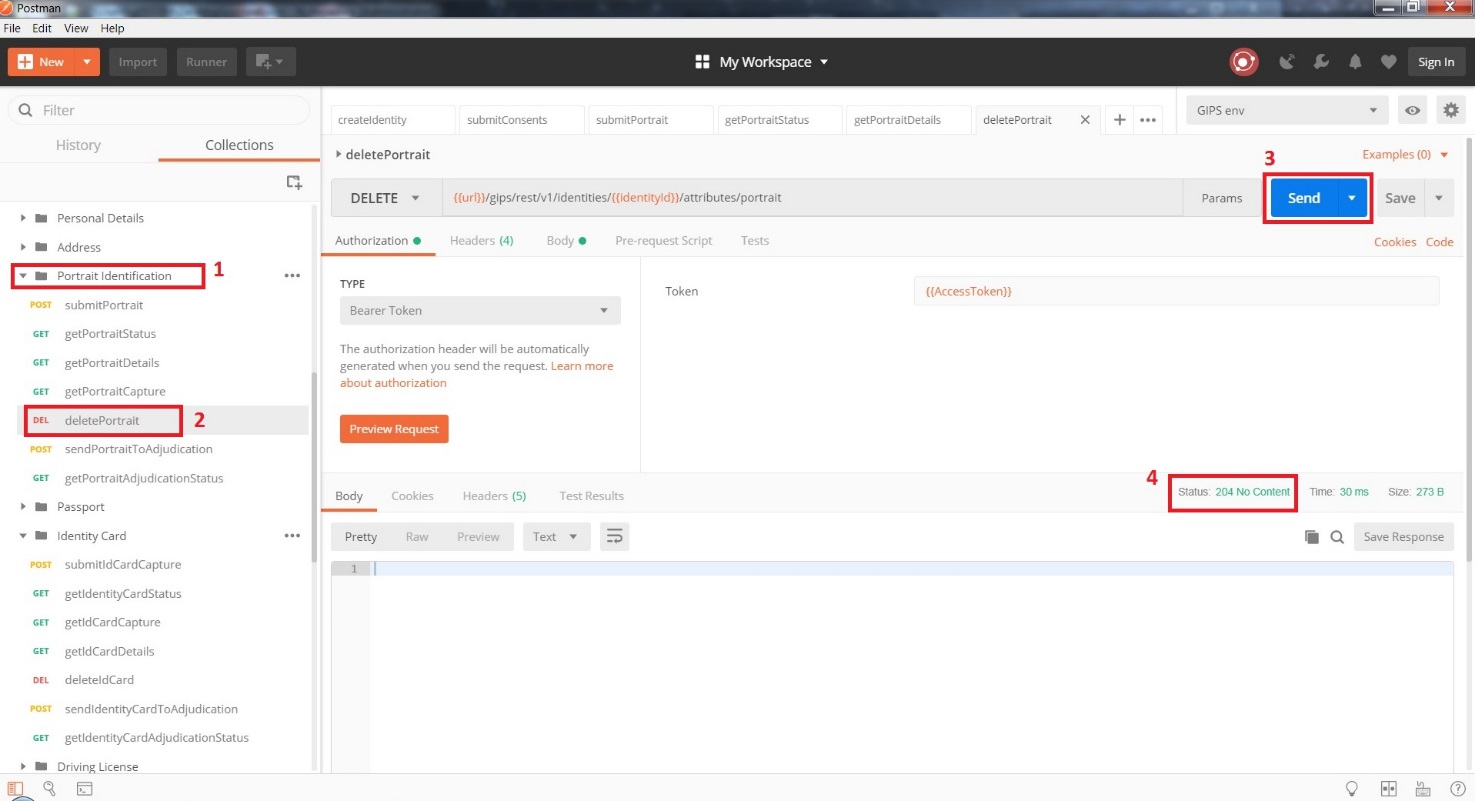
deletePortrait
Objective: This deletes a portrait sent previously.
Environment:
If you use an IDEMIA private cloud:
url,apikeyandidentityIdare used from the Postman environment.
Usage:
-
Open the folder
Portrait Identification. -
Click on: “deletePortrait.
-
Click on Send.
Response:
- Status shall be: 204 No Content in order to confirm that the portrait has been deleted.
Identity Documents
To send the identity documents, same URL is used for :
-
Passports
-
Identity Cards
-
Resident Cards
-
Driver's Licenses
In the Postman project, one folder has been created for each document type
and each folder is associated with a unique environment variable in order to
facilitate the tests (so that when a passport is submitted, Postman fills a
variable passportId, when a driver's license is submitted then drivingLicenseId
is use, etc.):

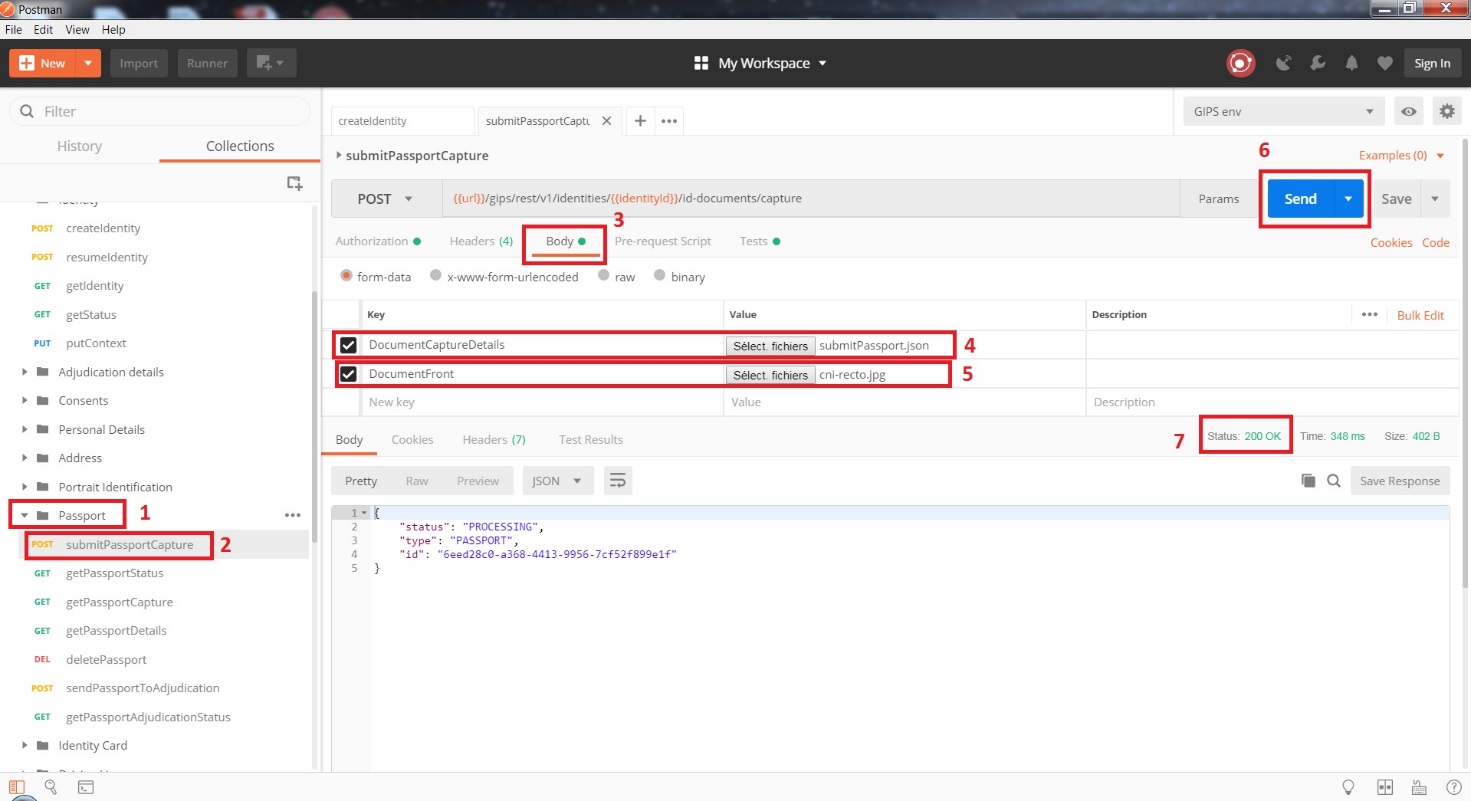
Submit Identity Document Capture
Objective: This sends an identity document image for verification of identity attributes and a portrait.
Environment:
If you use an IDEMIA private cloud:
url,apikeyandidentityIdare used from the Postman environment.
Usage (example for passport):
-
Open the folder
Passport. -
Click on submitPassportCapture.
-
Click on: Body and replace the parameters.
-
DocumentCaptureDetails: known details on the identity document like type and country. See the provided example in deliverysubmitPassport.json. This field is optional. If it's not sent, the classification will be done by GIPS.Example:
JSON1mrz: a list of string containing MRZ details | { "jurisdiction": "FRA", "documentType": "PASSPORT", "source": "LIVE_CAPTURE_IMAGE", "metadata": [{ "key": "KEY1", "value": "value1" },{ "key": "KEY2", "value": "value2" }] }
-
-
jurisdiction: document issuing country -
documentType: document Type -
source: from enumerationLIVE_CAPTURE_IMAGE,LIVE_CAPTURE_VIDEO,SCAN,DOCUMENT_CROP,OTHER -
metadata: a list of metadata -
DocumentFront= front image document -
DocumentBack= back image document
- Click on Send.
Response:
-
Status shall be 200 OK to confirm evidence has been associated with the identity.
-
The response body contains the evidence
IDDOCUMENTdetails like the unique evidence identifier, the evidence type, and status. -
As described previously, based on the chosen Postman folder, an environment variable is set and will be used for
GETandDELETEoperations on this evidence.
Note:
-
For identity cards, both the front and back are required, except for France, Italy, and Romania where the back is optional.
-
For passports, the back are forbidden.
-
For French Resident cards, if the MRZ of resident card starts with “IR” then both the front and back are mandatory, otherwise (“TS”), only the front is required.
-
For driver's licenses, only the front is required except for USA, UK, and Canada, where both sides are mandatory.
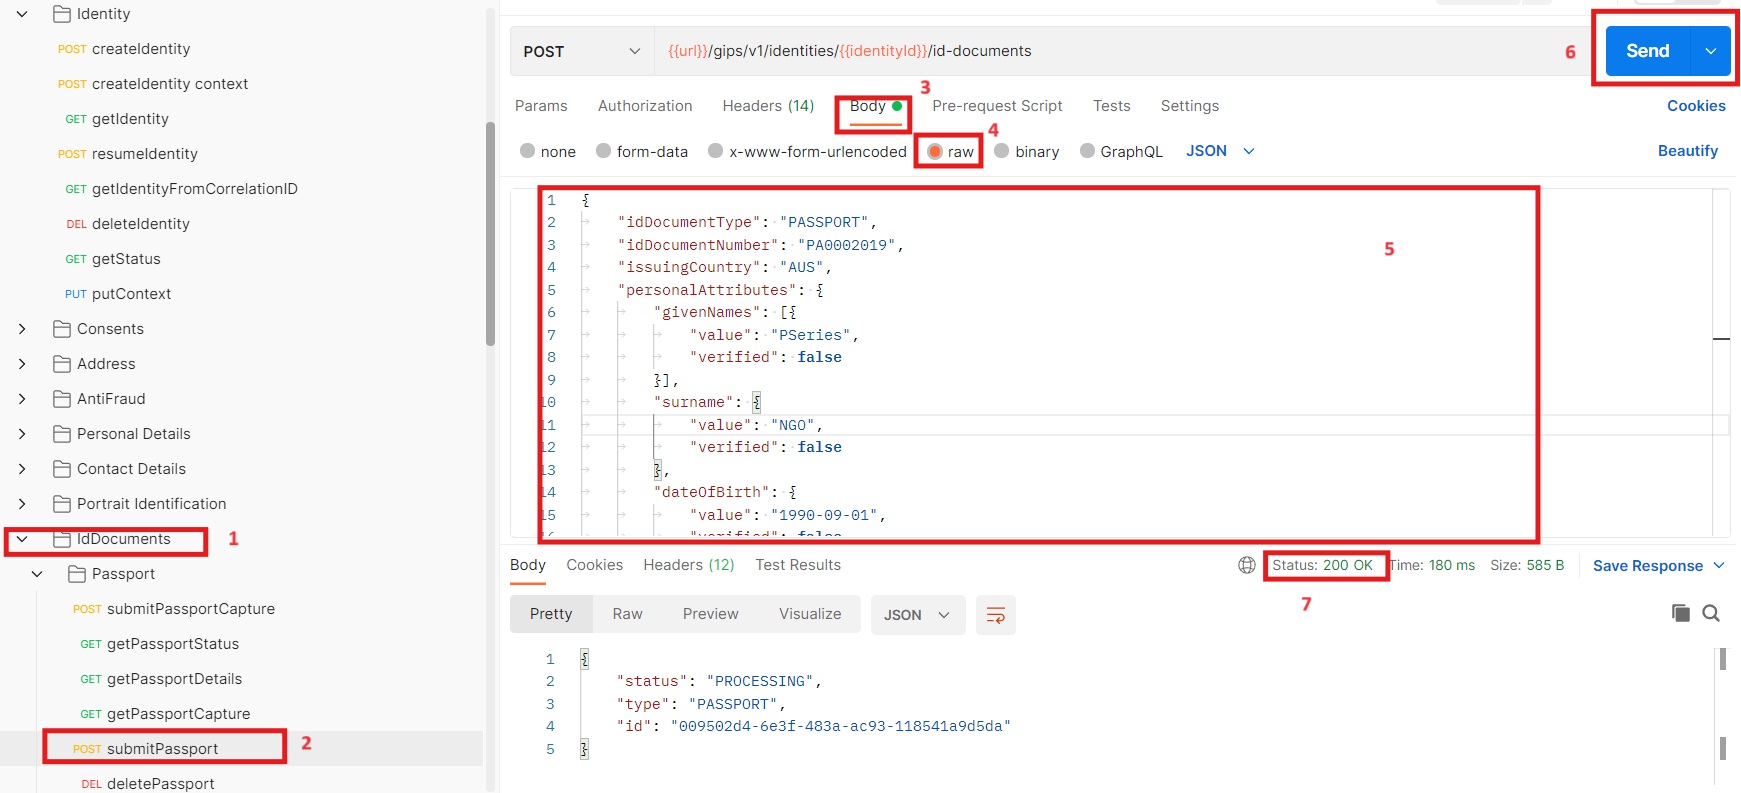
Submit Identity Document
Objective: This sends an identity document for verification of the identity attributes.
Environment:
If you use an IDEMIA private cloud:
url,apikeyandidentityIdare used from the Postman environment.
Usage (example for passport):
-
Open the folder
Passport. -
Click on submitPassport.
-
Click on Body.
-
Make sure you are in raw mode.
-
Update the data if needed.
Example:
-
JSON1{ "idDocumentType": "PASSPORT", "idDocumentNumber": "AB1234567", "issuingCountry": "AUS", "personalAttributes": { "givenNames": [{ "value": "CHRISTOPHE", "verified": false }], "surname": { "value": "ULYSSE", "verified": false }, "dateOfBirth": { "value": "1960-04-10", "verified": false } }, "metadata": [{ "key": "GENDER", "value": "M" }] }
- Click on Send.
Response:
-
Status shall be 200 OK to confirm that the evidence has been associated with the identity.
-
The response body contains the evidence
IDDOCUMENTdetails like the unique evidence identifier, the evidence type, and status. -
As described previously, based on the chosen Postman folder, an environment variable is set and will be used for
GETandDELETEoperations on this evidence.
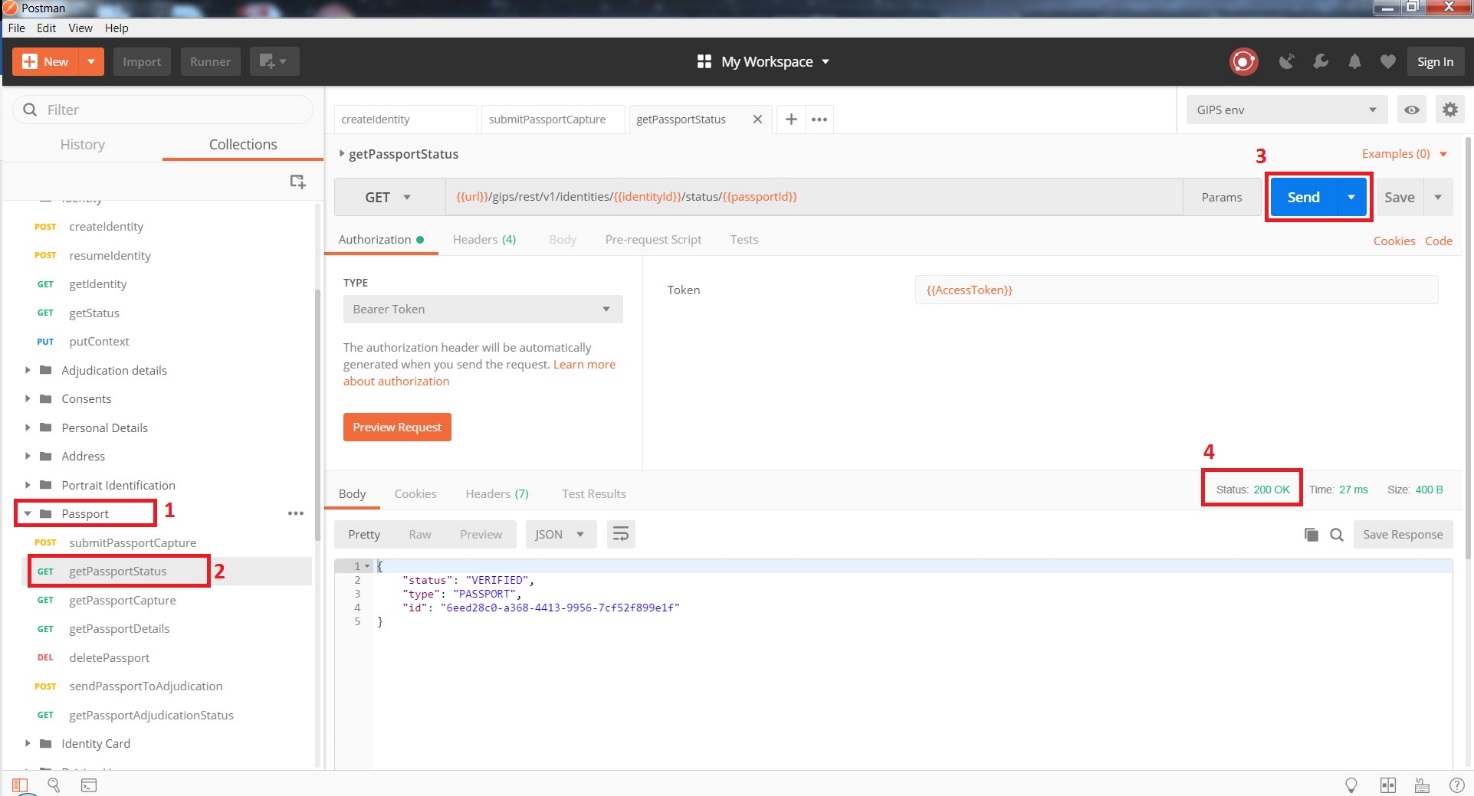
Retrieve Status for a Specific Identity Document
Objective: This retrieves the status for a specific identity document. This allows
the ability to perform polling on the evidence. As soon as the status is not PROCESSING, you can
perform a getIdentityDocumentDetails to retrieve all of the evidence details.
Environment:
If you use an IDEMIA private cloud:
-
url,apikeyandidentityIdare used from the Postman environment. -
The evidence unique ID is also used (for example for passport:
passportId)
Usage (example with Passport):
-
Open the folder
Passport. -
Click on getPassportStatus.
-
Click on Send.
Response:
-
Status shall be 200 OK.
-
Response contains the status of the identity document. As soon as the status is finished
PROCESSING, you can get all of the document details.
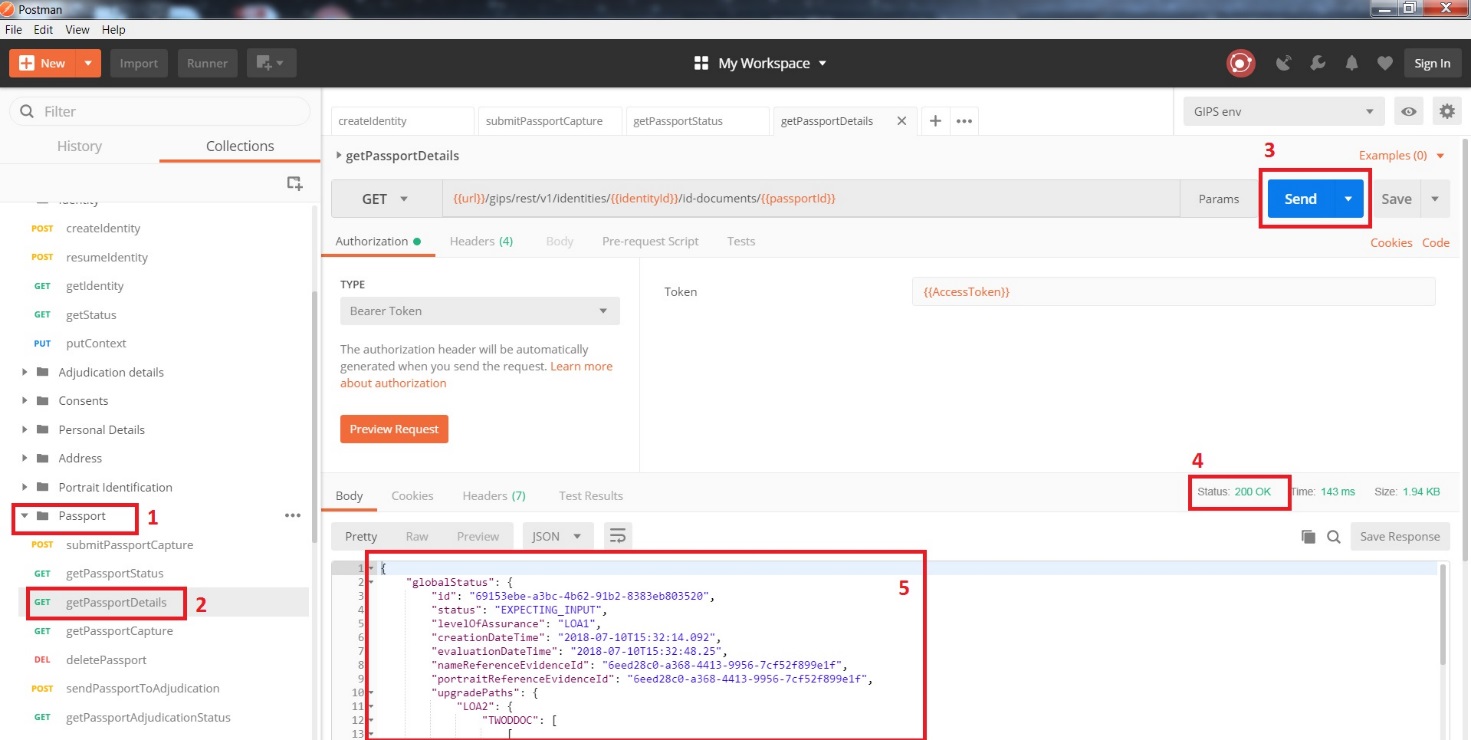
Get Identity Document Details
Objective: This retrieves the identity document details, based on its unique identifier.
Environment:
If you use an IDEMIA private cloud:
-
url,apikeyandidentityIdare used from the Postman environment. -
The evidence unique ID is also used (for example for passport:
passportId).
Usage (example with Passport):
-
Open the folder
Passport. -
Click on getPassportDetails.
-
Click on Send.
Response:
-
Status shall be 200 OK.
-
The response body contains the global status of the identity and details on the evidence(s) associated with the given identifier like status and score.
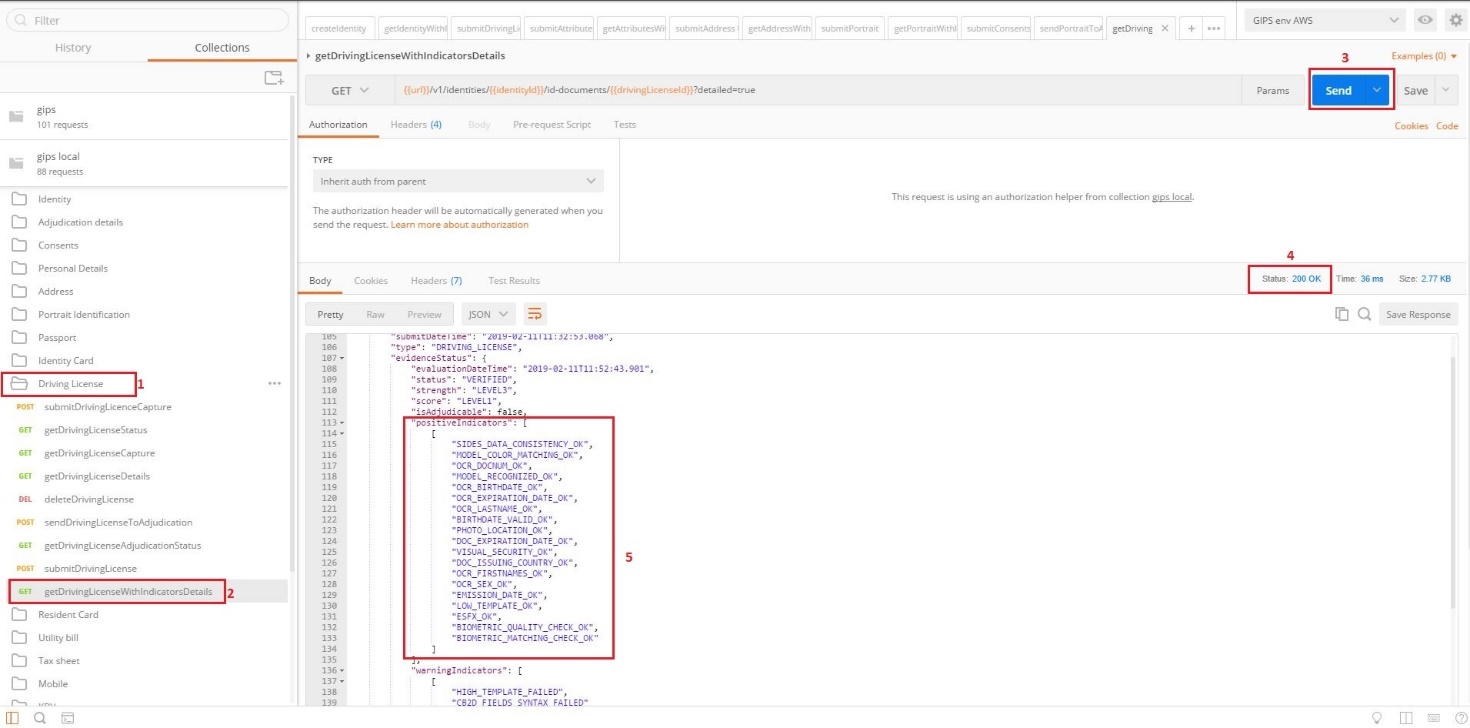
Get Identity Document with Indicators Details
Objective: This retrieves the identity document data and all the indicator details, based on its unique identifier.
Environment:
If you use an IDEMIA private cloud:
-
url,apikey, andidentityIdare used from the Postman environment. -
The evidence unique ID is also used (for example for passport:
passportId).
Usage (example with Passport):
-
Open the folder
Passport. -
Click on getDrivingLicenseDetails.
-
Click on Send.
Response:
-
Status shall be 200 OK.
-
The response body contains the global status of identity and details on the evidence associated with a given identifier like status and score.
-
Indicators details.
Get Identity Document Capture
Objective: Retrieve the identity document captured image, based on its unique identifier.
Environment:
If you use an IDEMIA private cloud:
-
url,apikeyandidentityIdare used from the Postman environment. -
The evidence unique ID is also used (for example for passport:
passportId).
Usage (example with Passport):
-
Open the folder
Passport. -
Click on getPassportCapture.
-
Click on the arrow on the right of the Send button.
-
Choose Send and Download. When the popup is displayed, choose a directory and a name to save the returned part in the file system.
Response:
- Status shall be 200 OK.
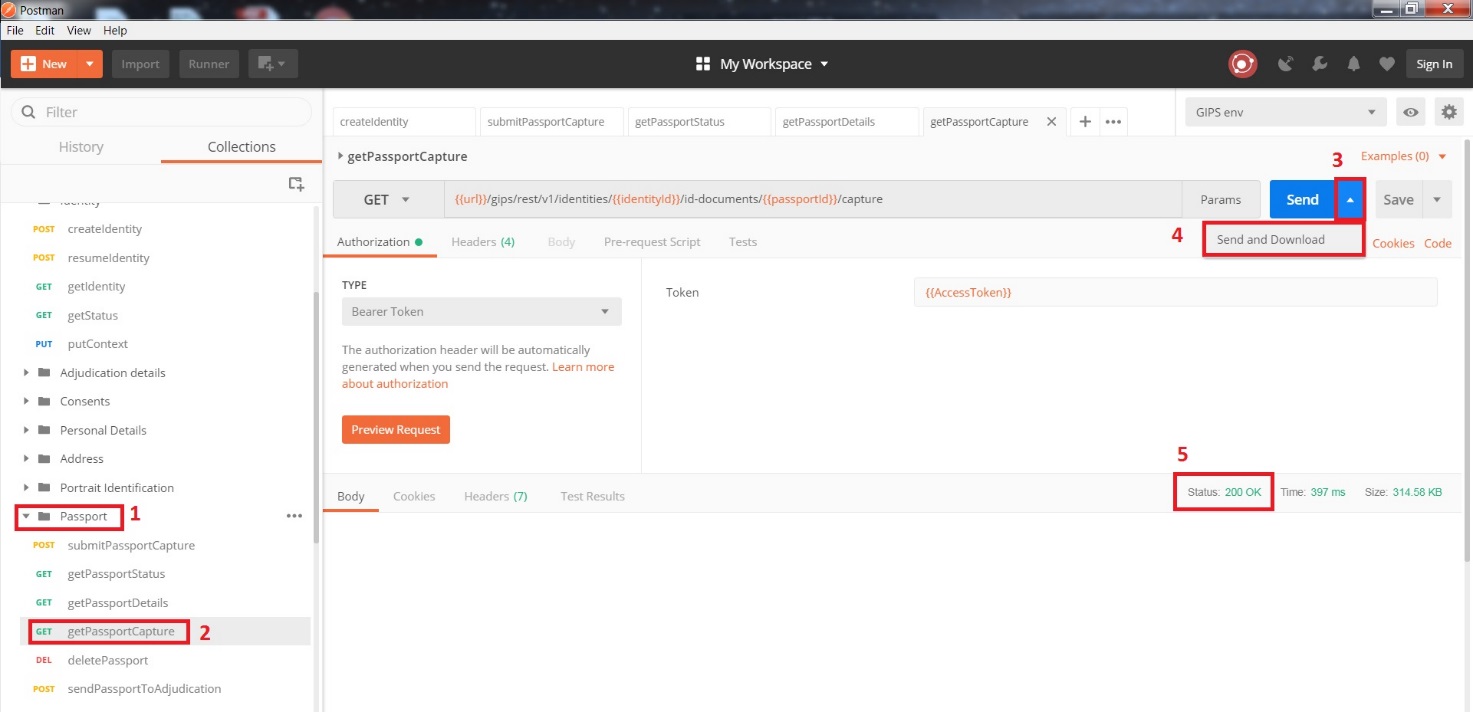
-
The saved content is a multipart response: file shall be edited to remove the multipart header and footer.
-
Edit saved file with file editor (notepad++ for example).
-
At beginning of the file, delete multipart header:
Language not specified1*--1b817195-cbe4-485f-90fd-4ed6f27f54a8*2*Content-Disposition: form-data; name="DocumentBack"*3*Content-Type: application/octet-stream*At the end of the file, delete multipart footer:
*--1b817195-cbe4-485f-90fd-4ed6f27f54a8--*.- Save the modifications brought and open the file with a photo editor.
-
Note: when you send a document with a front and back, the multipart gives back a saved response in two parts: the first part is the front of the document and second part is the back of the document.
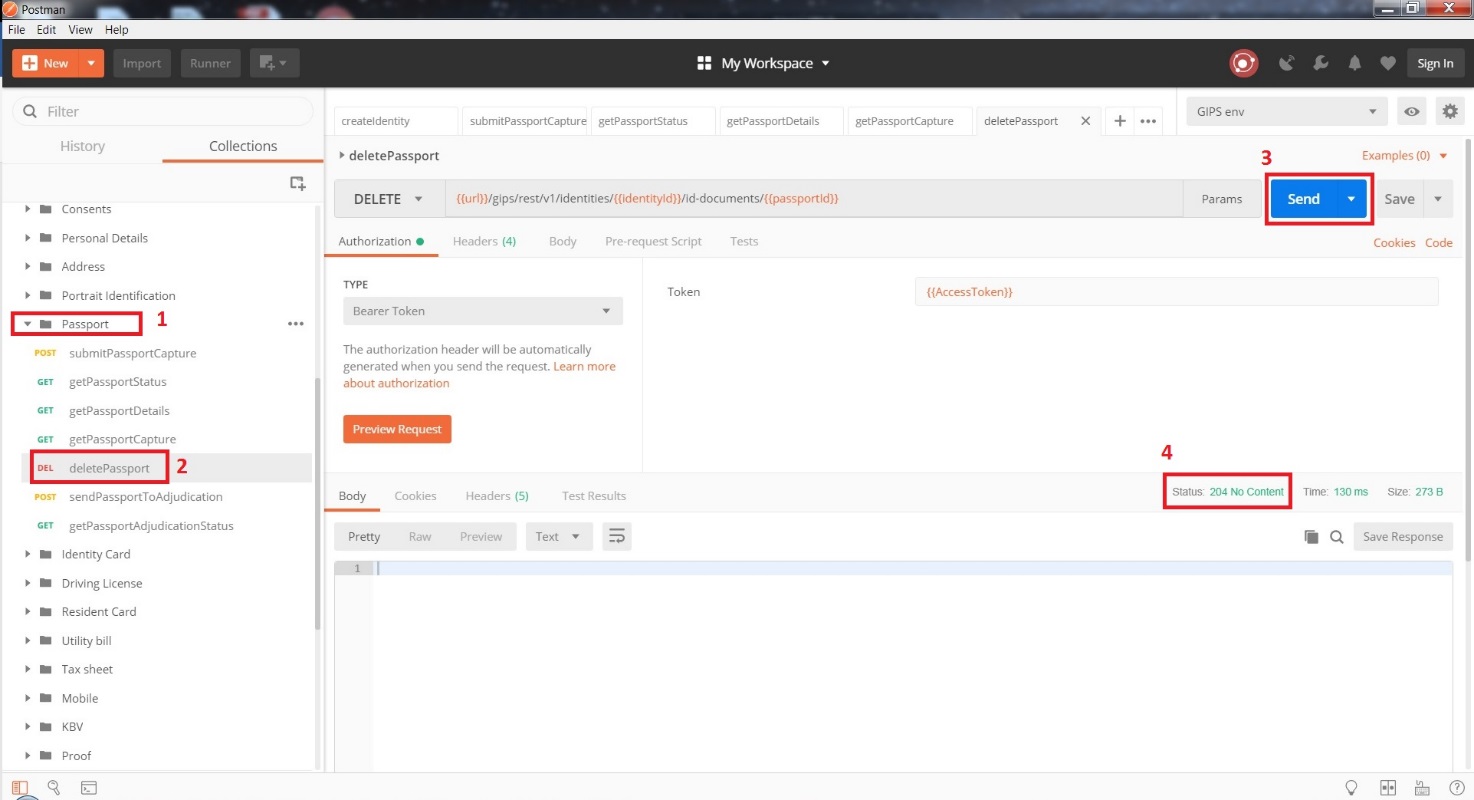
Delete Identity Document
Objective: This deletes an identity document sent previously, based on its unique identifier.
Environment:
If you use an IDEMIA private cloud:
-
url,apikeyandidentityIdare used from the Postman environment. -
The evidence unique ID is also used (for example for passport:
passportId).
Usage (example with Passport):
-
Open the folder
Passport. -
Click on deletePassport.
-
Click on Send.
Response:
- Status shall be 204 No Content in order to confirm that passport has been deleted.
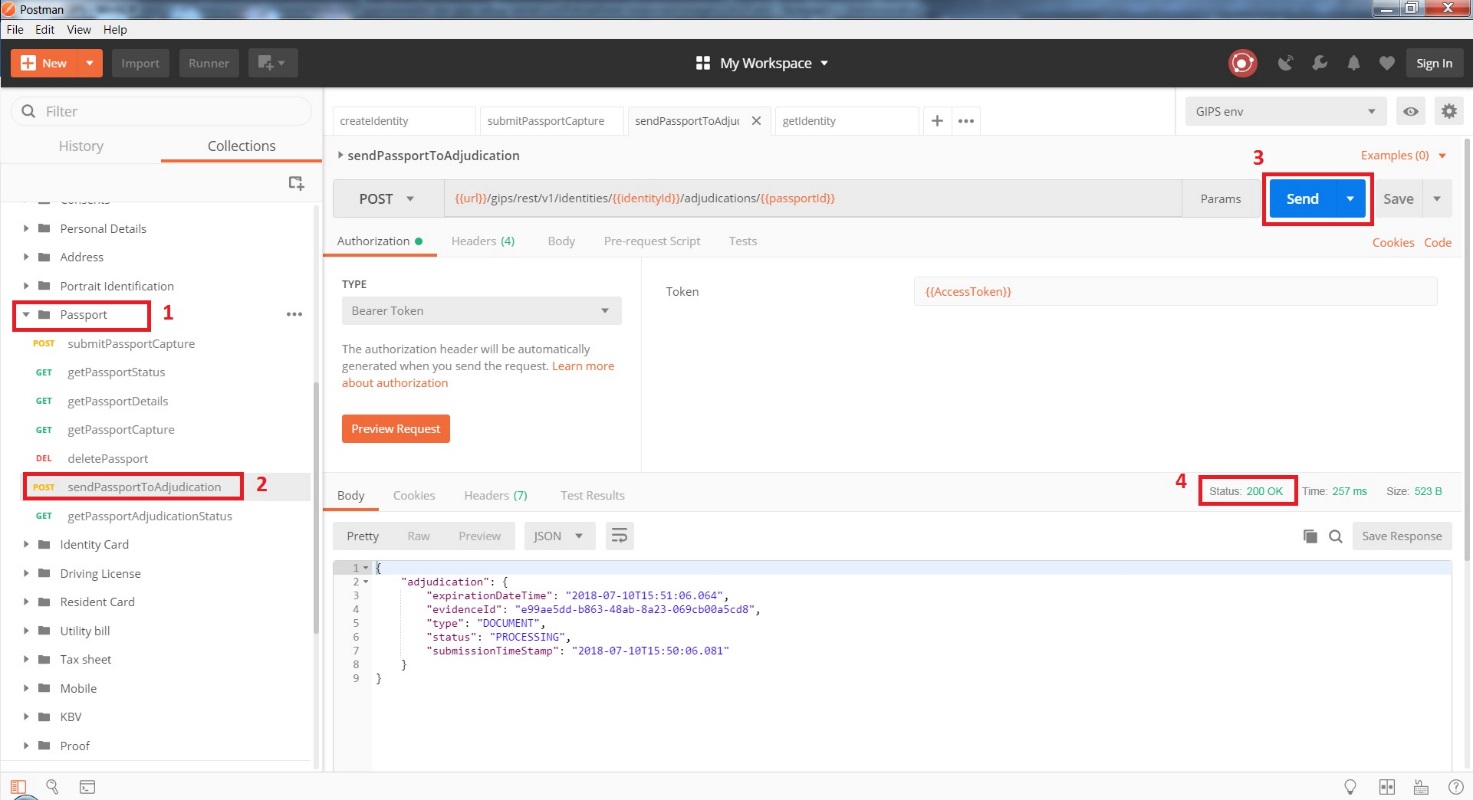
Send Identity Document to Adjudication
Objective: This sends the document to manual adjudication. The adjudication shall have
been activated for your tenant. An evidence can be sent to adjudication only if
the flag isAdjudicable is set to true and if adjudication is available, otherwise an
error will be given back.
Environment:
If you use an IDEMIA private cloud:
-
url,apikeyandidentityIdare used from the Postman environment. -
The evidence unique ID is also used (for example for passport:
passportId).
Usage (example with Passport):
-
Open the folder
Passport. -
Click on sendPassportToAdjudication.
-
Click on Send.
Response:
-
Status shall be 200 OK in order to confirm that passport has been well sent to adjudication.
-
Response contains the adjudication details confirming that DOCUMENT adjudication has been sent (PROCESSING) and the expiration date time of adjudication request.
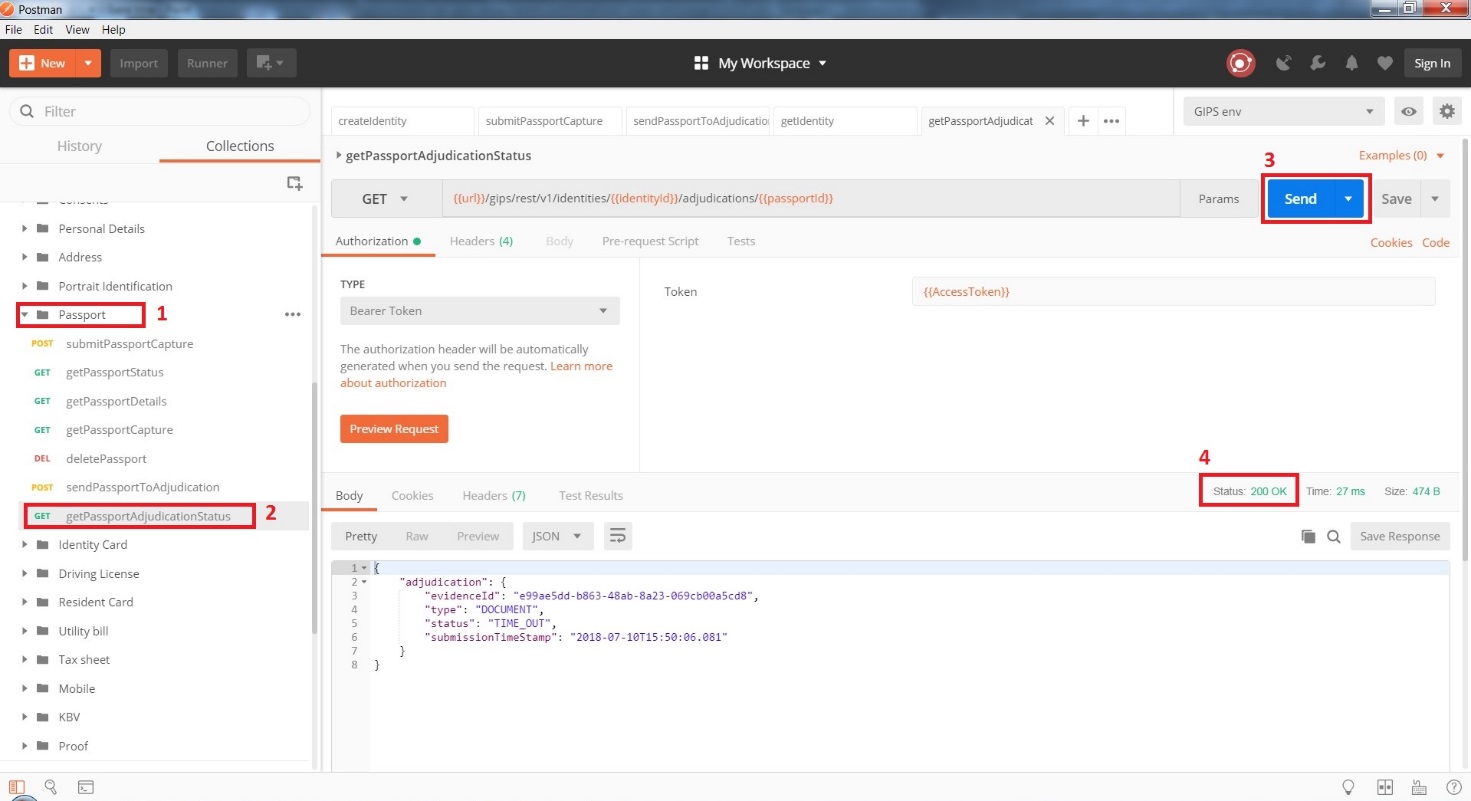
Retrieve Adjudication Status for a Specific Identity Document
Objective: Retrieve the adjudication status for a specific identity document.
Environment:
If you use an IDEMIA private cloud:
-
url,apikeyandidentityIdare used from the Postman environment. -
The evidence unique ID is also used (for example for passport:
passportId).
Usage (example with Passport):
-
Open the folder
Passport. -
Click on getPassportAdjudicationStatus.
-
Click on Send.
Response:
-
Status shall be 200 OK.
-
The response contains the adjudication details confirming if the
DOCUMENTadjudication is still in progress (PROCESSING) or if the timeout was reached (TIME_OUT) or if it was accepted or rejected by the operator.
Get Identity Document Portrait Crop
Objective: This retrieves the portrait crop extracted from the ID document sent previously.
Environment:
If you use an IDEMIA private cloud:
url,apikeyandidentityIdare used from the Postman environment.
Usage (example with Passport):
-
Open the folder
Passport. -
Click on getPassportCapture.
-
Click on the arrow on the right of the Send button.
-
Choose Send and Download. When the popup is displayed, choose a directory and a name to save the returned part in the file system.
Response:
- Status shall be 200 OK.
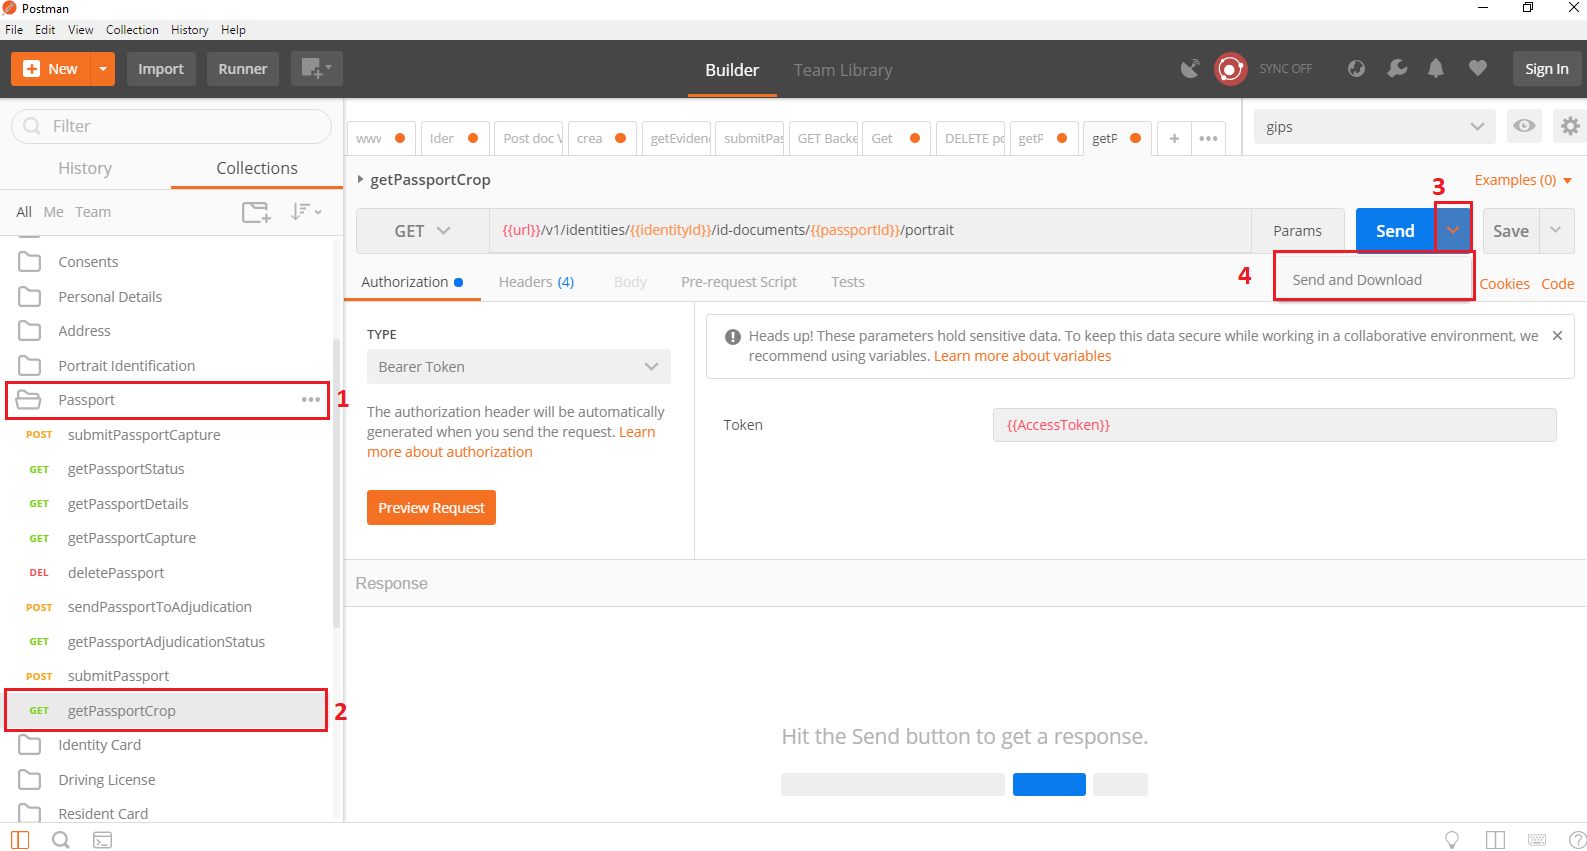
-
The saved content is a multipart response: file shall be edited to remove the multipart header and footer.
-
Edit the saved file with file editor (notepad++ for example).
-
At beginning of the file, delete the multipart header:
Language not specified1*--1b817195-cbe4-485f-90fd-4ed6f27f54a8*2*Content-Disposition: form-data; name="Portrait"*3*Content-Type: application/octet-stream*At the end of the file, delete multipart footer:
*--1b817195-cbe4-485f-90fd-4ed6f27f54a8--*.- Save the modifications brought and open the file with a photo editor.
-
Get Proof
Objective: This retrieves proof associated with the requested identity and discards the data on the server.
Environment:
If you use an IDEMIA private cloud:
url,apikeyandidentityIdare used from the Postman environment.
Usage:
-
Open the folder
Proof. -
Click on getProof.
-
Click on the arrow to the right of the Send button.
-
Choose Send and Download. When the popup is displayed, chose a directory and a name to save the returned part in the file system.
Response:
- Status shall be 200 OK to confirm that proof has been correctly generated.
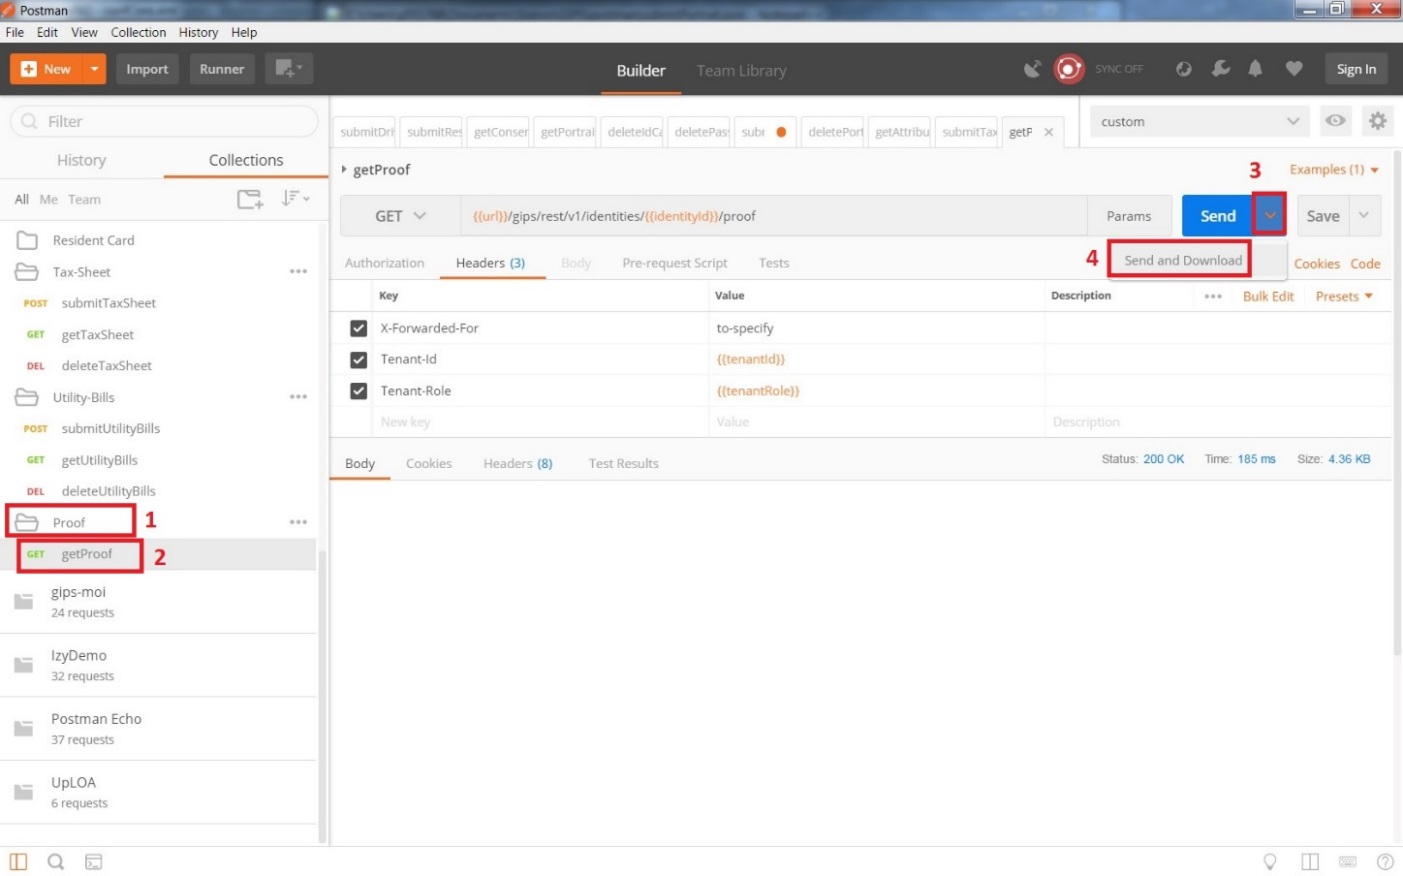
-
The saved content is a multipart response: 7-zip software can directly extract the content without editing file. If you use another zip editor you may have to edit the file to remove the multipart header and footer.
-
Edit the saved file with a file editor (notepad++ for example).
-
At beginning of the file, delete the multipart header:
Language not specified1*--1b817195-cbe4-485f-90fd-4ed6f27f54a8*2*Content-Disposition: form-data; name=”ef…1729.zip"*3*Content-Type: application/octet-stream*At the end of the file, delete multipart footer:
*--1b817195-cbe4-485f-90fd-4ed6f27f54a8--*.-
Save the file.
-
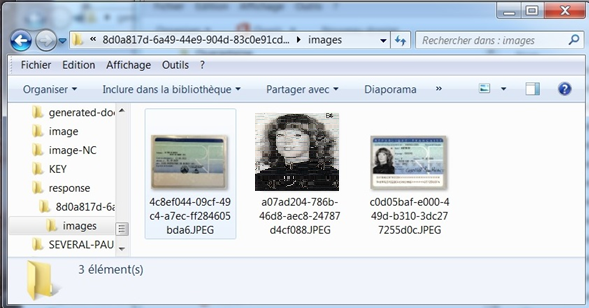
Open file with a zip extractor: it contains the proof as described in the proof documentation:
-
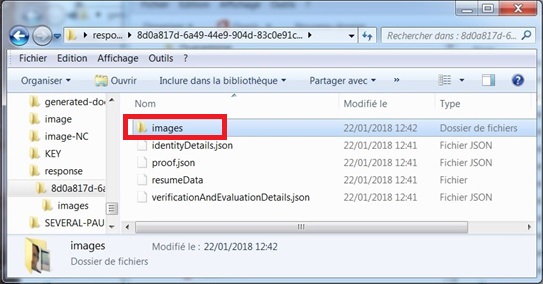
And folder image: